Removing and installing anti-roll bar
Remove the stabilizer to replace it if damaged or to replace its mounting pads.
You will need: a 13 mm wrench, a drill with a drill bit with a diameter of 12 mm, and pliers.
Perform the work on a lift or inspection ditch, having first removed the mudguard (see “Removing and installing the mudguard”).
1. Unscrew the two nuts securing the stabilizer to the lower right arm and remove the spring washers.
2. Remove the bracket. Repeat the steps to attach the stabilizer to the lower left arm.
Please note that the brackets for attaching the cushions to the levers are different: 1 – left; 2 – right.
3. Unscrew the two nuts securing the stabilizer to the right side member and remove the spring washers.
4. While holding the stabilizer, repeat step 3 to secure it to the left side member. Remove the stabilizer with brackets and cushions from the car.
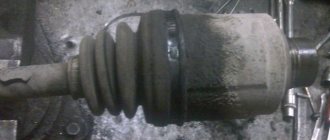
5. Remove the right and left cushions from the stabilizer.
Signs of rubber aging, mechanical damage, and wear of internal surfaces in contact with the stabilizer are not allowed on the cushions. Replace defective pillows.
All four pillows are the same.
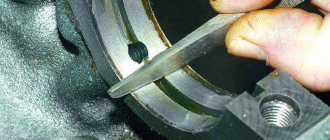
6. Secure the stabilizer in a vice to one of the brackets. Using a drill, remove the flare at the connection between the inner and outer brackets of the bracket.
Perform this and the next three operations only if it is necessary to replace the stabilizer mounting pads to the body.
When replacing a stabilizer, try to purchase a stabilizer complete with brackets and pads.
7. Separate the inner and outer brackets.
8. Remove the outer bracket from the cushion.
9. Remove the cushion from the stabilizer bar.
10. Repeat steps 6–9 for the other bracket.
11. Install the removed parts onto the stabilizer bar and the stabilizer onto the vehicle in the reverse order of removal.
To make it easier to install the cushions on the stabilizer bar, lubricate the bar with a saturated soap solution.
It is not allowed to cut pillows for installation.
After installing the cushions on the bar, check that their location matches the mounting points on the body.
When installing the brackets for attaching the cushions to the lever, first “tighten” one nut, then use pliers to tighten the bracket and “tighten” the second nut. After this, tighten both nuts.
Cushions and anti-roll bar - replacement
We remove the anti-roll bar when the bar is deformed or when all rubber pads on its mounting brackets are replaced. We replace the rubber pads of the clips securing the stabilizer bar to the levers without removing the bar itself.
Parts of the anti-roll bar: 1 — cushion clip (2101-2906048/49); 2 — nut M8 (16100811); 3 — spring washer (10516670); 4 — stabilizer (2101-2906010); 5 — stabilizer bar cushion (2101-2906040); 6 — outer bracket (2101-2906042); 7 — internal bracket (2101-2906043)
1. Place the car on an inspection hole or overpass and hang the front part of the car (see “Preparing the car for maintenance and repair”).
2. Mark the position of the stabilizer pad clips relative to the arms for correct installation during assembly.
The right and left clips for attaching the stabilizer pads are not interchangeable.
If we replace only the cushions, then mark their position relative to the stabilizer bar.
13 mm socket wrench
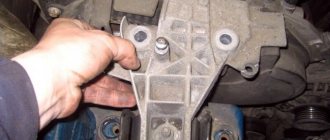
Unscrew the two nuts securing the stabilizer cushion clip to the lower arm.
4. Using a mounting spatula, remove the cushion clip from the lever studs.
5. Remove the pillow from the stabilizer. Similarly, remove the pillow from the opposite side of the stabilizer.
To replace the stabilizer or the pads of its mounting brackets, remove the mudguard (see “Splash guard - removal and installation”).
When removing the stabilizer bar, it is necessary that the load on the right and left front suspension springs be equal. Otherwise, when removed, the twisted rod may straighten out and cause injury.
13 mm socket wrench
Using an extension, unscrew the two nuts securing the stabilizer bracket to the body side member.
7. Similarly, unscrew the nuts securing the second bracket and remove the stabilizer. We clean the stabilizer bar from dirt.
8. To replace the stabilizer bracket cushion, clamp the bracket in a vice. If the stabilizer bar does not require replacement, then mark the position of the bracket pads relative to the stabilizer bar to facilitate subsequent assembly. Lubricate the stabilizer bar with soapy water to make it easier to remove the bracket with the cushion.
9. Turning the stabilizer bar in different directions, pull it out of the bracket cushion.
10. Use a slotted screwdriver to remove the rubber cushion from the bracket.
11. Similarly, remove the cushion of the second bracket.
1. Installation of the anti-roll bar is performed in the reverse order.
2. If the stabilizer bar has not been replaced, then we orient the stabilizer pads according to the previously applied marks.
3. Tighten the nuts securing the stabilizer brackets.
4. First, install the cage on the lower pin of the lever and tighten the nut 2-3 turns. Using sliding pliers, tighten the cage and attach the second nut.
5. After making sure that the cushion protrusion is in the hole in the cage, finally tighten the nuts. We install the stabilizer clip on the other side in the same way.
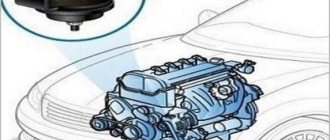
Briefly about the purpose and operating principle of the SPU
The VAZ team partially borrowed the design solution for the front suspension from their colleagues from Renault. In order for the replacement of stabilizer bushings on a Lada Vesta to be carried out purposefully and effectively, the cause of the breakdown must be correctly determined. For this, knowledge about the role of the SPU unit, as well as signs indicating the need for its repair, will not hurt.
A maneuver performed at speed definitely causes a side roll of the body, which can cause the car to roll over. It is to eliminate such consequences that a torsion-type anti-roll bar (STS) has been introduced into the front suspension. On Vesta, the part is installed only on the front axle of the car; its design features include the following facts:
- The main element is made of spring steel grades in the form of a round rod of a certain configuration.
- The rod is attached to the subframe using steel clamps and rubber bushings.
- Along the edges, the rod is attached to the front suspension struts using levers.
Principle of operation
Knowledge of the operating principles of this unit will help you understand the need to replace stabilizer bushings on a Lada Vesta car. They are based on the uniform redistribution of loads between the suspension elements. During lateral rolls, the stabilizer rods move in different directions. As a result, one end of the rod rises and the other goes down.
Rubber cushions that fix the middle part of the SPU allow it to twist around its axis with increasing body roll, due to which the position of the car on the track is adjusted. When making turns, the stabilizer struts additionally provide a high level of tire adhesion to the road surface.
How to remove the anti-roll bar of a VAZ 2106
We will need wrenches for “13”, “17”, “19” and “22”, and for the work we will also need a mounting spatula, a hammer, a screwdriver, a screw or hydraulic jack, and a wheel wrench. If everything is there, then you can start repairing.
- Remove the front shock absorber, then remove the engine mudguard, if your car has one, and then remove the wheel.
- We loosen the tightening of the nuts securing the lower arm to the axle and then loosen the tightening of the axle nut of the upper suspension arm.
- We unscrew the nut securing the outer ball joint of the side tie rod and disconnect it from the swing arm and move the tie rod to the side.
- After unscrewing the two mounting bolts, remove the caliper and, without disconnecting the brake hose, secure the caliper so that it does not hang on the brake hose.
- To make it easier to disconnect the anti-roll bar, place a jack under the lower arm and lightly load the front suspension while raising the jack.
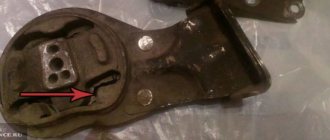
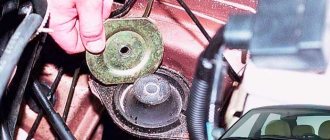
- Now you can unscrew the two nuts securing the stabilizer bracket and remove the bracket and rubber cushion. In the same simple way, unscrew the opposite bracket and remove it.
- Now we need to unscrew the nuts securing the stabilizer to the side members and then remove the stabilizer from the car.
This completes the process of removing the anti-roll bar for the VAZ 2106. Install the new stabilizer in the reverse order of removal.
If the stabilizer was removed not to completely replace it, but only to replace the rubber cushions, you will need a drill with a suitable drill whose diameter is slightly larger than the diameter of the hole for attaching the bracket to the side member of the car.
- Clamp the stabilizer bar bracket in a vise and drill a flare in both holes, after which the upper and lower brackets will easily separate. Perform the same actions with the second bracket.
Replace the old cushions with new ones and reassemble in reverse order.
How to replace stabilizer bushings
So, at the initial stage, it is important to understand on which axis replacement is needed (rear stabilizer bushings or front stabilizer bushings). At the same time, in practice, the front stub bushing often needs to be replaced, so let’s look at this in more detail.
First of all, replacing front stabilizer bushings may vary slightly between models, but the general replacement procedure is often similar and not difficult. The main thing is to prepare the necessary tools.
The general procedure for replacing the front stabilizer bushings is:
- drive the car into a pit or onto a lift;
- remove the wheels from the car;
- unscrew the fastenings of the struts to the stabilizer;
- disconnect the struts and stabilizer;
- check the stabilizer link bushings and the stabilizer link itself (replace if necessary);
- loosen the rear bolts securing the bracket holding the bushing, then unscrew the front ones;
- after removing the old bushings, it is necessary to remove dirt from the places where the new bushings are installed;
- After applying soap solution or silicone spray, you need to lubricate the bushings from the inside;
- install new bushings and reassemble in the reverse order;
Let us add that replacing the rear stabilizer bushings is not very different from replacing the front ones, however, changing the front stabilizer bushing is somewhat more difficult, since the front suspension is more complex in design. In fact, if you managed to change the front bushings, there will be no problems with the rear bushings.
By the way, regarding the squeaks of the bushings mentioned above, usually the bushings squeak in the cold in winter or in hot, dry weather. The reason is the low cost of the material from which the bushings are made or the design features of the car. Also, rubber can harden in the cold, lose elasticity and squeak. Another creaking indicates critical wear of the bushing.
Please note that in some cases, owners try to get rid of squeaks by lubricating the stabilizer bushings. So, if you need to replace the stabilizer bushing due to rubber wear, then no lubricants will help, since the part is deformed.
If the stabilizer rubber bands have been replaced recently and they are in good condition, then you can count on a temporary effect after lubrication. It is important to understand that lubricant promotes the adhesion of dirt and sand to the bushing. Of course, abrasive particles reduce the life of the bushing.
It should also be noted that the bushings must fit tightly around the stabilizer. If the connection is not so reliable, the stabilizer may begin to rotate, and the creaking in this case only intensifies.
We also recommend reading the article about what a stabilizer link is. From this article you will learn about the purpose and design of this element, as well as what signs indicate that the stabilizer link is out of order and how to replace the stabilizer bar link with your own hands.
Replacing the stabilizer bar: photo report
If you have ever had to change the stabilizer bar on your VAZ 2106, then you probably know that this procedure is not that complicated. As a rule, replacing the stabilizer bar on a VAZ 2106 itself should take place without any problems. The only thing is that sometimes problems arise when installing the stabilizer, that is, screwing the rod to the body at the places where its cushions are attached.
In order to do this job, we will need the following tool:
- Vorotok
- Ratchet handle
- Socket head 13mm, preferably deep
- open-end or socket wrench 13
The first step is to apply penetrating lubricant to all the stabilizer mounting bolts and nuts that you will be unscrewing. Although, even with this condition, it is not a fact that when unscrewing nothing will break off...
So, first we unscrew two nuts on one side of the car, which are shown in the photo below:
Now there are two central bolts on one side of the front end:
And the last two nuts are on the other side of the suspension, where the cushions are attached. After this has been dealt with, the VAZ 2106 stabilizer bar can be easily removed.
I outlined the main steps of how to replace the stabilizer bar. If necessary, we buy new pillows and replace them, but at the same time, there is no need to remove the bar, as described above, everything can be done by car! The price of new pillows is about 60 rubles.
Replacing bushings and anti-roll bar on VAZ 2101-VAZ 2107
Welcome! Anti-roll bar - designed to dampen vibrations; it is installed in many cars, such as the VAZ 2110, Priors, etc. this is no exception, its operating principle is as follows: when a car enters a turn, the stabilizer works to twist and thanks to this, it tries to return the car to its original position as quickly as possible, thanks to this the car does not tip over on its side and thereby stands more stable on the road, than without a stabilizer, there are two of them in the car, one stabilizer is in the front suspension (Which we are disassembling), and the second is in the rear (Transverse rod). If you want to know how to replace the rear stabilizer on a classic car, then in this case go to article: “Replacing jet rods on cars,” in which everything is described in detail, in paragraph 3.
Note! To replace the stabilizer in the front part, you will need to remove the wheels, hang out the entire front part (Because if you lift only one side and start to unscrew the stabilizer, it will be twisted and can shoot, thereby damaging you, so make sure that the front part the car was as level as possible when replacing the stabilizer) well, unscrew the nuts that secure the stabilizer, by the way, you will still have to remove the protection at the bottom, take this into account too and immediately think about how you will need the tools to carry out the replacement!
Is it possible to drive without a transverse stabilizer?
For a more stable ride and improved handling.
In principle, you can drive without it, but it’s not expensive, change it and go
dc_, still helps out in the pits, softens the blows
It creates a dependence of the wheel/axle on the car body; if it does not exist, then the load from the displacement of the wheel/axle will be imposed on other suspension elements and it is not a fact that these elements will withstand abnormal operation and load.
Without a stabilizer bar, the chassis seems to become softer,
but the car will become unstable, especially in high-speed turns on the highway, there will be more roll, oversteer may appear instead of the usual and safer understeer
I always drove without a stabilizer, when I bought the car I immediately removed it and installed it only before selling it, otherwise in our village you’ll give away your last pants on the links.
9959990, bullshit. I drive like crazy all year round and shedding is what really lasts the longest in the suspension... I changed the rack several times, I changed the levers (some were even bent), I changed the struts many times, the hub ones consistently every 4-6 months (even though the original costs 2.5-3.5 thousand rubles) and they shed only once for a mileage of more than 120,000 km and they are still alive, I probably changed the bushings 3 times, but they cost 200-300 rubles and are easy to change, about 20 minutes of fussing.. And it wasn’t the original that got the molts, but the first ones available in Japanese for a ruble or so (the original cost about 3 then).. The body cups will burst, that’s what your savings will cost, then you’ll weld it and paint it over and you can prove to hell that it wasn’t beating or some kind of sawing..
Igor, well, at least I saved on the links, you can’t remove the hub, right? Or racks? Removing the stabilizer is as easy as shelling pears and you can’t really drive it on our roads, especially in corners.
Igor, I don’t know what kind of car you have, but with people it’s the other way around. The stabilizer struts go 8-30 and that’s it. Gilly emgrand. Sportage 13 year all-wheel drive Well, that’s how it is for me. Ahhh, yes, on Largus in 5 years it’s 110 thousand and I don’t even know if there are stoic stubs there. in front or not. In short, depending on what kind of car
Yuri, Geely Emgrand changes them every six months. And don't lie to people. I work with them.
Evgeniy, I drive 50k km in half a year. It’s quite normal that I change them 2 times a year)
How to replace the stabilizer bar on a VAZ 2101-2107
- 40 14 62k
- 3 0 9k
Our photo report shows in detail how to replace the stabilizer bar on a VAZ 2101-2107. If the rubber seals on the stabilizer bar are heavily worn, the control of the car's ancestor becomes loose, which leads to poor handling of the car at high speeds. To replace the stabilizer bar, you do not need to have any special technical skills. It’s quite possible to cope with the task alone.
- Jack;
- Set of wrenches;
- Flat head screwdriver;
- WD-40;
You can also see our photo report on replacing ball joints on a VAZ 2107
Which stabilizer bar should I install on a VAZ 2107?
Original number 2101-2906010, average price 1072 rubles.
- Riginal RG21012906010 — 540 rub.
- OAT-VIS 21012906010 — 541 rub.
To begin this procedure, the first step is to apply a penetrating lubricant to all threaded connections that secure this structure, otherwise the bolts may break off when unscrewing, which happens quite often.
When several minutes have passed after application, you can try to unscrew the bolts and nuts, starting from either side, first unscrewing the side fasteners (clamps), which are shown in the picture below.
Then you can move on to the central mounts, which are also located on both sides of the front of the car, right and left.
When everything is unscrewed on both sides, the VAZ 2101-2107 stabilizer bar can be removed without any problems.
When is it necessary to replace stabilizer bushings on a Lada Vesta sedan and why?
If you notice any deformation of the steel rod, you should immediately straighten it or install a new one. Wear of rubber cushions, regardless of the type of Vesta gearbox , is characterized by the following symptoms:
- Extraneous noise or creaking in the front suspension area.
- The appearance of a squeak when driving over uneven surfaces or after overcoming a water obstacle.
- Deterioration in the quality of driving at speeds of 60-90 km/h.
If one of the signs appears, the condition of the pillows should be checked visually. Any swelling or cracking of the rubber is unacceptable. It would be a good idea to pay attention to the SPU racks, which themselves are very often sources of creaking due to the appearance of play in the connections.
The manufacturer claims that the resource of rubber cushions is enough for 25-30 thousand km. But practice shows completely different gaps. I've heard that some car owners replace stabilizer bushings on their Lada Vesta after the first thousand. However, repairs cannot be postponed, no matter at what stage it happens, because the condition of the front suspension directly affects the car's handling.
Which pillows are suitable for SPU Lada Vesta?
A certain proportion of motorists limit themselves to silicone lubricant, which is used to treat the pillow. In fact, AvtoVAZ itself recommends using a similar method in car service centers. It is likely that it will help at the first stage, but if there are serious defects, it is at least unreasonable to talk about lubrication - the part must only be replaced.
It is better to replace standard rubber bushings with products made of polyurethane; their catalog number is 17012680. The internal diameter of the original bushing is 21.5 mm. In addition, it is possible to use several more details:
- Polyurethane cushions from Chevrolet Niva 2123 with article number 17012680.
- Rubber bushings and metal brackets from KIA Rio with article numbers 548132K100 and 548141G000, respectively.