The car radiator is responsible for the temperature of the coolant in the system. Its malfunction can lead to the fact that the liquid will not cool and the car will “boil”. The most disastrous consequence of this may be deformation of engine elements. On an Aveo 250, replacing the heater radiator is quite expensive if the work is done in a service center. On average, they ask for about six thousand rubles for work. The high price is, among other things, due to the need to remove the front panel.
In general, many, after finding out how much it costs to replace a Chevrolet Aveo heater radiator, decide that they can do the job themselves.
Heating radiator diagnostics
A stove radiator leak in a small-scale incident can only be demonstrated by disassembling it. Although, there are also cases when all the antifreeze pours into the cabin, or a puddle forms under the car. If the leak is small, and you suspect it only by the decreasing level of liquid in the tank, you need to remove the panel and inspect the radiator itself.
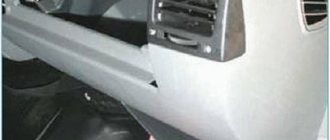
Removing the front panel of a Chevrolet Aveo
As mentioned above, on a Chevrolet Aveo, the heater radiator is replaced after removing the front panel.
Removing the dashboard is a somewhat labor-intensive task; parts are removed in the following sequence:
- Center console.
- Glovebox.
- Black plastic inserts.
- Cables from the oven dampers.
- Central overlay.
- Glove box.
- Control unit for backlight brightness and headlight range control.
It is better to label the detachable wire blocks to make it easier to put everything in place and connect.
After all the parts have been removed, unscrew the fastening bolts and remove the panel. To do this, you first need to lift it, then pull it towards you.
Popular problems
Car owners of Aveo T250 and similar brands may encounter difficulties with heating for various reasons. The most popular negative situations are:
- mechanical damage to the radiator of the standard heater in the Chevrolet Aveo, which causes metal ribs to bend and pipes to rupture;
- installation of a heater radiator on the Aveo T250 will be required if the system could leak due to through corrosion;
- The heater radiator on an Aveo needs to be replaced when the pipe joints or seals have lost their tightness.
As a result of such damage, the antifreeze level drops, and the coolant itself spreads throughout the cabin. Most often, you have to dismantle the dashboard to make installation of a new cabin heater accessible.
Operating principle of the interior heating system
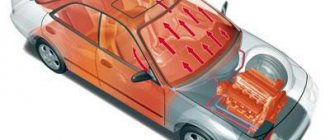
The Aveo's interior is heated using the same coolant, which, passing through the engine, picks up its heat and then releases it into the atmosphere through a cooling radiator located in the engine compartment.
Thus, the thermal energy generated by the engine is wasted (this, by the way, partly explains the low efficiency of internal combustion engines in general). So not using this energy to heat the cabin would be, to say the least, irrational. Read more: Immobilizer Kia Sid 2008
If the coolant that has absorbed the heat of the engine is not put into the cooling radiator, but into a similar unit in the car’s interior, then it would not release heat into the atmosphere, but would heat up the interior. And in order for this process to be carried out more intensively, it would make sense to install a fan in front of the cabin radiator, which would pump in cold outside air and direct it to the hot unit. It is on this principle that the Aveo stove works. The more you turn the corresponding knob, the more coolant is redirected into the system. The more intensely the heating system fan spins, the more intensely preheated street air is pumped into the cabin.
Disassembling the torpedo
For those new to the repair business, replacing the radiator of a standard stove with your own hands on an Aveo T200 or similar models begins with dismantling the entire front decor. It will be uncomfortable to work with the center console in any other way. At the next stage, remove all attachments from the front part:
- glove box;
- dark decorative inserts;
- center pad;
- cables that regulate the position of the furnace damper;
- a model that regulates the position of head optics and lighting elements;
- watches and other elements.
When disconnecting the pads, before removing the heater radiator, we recommend marking the contacts. Otherwise, problems may arise with the wiring harnesses, which damage many consumers of the on-board electrical circuit. The torpedo in many models is attached to the beam from the inside. In this case, there is a risk that dismantling and unscrewing the bolts will take a lot of time. To completely remove the torpedo, lift it and slightly pull it towards you (towards the cabin). At the next stage, we snap in all the available chip fasteners, with the help of which the cable bundles are fixed to the beam. We unscrew 6 bolts holding the connection to the body, and the same number of hardware located closer to the steering column. Now there is access to dismantle the beam blocking the path to the Aveo heater radiator.
How does the stove of a Chevrolet Aveo work?
The Chevrolet Aveo heater (or heater radiator) in the car interior is responsible for the comfort of the driver and passengers. People's health largely depends on temperature conditions and humidity. Therefore, drivers pay great attention to the performance of the stove.
However, after using the device for a long time, the heater core begins to leak. And this leads to the fact that coolant from the system can enter the cabin. This, of course, is far from the most pleasant “surprise”: antifreeze (antifreeze) begins to smell, and it can be quite difficult to get rid of the smell.
The main function of any car heater is to provide heat in the car. According to GOST, at a frost of -25 degrees, the temperature inside the cabin should be at least +16 degrees. These are the optimal performance of the working stove on the Chevrolet Aveo.
The stove on the Aveo operates in different modes, depending on the driver’s preferences.
To prevent undesirable consequences and heat loss from the passenger compartment, the driver must have minimal knowledge of the design of the heating system and the stove. The design of the stove block itself cannot be called tricky. The idea behind the device is that heat enters the cabin from a heated engine. The water pump circulates antifreeze throughout the system. When heated, the liquid enters the stove radiator. It heats up quickly (drivers often compare its action to a regular battery). When the radiator heats up, a fan turns on, which circulates hot air and blows it directly into the cabin. Antifreeze, after passing through the stove, returns to the engine again and so on in a circle.
The first heaters appeared in American-made cars in 1917.
How to find the furnace fuse
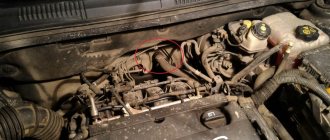
The tricky part of the Chevrolet Aveo design is that they are equipped with two fuse blocks at once. The first is located on the left side of the dashboard and can be reached through the open driver's door. And the second, which houses the required fuse for the stove, is mounted under the hood, in its upper part. The main landmark is the expansion tank.
The fuse box on a Chevrolet Aveo is easy to find by opening the hood - the device is located next to the expansion tank
To find the heater fuse, you need to:
- Open the hood.
- Find the fuse box.
- Unclip the cover by pressing the special latches on the sides of the casing.
- On the inside of the cover there is a diagram of the location of each of the car's fuses.
- The functionality of the element is checked visually: the magnetic thread must be intact, the contacts must not be oxidized.
By “repairing” your fuse with ordinary wire, you risk causing a short circuit in the machine’s electrical network.
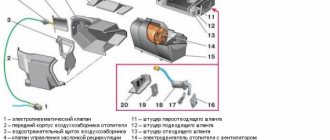
Table: decoding the meanings of relays, fuses and inserts on the Aveo
| Number of fuse link/pielohmintel/relay | Current strength, A | Protected circuit |
| Relay | ||
| R1 | Engine Cooling Fan Relay (Low Speed) | |
| R2 | Relay for low beam headlights | |
| R3 | Fog light relay | |
| R4 | Fuel pump relay | |
| R5 | A/C compressor relay | |
| R6 | Lighting relay | |
| R7 | High beam relay | |
| R8 | Power window relay | |
| R9 | Fan Relay/Main Relay | |
| R10 | Engine Cooling Fan Relay (High Speed) | |
| Circuit breakers | ||
| 11 | — | spare fuses |
| 12 | 10 | Right high beam headlight |
| 13 | 10 | Left high beam headlight |
| 14 | 20 | Sunroof |
| 15 | 10 | Sound signal |
| 16 | 15 | Fuel pump |
| 17 | I5 | Fog lights |
| 18 | 10 | Right headlight (high beam) |
| 19 | 10 | Left headlight (high beam) |
| 20 | 10 | Right headlight (low beam) |
| 21 | 10 | Left headlight (low beam) |
| 22 | 10 | Interior lamp |
| 23 | 30 | Glass heater |
| 24 | 20 | headlight |
| 25 | 25 | Same |
| 26 | 10 | Air conditioning compressor drive clutch |
| Fuse links | ||
| 27 | 60 | Anti-lock braking system (AB5) |
| 28 | 30 | Engine cooling radiator fan |
| 29 | 20 | Main relay |
| 30 | 30 | Window lifters |
| 31 | 30 | Fan |
| 32 | 30 | Internal fuse box |
| 33 | 30 | Ignition system |
| 34 | 30 | Same |
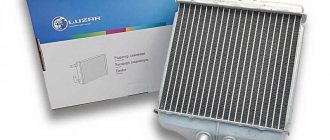
Replacing the interior heater yourself
Before starting work you will need a set of tools:
- hex heads for 12 and 10;
- a pair of ratchet heads;
- extension collar;
- Phillips head screwdriver;
- thread lock.
It is advisable to choose a screwdriver with a magnetized tip, which helps to hold hardware without dropping it. Even a simple screwdriver can be turned into such a tool if you connect it to a magnet for half an hour. Step-by-step replacement algorithm:
- Unscrew a couple of mounting bolts in the cabin that hold the stove with the evaporator and the air conditioning filter;
- in the engine compartment we get rid of two pipes leading to the radiator;
- unscrew the four bolts holding the stove to the body;
- we dismantle the housing, behind which the radiator we need is hidden;
- We carry out a visual assessment of its condition, identifying possible places of antifreeze leakage, wear, chips or damage;
- it is advisable to remove the motor and clean its external surface from dirt;
- install a new heater, further screwing in all the screws;
- We carry out complete assembly in the reverse order of disassembly.
If problems arise with the electronics responsible for cabin heating, then you should not repair it yourself. It is advisable to immediately contact car service specialists who have high-quality diagnostic equipment to identify problems.
Instructions for replacing the stove:
- From the interior, unscrew the 2 mounting bolts that secure the heater unit and the air conditioner evaporator unit with filter together.
- Now under the hood you need to remove two pipes that lead to the heater radiator
- Unscrew the 4 bolts securing the heater unit to the body.
- Remove the stove housing block.
- The heater radiator is in front of us. You can immediately assess where it is leaking and whether it is leaking at all. Assess the external condition for chips, cracks and other types of wear.
- I also recommend removing the heater motor (next to it) and cleaning it of dirt. In my case, there was enough dirt.
- Install a new interior heater radiator into the seat and screw a dozen screws onto the heater block.
- The remaining parts are assembled in reverse order. Pay attention to the wiring harnesses when connecting all electronics (dashboard, clock, heater, etc.)
I would recommend entrusting such problems, which may concern electronics and interior heating, to specialists from service centers, since this is a very delicate job and the slightest mistake can affect the operation of the entire car. It’s better to pay a little money for a high-quality replacement of the heater radiator than to struggle yourself and achieve nothing (there is such a thing).
Existing stove malfunctions
The Chevrolet Aveo heater is characterized by the following types of breakdowns:
- the honeycombs are clogged;
- the radiator broke down;
- the control unit does not function;
- radiator pipes are broken;
- The stove valve is out of order;
- The additional resistor does not work;
- coolant leaked;
- The radiator channels are clogged.
Leakage is the most serious of all the above faults, since it occurs due to corrosion or various mechanical shocks. Basically, leaks can be noticed in the places where the tubes are soldered, but cracks appear in the tank, the tubes themselves and on other parts.
Due to a leak of coolant from the radiator tubes, the entire heating system of the car may fail.
Clogging of the stove channels occurs gradually, as evidenced by improper operation of the system. However, no changes are observed in other details. Such deposits prevent the liquid from fully dissipating heat and reduce its volume.
The cause of failure of the Chevrolet Aveo stove may be clogging of its channels.
A clogged radiator is the most common problem. Despite the fact that a cabin filter is installed, dust will settle on the stove over time, reducing not only the area of the fins, but also the permeability of the cells. In addition, honeycombs can become clogged due to the improper use of various cleaning substances.
The cause of a breakdown of the heater in a Chevrolet Aveo may be a clogged radiator.
But there are problems that need a more serious solution, for example:
- The stove may not work due to a failed pump, as well as a clogged faucet or radiator. A faulty part will damage the engine cylinder head, which will lead to overheating. In this case, you will have to do a major overhaul of the engine.
If the pump fails, the heater stops heating the interior of the car.
- If the outgoing hose from the stove is quite cold, and the incoming hose, on the contrary, is hot, then you should look for the cause in a broken faucet. If everything is fine with it, replace the radiator itself, which probably contains scale.
Scale, dirt, dead insects, leaves can cause failure of the entire heating system
- It happens that an air lock occurs in the stove due to narrow tubes, and weak pressure is not able to expel it. A warmed-up motor will help get rid of the plug, after which you need to slightly unscrew the clamp on the hose and disconnect it from the tube. Thanks to such actions, a gap will appear through which the air will escape.
- If dirt gets into the radiator, the rotting process cannot be avoided, after which an unpleasant odor will be felt in the car interior.
Dirt in the Chevrolet Aveo heating radiator can cause an unpleasant odor in the cabin
The stove won't turn off
If the stove in a Chevrolet Aveo is faulty, it happens that it does not turn off, makes an unpleasant whistle, or does not heat well. Let's look into these problems.
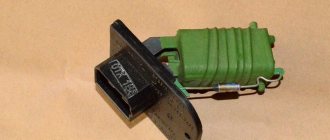
- If the car is equipped with non-electronic control of the heating radiator, then the main reason for its malfunction is the shorting or melting of the contacts located on the fan speed switches. The second reason is sticking of the relay contacts, which give it high speed.
Closing the contacts on the heating radiator fan causes the stove to fail
- With electronic control, the thyristor or transistor rotation speed control fails. The reason is a normal overvoltage, which is located in the on-board network of the car or the terminals were removed from the battery while the engine was running.
- When the control transistors burn out, a gap or short circuit is formed, which disables the entire system. In this case, it is impossible to control the speed and the heating radiator will stop turning off.
Replacing transistors on the cover of the stove control unit
- If the thyristors break down, the negative voltage will be constant and the motor rotation will not stop. They will remain open and the heater fan will not turn off.
Replacing control thyristors on a heating radiator
- The next option is improper operation of the control unit, which forces the thyristors to always be open, respectively, and in this case the heating radiator will not turn off.
Improper operation of the Chevrolet Aveo heater control unit leads to breakdown of the entire heating system
Related article: Nissan Leaf received a new version - all-wheel drive
The stove is whistling
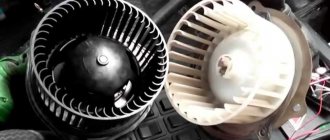
During operation of the stove, an unpleasant hum, creaking, or whistling noise is heard - this means that the problem is in the motor.
After five years of car operation, the lubricant completely or partially dries out in the bearing of the heating radiator motor.
You can fix this problem as follows:
- Remove the glove compartment in the cabin, since the heater motor is located behind it. Open it and pull it slightly towards you. Behind it there is a ventilation system.
In order to get to the motor, you need to remove the glove compartment in the car.
- On the right side there is a plastic box with a motor and an impeller.
Behind the glove compartment you need to find the heater motor and the heating system impeller
- Remove all screws.
In order to remove the cover, you must carefully unscrew all the screws on it.
- Disconnect the corrugated pipe and the power plug.
- Take out the motor and take it to a convenient place. Before you remove it, be sure to check the air ducts that may contain leaves. They also emit a characteristic rustling and hum as they interact with the impeller of an electric motor.
For repairs, we remove the heater motor from the car.
- Remove the impeller. To do this, you need to unscrew the nut on the motor shaft, using a size 8 wrench.
To disassemble the motor, you need to unscrew the impeller nut.
- There are screws attached to the plastic base and they need to be unscrewed.
To repair, you need to unscrew the screws securing the motor to the plastic base.
- Pull out the motor and use a screwdriver with lubricant. Rock the motor until it pops out. If this does not help, then slightly loosen the screws that are located on the back wall and lightly tap the motor through the gasket.
To carry out repairs, we remove the motor from the housing
- Disconnect the motor cover and remove the armature.
Remove the motor cover to remove the armature
- We take the anchor out of the motor.
To carry out repairs, we remove the anchor from the motor.
- We thoroughly clean and lubricate the bushings that are located on the body, as well as the cover of the electric motor.
- We dismantle the anthers.
- Use kerosene to flush bearings. If they fall off, then you need to replace them with new ones. And also mark the location of the bearing on the shaft.
To remove dirt, we rinse the bearings well in purified kerosene
- Carefully lubricate the anthers with lithol and put them back.
To improve performance, lubricate the bearing with lithol
- To install the bearing back, you need to use a block of wood and a hammer. Lubricate the rod before installing the part.
To assemble the motor, install the boot in place
- Remove oxidation from the manifold with fine sandpaper.
- Assemble the motor.
- The walls must also be lubricated with lithol before installing the motor in its place.
To facilitate motor assembly, lubricate the seat with lithol.
- In reverse order, we assemble the electric motor on the Chevrolet Aveo.
When repairing the stove motor, it is not recommended to use WD-40 liquid, since rust will appear if the substance gets on the copper contacts.