Installation and adjustment
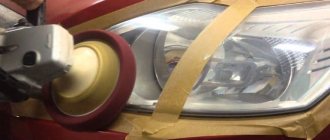
How to make angel eyes headlights with your own hands
Before adjusting the fog lights, make sure the following requirements are met. Firstly, there must be two devices. Secondly, their location is determined as follows:
- the distance to the side surface of the machine should not exceed 40 cm;
- distance from the road surface - at least 25 cm;
- the openings for the light of these devices must be located in the area of the opening that transmits the light of the low-beam headlights;
- viewing angles are + 15-100 vertically, and +45-100 horizontally.
Required condition! You can turn on the fog lights if there are side lights.
For those who are convinced of the presence of fog lights, their correct installation and full compliance with the owner’s requirements, we offer detailed instructions on how to set up fog lights with your own hands.
Video on how to make the adjustment yourself:
The car must be parked on a level area and at a distance of at least 5 meters from it there must be a flat and preferably a single-color wall. The ideal distance would be 10 meters, but if the road does not allow this, then this condition is not mandatory. Of course, those who decide to adjust the fog lights themselves should wait until it gets dark and carry out the procedure in a part of the city where there is no additional evening lighting.
Also check the condition of the wheels, because if one of them is even slightly flat, it will not be possible to carry out the adjustment properly.
Our most important participant is the wall. It is on this that we will create a diagram according to which we will configure the fog lights.
The following parameters must be marked on the wall:
- center of the machine;
- the center of each headlight;
- height from the ground surface to the center of the headlight.
The first straight line will connect the points indicating the height at which the headlights are located
Pay special attention to the coincidence in height of the central points. If the machine is on a level surface, they should be located at the same level
Adjusting the fog lights is to create a light that will sufficiently illuminate the driver’s path and not disturb other road users. To do this, it is necessary that the light and its angle of refraction correspond to certain parameters.
Setting the light level
The level at which the illumination must pass determines the angle of incidence of the headlights. You can calculate its normal position as follows.
If the angle of incidence of the low beam is 1%, that is, at a distance of five meters from the wall it will be 5 cm lower than the marked points on the wall. Data on the angle of incidence provided by the headlights can be seen directly on their surface. We measure down from our straight line as many centimeters as m calculated taking into account the angle of incidence indicated on the headlights and the distance from the wall of the car, and see how our foglights shine. Normally, light should pass absolutely smoothly along this line, refracting only at the central points.
Adjusting the refraction point
Note! The angle of refraction of light should occur precisely at the central point of the headlight. It’s easy to mark this point
Most manufacturers even put a cross or other designation in the center, but if there is none, you can mark it yourself without any problems and also mark it on the wall
It’s easy to mark this point. Most manufacturers even put a cross or other designation in the center, but if there is none, you can mark it yourself without any problems and also mark it on the wall.
Thus, before setting up the fog lights, you need to find out the angle of incidence and the point of refraction of the light, and based on these parameters, achieve lighting at the required distance from the designated line.
Then, as they say, it’s a matter of technique. Having determined how the light should look, we bring the headlights to the required state using a screwdriver or other available tools.
You need to constantly monitor the condition of your fog lights. Whether they are “original” or installed after purchasing the car, from time to time their operation may be disrupted. You need to monitor not only the height, but also the brightness of the lighting. We also note that this procedure carried out in car dealerships is not always carried out correctly. Setting up will not require much time, but will ensure safe driving on the road for the driver, passengers and other road users.
- How to adjust headlights yourself
- How to polish car headlights at home
- Rules for installing daytime running lights + video
- Xenon lamps for a car: characteristics and description
We adjust the fog lights on a VAZ-2114 with our own hands: setting up PTF
We install fog lights on a VAZ 2110 with our own hands. We install fog lights on a VAZ 2110 with our own hands.
Fog lights are undoubtedly not a superfluous element in the external lighting system of a car. And many owners of VAZ-2114, on which they are not installed, come to the conclusion that it is necessary to install such equipment. Such lighting elements are simply a lifesaver in conditions of poor visibility and poorly lit roadside conditions.
The video below shows general aspects of adjusting fog lights:
Step-by-step process for adjusting fog lights
You can start adjusting them. Carrying out this work can be roughly divided into two stages - this is preliminary preparation and the actual adjustment of the operation of the light flux. We will tell you more about them below.
Preparatory work
- Make sure that the newly installed equipment operates properly and turns on independently of the low beam headlights and in tandem with the side lights.
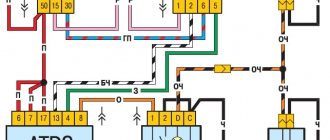
- If you have doubts about the correct connection, then our diagram will help you finally decide on this. Such a scheme is quite primitive and even a car enthusiast who has not previously dealt with electrical devices can understand it.
This is what the connection diagram looks like.
Everything is ready for adjustment.
As a rule, performing such work takes no more than 15 minutes; it is important to correctly follow the order of their implementation
Setting up PTF
The adjustment process will also not be difficult and looks like this:
PTF adjustment should be carried out when there is weight on the driver’s seat weighing at least 75 kg
These are the rules that describe GOST standards, so during adjustment, an assistant must be seated in the driver’s seat. Next, the first thing we do is adjust the light beams, please note that they must be identical to what is installed on the car - 57.7 cm. We adjust each headlight separately, covering the second light source with a piece of cardboard. This is what an approximate PTF adjustment diagram looks like.
Visual diagram of PTF adjustment on a VAZ-2114
The location of such a bolt is indicated by an arrow.
Another diagram for clarity
More about adjustment
However, after installing the fog lights, the process is not considered complete until they are fully adjusted, because it is this work that can increase the efficiency and reliability of the use of these devices
Below we will tell you how to properly adjust the fog lights and what you need to pay special attention to
Why PTF?
PTF and low beam lights
Surely every driver who has driven a car in foggy conditions knows how difficult it is. This is due not so much to limited visibility as to the impact of the beam of light on tiny drops of moisture, which, when reflected, create glare, significantly impairing visibility.
However, it is worth knowing and be sure to follow several rules for the operation of such lighting devices:
According to the accepted norms of the state standard (GOST - 8769-75 - approx.), installation of fog lights is not permitted at a distance lower than 25 centimeters from the road surface and the bottom of the car bumper. Fog lights with xenon lamps work much more efficiently, but they also cost more and traffic police officers “react” to such cars much more often. When choosing a headlight, pay attention to the light diffuser, which during operation should have a clear boundary of the luminous flux. When working, such headlights are able to produce light over a much wider range. When you install the headlights in place, make sure that their glass is protected with a special, transparent anti-gravel film
Thus, they will be less exposed to small stones from nearby cars, thereby reducing the occurrence of deformation and cracks on the glass. Pay attention to the limit of the luminous flux that the lamp produces, this way you can guarantee that the light beam will not be “broken” and will eliminate the possibility of dazzling oncoming drivers.
When looking at similar products in stores, your choice should only be products made of high-quality plastic, with a reflector that is not damaged and whose connections are waterproof. It is in this case that the fog lamp will last a long time and be effective.
Indispensable attribute
Do-it-yourself lighting technology, which is prohibited
Fog lights are designed for bad weather conditions when it is difficult to drive due to reduced visibility. They increase the safety of both the passengers of the vehicle and other road users.
In bad weather, conventional headlights are of little use, since the light beam is reflected from drops of water, and creates the feeling that the car is in a spot of light, which prevents the driver from seeing where he is pointing the car. Anti-fog models - scatter light directly in front of the car, which spreads along the roadway. This happens because the beam comes out dense, wide and flat.
Typically, these headlights emit white or yellow light and are installed both at the front and rear of the car. Adjusting the fog lights depending on environmental conditions does not require special skills and can be done independently.
Adjustment diagram
How to make a start button instead of an ignition key in a car with your own hands. How to connect the starter
The adjustment scheme for fog lights is simple in principle. It consists of setting the vertical and horizontal angles of their position.
- Distance between the center of the fog lamp and the ground.
- Horizontal mark on the wall at the same height.
- Turn on the low beam headlights and make a mark on the wall with the center of the two beams.
- Turn off the low beams and turn on the fog lights.
- When installing the car at a distance of 5 meters from the wall, the upper limit of the beam of the fog lights should be 10 centimeters below their height from the ground level. The installation of fog lights is carried out strictly parallel to the longitudinal axis of the car - they should not deviate either to the right or to the left.
- The distance obtained between the centers of the light beams should be 1200 mm.
- Draw a chalk line on the screen dividing the car into two equal halves.
- Draw a line that is 5 cm below the first one.
- Measure the distance from the fog lamp to the ground and from the lamp to the center of the car.
- The resulting intersection of two lines is the center of the fog lights.
How to adjust fog lights
The main task of the fog lamp adjustment process is to give them a certain position in space, characterized by the formation of a light beam directed into an area free of condensation and evaporation, located at a distance of 0.3-0.7 meters from the surface of the road surface. Expanding these boundaries in one direction or another significantly affects the functionality of fog lights.
The technological operation for performing adjustment work comes down to setting certain values for the vertical and horizontal angles of the device.
Preparatory activities
Adjusting the fog lights is preceded by the following measures:
- selection of a flat horizontal platform;
- measuring the pressure in the car tires and bringing it to the value specified in the car’s operating instructions (the value of this parameter affects the height of the fog lights relative to the road surface);
- refilling the fuel tank (until full);
- loading the vehicle to a weight equal to the load weight of the main period of operation;
- at a distance of 10 meters (some experts reduce it to 5 meters) from the vehicle we place (perpendicular to the surface) a special screen (you can use a wall, garage door, etc. as the latter);
- preparation of tools: screwdrivers, measuring instruments (ruler, tape measure).
Color of light beams
Read
Fog lights can be in several colors. Bulbs made from tungsten - Halogen bulbs work better for illuminating the ground at short distances. These bulbs are yellow, blue, orange or snow-white. Yellow lights are more useful and non-hazardous. Some fog lights use a blue color that can absorb light from fog and snow. Snow-white tinted bulbs that are close to daylight are also a good option for PTF. From time to time, fog lights may appear green.
The best light bulbs for car fog lights are sources with snow-white or selective yellow light.
White light
Snow-white light in fog lamps, which are made using xenon gas, they are highly durable and durable. In addition, they are significantly brighter than their halogen counterparts. Choose lamps with snow-white light, they do not produce blue waves that cause glare.
Selective yellow light
The selective yellow light of the bulb improves visibility during adverse weather conditions by reducing short wavelengths emitted by blue light.
Coating for selective yellow light lamps
If you want to make these lamps better, you can purchase a special coating that limits the amount of blue light emitted.
XDo you still think that diagnosing a car is difficult?
If you are reading these lines, it means you are interested in doing something in the car yourself and really saving money.
, because you already know that:
- Service stations charge a lot of money for simple computer diagnostics
- To find out the error you need to go to specialists
- The services use simple impact wrenches, but you can’t find a good specialist
And of course you are tired of throwing money down the drain, and driving around the service station all the time is out of the question, then you need a simple CAR SCANNER ROADGID S6 Pro, which connects to any car and through a regular smartphone you will always find the problem, turn off CHECK and good save money!!!
Installation and adjustment of car fog lights.
Only fog lights can improve visibility in case of poor visibility associated with bad weather conditions (fog, heavy rain, snowstorm). But only properly adjusted fog lights can work effectively.
In order to accurately adjust the fog lights, it is important to install them correctly on the car. The fog lights should be located at a level of about 250 mm from the ground. In addition, they must be secured so that the headlights do not protrude beyond the dimensions of the car more than the main optics and do not interfere with operation
It is recommended to mount the fog lights at an approximate distance of 400 mm/600 mm from the main headlight housing of the car.
In addition, it is necessary to secure them so that the headlights do not protrude beyond the dimensions of the machine more than the main optics and do not interfere with work. It is recommended to mount the fog lights at an approximate distance of 400 mm/600 mm from the main headlight housing of the car.
After installing the headlights, it is necessary to correctly adjust their vertical and horizontal angles. Otherwise, their efficiency will be reduced, and instead of being a reliable source of light in the fog, they will turn into a source of problems.
The process of adjusting fog lights:
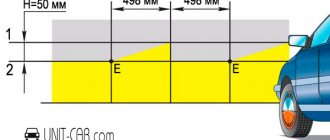
The position of the car and light beams on the screen during adjustment.
1. A special movable screen is placed close to it or the vehicle itself is driven to a flat wall at a distance of 7 or 6 meters.
2. On the screen, using a pencil, the center of the headlights is marked with visible dots, after which, retreating 100 mm down, a horizontal line is drawn.
3. After completing the marking, the movable screen must be moved seven or six meters from the car (and in the case of a wall, drive the car away) and turn on the fog lights.
4. With correctly adjusted fog lights, the upper limit of the light they emit should be at the same level as the previously drawn horizontal line. In addition, it is necessary to measure the distance between the centers of the light beams. Its optimal value should be 1200 mm.
Checking the fog lights:
After installing and adjusting the fog lights, it is necessary to test them. This will help you understand how accurately the fog lights shine. Naturally, it is best to do this on a foggy day, or at dusk by driving out onto the highway and turning on the fog lights.
Properly adjusted headlights should provide maximum illumination of the path at a distance of twenty meters or more from the car.
If any deviations from the normal operation of the fog lights are noticed and you cannot adjust them correctly yourself, you must contact a specialized center for computer correction of the headlights.
For safe driving in adverse weather conditions, the car is equipped with fog lights. You can install the devices yourself, without the need for special equipment or tools.
To get the most out of these optics, it is important not only to install correctly, but also to connect and then adjust the lighting. It happens that the light bulbs in PTF cars need to be changed
This is also easy to learn.
Helpful information
If the driver, after all the work on setting up the fog lights, does not like their glow, then perhaps the reason for this phenomenon lies in the design features of the optics. The color of the beam formed plays an important role in the illumination of the road. The most effective are fog lights that generate a light beam with a color that is in the long-wavelength part of the spectrum. It is this beam that ideally passes through the smallest drops of water. Red light works best in such conditions, but it is prohibited by the rules to be installed in front optics. Of the permitted colors, the most effective in conditions of fog or drizzling rain is the yellow ray.
In conclusion, it should be noted that adjusting the fog lights done by yourself will not be as accurate as it will be done by specialists in a car service center. The main distinguishing point is the presence of a special regoscope device, which is equipped with a measuring optical angle. However, the millimeter precision with which professionals adjust foglights is hardly worth the money and time spent.
If you liked the article, tell your friends by clicking on one of the buttons below.
Necessary tool
To adjust the headlights on a Lada Priora you will need:
FTAROY CHANNEL “To the point” (for frostbitten +18) SUBSCRIBE...
Adjusting the headlights
Lada Priora
, subscribe to my channel.
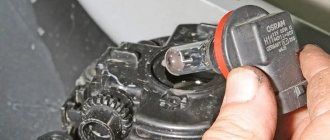
- First of all, we park the Priora car on a flat area five meters from a flat wall. Fill the tank with fuel until it is full and use a pressure gauge to equalize the pressure in the wheels. After inspecting the headlights, thoroughly wash them from contamination. We check that the headlight bulbs are working properly. If necessary, we install new ones.
- After the preparatory procedures, we proceed to adjustment. We move the lighting width control lever to position “0”. This position corresponds to the load of the vehicle with the driver. Turn off the lights and rock the car from side to side. Thanks to the rocking, all suspension elements will take a standard position. We ask a colleague (about the same weight as you) to sit in the driver’s seat of the car.
- For further adjustment, draw a special marking on a flat wall. The center line should be drawn so that the distance from the center of each headlight to the axle is identical. We mark the centers of each headlight with dots on the wall and draw two lines vertically through them. Draw a straight line between the lines and mark it with the letter “A”. Below, at a distance of 12 and 22 centimeters, draw two more lines in parallel.
- With the low beam on, close one of the headlights. The top point of the light spot from the headlight should coincide no higher than the horizontal center line. Also, the boundaries of the light beam of the fog lights are located along the same line.
- We make sure that the intersection of the inclined and horizontal sections of the boundaries of the light fluxes (at the point where the light beam breaks) coincides with a line that is drawn vertically and passes through the point marked as the center of the headlight. If deviations in the luminous flux are detected, we adjust the headlights with a hexagon of 6 millimeters by rotating the horizontal and vertical position screws. These screws are located under the hood in the headlights.
There is a special offer on our website. You can get a free consultation with our corporate lawyer by simply submitting your question in the form below.
How to adjust PTF - main points
The first step is to apply markings on a flat, vertical surface, it could be a wall; for this you will need chalk and a tape measure.
The markup is:
- A vertical line that corresponds to the central axis of the machine;
- Two parallel lines that pass through the center of the fogs;
Afterwards we draw two horizontal lines. Upper - represents the value between the centers of the fog lights and the road surface. The lower one, in turn, depends on how many meters there are to the car, as well as at what height the upper line is located. For example, if the car is 10 meters away, and the top line is at a height of 25-50 cm, then the bottom line will be at a height of 10 cm.
Next, you should turn on the PTF and make sure that they are adjusted correctly. We take a piece of dense material and cover one fog light. We check the accuracy of the settings and evaluate deviations, if any. If necessary, the fog lights are adjusted using adjusting screws. These screws will be different for everyone, depending on the make and model of the car. The adjustment continues until the light beam matches the control points. After setting up, both fogs are checked separately at the same time. If everything matches, the PTF adjustment can be considered complete.
Often, adjusting the PTF with your own hands does not give the desired result and the effectiveness of the fog lights still does not suit the owner. In this case, you should contact experienced specialists who, using special equipment (regscope), will adjust the fog lights quickly and correctly. It also happens that the quality of light is not satisfactory, in which case you should make sure that the correct bulbs are installed in the fog lights. By the way, xenon in PTF is unlikely to save you in foggy conditions, since it is the yellow light that effectively penetrates the veil of fog, rain and snow. Xenon in fog lights in most cases has more of a decorative effect.
Source
Why should you install fog lights?
Unfortunately, not the entire range of vehicles that modern automakers so generously offer us have correctly selected fog lights.
Attention! The fact is that in some cars, manufacturers save quite a lot on electrics, which means that the light, which should be bright enough, cannot fully manifest itself simply because it does not receive enough energy for this. As for bad weather, very often the headlights that were installed by the manufacturer are simply not able to cope with the weather conditions that the car encounters
The number of diodes in them is simply not enough
As for bad weather, very often the headlights that were installed by the manufacturer are simply not able to cope with the weather conditions that the car encounters. The number of diodes in them is simply not enough.
Those who doubt the advisability of such a purchase and its adjustment should realize that fog lights help not only in bad weather. Very often, experienced drivers note that the use of such light protects against accidents in places with a large number of turns, since the light does not hit the eyes, but spreads along the asphalt.
If you are choosing fog lights for the first time, pay attention to their characteristics:
- glass thickness and body strength;
- possibility of repair, for example, changing a lighting element or glass;
- quality of fastening and regulation;
- aerodynamic.
Adjusting the foglights
Let's move on to the most important point - adjusting the PTF. Please note that this step after installing the headlights is mandatory.
If the optics are positioned incorrectly, in addition to the fact that the lighting efficiency will be low, the light will also blind oncoming drivers. There is an easier option to adjust the position of the lighting fixtures and a more correct one. A simple method involves adjustment “by eye”. In this case, the headlights are adjusted so that the light does not rise too high. But, as you can understand, such an adjustment will be far from ideal.
With the second method, you need to wait until it gets dark and find a vertical wall. The car is installed perpendicular to the wall at a distance of 7–8 m and the low beam is turned on. Next, on the wall you need to mark the center of the low beam light beam. You can use chalk for this. A horizontal line is drawn between the marks. Measure 10 cm down from it and draw another horizontal line. This will serve as the upper limit for the light spot from the PTF. After the second line has been marked, the low beam is turned off. Only the headlights remain on, and the foglights are also turned on. You will need to align the light beam of each headlight so that it does not go beyond the line.
When the height of the light spot is adjusted, set the distance between the light beams of the headlights. This procedure is necessary to ensure that the roadside is fully illuminated when driving. To make adjustments, you need to set the light beam of one of the lighting fixtures level, determine its center and make a mark. About 120 cm are retreated from it towards the light beam of the second headlight and a second mark is made. It will serve as a guide for the light spot (center) of the second headlight.
Adjusting the fog lights
Precise adjustment of the light of fog lights is carried out at a service station, where mechanics use a special device, a regloskop, which has an optical measuring unit.
At home, the PTF can be adjusted using a screwdriver and an adjustment circuit. By the way, the foglights are adjusted only by height. After establishing the center of the light beam, you need to turn the adjusting screw with a screwdriver so as to achieve the required focus. Concern yourself about driving safety during severe weather conditions.
The principle of operation of the fog lamp
Before grabbing the tools and adjusting the position of the PTF on the car with your own hands, every car owner must understand the features of their operation.
And for this you need to remember that fog:
- These are the smallest particles of moisture that are in the air;
- The emanating heat from the ground (road surface) does not allow them to sink, causing them to literally hang, which leads to the formation of a milky veil;
- The stream of light, reflected from them like a mirror, returns back and blinds the driver.
Narrow work space
All drivers know that turning on regular headlights in fog leads to poor visibility. This happens because droplets of moisture are located exactly at the level of the headlight of a modern car. After all, their location was determined for better illumination of the road situation - as close as possible to the driver’s organs of vision.
But PTF has another task - to make movement in fog possible. That’s why they are installed on cars as low as possible to the road surface, so that they, as they say, “shine under the fog.”
Correctly adjusted PTF shines “under the fog”
The fact is that moist air close to the ground is drier and, accordingly, does not have glare properties.
Caution! In no case should you install fog lights lower than 25 cm from the road surface. This is prohibited by the current GOST 8769-75. But what is not prohibited is the production of stickers on headlights that will protect them from stones. Since the price of PTF does not allow neglect their safety.
Technical feature of the luminous flux
The second point that should be emphasized is that:
- The beam of the fog lights along the top edge has a clear boundary:
- This is done so that when it hits drops of moisture, it does not refract upward and blind drivers.
The peculiarity of PTF operation is the crossed upper limit
For reference: due to the special shape of the lens or marks applied to the glass of a classic headlight, the luminous flux of fog lights has a clear horizontal cut.
How should foglights shine?
Fog is micro droplets of water. When a beam of light hits them, it reflects off them and blinds the driver. This creates a “wall” effect. That is, when you turn on the low beam, a wall of light appears in the fog in front of the car, and visibility deteriorates. The brighter the light flux, the worse it becomes.
The closer to the road surface, the less fog there is. Therefore, the task of fog lights is to shine as close to the road surface as possible and the direction of the light beam must meet certain requirements:
- The light beam must have a clear cut-off line. If it is blurry, then the reflected light will blind the driver in the fog or oncoming cars
- Fog lights should shine below the horizontal axis of their installation no further than 10 meters. This is achieved by adjusting using the refractive index
- The color of the glow is not important. White and yellow are allowed. Other colors are prohibited by traffic regulations.
According to the test results, purchased lensed PTFs and standard ones installed at the factory performed best. Chinese analogues do not have a clear cut-off line. LED ones give better results, but you need to buy ones with a glow temperature no higher than 5000 K. Above this threshold, the color of the fog lights will be blue, which is fraught with a fine.