Thank you all for your response!
yaris
I have self-feeding cylinders.
It's all about the gap between the GTZ and the VUT rod! I have not seen anyone write about adjusting it in any article!
I quote: Before installing the master brake cylinder, we control the protrusion of the head of its adjusting bolt relative to the mounting plane of the master brake cylinder flange, which should be 1.25-0.2 mm
. To adjust the protrusion of the bolt head, turn it with an 8-point wrench.
This was the reason for the brakes being applied almost to the floor! But the “instructions” don’t say a word that the rod itself needs to be held with pliers and the “head” itself must be turned. And the key is not "on" 8
"But still "at
7
". I removed the GTZ three times to adjust the rod. And then this rod needs to be “inserted” back! I will say this is not very easy, since the pipeline is already connected and laid! It’s good that I didn’t leave the original brake fluid reservoir with its rubber hoses. I feel like I suffered even more then! The pedal began to take where it should be - in the middle! But “the music didn’t play for long!” Still, I guessed wrong.
Thanks again to Deeptown
for the hint where to dig, for the consultation at the moment when I stopped near the Dorogozhychi metro station with an oak pedal and almost blocked brakes. I had one adjustable wrench with me, thanks to it I unscrewed the GTZ and relieved the pressure. Then, on the floor with live brakes, I drove to the garage. There, within 5 minutes I removed everything, tightened the rod 5 turns and calmly drove home. But I see that I can add a couple more turns.
The vacuum brake booster (VBR) is one of the main components of the vehicle braking system. Even the slightest breakdown can trigger a failure of the entire system and lead to serious consequences.
Brake booster
Almost all modern cars are equipped with vacuum brake boosters. They have a fairly simple design, but are very effective and quite reliable.
Purpose
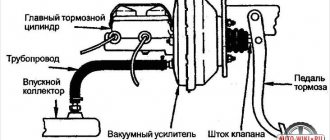
The VUT serves to transmit and increase force from the pedal to the brake master cylinder (MBC). In other words, it simplifies the driver’s actions when braking. Without it, the driver would have to press the pedal with incredible force to force all the working cylinders of the system to function simultaneously.
Device
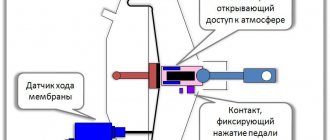
The VUT design consists of:
- housing, which is a sealed metal container;
- check valve;
- plastic diaphragm with rubber cuff and return spring;
- pusher;
- follower valve with rod and piston.
A diaphragm with a cuff is placed in the device body and divides it into two compartments: atmospheric and vacuum. The latter is connected through a one-way (non-return) valve to a source of air vacuum using a rubber hose. In the VAZ 2106, such a source is the intake manifold pipe. It is there that, during operation of the power plant, a vacuum is created, which is transmitted through a hose to the VUT.
The atmospheric compartment, depending on the position of the follow-up valve, can be connected both to the vacuum compartment and to the environment. The valve is moved by a pusher, which is connected to the brake pedal.
The diaphragm is connected to a rod, which is provided to push the master cylinder piston. When it moves forward, the rod presses on the GTZ piston, causing the fluid to be compressed and pumped to the working brake cylinders.
The spring is designed to return the diaphragm to its initial position upon completion of braking.
How it works
The functioning of the “vacuum tank” is ensured by the pressure difference in its chambers. When the car engine is turned off, it is equal to atmospheric pressure. When the power plant is running, the pressure in the chambers is also the same, but there is already a vacuum created there by the movement of the engine pistons.
When the driver presses the pedal, his force is transmitted to the follower valve through the pusher. Having shifted, it closes the channel that connects the compartments of the device. The subsequent stroke of the valve equalizes the pressure in the atmospheric compartment, due to the fact that the atmospheric channel opens. The pressure difference between the compartments causes the diaphragm to bend, compressing the return spring. In this case, the rod of the device presses on the GTZ piston.
The force created by the “vacuum driver” can exceed the driver’s force by 3–5 times. Moreover, it is always directly proportional to the applied.
Location
VUT VAZ 2106 is installed in the engine compartment of the car on the left side of the engine shield. It is secured with four studs on the plate of the brake and clutch pedal bracket. The GTZ is fixed on the body of the “vacuum generator”.
How does VUT work?
The basic principle of operation of a vacuum brake booster is the difference in pressure in the sectors provided by the valve force. When the device is inactive, the pressure in both sectors is the same - it corresponds to the pressure provided by the vacuum source. But when the driver presses the stop pedal, the follower valve experiences force from the pusher and blocks the connecting channel of both sectors.
But the valve continues to move, and the atmospheric sector interacts with the external environment through the channel. As a result, the pressure does not change in the vacuum sector, but a vacuum occurs in the air sector. The pressure difference in the sectors puts so much pressure on the piston rod of the brake cylinder head that it moves. When braking is completed, the sectors are united again, and the pressure there becomes the same. A return spring acts on the membrane, causing it to return to its original state.
The operation of the “vacuum brake” is directly dependent on the power of pressing the brake lever. Thus, for the mechanism to work better, the driver must still press the brake harder.
Scheme of operation of the brake system with a vacuum brake booster and ABS
In order to improve the performance of the vacuum brake booster, a pneumatic device is installed for braking in emergency situations. One sensor in its design measures the speed of the rod, the other determines the level of vacuum. If there is a lack of vacuum in the compartment, the sensor will report this.
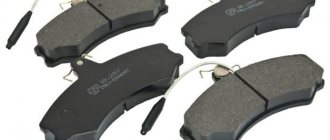
When used, the pads act on the brake discs. The materials of the pad linings are selected very carefully, but despite this, in order to press them to the discs, considerable effort is required, comparable to the pressure on the pedal of a man weighing at least 80 kg. But he will also have to exert considerable force to stop the car, especially since he has to apply pressure with one foot.
The fact is that the power of car brakes is many times higher than the power of the engine. Of course, hydraulics help reduce the pressure on the brake pedal, but still, without additional devices, it continues to remain quite high.
Thus, in Formula 1 racing cars, drivers apply a force exceeding 150 kg to the pedal. Ordinary drivers driving cars on the roads do not have such physical strength.
In this regard, in the early seventies of the 20th century, many passenger cars began to be equipped with VUT. Thanks to this innovation, the required pressure is greatly reduced. It can be reduced even more, but this way the brake pedal will not be able to keep up with transmitting information through the brake pads towards the discs - braking will speed up and the car's controllability will decrease.
Using the vacuum energy generated in the engine intake manifold is the most obvious and effective method of easing the driver’s effort when pressing the brake. But it has one significant drawback related to the peculiarity of its functioning. The efficiency of amplification is directly dependent on the amount of air pressure. The lower the pressure, the lower the degree of amplification - that is, the driver will have to press the vehicle stop pedal harder.
How to check the vacuum booster
If the symptoms listed above occur, the vacuum unit must be checked. You can determine the functionality of the device without removing it from the car. For diagnostics, we need a rubber bulb from a hydrometer and a screwdriver (slotted or Phillips, depending on the type of clamps).
We carry out verification work in the following order:
- Turn on the parking brake.
- We sit in the cabin and press the brake pedal 5-6 times without starting the engine. On the last press, leave the pedal in the middle of its travel.
- We take our foot off the pedal and start the power plant. When the “vacuum” is working, the pedal will move down a short distance.
- If this does not happen, turn off the engine and move on to the engine compartment. We find the amplifier housing there, inspect the check valve flange and the end of the connecting hose. If they have visible breaks or cracks, we prepare to replace the damaged parts.
Video: checking VUT
Efficiency of use
The VAZ 2109 model was one of the first domestic cars to receive such a unit as standard equipment (before that, not all cars were equipped with an amplifier). This innovation has significantly improved the efficiency of driving and reduced its braking distance, regardless of the road surface.
Braking efficiency with this unit increases on average by 30-40%, depending on the specific model and road conditions.
On video of the VAZ 2109 vacuum brake booster:
Repair or replacement
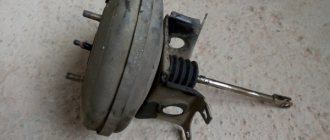
Having discovered a faulty vacuum brake booster, you can go in two ways: replace it with a new one or try to repair it. It should be noted here that a new VUT without a master brake cylinder will cost approximately 2000–2500 rubles. If you don’t want to spend that much money and are determined to repair the unit yourself, purchase a repair kit for the old “vacuum unit.” It costs no more than 500 rubles and includes those parts that most often fail: cuff, shank cap, rubber gaskets, valve flanges, etc. Repairing an amplifier itself is not a very complicated process, but it is time-consuming. It involves removing the device from the car, disassembling, troubleshooting, replacing faulty elements, as well as adjustment.
Change the vacuum booster or repair it, the choice is yours. We will consider both processes, and start with replacement.
Replacing VUT with VAZ 2106
- thin slotted screwdriver;
- spanner set to “13”;
- socket wrench set to "13".
- Place the car on a flat surface and put it in gear.
- In the interior, we bend the carpet under the pedal bracket. We find there the junction of the brake pedal and the booster pusher.
- Using a slotted screwdriver, remove the spring retainer from the pedal mounting pin and the pusher shank.
After replacing the device, do not rush to install the master brake cylinder, since before this it is necessary to check and, if necessary, adjust the protrusion of the rod, which we will talk about after considering the VUT repair process.
Video: replacing VUT
Repair of the VAZ 2106 vacuum cleaner
- vice;
- slotted screwdriver;
- small hammer;
- pliers.
- We fix the vacuum booster in a vice in any convenient way, but only so as not to damage it.
- Using a slotted screwdriver and pliers, we flare the halves of the device body.
Vacuum booster: device
So, the specified amplifier works due to rarefaction. Due to the fact that a vacuum is formed in the system, the brake booster creates additional force. In terms of design, the vacuum booster is integrated into a common unit with the GTZ (brake master cylinder).
The general design involves the following set of elements that make up the vacuum amplifier:
- frame;
- diaphragm;
- follow-up valve;
- pusher;
- GTZ piston rod;
- return spring;
Although the device may differ slightly on different car models, the general scheme is typical for both domestic cars of different years of production and foreign cars (for example, a VAZ vacuum brake booster or foreign-made cars).
The vacuum body itself is conventionally divided into two parts using a diaphragm. This division forms two chambers. One chamber faces the GTZ and is called a vacuum chamber, while the second, closest to the brake pedal, is an atmospheric chamber.
In a nutshell, the vacuum chamber is connected via a check valve to the area in the intake manifold behind the throttle valve. This is the source of vacuum for the VUT.
Also, in order for the vacuum cylinder to work more accurately and accurately in different operating modes of the internal combustion engine, an electric vacuum pump can be used as a source of vacuum. As a rule, this solution is used in cars with a diesel engine, since the vacuum in the intake manifold of such internal combustion engines is small.
As for the check valve, it disconnects the vacuum booster and the source of vacuum when the engine stops or when the vacuum pump fails. In turn, the atmospheric chamber is connected via a follow-up valve to the vacuum chamber and the atmosphere. When the valve is in its original position, the atmospheric chamber is connected to a vacuum chamber. If the driver presses the brake pedal, then the camera is connected to the atmosphere.
The function of the pusher is to move the follower valve. The pusher is connected to the brake pedal in the cabin. The diaphragm is also connected from the side of the vacuum chamber to the piston rod of the GTZ.
It is due to the fact that the diaphragm moves that the piston moves, as a result of which brake fluid is pumped under pressure into the working brake cylinders on the wheels. At the end of braking, the diaphragm returns to its original position due to the return spring.
Let’s also add that on modern cars, an emergency braking system can be integrated into the overall scheme for emergency braking. This system assumes the presence of an additional electromagnetic rod drive.
You can also highlight a solution called an active brake booster, which can work in some cases without the need to press the brake pedal. This active brake booster is necessary for the operation of the ESP system.
Bleeding the system
After carrying out any work related to the replacement or repair of brake system parts, the brakes should be bled. This will remove air from the line and equalize the pressure.
Tools and tools:
- jack and wheel wrench;
- key to "8";
- rubber or silicone hose with a diameter of 6 mm;
- a small, clean, dry container (preferably transparent);
- brake fluid (to top up).
In addition to all this, you will definitely need an assistant to bleed the system.
- Place the car on a horizontally flat surface. Loosen the nuts securing the front right wheel.
- Raise the car body with a jack. Unscrew the nuts completely and remove the wheel.
- Remove the cap from the fitting of the working brake cylinder.
Video: bleeding the brakes
At first glance, the process of replacing or repairing a vacuum brake booster may seem somewhat complicated. In fact, you just have to understand everything in detail, and you won’t need the services of specialists.
The effectiveness of your car's brakes is important - if the brake system does not work effectively, an accident may occur. To ensure precise brakes, a booster is installed on all modern cars; it ensures that the vehicle stops instantly when you press the pedal.
Repair of the vacuum brake booster is necessary if the brakes become “wobbly” and you have to press the pedal with great force to brake.
Amplifier operating principle
The vacuum amplifier is a round chamber divided inside by a membrane. On one side there is a vacuum hose connected, on the other side there is a valve that regulates the change between vacuum and atmospheric air. When you press the brake pedal, the vacuum hose is closed by the valve, and the membrane moves to the side, pushing the rod. The rod, in turn, presses on the cylinder piston. The harder we press the pedal, the more atmospheric pressure is created on the cylinder and pads.
A serviceable and good vacuum brake booster for the Gazelle makes the braking process more reliable. Vacuum problems will not completely affect the brake system, but a stuck brake pedal can negatively affect ride quality and lead to an accident when you need to stop quickly.
Repair of vacuum brake booster VAZ 2106, 2107, 2108, 2109, 2110
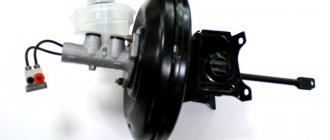
The vacuum brake booster (abbreviated as VUT) of VAZ vehicles makes the driver’s work easier - it enhances the effect of pressing the pedal in the braking system (TS). This unit consists of the following main parts:
- valve;
- metal case;
- diaphragms;
- piston;
- rod;
- powerful return spring;
- a pusher that connects to the brake pedal;
- protective cover;
- flange for installing a check valve.
The body of the device is divided into two halves by a diaphragm, and the master brake cylinder is installed on the side where the vacuum is created. A vacuum (vacuum) is created by connecting this part of the housing to the intake manifold of the internal combustion engine, and when the engine is not running, the channel closes the check valve installed in the VUT flange. Air (vacuum) with the help of a rod and piston when pressing the brake enhances the braking effect, thereby making the driver’s work easier - there is no need to press the pedal with great force. After releasing the pedal, a powerful return spring allows the diaphragm inside the housing to return to its original position. When the engine is turned off, no vacuum is created in the system and the vacuum brake booster does not operate.
On VAZ-2106-07 and VAZ-2108-10 cars, brake boosters are installed that differ in appearance, but the principle of operation of the devices is the same. We check the serviceability of the VUT as follows: press the brake pedal and start the engine - if the pedal “falls” (lowers under the pressure of the foot), the VUT works.
The main problem with a vacuum booster is damage to the diaphragm. When the diaphragm is ruptured, air penetrates from the outer part of the housing into the vacuum cavity, and a vacuum is not created in the device. But the malfunction may not necessarily lie in the device itself - often the VUT does not work due to air leaks or for other reasons:
- the “vacuum” check valve is faulty;
- there is air leakage from the hose connecting the intake manifold to the brake booster;
- there is no compression in the internal combustion engine cylinder where the vacuum comes from.
It should be noted that the vacuum brake booster on VAZ 2106-10 vehicles is connected by a hose to the fourth cylinder of the engine.
Repair of the vacuum brake booster of VAZ 2106, 2107, 2108, 2109, 2110 should begin with the dismantling of this unit, then the VUT must be disassembled.
What is VUT and why is it needed?
To determine the malfunction of the VUT, it makes sense to describe its purpose, operating principle, as well as the effect of the vacuum booster on engine operation. So, the main task of the “vacuum man” is to increase the physical force (usually 3...5 times) applied by the driver to the car’s brake pedal. This is vital because even a very strong person is not able to create enough force in the hydraulic brake system so that all the brake pads are compressed to the required value at the critical moment. This force is created due to rarefaction of air, and the area in the engine intake manifold is used as its source or is pumped by an additional pump.
Structurally, the VUT consists of two chambers - atmospheric (on the driver’s side) and vacuum (on the engine side). The vacuum chamber is connected to the intake manifold using an appropriate pipeline. When you press the brake pedal, the vacuum chamber is connected to the atmospheric chamber using a pusher, which has a so-called tracking valve. Next, the diaphragm is connected to the rod and brake fluid is pumped to the brake cylinders. If there is no force on the brake pedal, then under the influence of the return spring the diaphragm returns to its place, the pressure on the brake fluid weakens, which is why the brake pads move apart and braking stops.
In the simplest case, the vacuum brake booster takes vacuum from the intake manifold. To do this, it is connected to it by an appropriate pipeline. However, in many modern cars there are separate vacuum pumps for the vacuum pump. They come in two types. The first is mechanical, it is driven by the engine camshaft. The second is electric and is driven by a separate electric motor. The use of additional pumps not only increases the comfort of using the braking system, but also increases its reliability (for example, in the event of damage and/or depressurization). But still, the pump is only an auxiliary element, and the main vacuum is taken from the intake manifold.
Removing the vacuum booster 2106-07
Removing the VUT on a VAZ classic car is quite simple, and if you have minimal plumbing skills, this work is not difficult to complete. We remove the unit as follows:
- we turn off the engine, disconnect the main brake cylinder (GTC) from the “vacuum chamber”, the cylinder is held on by two nuts. There is no need to disconnect the brake pipes and hoses from the turbocharger; we simply move the cylinder to the side;
- we pull the hose off the check valve, while holding the valve so as not to pull it out and break it;
- in the cabin, remove the fixing bracket on the brake pedal and release the VUT pusher;
- then in the cabin we unscrew the four nuts that hold the “vacuum unit”, dismantle the unit - it is removed in the engine compartment.
Disassembling vacuum booster 2109
It is not difficult to disassemble VUT 2108-2109, but for disassembly it is necessary to fix the device. We disassemble the node in the following order:
- clamp the “vacuum sealer” in a vice;
- using a screwdriver on the body, we bend the grooves with which the two halves are held together;
- when almost all the rivets are straightened, it is necessary to hold the outer part of the body - a spring is installed inside the device, and it can shoot. If the old diaphragm is put back into place, there is no need to push the screwdriver far inward, as the rubber seal may be damaged;
- remove the rubber covers from the fastenings (2 pcs.);
- dismantle the plastic casing together with the diaphragm and pusher assembly;
Typically, the repair kit for the VAZ-2109 vacuum amplifier contains a diaphragm, a cuff, a boot, covers (2 pcs.) and a valve. All parts should be changed so that you don’t have to redo the work later. When assembling a vacuum amplifier, it is better to immediately fix the diaphragm on a plastic casing, this will make it easier to mount the unit.
Replacing the clutch cable on a VAZ 2109
Installing a new part is easy. There is only primitive mechanics here, based on the transfer of energy through a cable.
Reasons for replacement
The reason for repair may be clutch slipping or difficulty shifting gears. It often happens that the cable breaks due to a sudden load or jerk - this becomes the main source of problems.
Replacement
Performed in 2 ways. You will need a simple set of tools and 30 minutes of personal time.
Taking off the frill
A complex procedure involves many unnecessary steps, but if there is a question, there will be an answer.
- Drive the car into the inspection hole.
- Unscrew the cable from the pedal and remove it.
- Next, remove the frill and windshield wiper and open the hood.
- Then you should find the place where the cable is attached to the car. Unscrew it.
- Remove the old line and install a new one in its place.
Without removing the frill
You can replace the cable at home like this.
- Remove the adjusting part from the mount on the gearbox housing.
- Unscrew the cable guide and disconnect it from the clutch fork.
- The end of the cable is disconnected from the pedal by removing the cotter pin.
- Next, the entire line is pulled out of the car.
- Installing a new line is performed in the reverse order.
Repair of UAZ vacuum brake booster
Problems with the vacuum booster of UAZ vehicles can be identified by the following symptoms:
- the engine suffers, and since on UAZ engines the vacuum hose goes to the manifold of the first cylinder, if the VUT is faulty, this particular cylinder is not completed;
- a hissing is heard under the hood - the diaphragm is poisoning the air;
- the brake pedal is hard and does not press when starting the engine;
- There are wet leaks between the turbocharger and the amplifier (brake fluid is leaking).
If leaks of the brake fluid are detected in the area of the VUT, it is necessary to urgently change or repair the GTZ, but if the liquid has already entered the vacuum booster, most likely the VUT will also have to be repaired.
Another common malfunction in the brake system is failure of the check valve. This simple mechanism is very easy to check - you just need to blow into it. The valve should be blown freely in one direction (when rarefied air is supplied from the manifold), but air flows in the opposite direction with great difficulty. If the valve is faulty, it is blown freely in both directions.
How to inspect the serviceability of the vacuum brake booster on a VAZ-2109
Driving without a brake booster is at least dangerous, since the braking distance is structurally calculated taking into account the operation of this unit. If it malfunctions, this indicator significantly worsens, the driver loses control over the behavior of the car, which in many cases leads to traffic accidents.
Therefore, diagnosing and timely replacement of this unit is the responsibility of every conscientious driver.
Even while driving, there is a uniform method for checking functionality:
- If, when moving at any speed, the gas pedal is very tight, there is a clear problem with this particular unit. Failure can be caused either by a design defect in the unit itself (manufacturing defects) or by mechanical damage (failure of operating valves, breakage of one of the diaphragms);
- The deterioration of the braking properties of the car in this case, when the brake booster breaks down, the effect of the brake pedal is necessarily reinforced by a significant deterioration in the braking distance in relation to the working version.
Replacing VUT on UAZ vehicles
The amplifier is removed on cars produced by the Ulyanovsk Automobile Plant according to the same principle as on VAZ cars. Let's consider replacing VUT using the example of a UAZ-31519 car:
- first of all, we unscrew the two fastenings of the GTZ to the “vacuum”, usually the cylinder is secured with nuts 17, without disconnecting the brake pipes, we move it to the side;
- under the hood, in the area of the windshield, unscrew the 2 bolts of the VUT amplifier bracket, the standard bolts are 14 mm turnkey;
- in the cabin, at the connection of the rod with the brake pedal, pull out the cotter pin; for this you will need pliers;
- remove the connecting pin;
the two lower nuts of the amplifier bracket are located in the car interior, they are turnkey 17, unscrew this fastener;
- pull off the hose from the fitting of the device, dismantle the VUT;
- disconnect the bracket from the “vacuum” - to do this, unscrew the four nuts (they are 17 mm);
- the check valve is not included with the part, so we move it from the old VUT to the new one;
- We connect the bracket to the new amplifier, carry out the assembly - we install all the parts in their places.
How to remove the vacuum seal on a VAZ 2110
If self-diagnosis suggests a malfunction of the amplifier, then removing the vacuum seal on a VAZ 2110 is a matter of technique. To begin with, you should prepare a metalworking tool. It's good if there is a service kit. In his absence, you need to prepare the keys: three heads: 10 mm, 13 mm and 17 mm, a wrench with an extension, a pair of Phillips and slotted screwdrivers, and pliers.
Then, you can remove the vacuum seal on the VAZ 2110 in the following order:
- We disconnect the negative terminal from the battery (these are the rules of plumbing);
- We unscrew the upper screws that secure the soundproofing material to the engine shield;
- Disconnect the rubber band securing the expansion tank;
- Without disconnecting the connections of the coolant hoses, we move the tank to the side;
- Now it becomes possible to move back the sound insulation;
- Disconnect the terminal from the fluid level sensor on the brake cylinder cover;
- Holding the return valve, pull out the air supply hose from it;
- Next, you need to disconnect the vacuum seal and the brake cylinder. To do this, you need to unscrew the two outer fastening nuts;
- In order not to disconnect the brake pipes, smoothly moves the unscrewed cylinder away from the booster;
- Let's go to the salon. On the shield, along the perimeter of the brake pedal, we find four studs that are secured with nuts. We unscrew them;
- Then we disconnect the finger that connects the pedal and the amplifier pusher rod;
- After this, you can return to the engine compartment and remove the unscrewed unit.
With the amplifier removed, the pedal bracket will remain. It is secured with two nuts. It should be removed and reinstalled on a new vacuum unit for your VAZ 2110. Assembly occurs in the reverse order. After you managed to change the vacuum seal on a VAZ 2110, you do not need to bleed the brakes, because the brake pipes were not disconnected.
Features of repair of UAZ vacuum amplifiers
Unlike the vacuum amplifiers of VAZ cars, the VUT housing on UAZ cars is very durable, and it is not at all easy to halve it. You can bend the protrusions using a pry bar and a hammer, but this way the work is done in violation of the technology - according to the instructions, you need to rotate one half relative to the other. The biggest problem during disassembly is the “halving” of the body - sometimes these parts boil so much that it is impossible to disassemble the assembly. Car owners are advised not to press one body into another under any circumstances - then turning will definitely not work.
Another problem in repairing “vacuum units” is the low quality of spare parts in the repair kit; sometimes the installed parts are not enough for six months. Motorists advise not to do repairs, but to buy a new spare part, although there is another disadvantage - VUT for cars like UAZ-469 or UAZ-452 is not cheap, about 3 thousand rubles. As an option, you can pick up a “vacuum” from a foreign car at a car disassembly shop, whose mountings fit the main brake cylinder, and install it on the car by fitting it. The result is cheaper and more reliable - imported parts, even in used condition, last for several years without any complaints.
Adjusting the rod of the vacuum brake booster UAZ
Often, after replacing the VUT, problems appear, and the car no longer brakes as well as it did before with a working “vacuum system” - the brake pedal takes off at the very end, or the system does not fully release the brakes. The whole point here is the rod that presses on the GTZ piston - it may not be adjusted from the factory. This rod has an adjusting screw, which is secured with a locknut. On UAZ cars (we don’t take the “Patriot” model into account), we check the rod adjustment as follows:
- push the rod all the way back;
- take a metal ruler or feeler gauge to adjust the valves and lay it along the body;
- We measure the protrusion above the body with a caliper - the rod should extend approximately 7.8-8.0 mm;
- if this distance does not correspond to the norm, loosen the lock nut and use the adjusting screw to increase or decrease the length of the rod;
- Having established the desired size, fix the screw with a lock nut.
Even on the UAZ Hunter, the pedal can “take” at the very end, and it has a large free play. It is necessary to pay attention to the position of the pedal - if it is too low from the floor in the cabin, it needs to be adjusted:
- unscrew the brake light mounting nuts on the brake pedal;
- disconnect the wires from the brake light sensor;
- Use two 19 mm nuts to raise the pedal, press the brake to check the free play, and if the pedal is adjusted normally, tighten the nuts.