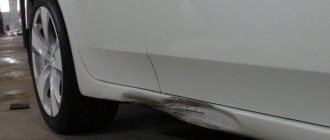
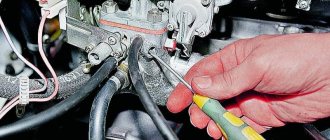
In this article I will tell you how to fix a dent on a bumper. Let's look at several ways to heat a bumper and the correct sequence for straightening a dent.
Pressing from the reverse side can be considered the easiest way to straighten a dent. However, for a plastic bumper, if you get to the back side or even remove it, it will be difficult to push out the dent due to the rigidity of the plastic. Extruding a dent on a plastic bumper is made easier by heating it. The rules given in this article will help you straighten a deformed bumper without causing additional damage. It is impossible to restore a bumper to new condition by simply pushing out the dent from the inside. Usually scratches and small creases remain, which require further puttying, priming and painting. However, if everything is done correctly, the bumper will look 90% better even without painting.
Preparing the bumper for repair
- Wash and dry the damaged part of the bumper before repairing.
- It is not always necessary to remove the entire bumper to fix a dent. You can remove the protection from below or loosen the fender liner to gain access to the back of the dent. Thus, it will be more convenient to press on the dent from the back side when the bumper is fixed.
- Again, if the bumper is removed, it becomes possible to heat the back side of the bumper. This makes heating more even.
Bumper heating
- To straighten a dent, you need to properly remove all the stress created by the deformation. This can be done by heating the plastic and applying the right amount of force. When heating a dent, you also need to heat 10–15 cm around it. By doing this, you relieve the tension in the area around the dent created by the impact.
- For heating, you can use available means such as a hair dryer or boiling water. Other means that help to more evenly heat the entire deformation zone at the same time are exposure to an infrared lamp (drying), as well as dipping the damaged part into a bath of hot water. We will consider all these means below.
- Consider the thickness of the plastic before applying heat to the dent. On some modern cars, the plastic is very thin and can easily overheat.
- If the plastic is not hot enough, the deformation will not ease and, when straightened, will return. On the other hand, if you overheat the plastic, it will become much more difficult to repair. It will stretch unnecessarily when pressed. When plastic is overheated and on the verge of melting, strength and elasticity deteriorate as it cools. Therefore, it is important to heat the bumper to the correct temperature and not overdo it.
- There are cases when stronger heating of the plastic is necessary in certain places. For example, to remove folds formed during deformation.
- When using a hair dryer, you need to heat the bumper until the surface is hot when touched. The ideal temperature for heating the bumper is between 160–200 degrees. When heating the bumper, you need to hold the hair dryer nozzle close to the surface to control the heat, but no closer than 10 cm. Move the hair dryer evenly at a moderate speed to properly warm up the plastic. Excessive heat may cause the paint to bubble. At this temperature, the plastic can change shape with moderate force. Don't forget that you need to heat not only the dent, but also the area around it. When using a hair dryer, use its highest setting. A hair dryer is best used on medium settings. If the dent is large, then you can use two hair dryers. It is better to have a second person help.
- When using hot water to straighten a dent, you need to boil a full kettle or pan of water. Hot water will make the plastic more flexible. Such heating will not last long, so you need to do everything very quickly. You need to get to the other side and press. We will look at dent correction in more detail below.
If a dent has formed on the ribs of the bumper, then after heating you need to press directly on the ribs.
- To straighten the dent, the bumper can be immersed in a bath of hot water (80–90 degrees Celsius) for several minutes. Part of the dent may return on its own, but the rest must be straightened by hand after removal from the bath. To remove any remaining deformation, you can apply local heat with a hairdryer set to the desired temperature.
- Infrared drying can be used to heat the damaged area. Drying can be considered a less accessible heating method, but effective. It is used in body repair and car painting. Drying softens a large area, and the dent becomes pliable and all stress is relieved. No matter how deep the dent is, it will heat up evenly and return easily without significant effort. In addition, if the plastic is well heated, there is less chance of small cracks appearing in the paint after straightening.
Torpedo restoration options
The most accessible ways to eliminate defects include:
- application of acrylic paint and varnish;
- use of matte enamel;
- applying a composition containing rubber;
- pasting with vinyl material;
- finishing with leather or leatherette.
When painting a car dashboard, preference is given to matte compounds. Glossy paint glitters in the sun, distracting the driver from driving the car.
Preparation for restoration work
Before starting work, you need to prepare the tools and materials that may be required to repair the torpedo.
Preparatory stage of work. These include:
- degreasing composition used to prepare the surface for painting;
- detergent to remove dirt;
- a set of screwdrivers with different attachments;
- several types of sandpaper;
- coloring composition;
- primer for plastic surfaces;
- varnish;
- abrasive paste for polishing varnish.
You also need to prepare the room in which the dashboard repair will be carried out. The box must be free of debris and dirt.
It is necessary to maintain a uniform temperature specified in the instructions for use of the paint product. To obtain good lighting, install additional lamps. This will allow you to detect and eliminate minor defects in time.
Torpedo dismantling
The torpedo is dismantled by performing the following steps:
- Determine the location of screws and other fasteners. If the bolt or retainer is not removed, the plastic may be damaged and the panel cannot be reinstalled.
- Remove the steering wheel and all controls. After this, disconnect the cables connected to the dashboard. The plastic cover is removed and put aside. Plugs and fasteners removed during dismantling are marked accordingly. After removing all the fasteners, the torpedo is removed from the passenger compartment through the passenger door.
It is recommended that novice craftsmen take photographs of the dismantling process. This will help you easily assemble the panel after painting. Particular attention is paid to branded fasteners. If damaged or lost, parts will have to be ordered.
Preparing the surface for painting
The torpedo preparation process includes the following steps:
- Cleaning the panel. Using a detergent, the surface is cleaned of dust and other contaminants. The panel is thoroughly dried.
- Elimination of defects. The dashboard often has small scratches that appear even after painting. Remove defects with fine-grained sandpaper or a grinding machine. In the latter case, be careful, because when the speed is set high, the panel will melt.
- Degreasing. After grinding, the surface is blown and wiped with a special compound. You should use products that do not damage the plastic, such as alcohol or soap suds.
Priming the torpedo
The application of paintwork begins with priming. This improves paint adhesion and smoothes the surface. To treat torpedoes, they use compounds supplied in cans. A standard bottle is enough to apply 2-3 layers of primer. The product is applied taking into account the recommendations presented in the instructions.
Spray the composition from a distance of 20-25 cm. A new layer of primer is applied only after the previous one has dried. After completion of the work, the surface is inspected for smudges. Defects are removed with a napkin.
Applying paint
To restore the instrument panel, paint cans are purchased. To treat the entire surface, 2 bottles of medium volume are enough. The paint is applied in 2-4 layers. The first time the paint is sprayed from a long distance, forming a thin coating. This allows you to detect defects left after sanding and priming.
Problem areas are cleaned with sandpaper. The second and subsequent layers are applied from a distance of 20-25 cm. The paint should lie evenly on the surface without spreading. The panel is left for several hours until the composition sets.
Final varnishing
If it is necessary to obtain a matte finish, this step is skipped. In other cases, the surface of the car interior panel is coated with varnish of the same brand as the coloring composition. Varnishing is performed in 2 stages. First, a thin layer is formed. The final coating should be thicker. The treated panel is inspected under bright lighting, identifying stains and smudges.
How to fix a dent on a bumper?
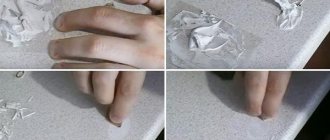
- When the desired temperature has been reached, you can begin squeezing out the dent. For large dents and small waves, a gloved hand works well. For sharper dents, creases, or to restore edges, a wooden block can be used. If you can’t get your hand through, use a long block with a rag wrapped around it.
- The plastic cools down quite quickly, so you need to maintain the temperature to keep it pliable.
- When straightening a dent, it is best to start from the outer part of the dent and work towards the deepest part. The deformation stress is concentrated at the edges. Relieving the tension will allow the deepest part of the dent to straighten out easily. If the area with stiffening ribs is deformed, then you need to press directly on these ribs.
Sometimes a shallow dent in a bumper can be straightened out by applying heat and then applying pressure to the raised areas formed along the edges of the dent. This way, you don't even need to push out the dent from the back side.
- Straightening out a dent sometimes requires direct, steady pressure. In other cases, smoothing may be required. There is no need to be afraid to press with force, but if the plastic does not give in, then you need to heat this area some more.
- Some dents are easier to fix than others. Sometimes several editing steps are required.
- You can use a hairdryer to spot heat the remaining creases or holes.
- Once you have straightened the dent to the desired shape, holding it from the back side, fix the result with a wet rag. It will cool the bumper and the shape will remain unchanged. The rag should be applied around the dent.
- After straightening the dent, the bumper can be put back in place and the remaining defects can be polished, or a brush can be used to touch up scratches. Deeper scratches and uneven surfaces require puttying, priming and painting.
Painting of domestic models
Painting of panels of domestic cars is carried out according to the same algorithm. The part is cleaned of dirt, dust, degreased, and carefully processed with sandpaper. Prime the surface, let the primer dry, and then paint it in several layers. Be sure to varnish the panel so that the quality of the finished paintwork is the highest. After complete drying, put the part in its original place.