It is recommended to adjust the valves on the VAZ 2106, as well as on other classic Lada models, every 10 thousand kilometers.
Failure to follow these recommendations can lead to disastrous consequences, in particular, increased fuel consumption, decreased engine power and many other troubles.
But the last link in diagnosing that it is time to adjust the valves is their knocking while the engine is idling.
This sound is very specific and it is impossible to confuse it with some other sound.
Each driver decides for himself where to adjust the valves of his six, at a service station or in the garage on his own.
Let's assume that you yourself decided to carry out this work, especially since if you are reading this article, then most likely this is all true.
Specifics of the work
There is a category of drivers who strive to do all the maintenance and repair work on their car themselves.
This is especially true for owners of domestic cars, and this is commendable.
But such drivers need to realize that a number of works, especially those related to adjustments, require not only theoretical knowledge and experience, but also a kind of “feeling” that comes with time, through trial and error.
Especially such work includes all adjustments carried out on the carburetor, as well as valve adjustment and a number of other adjustments.
Therefore, if you are doing this for the first time, then call a person who has done such work on his car at least 3-5 times, and preferably on the same model as yours.
Also, before carrying out work, check the timing belt tension. It is important.
IMPORTANT: The engine should only be cold, but not lower than 30 - 400C, this is the ideal temperature.
If you have just arrived at the garage and want to adjust the valves on the same day, then it will take about 5-6 hours for the engine to cool down.
You can immediately begin removing the valve covers and other parts; this will reduce the engine cooling time to 1-2 hours, as the heat exchange between the hot engine and the environment will increase.
It’s better to proceed from the principle: arrive in the evening, carry out the work in the morning.
By the way, don’t forget about the gasket under the valve covers; in 90% of cases it has to be replaced, so you should have a new gasket on hand.
Counting cylinders and valves.
The valves are counted as follows. Stand to the left of the car in the direction it is moving, near the engine. Face the engine.
Cylinders and valves are counted from left to right of the timing chain.
The last will be the 4th cylinder and 7.8 valves, but the adjustment begins with valves No. 6 and 8.
Preparatory activities
In order to adjust the valves on a VAZ 2106, you don’t need many tools; the list is given below.
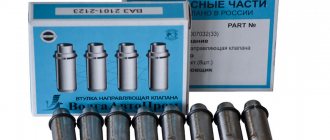
- A wide feeler gauge for measuring a gap of 0.15 mm (a narrow one will not work, there are special ones from VAZ);
- A special key for cranking the engine shaft (you can do without it);
- 10mm socket wrench for removing valve covers;
- Wide flat screwdriver;
- Open-end wrenches for 13 and 17;
- Standard set of tools.
Type of probe for adjusting VAZ valves.
Why do you need valve adjustment?
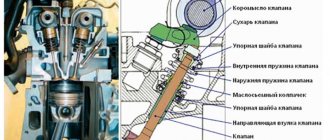
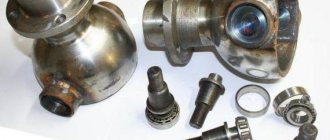
If you carefully examine the valve system of the “six”, its design can be roughly compared to a rocker arm diagram. Rotating, the camshaft presses its cam on one side of the rocker arm, lifts it, while the second edge, located on the top of the valve, lowers the rocker arm, thereby opening paths for injection of the fuel mixture or for removing gases.
It is necessary to provide a certain gap between the parts in question. The valve opens to an extent that ensures the correct functioning of the motor.
Helpful advice If the gap is too small, the valves do not close completely, which causes a decrease in engine power, leads to excessive fuel consumption and failure of the valves themselves. In addition, due to the discrepancy between the clearances and the standard indicators, engine noise increases, the rods are deformed, and accordingly, the under-closing gap of the valve itself increases even more.
Fuel burning in the engine leads to heating of all its parts, including the gas distribution mechanism. Due to heating, the valve clearances discussed above also decrease. According to the developers, the temperature gap indicator for the VAZ 2106 engine should have a value of 0.15 mm.
In the initial unheated state, the gaps between the parts in the gas distribution mechanism are increased to the maximum, therefore, when starting the engine and for several subsequent seconds, noise is heard from the impacts of the rocker arms and rods. As the engine warms up, the noise decreases.
Freeing up work space
You need to understand that you won’t immediately remove the valve cover, you need to get to it.
Using a size 8 wrench, unscrew the three bolts and remove the air filter cover, and then remove the filter element.
Disconnect all the hoses that go to the air filter.
Using a size 8 wrench, unscrew the four bolts securing the air filter housing to the carburetor and finally remove the air filter.
Go ahead.
Using the same key number 8, disconnect the choke cable.
Disconnect the washer spring, and then the gas pedal linkage itself.
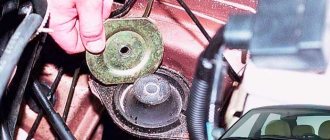
Then we remove the distributor cover and move the high-voltage wire harnesses to the side so that it is convenient to work.
We take out the oil dipstick, while inserting a clean rag into the hole to prevent dirt from getting in.
Now we can freely make the adjustments we need.
Also read - Do-it-yourself valve lapping, videos, photos, devices and tools used.
Preparatory work
So, the engine is cooled down, and the car itself is placed on a flat surface and immobilized. You can start working:
- Remove the carburetor air filter cover and remove the filter;
- We unscrew the filter mounting bolts and remove it, having first disconnected the pipes going to it;
- We remove the cable for manual control of the air damper (choke) and disconnect the throttle linkage;
- Unscrew the bolts securing the valve cover and dismantle it;
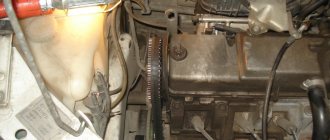
- Check the chain tension (it must be normal, otherwise you will have to adjust the tension first);
- Remove the distributor cap.
Now you need to set the TDC of the piston in the 4th cylinder and the marks on the knees will help with this. camshaft drive shaft and cover. shaft, as well as on the camshaft gear and its cover.
To do this, you can use a key of appropriate size, which you need to rotate the knees. shaft for the drive pulley bolt. Or use one of the drive wheels. To do this, you need to hang it with a jack, engage 4th gear and slowly turn the raised wheel. In this case, the transmission will ensure rotation of the crankshaft. But with the second method, you will need an assistant, since it will be difficult to check the coincidence of the marks.
We recommend: How to change the cabin filter on a Chevrolet Niva?
Set the piston of the 4th cylinder to the TDC position
This action is mandatory and to perform it you will have to turn the engine crankshaft.
If you do not have a special key,
You can use a 36mm head, or by hanging the rear wheel and engaging 4th gear, turn it in the desired direction.
Achieve:
The long mark on the front cover and the mark on the crankshaft pulley matched.
The mark on the camshaft driven sprocket must coincide with the protrusion on the bearing housing bed.
If this requirement is not met, then the marks on the crankshaft pulley are taken as a basis, and the marks of the gas distribution mechanism will have to be adjusted.
How to do this is a separate topic of “conversation”, but we will definitely touch on it in the following articles.
If all the marks are set correctly, we proceed to adjusting the valves of the VAZ 2106.
Do-it-yourself adjustment of VAZ 2106 valves - step-by-step instructions
Step 1: Prepare your tool
This includes:
- open-end wrenches for 17 and 13;
- 0.15 mm feeler gauge (can be replaced with a micrometer);
- flat screwdriver;
- socket set and ratchet.
Step 2. Make sure that all the necessary conditions are met:
- the engine temperature is as close as possible to the temperature in the garage (outside);
- The timing belt has normal tension.
Step 3: Remove the valve cover
- Unscrew the fastening nuts (3 pcs.) of the air filter cover and remove it.
- Remove the filter itself.
- Having loosened the 4 fastening nuts, disconnected the breather hose, the choke cable and the carburetor damper drive rod, remove the remaining part of the air filter housing.
- Unscrew the mounting nuts (8 pcs.) of the valve cover - here you will need a 10mm socket and a ratchet - and remove it.
Step 4. Align the crankshaft and camshaft pulley to the marks
Essentially, if the timing chain tension was correct, the marks will align on their own - without adjustment. However, to be on the safe side, it is still better to double-check whether the crankshaft pulley mark and the longest mark on the carburetor front cover match, as well as the camshaft sprocket mark and the protrusion on the cover.
The procedure for adjusting the valves of the VAZ 2106
Step 5: Adjust valves #6 and #8
If the marks are correctly set, the piston of the 4th cylinder of the engine is at TDC (top dead center), which means it’s time to adjust valves No. 6 and No. 8. The valve number is counted from the front of the engine, that is, to your left.
So, take a dipstick and insert it between the camshaft and the rocker. This procedure should be carried out with noticeable difficulty. If this is not the case: the dipstick goes in very easily or, conversely, does not insert at all - by acting on the adjusting bolt and control nut, the valves must be adjusted.
- Using a 17-mm open-end wrench, loosen the locknut clamp.
- Without releasing the latter, use a 13mm wrench to rotate the upper adjusting nut until the optimal clearance is obtained.
- Tighten the locknut to its original position.
- Take control measurements with a probe.
- If necessary, repeat all the above steps.
Step 6
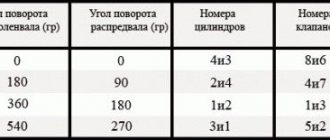
Turn the crankshaft 180 degrees and adjust valves No. 4 and No. 7 in the same way as step 5.
Step 7
Adjust valves No. 1 and No. 3, after first rotating the crankshaft 180 degrees (360 degrees from the initial position).
Step 8
Again, rotate the crankshaft 180 degrees (540 degrees from the original position) and adjust valves No. 2 and No. 5. The actions are the same.
Step 9
Complete the work on adjusting the valves on the VAZ 2106 by assembling all the removed parts in the reverse order.
Removing the valve covers
To remove the valve cover of a VAZ 2106, a 10mm socket wrench is used; as a rule, this action does not cause problems for anyone.
After the valve cover is removed, check the condition of the gasket; if there are defects on the surface, it is advisable to replace it immediately.
The marks are set, the cover is removed, we proceed directly to adjusting the valves.
Engines
How to adjust valves on a VAZ 2106? To answer this question, you first need to figure out what power units were installed on this model. Most often you can find 3 options for motors:
- VAZ-21011;
- VAZ-2103;
- VAZ-2106.
Technically they were almost identical. The difference between them is volume. This was achieved by the difference in the diameter of the piston and the magnitude of its stroke. All other structural elements were no different. The OHC gas distribution system was used. The need to regularly adjust the valves arises due to the nature of the transmission of force from the camshaft. With constant rocker operation, the valve stem moving parts wear out and need to be adjusted periodically. This procedure is the same on all three engines.
Work order
We have the fourth cylinder at TDC, we adjust the thermal clearances in the 6th and 8th exhaust valves. The 6th valve belongs to the 3rd cylinder.
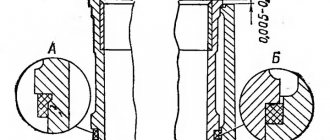
Now a wide probe up to 0.15 mm comes into play. It must be inserted as shown in the photo.
The penetration force of the probe is not unimportant. Many people make a mistake here, which leads to incorrect results.
The dipstick should fit between the camshaft and the rocker with a certain force, which indicates correct valve adjustment.
This is the difference between an experienced master who feels the right effort, and a beginner who can make a mistake.
If the probe passes freely or does not pass at all, then it needs to be corrected to the standard of 0.15 mm.
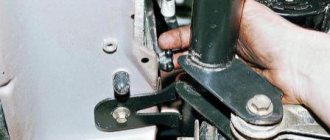
To do this, use a 17 wrench to loosen the nut, as shown in the photo below.
Using an open-end wrench 13, depending on the situation, by rotating it in the desired direction, the correct gap is set.
The lock nut fixes the set adjustment value, but then a control check is made, since when the lock nut is tightened, the gap may be lost.
After making sure that everything is fine, we move on to the 6th valve. All actions are repeated.
When the clearances of valves No. 6 and 8 are adjusted, we proceed to adjusting the clearances of valves No. 4 and 7, No. 1 and 3, No. 5 and 2.
To obtain the correct result, it is necessary to rotate the crankshaft a certain degree, see the figure below.
Since the distributor cover has been removed, you may notice that its slider turns. This point can also be used to properly adjust the valves.
After turning the slider every 90 degrees, the next pair of valves is adjusted.
For convenience, you can make marks on the body every ? runner revolutions.
After adjusting valves 5 and 2, we can consider that the work is completed; all that remains is to return everything to its normal places and check the operation of the engine.
Start the car, see how the engine works at idle, then you need to drive a couple of kilometers and compare the engine response with what it was before the work.
Also read why valves bend on VAZ engines.