Why does the fuel level sensor show incorrectly or the fuel level does not work?
Let's start with the fact that many people mistakenly believe that if the fuel level sensor does not work, this does not affect the overall functionality of the engine and its systems.
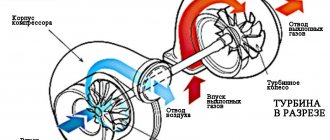
In fact, in such a case, there is not only a great risk of being left without fuel at the most inopportune moment (for example, far from a gas station on the highway), but also of causing certain vehicle devices to fail. More precisely, we are talking about the fuel pump. In a nutshell, the fuel pump in the power supply system of injection engines is submersible, constantly in the fuel, and is cooled by the fuel.
It is for this reason that a normally working fuel level sensor indicates that there is no fuel and refueling is needed. When the level is reduced to the limit, the warning lamp lights up. At the same time, at least 3-5 liters of fuel still remain in the tank itself, which allows you to partially cool the pump, avoid debris and dirt from getting into the fuel supply system from the bottom of the tank, and also drive a few more kilometers if necessary.
If the sensor shows incorrectly or does not work, the driver often has to drive with the level light on, there is always too little fuel in the tank, the pump overheats (especially in hot weather) and quickly fails. Also, dirt from the bottom of the tank can prematurely clog the fuel pump filter (mesh filter), as well as the fuel filter itself, etc.
In other words, if the fuel sensor in the car does not work, this can cause not only inconvenience, but also a number of other troubles. In order not to have to clean the fuel system, as well as to increase the service life of the fuel pump or avoid replacing it, it is recommended to troubleshoot the FLS as soon as possible.
Rheostat fuel level sensor
The operating principle of such a sensor is based on bimetallic strips, which move the indicator needle on the instrument panel. The position of the strip depends on the resistance created in the sensor circuit.
A float with a special lever is installed in the car’s gas tank. As the fuel in the tank increases, the resistance decreases, which means the current increases, which heats the strip and it moves the indicator needle.
When the fuel level decreases, the float lowers and uses a lever to reduce the voltage in the circuit. Thus, the current decreases, and the bimetallic strip moves the indicator needle to a different position, corresponding to the fuel level in the tank.
To put it simply, if the circuit breaks, the sensor stops working, and will always indicate that the tank is empty, and if there is a short circuit in the rheostat circuit, it will indicate that the tank is completely filled with gasoline.
There are a number of sensors in which the resistance changes quite the opposite. Accordingly, the readings will be different.
Fuel sensor with magnet
Such a sensor, instead of a bimetallic strip, uses a magnet that is placed in a magnetic field. This field is created using three induction coils to which voltage is applied.
The principle of operation is that part of the voltage is supplied to all three coils and only the remaining part goes to the first turn. This part will change depending on the position of the magnet in the magnetic field, which changes the resistance of the circuit.
The advantage of such a sensor is that its readings are more accurate and respond faster to changes in fuel level.
Electronic fuel level sensor
This type of sensor is significantly different from its analogues and is a modern device that shows a more accurate amount of fuel in the car’s tank.
To indicate the fuel level, a digital display is used, which operates based on data on the resistance of the same circuit. A special voltage regulator receives information about the resistance and decides which part of the display needs to be turned on to display information about the status of the fuel level.
Lever type sensor
A lever level sensor consists of a potentiometer, a float and a lever connecting them. In turn, the potentiometer consists of two sectors, one of which has plates of resistive material and a slider in contact with the sector and also connected to the lever. Its second end is connected to the float.
This design works quite simply: a float, made in the form of a hollow, sealed element (made of metal or plastic), is always located on the surface of the fuel. As gasoline is consumed, it lowers, while using a lever it moves the potentiometer slider. It is in contact with the sectors to which the wires leading to the fuel indicator are connected. By changing the number of plates that are connected to the electrical circuit of the potentiometer, the resistance also changes.
That is, when the tank is full, the slider is in its extreme position, so the electric current passes along the shortest path in the potentiometer, on the plate sector through the outermost plate. Because of this, the resistance is the lowest (about 7 Ohms). As gasoline is consumed, the slider moves and connects more and more resistive plates into the circuit, which increases the resistance (with half a tank, this parameter is 120-130 Ohms). When the tank is empty, the entire plate sector is already involved, providing maximum resistance in the circuit (320-340 Ohms). Note that the resistance parameters are indicated approximately, since different models of fuel level sensor have their own specific parameters.
The positive qualities of the lever type sensor include a very simple design, which ensures reliability, as well as low cost. But it also has disadvantages - the contact pairs wear out over time, and this FLS also has an error in the readings, especially for cars with analog fuel indicators.
It is used everywhere both on domestic cars (VAZ of all models, GAZ, KamAZ), and on foreign ones - Toyota, Volkswagen, etc.
Tube type sensor
The tube type sensor is slightly different in design. It does not have a potentiometer as such in its design, but the principle of its operation is involved.
It consists of a protective tube, inside of which there is a guide post with a float moving along it, as well as a looped resistance wire connected to the wires going to the indicator. Inside the float there are slip rings that are in constant contact with the wire, providing another ring of resistance wire through which the electric current flows.
This type of sensor works like this: through the hole at the bottom, fuel enters the protective tube, on the surface of which a float floats. Due to the movement of the float depending on the amount of fuel, the resistance changes.
That is, when the tank is full, the float is at the top of the protective tube. In this case, the electric current moves along a short path, since only a small section of the resistance wire is involved. As fuel is consumed, the float lowers and the length of the wire increases, which ensures an increase in resistance in the circuit.
Troubleshooting
There are times when the sensor indicates that the tank is always empty or completely full. Moreover, the readings do not change, even if the fuel level is changed.
Main reasons:
- The sensor is faulty and needs to be replaced.
- There is a poor contact connection with the body.
- A faulty voltage regulator is supplying incorrect power to the sensor.
- The fuel gauge is faulty.
- There are problems associated with the wiring of the sensor circuit, most often a break.
Before drawing conclusions about a malfunction of the voltage regulator, it is necessary to measure the output voltage at the contacts of the device. To do this, you will need to remove the dashboard and connect a voltmeter to the contact terminals.
To test devices, the sequence does not matter. Most often, they begin to look for the problem in devices that are located in the most accessible place.
How to make a sensor with your own hands?
A homemade capacitive controller is made from two modules connected to each other using three wires:
- The first module, made in the form of a metal plate, is connected to the capacitive regulator unit.
- The second module must be connected to the display unit.
- Power is supplied to the device unit via two power lines. The third conductor sends a signal to the block, which is converted into an indicator of the fuel volume.
Before making the sensor, the following nuances must be taken into account:
- The working surface of the two electrodes must be insulated from contact.
- The space between the electrodes must be completely filled with fuel if the controller is immersed in liquid.
- The sensor must be installed at an angle in the gas tank.
- A homemade device should not have moving components or parts.
- The regulator should be powered by no more than 5 Watts. If the voltage is higher, the fuel may ignite due to a spark.
- The measuring circuit should be placed as close to the controller as possible. The cables for its connection should be no longer than 2 cm.
The most basic reasons for incorrect fuel level display on the VAZ-2112 instrument panel
It happens that the fuel level sensor fails, but there can be many reasons why the fuel level needle is lying, and in this article we will look at the most basic of them.
Fuel level surges
When the fuel level readings “jump”, showing one value or another, the malfunction may lie in the “abrasion” of the circuit board tracks on the fuel level sensor (located on the fuel pump in the gas tank - approx.). They are most often erased due to the impact of the slider on them. This problem can be solved by bending its base to the track, but if they are worn out too much, you will have to replace them together with the float.
Some of the tracks on the board have been erased.
Please note that if you are going to replace the FLS (fuel level sensor - approx.), be sure to look at its markings. Since there are many analogues for the VAZ-2112 sold, and the resistance values for them are all different. And if the sensor differs from the previous one, the problem will not disappear, since the readings will also be incorrect.
How to check the operation of the sensor
There are many ways to check the performance of the fuel level sensor. One of them is checking the circuit resistance. To do this, connect an ohmmeter to the disconnected contacts and pay attention to the readings. If they deviate from the norm, then you have found the cause of the problem. After this, the fuel level sensor is replaced.
To check the fuel in the tank and assess compliance with the sensor readings, you can use many available tools. Insert a clean dipstick into the tank and check that the tank is full. It is not necessary to have exact readings; in this case, approximate ones will do just fine.
Another way to check is to completely drain the gasoline from the tank and gradually top it up. After each topping up, the resistance value of the sensor is monitored and must be changed.
A similar option is used when removing the sensor from the tank. In this case, you need to change the position of the float lever by hand. Thus, the verification becomes much more accurate.
Non-electrical reasons for sensor malfunction:
- A hole appeared in the float, which caused it to not be properly immersed in gasoline.
- Deformation of the fuel tank, as a result of which it interferes with the normal movement of the float.
- Defects in the float lever. These could be its breaks and kinks.
If the sensor is in perfect order, then the problem must be looked for in the fuel gauge or electrical wiring. To check the wires you need to measure their resistance or simply “ring”.
Non-electrical causes of problems
It is also important to know that the fuel level can be measured incorrectly not only due to wear of the magnetic and current-carrying parts of the device. Here's what can also affect the sensor's performance:
- The float lever in the lever-type sensor has broken off or bent;
- There is a hole in the float that causes it to not sink properly into the fuel;
- The fuel tank is deformed, which prevents the float from moving.
Having checked the sensor itself and the wiring and found no faults in them, you need to check the fuel tank. This is a very rare defect, but it still occurs. If both the sensor and the gas tank are in order, the reason for the incorrect determination of the fuel level is sought in the level indicator and in the wiring, which will need to be “ringed”.
How is the fuel level gauge checked?
The fuel level gauge can also be checked using several methods. To diagnose its condition, you can remove the sensor from the gas tank and turn on the car’s ignition. Move the float lever in different directions. If the device readings have not changed, it means that it really does not work.
Another way to check is to use a special calibration tester. It is connected instead of the fuel level sensor and changes the resistance of the circuit. If the arrow of the device does not respond, then the pointer needs to be replaced.
If you use a magnetic sensor, you can check the circuit resistance using an ohmmeter. As a rule, the norm for such indicators is considered to be a resistance of 10-15 ohms.
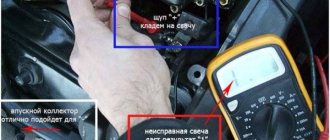
Checking the fuel level sensor with a multimeter
After a visual inspection, a check with a multimeter may also be necessary. In other words, to understand why the fuel sensor is not working, the specified sensor is also checked in ohmmeter mode.
The fact is that the resistor can change resistance over time, which leads to incorrect sensor readings. Resistance should be checked with the tank empty, 50% full and full. If it is determined that the resistance is not normal, it is better to immediately install a new sensor.
We also add that if, after installing a new FLS, the sensor does not accurately determine the fuel level in the tank, this is often due to the fact that the resistance deviates from the nominal one. In fact, we can say that the wrong sensor is installed.
As a rule, when choosing, it is important to consider that although fuel level sensors are visually similar, they usually have different resistance values. In fact, this is precisely what leads to errors. For this reason, you need to purchase a sensor that has the required resistance.
Fuel level sensor float and other problems
In cases where the fuel level indicator does not work, in some cases it is directly related to the float. Floats can be of two types:
- hollow float made of plastic or thin metal;
- the so-called “foam” float, which is made of a porous base;
In the first case, the float may gradually wear out and become damaged; the fuel level indicator needle gradually fails to reach the maximum when filling a full tank.
Fuel can get inside the hollow float, causing the level sensor to show incorrect data. To fix the problem and carry out repairs, it is necessary to replace the float of the fuel level sensor in the tank.
You also need to understand that if the fuel sensor is lying, you should not exclude the possibility of mechanical damage to the gas tank itself. If the tank is damaged, then the float may simply jam.
As a rule, in this case the pointer works accurately, but the range is very limited. The fuel level arrow may also be “stuck” in only one position. In fact, the problem is not the most harmless and often requires a complete replacement of the gas tank to solve it.
By the way, often when buying a used car, you can hear from the seller that the fuel pump screen was recently cleaned or the fuel pump was replaced, after which the fuel level sensor, etc., stopped working.
At the same time, the seller claims that there is simply no time to fix such a minor breakdown. In fact, if the fuel level sensor in a car does not work, this can be caused either by a failure of the sensor itself or the float, or by deformation of the gas tank. Naturally, changing the tank is quite expensive.
We also note that if the FLS does not indicate the fuel level correctly, the bending of the lever may also be the cause. In this case, the pointer arrow is not able to reach the extreme marks.
The lever can be corrected, but it is important to understand that the problem itself occurs as a result of one or another mechanical effect on the tank. Also, after editing, the float may still jam. Again, in such a situation, it may be that the tank itself needs to be repaired or replaced.
The list of possible problems with the FLS is completed by the fuel level indicator. To understand why the fuel sensor does not work, you need to consider that the problem may be not only in the sensor, but also in the indicator.
In this case, the incorrect fuel level is displayed due to the fact that the movable winding of the indicator is jammed. In turn, this leads to the fact that it is not possible to move freely, and the data on the indicator itself will be inaccurate.
What to do
First you need to carry out diagnostics, that is, find out which part is damaged - the sensor, wiring or the indicator itself. For this, a regular multimeter is used, but you can replace it with a test lamp.
First you need to gain access to the fuel section and the fuel level sensor itself. To do this, with the car running, you need to remove the connector in the service hatch under the rear sofa of the car. Then, using the electrical supply diagram, you need to determine which wire goes from the sensor to the fuel indicator. One connector of the multimeter must be connected to the ground of the car, the other to the positive terminal of the wire coming out of the hole. The multimeter should show the on-board voltage (12 V). If you close the positive terminal to vehicle ground, the indicator arrow should show a full tank. If this does not happen, the wiring or the indicator itself is to blame. If the needle shoots up to the extreme position, the problem is in the fuel sensor.
Modern fuel sensors are best replaced as an assembly. Their price is not so high as to make repairs that do little to help the business. However, in some cases, you can try to clean the sensor from dirt and try to adjust the slider. To do this, you will have to remove the sensor (you must first drain the fuel, turn off the car and remove the negative terminal from the battery). After removing the sensor, you need to inspect the working surface of the sectors for wear. If the width of the wear line is small, you can adjust the slider so that it moves along the undamaged surface of the sectors.
We recommend: Replacing valve guides yourself
If incorrect readings of the fuel level indicator are not associated with the fuel sensor, then you will have to remove the indicator from the dashboard. Wiring problems can also be diagnosed using a multimeter. The malfunction of the device itself is determined manually after removing the device - if the arrow is jammed, you can try to clean it and adjust it.
Fuel level sensor device
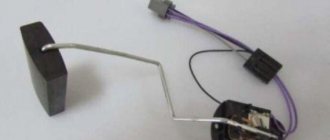
The most common fuel level sensor, potentiometric, has many advantages that have led to its widespread use. First of all, it is a simple device, low cost and high measurement reliability. Among the main disadvantages, one should note the rather rapid wear and oxidation of contact tracks under the influence of friction and fuel in the tank. Fuel level sensors of this type, according to the type of design, are divided into:
Regardless of the design, the main element of the device is a float made of lightweight material such as foam or plastic (thin-walled metal floats are also available) floating on the surface of the fuel. In a lever-type FLS (for example, on VAZ-2110 or VAZ-2107 cars), the float and the moving contact of the potentiometer are connected via a thin metal lever.
The potentiometer itself is a resistor with metal strips applied to its surface, which has a movable contact, the operating principle of which is to create variable resistance to the electric current passing through it. This sensor is completely universal; it can be installed in absolutely any fuel tank. Its main disadvantage is that it is sensitive to how the fuel sloshes around in the tank, which is why it shows the remaining amount incorrectly during ascents and descents.
A tubular type FLS is a cylinder with a float moving inside. The float has slip rings that are connected to resistance contacts located along the walls of the cylinder. The principle of its operation is the same as that of a lever sensor. The main advantage of this type of fuel level sensor over the one described above is that it is less susceptible to fluctuations in the fuel level in the tank associated with vehicle driving conditions (uphills, downhills, rolls), i.e. it shows the remaining amount more accurately. However, due to its geometric dimensions, such a device cannot be installed in every fuel tank.
How to properly connect a car fuel level sensor with a ground switch
If the car is equipped with a mass switch, two options for connecting the fuel level sensor can be used:
- connection behind the mains switch. It should be noted that in this case, when the mass is turned off, the sensor will be de-energized. The indicator will display the latest fuel level data that was recorded during vehicle operation. Once the sensor is turned on, this data may change. The reasons are daily temperature fluctuations, deformation of the fuel tank or fuel drainage while the car is parked. At the same time, it is impossible to establish the time of drainage (and, accordingly, to directly prove its fact). If you are using an inexpensive fuel level sensor, this type of connection diagram is quite suitable. In this case, there is no need to use galvanic isolation. It is also recommended if the car battery is often removed or missing;
- connection directly to the battery. It is recommended to use modern electronic sensors with integrated galvanic isolation. It protects equipment from exposure to electric current in an emergency. If there is no built-in galvanic isolation, you need to install it additionally. Connecting a fuel level sensor using this scheme is considered optimal in functional and practical terms. In addition, it is recognized as safe, since the device consumes current in the range of 10–48 milliamps. The sensor body is made of non-conductive material, which protects electrical circuits from current breakdown.
Adjusting the fuel sensor (FLS) - removing the fuel pump
- Raise the rear sofa.
- We remove the fuel pump and clean everything from dirt. (More information about removing the fuel pump here).
- Next, we connect the control wires to the fuel pump and begin to move the float from side to side. While watching the arrow on the instrument panel. During rotation, its readings should also change from full to empty tank.
If in any position the arrow indicates incorrect values, then it is necessary to bend the adjusting tongues on this side so that the float rod can move to the right or left freely, depending on its location.
Instructions for replacing and connecting the regulator yourself
To replace it, you need to prepare a set of keys, a new FLS, and know how to remove the fuel level sensor. In order to find out how to connect the FLS, you need to understand the connection diagram.
Fuel level sensor connection diagram
The replacement procedure consists of the following steps:
- Drain the fuel from the tank.
- Next, you need to determine how best to get to the regulator: through the back seat or through the luggage compartment.
- Remove the protective plastic cover from the fuel tank, under which the FLS is located.
- Disconnect the plug with wires from the regulator.
- We unscrew and remove all the tubes by loosening the clamps using a Phillips screwdriver.
- We take out the old FLS and install a new one.
- We make the connection according to the diagram.
- Assembly is carried out in reverse order.
After replacement, you need to fill the tank with fuel and check the operation of the FLS. The indicator should have a value corresponding to the volume of fuel filled.
If the fuel level sensor is faulty, then knowing how to fix it, you can save time and money on visiting a service station.
Site about off-road vehicles, SUVs, off-road vehicles
The fuel level indicator 131.3806 is checked for correct readings of the fuel level in the tank by filling the fuel tank with fuel from a measuring container. If the fuel level indicator 131.3806 and the fuel level sensor 6202.3827 are in working order and correctly adjusted, then at a voltage of 12.5 Volts and a temperature of 20+-5 degrees, the accuracy of the readings at points of the indicator scale and 0.25 is approximately 5%, at the point 0.5 - approximately 7%, and at point P - approximately 9%.
Setting the sender
Once you receive your new fuel gauge kit, you should follow the instructions that apply to your new unit. In general, the installation will involve the following steps. Note that senders are typically not connected devices. The length of the sender arm can be adjusted to suit the dimensions of your fuel tank. This also ensures that the sensor is reading correctly.
First, measure the depth of the fuel tank from the top of the tank, near the sending unit, to the base. This measurement determines the length of the sending unit's float arm. Then cut the transmitter arm and match it to the depth of the tank. A pair of wire cutters usually does the trick, but some require a hacksaw. Once you have cut the float arm to the correct length, secure it with set screws to the flange of the new sender that will be screwed into the top of the tank.
The sending wire comes from the post in the center of the flange. There may also be a ground wire that comes from the second pin at the edge of the flange. Both wires lead to the rear of the fuel gauge. Turn off power to vehicle systems before disconnecting wires. Then disconnect the positive and ground wires from the old sending device. Note that if the sensor is grounded directly to the tab on the tank, there may be a missing ground wire. Remove the screws that hold the sending unit into the tank and remove it.
Next, remove the three wires on the back of the old sensor. One wire goes to the center pin on the tank sending unit, one goes to ground, and the third connects to the 12V source, usually the ignition switch. Remove the fuel level indicator.
Install the new sender by lowering the float into the tank. Be sure to insert a new gasket under the flange, then align the gasket with the holes in the sender and in the tank. Once the gasket is aligned, mark it against the flange as it may rotate while you center the screw holes to match the tank holes. Mark the screw holes in the tank for easy alignment; the flange will cover them and make them difficult to find. Make sure the float arm can move freely and will not stick to the corner of the tank or vertical wall.
Orient the sender block so that the movement of the float is not obstructed. You can test this in advance by holding the sender close to the tank before installing it to see how the float can move freely. Once you know the correct orientation, duplicate it when you place the device in the tank. To minimize confusion, use a marker to show the direction the float arm will move when the screw holes are aligned. Insert new screws and tighten them.
Removing the fuel pump
For many cars, including the VAZ 2110, changing the fuel level meter does not cause any particular difficulties. Every driver, not to mention high-quality drivers, is capable of doing it with his own hands. For clarity, you can look at the video material. It is allowed to disassemble the sensor only after removing the fuel pump in advance. It is preferable that there is not a very large amount of fuel in the tank, no more than 50% percent.
So:
- With the trunk floor covering folded back, use a screwdriver to remove the dark square cover.
- Then unhook the negative terminal of the battery and mark which gas line pipe goes to the supply and which goes to the fuel return. The direction of the fuel jet on the nozzles is demonstrated by arrows.
- Using a 17 key, loosen the fitting and remove the fuel supply pipe; we do the same with the 2nd pipe.
- Using a 7mm socket, unscrew the nuts that secure the pressure ring. As a rule, they are tightly tightened: you can loosen the grip by carefully hitting the handle of a flat-head screwdriver mounted on the edge of the nut with a hammer.
- Having released the pressure ring, lift the assembly, remove the meter float from the gas tank hole and remove the pump. At this stage, the replacement of the fuel sensor on the VAZ 2110 has been partially completed.
Let's disassemble the sensor:
- Then you need to use a Phillips screwdriver to unscrew the 2 screws that secure the fuel level indicator to the pump and release the electrical connector of the pump.
- Using a screwdriver, bend the clamps and remove the guides from the pump building. Then, holding the nuts with a size 5 wrench, unscrew the fastening bolts on its cover.
- Having dropped the cover, we completely free the damaged device. From now on it is possible to take a new element and perform reverse assembly. Before moving on to it, look at the condition of the fuel pipes, bushings, and rubber seals.
- If these components do not inspire much confidence, you can also change them, especially since the cost of the rubber gasket allows you to do this without loss to your budget. The bushings centering the gas tank body can simply be treated with WD-40 lubricant.
- Although replacing the fuel level meter on a VAZ 2110 does not present any particular difficulties, disassembly and reassembly must be done carefully. When installing the pump assembly into the reservoir reservoir, you should check that the indicator on the flange points to the rear part of the vehicle.
- The work is almost complete, only a small detail remains: before fixing the hatch, you should check for any fuel leaks. To do this, you simply need to start the engine and give it the opportunity to work a little. If everything is in accordance with the norm, screw up the cap - changing the fuel sensor on the VAZ 2110 is completed.
Note! When replacing an old sensor with a new one, try to buy the same type that was installed, the thing is that the sensors all look similar to each other, but they are different, and if you buy with the wrong marking, then there is a chance that it will work for you it won’t, or it won’t be as it should be!
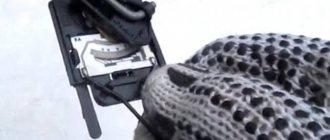
Removal: 1) Essentially, this sensor is changing and is not so difficult, but the first thing you need to do is remove the fuel pump from the car, you can read more about how to do this in the article entitled: “Replacing the fuel pump with "VAZ".
2) When you have removed the fuel pump, proceed to disassembling it and removing the sensor. To do this, use a screwdriver (Thin screwdriver) to move the retaining ring (Indicated by the red arrow) from the upper groove to the lower one, which is indicated by the blue arrow, thereby giving yourself the opportunity lift the cover of the fuel pump, and after it is lifted, disconnect the wiring from the fuel pressure regulator terminal as shown in photo 2.
Note! This locking ring is located on only one guide; there are essentially two guides in total, but on one of them there is a spring and a locking ring, so when the locking ring is moved to the very bottom, lift the cover to the highest level!
3) Now you will need to deal with the wires, namely, disconnect all of them so that they do not interfere with the removal of the sensor, we proceed to disconnect the first block of wires, to do this, simply squeeze out the latch that secures it (It is indicated by the arrow) and then disconnect the block and make sure that she hung.
4) Then move on to the second block of wires, it is attached a little differently, but disconnecting it will also not be difficult, to do this, use a screwdriver to press the latch (It is indicated by an arrow) and then disconnect the block as shown in the small picture.
5) And finally, you will need to slide the sensor along the grooves (It moves in them) and releasing the two clamps that secure it (see photo 1), completely remove the sensor from the fuel pump as shown in photo 2. Installation: The new sensor is installed exactly like this It’s the same as removing it, only you’ll need to do all this in the reverse order of removal.
Malfunctions in vehicle operation with a faulty FLS
So:
- Let's say you see that your fuel level is changing rapidly. The reason for this phenomenon may be the contact path worn out under the influence of the slider.
- If there is slight wear, you can try to get out of this situation in this way: bend the runner mount a little more than the problem area. If the track wear is enormous, you will need to change the VAZ 2110 fuel level sensor.
- There is another difficulty that often arises: the device deceives - its indicator indicator shows the level of remaining fuel with a significant error. The device probably just needs to be configured.
- In this case, it is disassembled and the pointer is moved manually from the left extreme position “1” to the right position “0”, monitoring the accuracy of the readings. If the pointer does not reach the extreme positions, tighten the adjusting tab - this will increase the stroke of the arrow.
- There is also a similar picture: you have half a tank of fuel, but the device indicates that there is nothing there. In this case, it is necessary to check all contacts of the meter. First, those that are on the device panel - it is probably necessary to tighten the nuts that secure the wires.
- Everything is fine with the wires on the panel - check if the lever is jammed in transition positions. To establish the general functionality of the fuel gauge, it is necessary to check the connections of the ground wires and the handbrake handle.
Important! You have done the prevention, but there is no effect - this means that the VAZ 2110 fuel level sensor needs to be replaced.
Before purchasing a new device, check its labeling. For this purpose, there is a proper annotation in the machine’s operating manual. There are approximately 10 types of meters, differing in resistance levels. This coefficient is personal for any device.
Replacing the VAZ fuel sensor of the tenth family
Instructions are in the service manual. Before you buy a fuel sensor for a VAZ 2110, you will need to find out its markings. The fact is that there are many varieties of such sensors (at least 8). The whole difference between them is in the resistance, which is different for each sensor. To be completely sure, you should buy a sensor of similar markings, otherwise there will be false readings from the fuel sensor. By the way, the older the sensor, the more difficult it is to find (the oldest are DUT-1).
Preparation for removing or replacing the fuel sensor on the VAZ-2110 and Lada Kalina
Replacing the FLS on a VAZ-2110 and Lada Kalina is possible only after preliminary dismantling of the fuel module. It is advisable that during work the tank is filled with gasoline to no more than half.
The procedure for preparatory operations for the VAZ-2110 and Lada Kalina is the same:
- Remove the lower part of the rear seat.
- We bend the protective mat and sound insulation of the body above the fuel module hatch.
- We clean the hatch cover and the body around it from dust and debris.
- Using a Phillips screwdriver, unscrew the 4 screws securing the hatch cover to the body.
- Remove the cover.
- We remove accumulated dirt and dust from the fuel module.
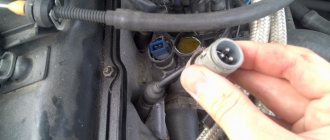
- Having released the connector block lock, disconnect the connector with wires from the fuel module body.
- We relieve the gasoline pressure in the fuel line - turn on the starter for 10–15 seconds so that it rotates the crankshaft during this time (if the engine starts, then wait until the gasoline from the fuel line is exhausted and the engine stalls itself), and then turn off the ignition.
- We disconnect the “ground” of the car with a button or by disconnecting the battery terminal.
During subsequent replacement operations, keep in mind that some gasoline remains in the fuel line after the pressure is released.
Interchangeability of fuel level sensors on the VAZ 2110
For VAZ 2110 cars there are 2 types of fuel level sensors:
- For the Vladimir instrument cluster and for the Kursk (JSC "Schetmash");
- For VDO.
The sensor resistance table for the VDO instrument looks like this:
Select a fuel level sensor based on resistance
If you don’t know which fuel level sensor to choose, then you can select a fuel sensor based on the parameters . You need to create a resistance in place of the sensor, and then measure it with a tester and find out the resistance. To do this, you will need a 1 kOhm variable resistor, which should be connected instead of the FLS. Full tank - resistance 6-7 Ohm. By adjusting the indicator to the empty tank position, we measure the resistance. The data obtained serves as the basis for searching for a new sensor with the same resistance. The main thing is that the resistance of the new sensor matches the pointer.
Replacing the FLS on a VAZ-2114
Even a novice driver can repair the sensor with his own hands. Of course, the breakdown should not be serious, then replacing the failed element will not be difficult and will not take much time. For example, if a float breaks, you can always purchase a new copy on the automobile market. The old float is easily removed from the holder and a new one is installed in its place.
Oxidized wires are also often replaced with new ones if stripping them is impossible. The price of a new sensor is relatively low, so most often drivers prefer to simply purchase a new mechanism.
The process of replacing the FLS on a VAZ-2114 includes the following procedure:
- Remove the lower part of the rear seat and remove the upholstery, since the sensor is a structural part of the fuel pump. It is impossible to get to the mechanism without going through the module.
- Using a key number 7, release the two screws securing the gas tank cap.
- Then you need to unscrew eight more screws securing the edge of the lid.
- After these steps, the cover can be easily moved forward.
When access to the fuel pump is ensured, it is necessary to remove part of the wire block. Don't forget to unscrew the line nuts. Before the cap is completely released, it must be turned once, this way the pressure in the system will be reduced.
It is necessary to carefully and carefully release the fuel pump so as not to damage the float; it should first be lifted, and then turned clockwise and tilted. Once you have the fuel pump in your hands, you can start looking for the sensor itself.
The procedure is as follows:
- use a screwdriver to move the locking ring;
- remove the module cover;
- remove the sensor terminals and release the fastenings from the cover;
- disconnect the block;
- Release the fuel sensor clamps and remove the mechanism.
At this point, the work of replacing the sensor is considered complete. It is necessary to install the new mechanism in place and assemble the module in the reverse order. As you can see, there is nothing difficult in performing this work; you just need to arm yourself with the necessary equipment: screwdrivers and a set of keys.