Purpose of the thermostat on the VAZ 2106
The thermostat must control the degree of heating of the coolant and react in a timely manner when the antifreeze temperature becomes too high or, conversely, too low.
The thermostat maintains the temperature of the coolant in the engine cooling system in the desired range
The device can direct coolant through either a small or large cooling circle, thereby preventing the engine from overheating, or, conversely, helping it quickly warm up after a long period of inactivity. All this makes the thermostat the most important element of the VAZ 2106 cooling system.
Thermostat location
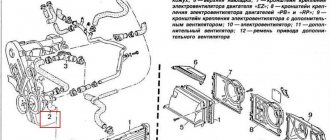
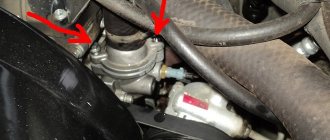
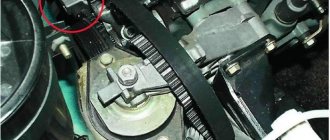
The thermostat in the VAZ 2106 is located to the right of the engine, where the pipes for discharging coolant from the main radiator are located. To see the thermostat, simply open the hood of the car. The convenient location of this part is a big plus when it becomes necessary to replace it.
To gain access to the VAZ 2106 thermostat, simply open the hood
Principle of operation
As mentioned above, the main task of the thermostat is to maintain the engine temperature within specified limits. When the engine needs to warm up, the thermostat blocks the main radiator until the engine reaches the optimal temperature. This simple measure can significantly extend the life of the engine and reduce wear on its components. The thermostat has a master valve. When the coolant reaches a temperature of 70 °C, the valve opens (it should be noted here that the opening temperature of the main valve can be higher - up to 90 °C, and this depends both on the design of the thermostat and on the thermal filler that is in it used).
Essentially, a thermostat is a regular valve that responds to changes in antifreeze temperature
The second important element of the thermostat is a special compression cylinder made of brass, inside of which there is a small piece of technical wax. When the antifreeze in the system reaches 80 °C, the wax in the cylinder melts. As it expands, it presses on the long rod connected to the main thermostat valve. The rod extends from the cylinder and opens the valve. And when the antifreeze cools, the wax in the cylinder begins to harden, and its expansion coefficient decreases. As a result, the pressure on the rod weakens and the thermostatic valve closes.
By opening the valve here we mean moving its leaf by only 0.1 mm. This is the initial opening value, which consistently increases by 0.1 mm as the antifreeze temperature rises by two to three degrees. When the coolant temperature rises by 20 °C, the thermostat valve opens fully. The full opening temperature can vary from 90 to 102 °C depending on the manufacturer and design of the thermostat.
- Thermostat for VAZ 2115 - device, replacement and repair
Replacing the thermostat VAZ 2107
The work of replacing a thermostat does not require high qualifications and expensive tools (devices). All you need is a slotted and Phillips screwdriver or an 8mm socket wrench to loosen and tighten the clamps holding the coolant hoses. The procedure is as follows:
- Wait until the engine cools down.
- Drain the antifreeze.
- Loosen the clamp on the radiator pipe going to the thermostat. Disconnect the hose.
- Loosen the clamps and disconnect the hoses from the cylinder block and pump pipes going to the radiator, and disconnect the hoses.
- Remove the thermostat from the car along with the three hoses attached to it.
- Loosen the thermostat hose clamps and remove them.
- If the thermostat has band clamps, replace them with worm clamps.
- Install the hoses on the new thermostat and put on the clamps without tightening them.
- Install a new thermostat on the car, put hoses and clamps on the corresponding pipes.
- Tighten the clamps
- Fill with coolant.
- Start the engine, make sure there are no antifreeze leaks and that the new thermostat is working.
Types of thermostats
The VAZ 2106 car was produced for many years. And during this time, engineers made a number of changes to it, including thermostats. Let's look at what thermostats were installed on the VAZ 2106 from the release of the first cars to the present day.
Single valve thermostat
Single-valve thermostats were installed on the very first “sixes” that rolled off the VAZ assembly line. The operating principle of this device has been described in detail above. To date, these devices are considered obsolete, and finding them on sale is not so easy.
The first “sixes” were equipped with the simplest, single-valve thermostats
Electronic thermostat
An electronic thermostat is the latest and most advanced modification that replaced single-valve devices. Its main advantages are high accuracy and reliability. Electronic thermostats have two operating modes: automatic and manual.
Electronic thermostats are used in modern cooling systems and differ from their predecessors in high accuracy and much greater reliability
Liquid thermostat
Thermostats are classified not only by design, but also by the type of fillers. Liquid thermostats were the very first to appear. The main component of a liquid thermostat is a small brass cylinder filled with distilled water and alcohol. The operating principle of this device is the same as that of the wax-filled thermostats discussed above.
Solid thermostat
The filler in such thermostats is ceresin. This is a substance similar in consistency to regular wax, which is mixed with copper powder and placed in a copper container. The cylinder has a rubber membrane connected to a rod, also made of dense rubber that is resistant to high temperatures. Ceresin, expanded from heating, presses on the membrane, which, in turn, acts on the rod and valve, ensuring the circulation of antifreeze.
The main element of a solid-fill thermostat is a container with ceresite and copper powder
Which thermostat is better
Today, thermostats based on solid fillers are considered the best option for the VAZ 2106, since they have the optimal combination of price and quality. In addition, they can be found in any auto store, unlike liquid single-valve ones, which are practically no longer on sale.
- Thermostat VAZ 2112 16 valves
Signs of a broken thermostat
There are a number of signs that clearly indicate that the thermostat is faulty:
- The light on the instrument panel is constantly on, indicating that the engine is overheating. This usually happens because the thermostat valve has closed and is stuck in that position;
- The engine warms up very poorly. This means that the thermostat valve does not close tightly. As a result, antifreeze flows through both the small and large cooling circles and cannot warm up in a timely manner;
- After the engine starts, the lower thermostat tube heats up literally within a minute. You can check this by simply placing your hand on the nozzle. This situation indicates that the thermostat valve is stuck in the fully open position.
If any of these symptoms are detected, the driver should replace the thermostat as soon as possible. If the car owner ignores the above symptoms, this will inevitably lead to overheating of the engine and its jamming. It is extremely difficult to restore an engine after such a breakdown.
Pay attention to the quality of thermostats
The auto mechanic explained that thermostats in our country are not of good quality, be it France or Russia, to say that they are not of good quality is to say nothing at all.
AURORA is especially guilty of quality. Therefore, in order not to install a obviously defective thermostat on a car, it must be checked for functionality.
To do this, you just need to immerse it in hot water. If the thermostat valve works, then you can safely install it on the car.
The thermostat VERGIN (France) was removed from the car and tested in hot water, and to our surprise, it turned out to be not working. Or rather, the valve worked, but very weakly.
I had to go to the store and change the thermostat for the third one. They checked it in hot water, it turned out to be working, they put it in its normal place, started the car, warmed it up, and everything became normal. As a result, through joint efforts the car was repaired.
True, we still had a suspicion about the pump, but we never got to it.
Methods for checking the thermostat
There are four main ways to test the thermostat's functionality. We list them in increasing order of complexity:
- The engine starts and idles for ten minutes. After this, you need to open the hood and carefully touch the lower hose coming out of the thermostat. If the device is working correctly, the temperature of the lower hose will not differ from the temperature of the upper one. After ten minutes of operation they will be warm. And if the temperature of one of the hoses is significantly higher, the thermostat is broken and needs to be replaced.
- The engine starts and idles. After starting the engine, you need to immediately open the hood and put your hand on the hose through which antifreeze enters the upper part of the radiator. If the thermostat is working properly, this hose will be cold until the engine is properly warmed up. If the thermostat is working properly, then immediately after starting the engine, the hose leading to the radiator will remain cold, and when the engine is fully warmed up, it will become hot
- Check in liquid. This method involves removing the thermostat from the car and submerging it in a pan of hot water and a thermometer. As mentioned above, the temperature at which the thermostat fully opens varies from 90 to 102 °C. Therefore, it is necessary to immerse the thermostat in water when the thermometer shows a temperature within these limits. If after diving the valve instantly opens, and after removal from the water it gradually closes, then the thermostat is working. If not, you need to change it. To check the operation of the thermostat, you only need a pan of water and a thermometer
- Check using the ICH-10 hour indicator. The previous testing method only allows you to establish the very fact of opening and closing the valve, but does not make it possible to accurately determine the temperature at which all this happens. In order to measure it, you need a clock indicator, which is installed on the thermostat rod. The thermostat itself is immersed in a container with cold water and a thermometer (the thermometer division should be 0.1 °C). Then the water in the pan begins to heat up. This can be done either using a boiler or by putting the entire structure on gas. As the water heats up, the degree of valve opening is monitored and recorded and displayed on a dial indicator. The observed numbers are then compared with the stated thermostat specifications, which can be found in the vehicle's owner's manual. If the difference in numbers does not exceed 5%, the thermostat is working; if not, it needs to be replaced. Checking with a dial indicator gives greater accuracy compared to the method that uses a conventional thermometer
Video: checking the thermostat
All about the thermostat VAZ-2107
This article is for those who want to thoroughly understand how the thermostat of the VAZ “classic” works and works, how to determine the malfunctions of this device, select the right spare part and perform a replacement. It is the thermostat that is to blame for the fact that in winter the cabin is cold and the engine takes a long time to warm up. It is also the most common cause of engine overheating.
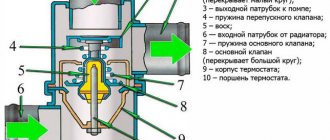
What's inside the thermostat
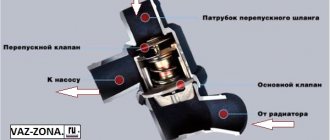
The classic thermostat housing was originally made of brass. Then, different factories at different times produced thermostats with housings made of aluminum alloy and steel. During assembly, a block of two assembled valves is placed inside the two halves of the housing. Then it all gets rolled up and becomes inseparable. The valve block is assembled inside the holder. The rod is fixed motionless. The main and bypass valves can move relative to it, overcoming the force of the springs. On the outside, the housing has three pipes for connection to the water pump (pump), engine and radiator.
1. Inlet pipe (from the engine). 2. Bypass valve. 3. Bypass valve spring. 4. Glass. 5. Rubber insert. 6. Outlet pipe. 7. Main valve spring. 8. Main valve seat. 9. Main valve. 10. Holder. 11. Adjusting nut. 12. Piston. 13. Inlet pipe from the radiator. 14. Filler. 15. Clip. D - fluid inlet from the engine. R - fluid inlet from the radiator. H - liquid outlet to the pump (pump).
How does the VAZ-2101-2107 thermostat work?
After starting a cold engine, antifreeze begins to be pumped through the thermostat housing from the engine to the pump, through the upper and middle pipes. The main valve is closed and does not allow fluid into the radiator, and the bypass valve is open. The engine warms up and the coolant temperature rises. Gradually, heat is transferred to a special filler, which, pushing away from a stationary piston, lifts the valves up (as shown in the picture). The filler and piston must be adjusted so that the opening of the main valve begins at a temperature of 81 degrees C with a tolerance of +4 - +5 degrees (note - only a plus!). The liquid begins to circulate through the radiator and cool, but some of it still passes directly to the pump. Next, the valve rises 6 mm and, at the end of the stroke, closes the bypass valve. If it is not closed, the antifreeze will spin in a “small circle” - pump-motor-thermostat-pump, and this will lead to overheating. The liquid pumped through the radiator quickly cools itself and cools the filler in the thermostat. It compresses, the valves move down with a spring, opening the bypass valve and closing the main valve. This process is continuously repeated, maintaining the engine temperature between 87 and 92 degrees. This is how the thermostat of a car that has recently rolled off the production line works. You don’t need any cardboard, but you will only have to insulate the “face” in frosts below 40!
Malfunctions of the VAZ-2107 thermostat, checking operation
Nothing is eternal under the Moon! And the thermostat gets tired over time. The properties of the filler change, the rubber of the valves becomes dull, and the springs lose their elasticity. We notice that the VAZ-2107 takes a long time to warm up, and in cold weather the temperature gauge needle barely reaches the edge of the green sector. This malfunction can progress and, over time, the temperature will end up in the middle of the white sector of the scale. You can check the operation of the thermostat without removing it from the engine. This is done like this: start the cold engine and feel the lower pipe near the thermostat with your hand. It should not become warm until the temperature indicator needle reaches a point 3-4 mm from the red zone of the scale. If the heat is felt earlier, the thermostat is not fully operational. The second malfunction is engine overheating due to a stuck thermostat. Here everything looks like this - the engine is hot, but the radiator and its pipes are cold. A thermostat with a stuck valve needs to be replaced urgently. If a malfunction occurs far from civilization, you can pick out the main valve and drive to the repair site. There is no need to remove both valves; the engine will overheat, because the “small circle” is not closed.
We independently change the thermostat on a VAZ 2106
Before starting work, you should select tools and consumables. To replace the thermostat we will need:
- new thermostat;
- coolant (5 liters);
- basin for draining old antifreeze;
- flat screwdriver.
It should be noted here that the thermostat cannot be repaired. The reason is simple: inside it has a thermoelement with liquid or solid filler. It is the one that fails most often. But such elements are not sold separately, so the car owner has only one option - replacing the entire thermostat.
Sequence of work
Before performing any manipulations with the thermostat, you need to drain the coolant. Without this operation, further work is impossible. It is convenient to drain antifreeze by placing the car on an inspection hole and unscrewing the cap of the main radiator.
- After draining the antifreeze, the car hood opens. The thermostat is located to the right of the engine. Three hoses fit to it. All hoses from the thermostat must be removed
- The hoses are attached to the thermostat pipes using steel clamps, which are loosened using a flat-head screwdriver. It is most convenient to loosen the clamps on the thermostat hoses with a large flat-head screwdriver
- After loosening the clamps, the hoses are removed from the pipes manually, the old thermostat is removed and replaced with a new one. The hoses are returned to their place, the clamps are tightened, and new coolant is poured into the radiator. The thermostat replacement procedure can be considered complete. After removing the hoses, the VAZ 2106 thermostat is removed manually
Video: changing the thermostat yourself
So, the owner of a VAZ 2106 does not need to go to the nearest car service center to replace the thermostat. Everything can be done with your own hands. This task is entirely within the capabilities of a novice driver who has at least once held a screwdriver in his hands. The main thing is not to forget to drain the antifreeze before starting work.
Replacing the thermostat on a VAZ 2107
In general, I had a problem - the engine began to underheat. It simply didn’t warm up to the operating temperature of 90 degrees and that’s it. The maximum arrow on the dashboard rose as in the photo