How to tighten the timing pulley on a Priora
The Lada Priora car is equipped with high-strength timing belts from Gate, as the manufacturer states that the belts can be used for 100,000 km, however, the timing belt requires constant supervision. The belt may wear out ahead of time due to deviations in the operation of other components with which it works together (guide or tensioner, due to play or jamming of the pump). In this article we will talk about replacing the Lada Priora timing belt, if such a need has arisen. As a rule, replacing the timing belt is necessary if the rubber on it is cracking, breaks, excessive wear or pullouts of the teeth.
Timing belt design on a car on a VAZ 2170 2171 2172 Lada Priora
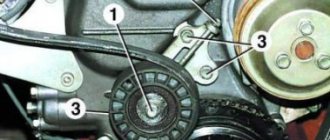
Rice. 1 Diagram of the gas distribution mechanism drive of the Lada Priora car: 1 - crankshaft toothed pulley; 2 — toothed belt; 3 — water pump pulley; 4 - tension roller; 5 — exhaust camshaft pulley; 6 — rear protective cover of the toothed belt; 7 — intake camshaft pulley; 8 — ring (synchronization disk) for the phase sensor; 9 — support roller; A - TDC mark on the crankshaft toothed pulley; B — installation mark on the oil pump cover; C, F - installation marks on the rear protective cover of the toothed belt; D — installation mark on the exhaust camshaft pulley; E - installation mark on the intake camshaft pulley
Monitoring the condition of the timing belt on a VAZ 2170 2171 2172 Lada Priora
The camshafts are driven into rotation from pulley 1 (Fig. 1) of the crankshaft through a belt drive with a toothed belt. Under the camshaft pulleys there are two rollers: on the left is a tension roller 4, on the right is a support roller 9. On the support roller, the mounting hole is made in the center of the inner race, on the tension roller it is located eccentrically (offset from the center by 6 mm). Therefore, by turning the tension roller relative to the fastening bolt, you can adjust the belt tension. The camshaft pulleys differ in that a synchronization disk 8 is welded to the pulley 7 of the intake camshaft, which ensures the operation of the phase sensor. The drive is covered with plastic covers at the front and rear. To set the valve timing, there are timing marks A, D, E on the pulleys, B on the oil pump cover, as well as C and F on the rear drive belt cover. When the phases are correctly set, mark A should coincide with mark B, and marks D and E should coincide with marks C and F. Replace the camshaft drive belt if, upon inspection, you find: - traces of oil on any surface of the belt; - signs of wear on the toothed surface, cracks, undercuts, folds and separation of fabric from rubber; - cracks, folds, depressions or bulges on the outer surface of the belt; - fraying or delamination on the end surfaces of the belt.
Tools necessary for replacing the timing belt on a VAZ 2170 2171 2172 Lada Priora
You will need: the tools necessary to remove the alternator drive belt and the front timing belt cover, a 15-size wrench, a 17-size socket wrench, a special wrench for turning the tension roller or a circlip remover, a mounting spudger or a large screwdriver.
Operations when replacing the timing belt on a VAZ 2170 2171 2172 Lada Priora
1. Disconnect the wire from the negative terminal of the battery.2. Remove the generator drive belt (see “Replacing the generator drive belt on a VAZ 2170 2171 2172 Lada Priora”).3. Set the piston of the 1st cylinder to the TDC position (see “Installing the piston of the 1st cylinder to the TDC position of the compression stroke on a VAZ 2170 2171 2172 Lada Priora”). 4. Using a 15mm wrench, loosen the tension roller mounting bolt and turn the tension roller to release the belt tension.
5. Remove the belt from the camshaft pulleys, tension pulley and water pump timing belt.
6. In order to unscrew the bolt securing the generator drive pulley, it is necessary to secure the crankshaft from turning. To do this, after removing the plug in the clutch housing, an assistant must use a mounting spatula or a large screwdriver to hold the crankshaft by the teeth of the flywheel ring. It is also possible to fix the flywheel to unscrew the bolt when replacing the timing belt in the following way: - engage 5th gear; - if necessary Place chocks under the wheels or have an assistant press the brake pedal.
7. Using a 17mm spanner, unscrew the crankshaft pulley mounting bolt...8. ...take it out with the washer and remove the generator drive pulley from the crankshaft.
9. Remove the washer from the timing belt pulley.
10. Remove the timing belt from the crankshaft timing belt.
11. Before installing a new belt, clean the pulleys and tension roller from dirt and grease, and degrease them with white spirit.
12. Install the camshaft drive belt in the reverse order of removal. The generator drive pulley is installed in only one position. The groove of the pulley should fit into the boss of the timing gear drive pulley.
13. When installing the belt, ensure the tension of its leading branch.
14. After installing the belt, adjust its tension. To do this, using a special wrench or a lock ring remover inserted into the grooves of the outer disk of the tension roller, turn the roller counterclockwise... 15. ...until the cutout on the outer disk aligns with the rectangular protrusion on the inner sleeve of the tension roller. Use a 15mm wrench to tighten the tension roller bolt to the torque recommended in the appendix.
If you hear noise from the camshaft drive belt, there is a possibility that the tension roller bearing has failed. Remove the roller and check the functionality of its bearing. If, when turning the bearing, you feel jamming, axial play, or signs of grease leaking out of the bearing, replace the tension roller.
16. To replace the roller, before installing the belt, completely unscrew the bolt securing it and remove the roller. 17. Install the new tension roller in the reverse order of removal. In this case, the roller disc with the markings should be directed outward.
18. Adjust the tension of the timing belt (see paragraphs 13-15).19. Install all removed parts and assemblies in the reverse order of removal.
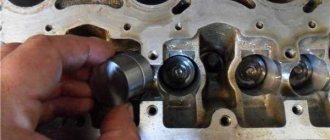
In order to check the roller, it is necessary to remove the upper timing belt guard.
To check we need:
1. Unscrew the protective cover. It is screwed on with 5 5mm hex screws. If someone has already climbed into this car before you, then instead of screws there may be ordinary “10” key bolts.
2. Remove the casing. Inspect the condition of the belt. Part of the belt will be hidden, and it is better to inspect it all by cranking the engine with the starter (after disconnecting the harness from the ignition coils or injectors) or pushing the car in 4th gear.
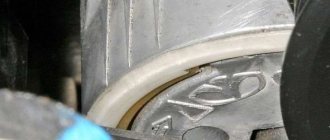
3. Inspect the condition of the video. There should be no damage to it. We look at the position of the marks relative to the groove. If it has moved more than 4 mm, then the timing belt and rollers need to be changed.
For clarity, the photo shows a new video. The risk is indicated by the upper arrow, and the groove by the lower. In a tense state, the risk is located opposite the groove.
4. To check the condition of the roller, press your fingers on the belt between the two camshaft gears. With a force of 10 kg, the needle should deflect by 4 mm.
5. An easier way is to start the engine and turn on additional devices (air conditioning, heater, high beam). At idle, the pointer on the roller should wobble slightly. When re-gasping, the needle should deviate from the normal position by about 2 mm and return to the working position. If the pointer does not move when re-gasping, then the roller needs to be changed.
6. With the engine running, you need to listen to both videos for any extraneous noise. If the rollers “whistle”, then they need to be replaced. It is better to change both together with the belt at once, because Repairs in the event of a belt break for any reason will cost a significant amount.
7. Replacing the rollers and belt is described in detail in the article replacing the timing drive on Lada Priora, Kalina and Granta cars (16 valves).
8. If all parameters are normal, then we assemble them in reverse order.
Please rate the article
The timing belt is a timing belt that is designed to synchronize the engine camshaft and crankshaft. Taking into account the maintenance regulations, the condition of the gas-type timing belt must be checked every 105 thousand km. The timing belt replacement on the Lada Priora should be carried out after 200 thousand km.
Installing a new timing belt
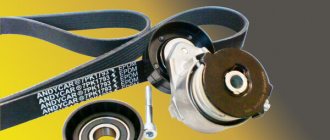
- A new timing kit from Gates was purchased.
- The kit includes a toothed belt and a tension roller.
VAZ 2110 timing kit. - We check that all marks match. We start installing the belt from the crankshaft pulley, then put it on the camshaft pulley, pump and tension roller. We make sure that the descending branch of the belt between the pulleys is tensioned.
- We tighten the timing belt by turning the tension roller counterclockwise. The optimal tension is considered if, with the effort of two fingers, we can turn the belt at the longest section by a maximum of 90 degrees.
We also check the tension during periodic monitoring.
Tighten the tension roller fastening.
- We install all elements in the reverse order of removal.
Do not overtighten the timing belt as this will apply increased force to the pump bearing and it will not last for a long time.
The entire operation took approximately 30 minutes. Since this procedure does not require hanging the engine, you can do it yourself in the field, and if the pump does not change, then you don’t even need to remove the wheel.
Repair work
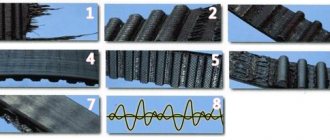
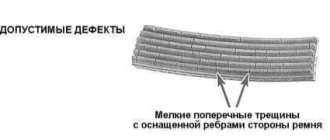
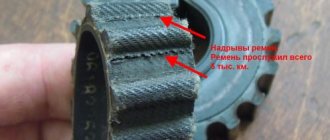
When carrying out such work, it should be remembered that a failed timing belt from a Priora 2172 can lead to costly repairs to the vehicle’s power unit. At the same time, you need to know that the surface of the toothed part of the belt should not have cracks, folds, undercuts of teeth and separation of fabric from rubber. The reverse side of this part should not be worn out or have signs of burning. As for the end surfaces, there should be no delamination or fraying. If there are traces of oil on the timing belt of the Lada Priora, it will need to be replaced urgently. In this case, it is imperative to find out the reason for the appearance of this liquid.
Step-by-step instruction
You can check the position of the crankshaft as follows:
Such work must be carried out carefully so as not to disrupt the valve timing while unscrewing the bolt.
Therefore, replacing the belt on a Lada Priora must be carried out with at least one assistant. Its task is to fix the flywheel. To do this, a large slotted screwdriver is inserted between the teeth of this unit (due to the presence of a hole in the clutch housing).
If the timing belt is changed on a Priora, then new support and tension rollers are installed. To do this, remove the tension roller by unscrewing the fastening bolt. To remove the support roller, unscrew the bolt using a spanner set to “15”. The roller is dismantled along with the bolt and thrust washer. The last part has cores that prevent the washer from being removed from the bolt.
Before installing a new belt, you need to make sure that the marks on the camshaft and crankshaft match. You can control the position of the second element taking into account the alignment of mark No. 1 on the crankshaft toothed pulley with mark No. 2 on the oil pump cover.
If after completing this work you hear noise from the drive belt, then it is possible that the tension roller bearing has failed. To do this, you will need to remove it and check for functionality.
One of the latest developments by VAZ engineers of the last decade is the 21126 engine, which became the main power unit on the VAZ-2170. Here, cylinder honing and new pistons were used, which contributed to an increase in power. However, a banal break in the gas distribution mechanism drive will damage the components of even such a technologically advanced unit. Therefore, it is better to check and change this component of the system in advance.
Clearing access to the timing belt
Having dismantled the engine compartment, we got excellent access to the bolts securing the right power unit support, as well as to the retainer of the upper timing belt cover. To remove the cover itself, turn the lock to the Open position using a slotted screwdriver. We press and the latch comes unfastened. There are two of them - front and back; unfasten both and remove the cover.
Now remove the accessory drive belt. To do this, use a “15” key to loosen the belt tension. We remove the belt and return the tensioner to its original position. Having removed the belt, we check it for cracks by turning it outward and loading it. Even if we have the slightest suspicion of cracks, we change the auxiliary drive belt without any extra thought. We have it in good condition.
When is it necessary to replace the timing belt on a Priora car?
In any case, the condition of the element must be monitored every 45 thousand km . The first signs that a timing belt replacement is already necessary on a Lada Priora are the following factors:
Low mileage does not always guarantee trouble-free operation of the car. Quite often in reviews from car enthusiasts you can come across a situation where the belt drive wears out ahead of schedule due to oil and dirt getting on it. These components enter through seals and cracks in the casing, so it is important to eliminate the causes of leaks and inspect the part.
It is important to understand that replacing the Priora timing belt must be done in a timely manner; in no case should the matter be delayed until it breaks. Otherwise, the cost of repairs may unpleasantly surprise the owner. This is largely due to the absence of recesses for the valves on the pistons, so a break in the part leads to their direct contact, after which the latter usually bend.
Problems with the strength of the belt drive at high speeds generally lead to catastrophic consequences, including breakage of the pistons and even deformation of the connecting rods. In order not to expose themselves to risk, experienced motorists are advised to periodically monitor the condition of the rubber transmission, as well as the degree of its tension.
How to replace the timing belt on a Lada Priora on your own?
The process includes not only the rotation of the rubber transmission, but also the rollers - tension and support - change along with it. Repair kits are usually sold at auto dealerships. To work you will need the following tools:
Next, the process of changing the drive occurs in the following order:
Important! During the repair process, you need to check the condition of the coolant pump. Its shaft should rotate freely, without play or extraneous noise. Traces of coolant leakage are unacceptable. If one of the factors is present, be sure to change the pump.
How to adjust the drive tension on a VAZ 2170?
The final stage of replacing the timing belt on a Lada Priora car is performed according to the following scheme:
The tension roller bolt is tightened to a torque of 35-41 Nm , and the auxiliary pulley is tightened to 105-110 Nm . Assembly is performed in the reverse order; we do not install only the upper plastic casing for visual control of the work performed.
Next, we start the engine and observe - indicators 1 and 2 on the roller should not deviate from the norm by more than 2 mm , after which they should take the working position. After checking the functionality of the units, the upper drive casing is installed in place.
The described process is similar and can be applied when repairing Lada Kalina and Lada Granta cars. The technique for replacing the gas distribution mechanism drive is available to any car enthusiast, but requires special care. The slightest displacement of the marks can result in expensive repairs.
The timing belt is an important component of your car's engine, connecting the crankshaft to the camshafts. Its main function is the precise and timely movement of valves in accordance with the positions of the pistons in the cylinders. In the event of a break, this correspondence is violated, and the valves may begin to move towards the pistons, which inevitably leads to large and expensive repairs. That is why it is recommended to check the condition of the timing belt at every opportunity. In Lada Priora, replacing the timing belt, or checking it, is required with the same frequency and for the same reasons as on other cars. Now we will look at this process in detail.
The test is carried out on a cold engine at room temperature. If your car has air conditioning, you will need to remove the accessory drive belt. To inspect the timing belt in detail , you need to hang one wheel by lifting the car with a jack or lift. Next, carefully studying every millimeter of the belt, we rotate the suspended wheel forward as the car moves. The belt must be perfectly smooth, without longitudinal or transverse cuts. There should be no peeling on the belt and no threads included in its composition should stick out. Each tooth should be in place and there should be no cracks or broken pieces of belt at the base of each tooth. Equally important is the absence of traces of oil leakage onto the belt. Belts of this type, like any other belts, do not tolerate contact with motor or any other oil - it very quickly destroys their composition and, sooner or later, leads to the breakage of the timing belt itself. Before replacing the timing belt due to oil getting on it, it is necessary to find out and eliminate the cause of the leak.
On VAZ-21126 power units, the camshafts are driven into rotation by the crankshaft pulley (1). Under the right camshaft (looking at the engine compartment from the front) there is a support roller (9) for the timing belt (2). Under the left camshaft there is a roller used to tension the belt (4). Even lower, under the tension roller, there is a coolant pump, the pulley (3) of which is driven by a toothed belt. The tension roller mount is designed so that the axis of rotation can move relative to the engine. This creates tension in the timing belt when the roller rotates relative to the axis of its fastening. A synchronizing disk (8) is attached to the right camshaft pulley (7), which ensures the operation of the timing sensor. The drive is covered with plastic covers to prevent the entry of foreign objects, dust and dirt. To correctly set the phases, special marks are used:
— mark A located on the crankshaft pulley must coincide with mark B located on the engine body above the crankshaft
— mark D located on the left camshaft pulley (5) must coincide with mark C located on the rear cover (6)
— mark E of the camshaft pulley (7) must coincide with mark F on the rear cover (6)
Removing the old belt
To replace the timing kit and timing belt you will need the following tools:
- spanners,
- a special key that allows you to adjust the tension roller,
- retaining ring remover,
- large screwdriver.
First of all, you need to remove the negative terminal from the battery. To ensure free access to the timing belt, all elements are removed (engine protection, generator drive belts, the generator itself, the power steering fluid reservoir, but only if this is necessary), which may somehow limit freedom of action.
After unscrewing the tension roller mounting bolt, turn it so as to reduce the timing tension
Next, you need to install the piston of the 1st cylinder at TDC (top dead center), unscrew the bolt that secures the tension roller, and turn the roller a little in order to release the tension on the timing belt. After this, the belt is removed from the tension roller pulleys, camshafts and pump pulley.
Unscrewing the generator drive pulley bolt will be a little more difficult, because here you need to fix the crankshaft to prevent it from turning. To do this, you will need an assistant who, using a large screwdriver, will hold the crankshaft by the teeth of the flywheel crown, at the same moment it is necessary to remove the plug in the clutch housing.
Then the crankshaft pulley mounting bolt is unscrewed, which is subsequently removed together with the washer.
By removing the timing belt drive washer from the pulley, we can remove the belt
Now you can remove the generator drive pulley from the crankshaft. After this, the timing belt drive washer is carefully removed from the pulley, and it can be dismantled.