The standard location of fuses on cars of the Mazda 3 family is unchanged, regardless of the generation or year of manufacture of the technical product.
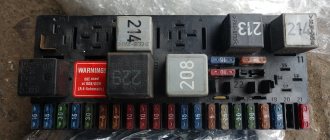
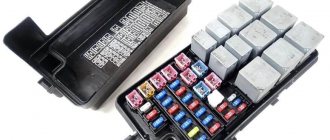
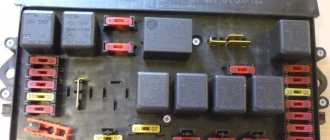
The main fuse block (hereinafter referred to as the PSU) is installed in the passenger compartment, in the lower right part of the dashboard, above the glove box. Total: relays 14 pieces, power supplies - 36 pieces.
Where is the additional unit located: the power unit of the modules is located in the engine compartment, behind the battery, in a black plastic case.
During the daily operation of a technical device, power supply units wear out and melting elements burn out. Mechanisms and units stop functioning normally.
The process of replacing fuses is not at all difficult; every car enthusiast can do the task. Be careful when performing preventive maintenance; install only equivalent modules.
If any difficulties or difficulties arise, contact the service station specialists.
Description of fuses for a Mazda 3 car: location, diagram, price
In Mazda 3 from the first to the third generation (BK, BL, BM) blade-type fuses with a melting element in the center are pre-installed. Cylindrical modules are not installed on Mazda3 due to the outdated design.
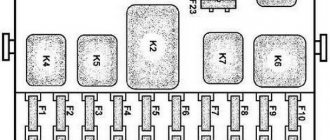
Relay-breaker layout diagram
| Designations | Who is responsible for what/what provides |
| K 1 | Fog lights |
| K2 | Signal |
| K 3 | Heated rear window |
| K 4 | Electrical supply circuit |
| K5 | Fuel pump (gasoline pump) |
| K 6 | Reserved |
| K 7 | Reserved |
| K 8 | headlight washer |
| K9 | Electric air conditioning fan |
| K 10 | Compressor clutch |
| K11 | Reserved |
| K 12 | Starter relay |
| K 13 | Reserved |
| K 14 | Electronic engine control unit |
Recommendations
Comments 8
The problem with the lack of backlight when turning on the side lights has been solved; let me remind you - when turning on the side lights, or side lights + low beam, only the lights in the ashtray, glove compartment and wells came on in the cabin (but without blue, only red). So the problem was the short circuit of the antennae of the light bulb, which was located in the backlight of the brightness control lamp. I remembered that I had recently changed a light bulb there and apparently the mustache was sticking out and touching something and that’s why there was a problem, as soon as I took out the light bulb everything started working right away. In general, if anyone has such a problem, remember which light bulb you changed recently and look there.
I don’t remember the number of the fuse, but mine was brown... I think it was 7 with some letter. Look and don’t rush to solder and disassemble half the machine)
Yes, I didn’t intend to solder or disassemble anything) there it is at 7.5A. When I have time, I’ll take a look at his condition.
82nd before behind the glove compartment, this one?
Did the problem appear after replacing the cabin filter?
Well, I changed the filter 5 days ago, the problem appeared yesterday.
The problem is most likely in the size relay, which is located in the interior fuse block. There is a topic on the Mazda 3 forum where the solution to the problem is described in detail. I encountered it myself, resoldered the contacts on the relay and it went away)
Damn, this is definitely not before? Why don’t you want to solder anything...
| Fuses serve to interrupt a circuit when the current exceeds a certain value and protect components and wires that may be damaged by too much current. A sudden increase in current is usually caused by a fault in the circuit, most often a short circuit. The fuse box is located under the instrument panel on the driver's side. |
| Each of the fuses protects its own circuit; its belonging to a particular circuit is indicated on the cover of the fuse box. |
| Rice. 7.2. Example of good and bad fuses |
| The fuse box contains blade type fuses, the color of which corresponds to the fuse's protection current. If any element of electrical equipment fails, first of all, you should check the condition of the fuse. The serviceability of the fuse is determined by the presence of a wire conductor connecting the fuse contacts (Fig. 7.2). |
Read more: Dnepr or Ural which is better
| Rice. 7.3. Special tweezers for removing fuses |
| To replace a failed fuse, first turn off the corresponding electrical circuit and remove the fuse from the socket with tweezers (Fig. 7.3). |
| If a newly installed fuse fails immediately when voltage is applied, check the electrical circuit being protected. If a fuse protects several circuits, then they must be connected one by one in order to determine the faulty circuit by the blown fuse. |
| The heater and air conditioner draw a lot of current, so the fuse box has a switch to protect their circuits. If the circuit is interrupted by the breaker, turn off the heater and air conditioner before pressing the breaker's reset button. |
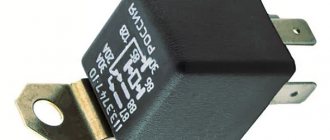
| A relay is an electronically controlled switch that is typically used as follows: |
| – switches large currents remotely from the circuit in which this current flows, allowing the use of thinner wires and switch contacts; |
| – has more than one control input, unlike a mechanical switch; |
| – performs the function of a timer, for example, sets the operating interval of the windshield wipers. |
| If the electrical circuit controlled by the relay fails and the relay may be causing the problem, listen to the relay operate while the system is on. If the relay is working properly, you should hear a click when it turns on. If the relay is working properly, then the cause of the malfunction lies in the elements or connecting wires. If the relay does not work, it means that it is not receiving the main power supply or control pulse, or the relay is faulty. |
| Most relays are located in the fuse and relay box located in the engine compartment. |
| Some specialized relays are located separately or in separate blocks under the instrument panel and in the engine compartment. |
Fuse links, fuses and relays for switching on electrical equipment are installed in blocks located in the engine compartment and in the vehicle interior behind the instrument panel.
Note The fuse locations are marked on the block covers.
FUSE AND RELAY BLOCK IN ENGINE COMPARTMENT
| Removing the fuse box cover |
FUSE AND RELAY BLOCK IN THE CAR PASSENGER
The fuse box is located on the right under the glove compartment
The standard location of fuses on cars of the Mazda 3 family is unchanged, regardless of the generation or year of manufacture of the technical product.
The main fuse block (hereinafter referred to as the PSU) is installed in the passenger compartment, in the lower right part of the dashboard, above the glove box. Total: relays 14 pieces, power supplies - 36 pieces.
Read more: UAZ Patriot additional interior heater
Where is the additional unit located: the power unit of the modules is located in the engine compartment, behind the battery, in a black plastic case.
During the daily operation of a technical device, power supply units wear out and melting elements burn out. Mechanisms and units stop functioning normally.
The process of replacing fuses is not at all difficult; every car enthusiast can do the task. Be careful when performing preventive maintenance; install only equivalent modules.
If any difficulties or difficulties arise, contact the service station specialists.
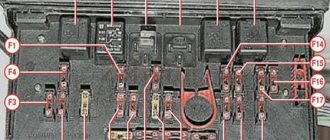
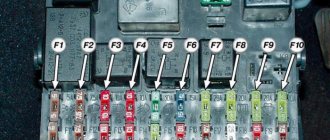
Mazda 3 fuse diagram
| Marking/amperage | What he is responsible for (with description) |
| F (F-1) / 40 | Electric cooling fan |
| F (F-2) / 80 | Hydraulic booster pump |
| F (F-3) / 40 | Power circuits: diagnostic connector, emergency lights, front wiper, glass washer, central locking, dimensions |
| F (F-4) / 40 | Headlights |
| F (F-5) / 80 | RTS electrical circuit |
| F (F-6) / 30 | Reserved |
| F (F-7) / 30 | ABS, stability control |
| F (F-8) / 20 | ABS optional |
| F (F-9) / 30 | Electronic engine control unit |
| F (F-10) / 10 | Reserved |
| F (F-11) / 30 | Ignition switch, starter, additional power circuit |
| F (F-12) / 20 | Starter solenoid relay |
| F (F-13) / 30 | Auxiliary power circuit, ignition |
| F (F-14) / 30 | Reserved |
| F (F-15) / 40 | Air conditioning system |
| F (F-16) / 15 | Reserved |
| F (F-17) / 40 | Heated rear window |
| F (F-18) / 10 | Reserved |
| F (F-19) / 20 | Stability control (optional) |
| F (F-20) / 15 | Fog lights |
| F (F-21) / 15 | Signal |
| F (F-22) / 15 | Reserved |
| F (F-23) / 20 | |
| F (F-24) / 15 | For headlight washer |
| F (F-25) / 10 | Gasoline pump |
| F (F-26) / 10 | Air conditioning system |
| F (F-27) / 20 | Generator |
| F (F-28) / 15 | Reserved |
| F (F-29) / 10 | Reserved |
| F (F-30) / 15 | |
| F (F-31) / 10 | ECU |
| F (F-32) / 10 | central locking |
| F (F-33) / 5 | ECU |
| F (F-34) / 15 | Standard cigarette lighter |
| F (F-35) / 5 | Headlight washer module |
| F (F-36) / 15 | Reservation |
The price for a complete set of fuses ranges from 2500 – 2700 rubles, depending on the region of purchase. Individual modules from 150 rubles, relays - switches from 450 rubles.
14.4. Circuit breakers
| GENERAL INFORMATION |
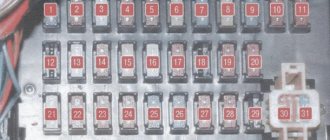
Location of the fuse box on the left side of the instrument panel
| The location of the fuses and the electrical circuits protected by the fuses are shown on the sticker (shown by an arrow) located on the inside of the fuse box cover. |
Location of fuses on the fuse block
| № | Current consumer | A |
| 1 | Heated windshield washer jets, heated exterior mirrors | 5 |
| 2 | Direction indicators | 10 |
| 3 | Interior lighting | 5 |
| 4 | License plate light | 5 |
| 5 | Heated seats, air conditioning | 7,5 |
| 6 | Central locking | 5 |
| 7 | Reversing light | 10 |
| 8 | Telephone | 5 |
| 9 | ABS control unit | 5 |
| 10 | Engine Electronic Systems | 10 |
| 11 | Selector (with automatic transmission) | 5 |
| 12 | Telephone | 7,5 |
| 13 | Brake lights | 10 |
| 14 | Lamps and reading lights, central locking | 10 |
| 15 | Automatic transmission | 10 |
| 16 | Windshield washers | 10 |
| 17 | Heated rear door stop cylinder | 7,5 |
| 18 | High beam right | 10 |
| 19 | High beam left | 10 |
| 20 | Low beam right, headlight range control | 10 |
| 21 | Low beam left | 10 |
| 22 | Side and parking lights right | 5 |
| 23 | Side and parking lights left | 5 |
| 24 | Windshield washers | 20 |
| 25 | Ventilation system fan, air conditioning system | 25 |
| 26 | Heated rear window | 20 |
| 27 | Rear window wiper | 10 |
| 28 | Fuel pump | 15 |
| 29 | Engine Electronic Systems | 10 |
| 30 | Tilt-and-slide sunroof panel | 20 |
| 31 | Automatic transmission | 10 |
| 32 | Engine Electronic Systems | 10 |
| 33 | Headlight cleaners | 20 |
| 34 | Engine Electronic Systems | 10 |
| 35 | “Plus” of long-term trailer power supply | 30 |
| 36 | fog lights | 15 |
| 37 | Terminal "S" | 20 |
| 38 | Luggage compartment lamp, central locking | 10 |
| 39 | Emergency alarm | 15 |
| 40 | Sound signal | 20 |
| 41 | Cigarette lighter | 15 |
| 42 | Radio | 15 |
| 43 | Engine Electronic Systems | 10 |
| 44 | Seat heating | 15 |
Warning
The fuse marked on the fuse block as number 24 is designated as number 224 on the car's electrical diagrams, that is, on the electrical diagrams the number 2 is added to the front of the fuse number.
Replacement
| EXECUTION ORDER |
| 1. To replace fuses, open the cover by inserting a screwdriver from the bottom into the groove marked with an arrow and press the cover. |
| 2. If the fuse is blown, it means that the conductor connecting the fuse contacts is broken. |
| 3. To remove the fuse, use tweezers to remove the fuse from the connector. Remove the fuse from the tweezers. The wire inside the fuse is easily visible and will be severed if the fuse blows. |
| 4. Install a new fuse rated for the same current. On the reverse side, each fuse has an inscription indicating the value of the protected current. In addition, the color of the fuse also corresponds to the amount of current being protected (see below). |
| 5. Replace the fuse box cover. |
| 6. If the installed fuse blows again, check the electrical circuit protected by the fuse. |
| 7. Never replace the fuse with a jumper wire, as the vehicle's electrical circuit may be seriously damaged. Warning Fuse and circuit specifications may vary from year to year. |
| Current | Color |
| 5 | Light brown |
| 10 | Red |
| 15 | Blue |
| 20 | Yellow |
| 25 | White |
| 30 | Green |
Fuse box in the engine compartment on the battery
| Circuit breakers | A |
| Cooling fan, 1st stage | 30 |
| ABS motor relay | 30 |
| ABS main relay | 30 |
| Metal fuses: | |
| Generator | 150 |
| On-board network | 110 |
| Cooling fan 2nd stage | 30 |
| Engine Electronic Systems | 50 |
| Diesel engine preheating | 50 |
Automatic circuit breakers
All together, the electric windows and sunroof drives are also protected by a circuit breaker, which in case of overload automatically turns off (for example, when the glass freezes) and turns on again after a few seconds.
Reasons for fuses failure on Mazda 3
- Violation of the schedule developed by the manufacturer for routine technical inspection of the vehicle;
- Purchase of non-original components, low-quality wiring;
- Violation of installation technology;
- Damage to adjacent mechanisms, which resulted in failure of the power supply unit;
- Short circuit in the electrical supply circuit;
- Damage to the insulation layer;
- Oxidation of contacts;
- Loose terminal fixation;
- Moisture getting inside, condensation forming.
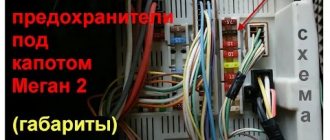
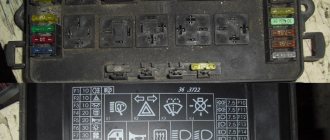
Block under the hood
The second part of the fuses is located in the front of the car. In cars manufactured after 2013, the fuses are located on the right in front of the driver near the rib. They are closed with a massive casing, which is secured to brackets and plugs. There is a helpful list of symbols on the inside of the block cover.
In older Mazdas, namely those produced later than 2009, you can find fuses under the hood almost there. The casing is smaller in size and is not so prominent in comparison with the general plane of the mechanisms. Opposite the driver's seat under the hood you can see a blue tank, literally under it all the fuses are located. The plug is located at the back, which makes access to the casing a little difficult. In the first generation of Mazda, the fuses are located in the same area, but the block cover is even more miniature and flat.
In general, the procedure for replacing fuses will be absolutely simple, even for those car owners who are not used to opening the hood at all. Standard designations will help you understand what exactly needs to be changed.
Replacing fuses on a Mazda 3
Preparatory stage: spare fuses, rags, screwdriver, additional lighting.
Sequencing:
- We place the Mazda 3 on a flat surface, secure the rear wheels with wheel chocks;
- Open the passenger door, lower the glove compartment lid;
- We unclip the glove box body and remove it from its regular place;
- Unscrew the two screws and remove the mounting block;
- Using plastic tweezers, remove the modules one by one and check for serviceability.
To speed up the process of finding the “right” module, we will use the diagram on the back of the cover. To help the master, serial numbers, markings, and pinouts are indicated.
Finally, we assemble the structure in reverse order.
To replace modules in the engine compartment mounting block, you must:
- Open the hood, turn off the engine;
- On the left side, behind the battery, unclip the housing cover of the mounting block;
- Using tweezers, remove the fuse with the desired serial number. If necessary, check the number on the back of the cover;
- We replace the faulty element with a new one;
- We check the integrity of the relay switch and install a new one as necessary.
The average service life of domestically produced fuses is 35 – 45 thousand km. Imported analogues take 7 – 10 thousand longer to survive.
Where are the fuses located?
In first-generation Mazda 3 cars (2003-2009), one unit is located under the hood, the second in the cabin. A special feature of the second generation vehicle (2009-2013) is the presence of a fuse box and a relay box, which are located under the hood, and another one is located in the cabin. When developing the third generation cars (2013-2018), engineers returned to the scheme implemented in the original version of the Mazda 3.
In cars manufactured before 2009, the fuse box in the passenger compartment can be found directly under the dashboard. While in the cabin, you should pay attention to the area on the left side of the steering column. In the next generation of cars, the fuses were located under the glove box, hidden by a massive plastic casing. In order to open the interior unit, you need to press the small transparent latch.
Owners of the latest version of the Mazda 3 need to go down to the area located to the side of the driver's feet. The plastic cover immediately comes into view, which hides the fuses.
The current generation car is equipped with a fuse box on the right side of the driver (rib area). It is securely hidden by a casing; the design includes brackets and plugs for fastening. Having opened the block, you can study all the presented fuse designations.
The second generation Mazda 3 hides fuses in approximately the same place as the latest car models. It is worth noting the smaller size of the casing. The plug is located on the back side, which makes access to the fuses somewhat difficult. In terms of the location of this block, there are no differences from the first generation machines. Before working on fuses or any other electrical components, it is important to turn off the ignition.
Recommendations for servicing the mounting block
- Periodically check the condition of the fuses, replace with new ones as necessary;
- After long trips through puddles or in the rain, check for moisture and condensation in the mounting block. Dry the board with a stream of compressed air;
- Install modules with similar current strength (amperage). Do not exceed (underestimate) Amperes;
- If the mechanism suddenly stops functioning, do not rush to replace it with a new one. Check the module status, use a multimeter to diagnose;
- During preventive maintenance, check the quality of fixation of terminals and limit switches. Press with pliers as needed.
Despite the apparent simplicity of the design of the mounting block, carry out diagnostic work at a service station. Unprofessional intervention in repairs leads to undesirable consequences.
How to change Mazda 6 fuses
Volkswagen passat b4 all fuses and relays
You need to release the fuse box cover latch and remove the cover. On the reverse side you can find spare fuses, replacement pliers, and a fuse layout. Diagrams can also be found in the repair manual.
Use pliers to grab the desired fuse and pull it out of the socket. To check, you can look at the removed part against the light
. If the thread inside is damaged, the fuse has blown.
However, even visually, an entire fuse should be replaced, since the consumer it protected refuses to work. The fuses are quite cheap.
The new fuse must be of the same rating (5A, 10A, 15A, 20A, etc.) as the blown one. To make it easier to navigate, the fuses are painted in different colors.
If the problem with the consumer (headlights, power windows, interior lighting, etc.) has not been resolved, there may be a short circuit or the electricity consumer itself is faulty.
DIY repair and maintenance
If an extraneous sound appears in the rear of the car, especially when the engine is running for a long time, you need to think about replacing the Mazda 3 fuel pump
To carry out this work, it is important to purchase new equipment and a filter system. The cost depends on the manufacturer
However, it is worth saying that there is not much difference - the service life is long in any case. Carrying out the work carefully will ensure not only the safe operation of the system itself, but also the entire vehicle as a whole. This allows us to say that the device can be considered a key component of the machine’s performance.
Description of the fuel pump
In order to gain access to the fuel pump, you must:
- Remove the carpet located in the car under the rear seats.
- After this, you need to remove the foam that is under it and find the small fuel pump chip and disconnect it.
- Next, go under the car and disconnect the gas tank itself.
- Disconnect the pipes leading to the fuel tank - remove the durable fittings that are in the public domain.
Important! Care should be taken when removing the special protection that separates the high-temperature exhaust system from this device. At first glance, it may seem that the Mazda 3 gas tank is large in size and weight, however, this is not the case - the device is made of plastic
As can be seen from all of the above, accessing the fuel pump is easy - even a novice car enthusiast can cope with such work. Working with the fuel pump relay is of particular importance. This requires certain knowledge and skills, but this, as a rule, is already important when performing repairs, where additional tools, knowledge and appropriate qualifications are required.
Fuel pump maintenance
In order to check the serviceability of the Mazda 3 fuel pump, you need to perform actions in accordance with a certain algorithm:
- Separate the mounting screws and remove the tie-down hooks in the luggage compartment.
- Remove the carpet under the rear seats by disconnecting the fasteners on the rear door carpet.
- Remove the gas tank cap and disconnect the electrical wiring, taking utmost care to keep the wires intact.
- Connect a voltmeter and crank the engine to take readings.
- When obtaining information about the battery voltage, it is necessary to check the conductivity. If it is missing, the fuel pump must be replaced.
- If there is no battery voltage, it is necessary to remove the trim panel under the fuse mounting block and disconnect the electrical relay of the fuel pump control unit.
- Disconnect the wire from the fuel pump starter terminal.
- With the engine turned on, measure the voltage and, if there is no voltage, check the functionality of the engine control fuse and electrical wiring.
- All changes must be made one by one between all connection wires and the Mazda 3 body.
Such measurements make it possible to determine the cause of a malfunction or places where they may appear in the near future and eliminate such failures in a timely manner and at minimal cost.
Fuel pump repair
Repairing a fuel pump is quite simple, however, it can take a lot of time. To do this, you simply need to disconnect the gas tank and perform a simple replacement of the fuel pump
In addition, it is important to understand that related problems may arise related to the vehicle's electrical wiring and therefore it is important to regularly measure the voltage
The functionality of the replaced fuel pump is checked by connecting the car battery terminals and running the engine for a short time. Even before the motor starts working, you can hear a sound that gives an idea of its performance.
Next, it is important to visually assess the presence of leaks from connections on the rear of the body
Important! All work must be carried out as far as possible from open flames and with the utmost care. Useful tips
Useful tips
In order to correctly perform all work related to replacing and servicing the gas tank and fuel pump, it is necessary to strictly follow certain operating algorithms. Only in this way can the functionality of the vehicle and its systems be ensured, which will certainly reduce the costs of subsequent repairs and maintenance. To perform work related to the Mazda 3 fuel pump, you must have a pit or overpass
Before starting work, it is important to drain the fuel, which will allow you to replace the pump as quickly and safely as possible.
Removal and replacement instructions
It is worth saying that Mazda developers have done everything to make it extremely convenient for those who will operate the car to change consumables, including fuses. In order to get to the compartments there is no need to remove any components or systems.
Preparation
If a consumer fails, use the diagrams to find out in which block it is located. For example, the element responsible for the headlight washers in the Mazda 3 is installed in the engine compartment. And for the headlights and the cigarette lighter in the cabin. Further in the table we find that the headlight washer is number 9, similarly we determine the location of the elements protecting the headlights and the cigarette lighter.
Steps
If the element is placed in a compartment located in the engine compartment of the Mazda 3, then we proceed according to the following scheme.
- Open the hood cover and fix it.
- Finding the location of the block. It's not difficult; it's located on the right. In the photo there is a red arrow pointing to it.
- Next, we find the lever located at the back.
- Pull it and open the lid. There is a diagram on the reverse side.
- We find in it the element we are interested in, a headlight washer or another.
- Let's take it out.
- We check visually. If the fuse is blown, there may be traces of melting on it or a burnt-out spiral may be visible. To determine more precisely, you can use a tester.
- Next, instead of the blown one, we install a new fuse of the same rating.
Decoding the engine compartment section
The request returned an empty result.
- If we have problems with the fuse located in the passenger compartment of the Mazda 3, then we need to find where it is located.
- Next, remove the holder (made of plastic).
- We remove the cover itself.
- Now you need to press out the holders that secure the compartment cover.
- Remove the cover.
- We find two latches with the help of which the block is secured.
- Let's lower it down.
- Next, we do everything as in the engine compartment.
Interpretation of the salon section
The request returned an empty result.
- Electrical fuses can only be replaced with ones of the same nominal value. If a fuse is installed whose rating is higher than the one that was installed previously, it will not be able to protect the consumer. If it is less, it will most likely burn out immediately.
- Once and for all, forget about any bugs and metal jumpers that careless drivers sometimes install instead of electrical fuses. At best, the consumer will be damaged; at worst, such actions can lead to a fire.
- Carry a set of protective elements of various ratings in the glove compartment. It is quite possible that some element will burn out when you are away from the places where they are sold.
- Elements that protect consumers such as the cigarette lighter and headlight washers often burn out, so you should definitely have electrical fuses of the appropriate rating with you in the glove compartment or other place.
- Also, the cigarette lighter fuse may blow if any equipment incompatible with its power is connected to its socket.
Sorry, there are no surveys available at this time.
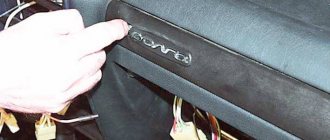
Fuse box in the Mazda 3 BM interior
The interior power fuse box of the Mazda 3 BM is mounted in the niche of the door pillar on the driver's side.
(Link to photo source)
To gain access to the protective elements of the electrical circuit, you will need to remove the decorative casing by pulling the edge.
Scheme for protecting electrical equipment with fuse links in the Mazda 3 BM interior:
- 1 (P. SEAD D) – chair position corrector (30A);
- 2 (D. LOCK) – central locking (25A);
- 3 (P. WINDOW 2) – window lift drive (25A);
- 4 (SEAT WARM) – seat heating complex (20A);
- 5, 9 (R. OUTLET 3, 1) – additional power sockets (15A);
- 6 (SRS 2/ESCL) – load controller mounted in chairs (15A);
- 7 (SUNROOF) – hatch (10A);
- 8 (M. DEF) – heating system for external mirrors (7.5A);
- 10 (MIRROR) – mirror position regulator (7.5A);
- 11 (F. OUTLET) – cigarette lighter fuse Mazda 3 3rd generation (15A);
- 12 (AT. IND) – indication of the position of the automatic transmission selector (7.5A);
- 13-15 – not used.