Published: 01/29/2016
Rating:
Tags:Chevrolet NivaBumper repair
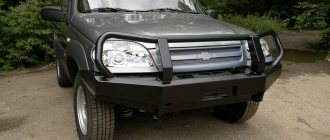
“Niva Chevrolet” is a practical domestic SUV for lovers of “forays” into nature. But those who like to drive through swampy areas and difficult places often complain that the Chevy's front bumper cannot withstand all the loads. After this, it must be repaired or replaced. That’s why lovers of such recreation try to install a power bumper, which can be purchased and installed in the cabin or made with your own hands. To do this we will need free time, skillful hands and a lot of patience.
Power bumper for car
When installing a power bumper, it is advisable to provide fastenings for additional equipment that will not be superfluous:
- winches;
- hi-jack;
- lighting.
You can buy a new body kit for Sheva Niva or make it yourself.
How to make a power bumper with your own hands: diagrams and drawings
Therefore, to make this type of protection you have to resort to various tricks.
Many people make them themselves, at home. To do this, you will need the following tools and materials: Do-it-yourself power kit on a car When doing this work with your own hands, you need the skills of a specialist, since nothing will come of it without good welding. You also need to draw a sketch of the power body kit with all the dimensions you expect. Such sketches should be made in three planes, with the metal cutting areas and bending points marked.
Making a reinforced bumper with your own hands
Chevrolet Niva power bumper After this, you can begin preparatory work. When doing all the work with your own hands, the main thing is to follow safety rules, because you will be working with an open Chevrolet Niva power bumper.
When manufacturing a power bumper, we recommend using special graphic editors in which you can easily calculate the dimensions of your new body kit, bevel angles, mark fastening points, and also determine the amount of material required. You need to decide what shape and what metal your new, reinforced bumper will be made of. It is recommended to use metal with a thickness of 3-4 mm.
The weight of this structure was about 12 kg.
Yes, it’s heavy, but reliable. Jack tests were successful. Now let's get to work on the bolts securing the bumper itself to the amplifier bars.
Advantages and disadvantages
Advantages of overlays and films:
- budgetary;
- easily replaceable;
- protect from minor mechanical damage;
- no they cause problems on the legislative side.
- they will not protect you in serious accidents;
- wear out relatively quickly.
Advantages of kenguryatniks and power bumpers:
- a car guard and a power body kit provide much more serious protection in case of an accident for the vehicle and for the driver and passengers;
- Additional lights for SUVs are often installed on the kenguryatnik; a winch is installed on the power body kit;
- The new body element transforms the car's design.
Preparatory work
Before starting to create a power buffer, it is necessary to carry out a number of preparatory measures.
- Determine the objectives of the future product. The design of the power bumper also depends on the list of tasks. If you need to increase the strength of the standard body kit, then create an identical part from a more durable material. Well, if the vehicle will be used in harsh conditions (for example, hunting or fishing), then it will be necessary to acquire a more reliable body element. For example, the Niva can be equipped with a homemade kenguryatnik (it can act as a basis for installing attachments, for example, additional lighting devices or a winch).
- Create a drawing of the future product. This step will allow you to make a symmetrical kenguryatnik on the field with your own hands. Subsequently, when constructing the body element, it is necessary to follow the created drawing.
- Prepare the necessary tools and materials:
- The power bumper can be made from sheet metal, square or round steel pipes.
- To work, you will need a welding machine, a grinder and a grinder, a spray gun, a pipe bender, and a drill.
Creating a power kit requires basic skills in working with a welding machine, pipe bender, drill and grinder. If they are not there, then you should turn to professionals. Otherwise, the result of the work will be disastrous.
Buy or make
Stainless steel bumper protection allows you to avoid accidental collisions with the curb, as it provides for the installation of an additional metal part - kengurin. Initially, such devices were used only for SUVs. However, recently such protection has begun to be installed on other models of passenger cars. It is almost impossible to find a ready-made kit for sale. Extended protection looks quite good on minibuses, as well as SUVs. Such accessories are not manufactured for passenger cars of other classes. If the desire to decorate the body of your vehicle has not disappeared, then you can try to make the protection yourself.
DIY front power bumper UAZ 469
Self-production of a power bumper requires a detailed drawing. You can make it yourself or find a ready-made version. Some motorists use specialized computer programs to create a drawing. When making a drawing, you must consider:
- Product width. Before creating a drawing, the car body is measured.
- Places where the power bumper is attached to the car. The product is attached to the UAZ 469 frame with bolts. To do this, you need to mark the location of the holes on the drawing.
- Availability of additional attachments. The location of fog lights, tow hooks, winch, etc. is noted on the drawing.
To manufacture a power bumper, welding will be required. You can use devices of any type designed for joining workpieces made of a specific metal. If you have no experience in welding metal parts, it is better to contact a specialized workshop. Specialists will manufacture a power bumper according to a pre-prepared drawing.
Before starting work, according to the created drawing, parts are cut out from thick cardboard. After this, they glue the model together and try it on the car. This procedure allows you to identify shortcomings and eliminate them as soon as possible, and prevents damage to the material if there are errors in the drawing. The car owner can evaluate the appearance of a car with a power bumper and, if necessary, make changes to the design of the product.
After preparation, they begin to manufacture the power bumper. For this, prepare the necessary materials. The power bumper can be made from a metal channel, profile pipe, or corner. The amount of material is selected according to the prepared drawing. Assembly of the front power bumper of the UAZ 469 car is carried out in the following sequence:
- Marking. Markings are applied to the material that exactly correspond to the drawn up drawing. To correctly apply markings, you can use measuring tools or transfer the necessary lines from an already made template.
- Preparing parts. The power bumper is divided into three parts. Each of them is made separately. The central part is equipped with brackets designed for fastening to the car frame. Standard fasteners will not withstand high loads. In this regard, it is necessary to strengthen them with pieces of metal plate, or to make new ones. Metal cutting is carried out with an angle grinder or using a gas cutter.
- Installation of the central part. The mounting brackets are fixed to the power bumper with bolts or by welding. After this, the central part of the bumper is installed in the seat. If the car owner plans to use a winch, at this stage it is necessary to provide a place for its installation and make mounting brackets. In the central part of the power bumper you will need to cut a hole for the winch cable to pass through.
- Installation of side parts. The parts are installed on the car according to the drawing and fixed to the central part by welding. If the bumper is made from a profile pipe, then it is necessary to bend the sections at the desired angle. To do this, you can use a specialized pipe bender or bend the sections in any other way.
- Cleaning welds. After connecting all parts of the power bumper of the UAZ 469 car, it is necessary to eliminate the welding seams on the front surface of the product. For this, an angle grinder is used.
- Preparing for painting. A layer of primer is applied to the surface of the product. It is better to choose an anti-corrosion compound. This will protect the metal parts of the bumper from corrosion and increase the service life of the product. The bumper is painted in several layers. The color of the product may be similar to the car or different. The color selection is based on the personal preferences of the car owner.
- Installation. The power bumper of the UAZ 469 car is attached to the car frame. This makes it possible to achieve high resistance to mechanical damage of varying degrees.
Preparing the machine
First you need to prepare the car for what awaits it. A disassembled car will be needed not only because a bumper will be installed on it; that is still a long way off. It is necessary to disassemble it because the mock-up will be immediately tried on in order to assess in advance how the car will look. Let's start disassembling the front of the car. First of all, we’ll figure out how to remove the original bumper of the car, and everything that, in your opinion, will interfere with the installation of the power version. Next, we begin making a drawing or layout. The layout will, of course, be better. But those who have imaginative thinking can simply draw on paper. However, we repeat, the layout will be better: it will allow you to immediately see what exactly happened and how it will look on the car.
When making a layout, you can go online and look at ready-made options: any elements you like can be used in your work. Or you can find ready-made independent work and ask for drawings.
A huge advantage of independent work is complete freedom: you can make a bumper with a cradle, or with a winch, or you can combine it. In general, complete freedom of action.
When choosing the appearance of the bumper, the only limitation will be your imagination. But technical excesses should be approached more thoughtfully. We should not forget that the bumper should not only be very durable, but also weigh a little. If the bumper is too heavy, it may adversely affect the car body. You also need to carefully measure all elements and check their symmetry.
When making a bumper for a Niva (and this is a fairly widespread SUV), you need to think about strengthening the side members in advance, since the standard ones will not withstand such a large additional weight. Also, you will be 100% confident in a self-made bumper, while a purchased one will be scary even to test. Having given so much money for it, it would simply be scary to ruin it with blows or something else.
Power bumpers for Niva and Chevrolet Niva
Using a grinder, you need to cut off the front plates of the side members, as shown in the photo below. Preparation for installing a power bumper 1 - cut-out plate; 2 - what should happen after cutting out the plates. The next stage is preparing the bumper for painting. Usually a special powder dye is used. Since the choice of colors is very large, you can transform the bumper the way you want.
The most commonly used glossy finish. Painting is not that difficult. The main condition, as with most other car repair activities, is the correct choice of materials and tools. If a removable winch or rack is installed, it is also recommended to paint them.
If all processes are carried out correctly, the result will exceed your expectations. You can enjoy a comfortable and safe ride in your car.
Don’t forget that by repairing and installing these parts on your car yourself, you save quite a lot of money.
Niva. Do-it-yourself power bumper VAZ 21213. Without registration with the traffic police.
You can use a square channel that will be attached to pre-made amplifiers, taking into account the bending angle of the bumper. A pre-cut square pipe is welded to the finished fasteners. It is necessary to observe all the symmetry of this process, because if the size of the central and curved parts, as well as the bending angles, are different, the bumper will turn out to be beveled.
All seams must be thoroughly welded, removed from slag and cleaned with a grinder. The guide jaws for the winch are installed, places for the hi-jack are cut out, and the installation location for the towing clamps is provided.
After the power bumper has been manufactured and installed, it is recommended to test it, since the entire structure may need to be strengthened. Further work consists of covering the entire structure with anticorrosive, primer and then painting it. To do this, it is recommended to use high-quality powder paint, which, in turn, also protects the metal from corrosion.
The main thing in this matter is to determine your capabilities, namely, the ability to work with metal and welding.
This is the main part of the work you do. Universal arch extensions Author: Vysotsky Alexander Petrovich Higher education: Chita State University, Institute of Technological and Transport Systems, specialty - cars and automotive industry. Repair of passenger cars of domestic and foreign origin.
Design options
You should carefully consider what to choose and install on your car. Today, a wide range of power body kits are produced that can replace a standard fiberglass bumper that cannot withstand extreme loads. The choice of towbars for Niva is approached with the same care.
Car owners are offered to buy several design options that have their own characteristics. They can be roughly described as follows:
- classic devices with a platform for a winch;
- designs with additional space for a hi-jack;
- models with towing eye and roller holders;
- with stops for using a jack;
- with and without a kenguryatnik.
If you decide to install a power bumper on your Niva, be sure to consider a few points.
I would include the most significant installation nuances:
- Winch and the possibility of its installation. It will be indispensable if you get into a mud trap. The winch allows you to get out of a difficult situation without outside help;
- Hi-jack. An interesting device, also necessary for getting out of difficult road situations. The operating principle is similar to a jack that lifts wheels stuck in the mud;
- Additional optics. Its installation is not always mandatory, but sometimes it turns out to be useful. A prime example is fog lights;
- Place for mounting a license plate.
I can’t say that self-assembly is preferable to buying a factory body kit. But creating reinforced bumpers with your own hands is not so easy. You will need certain skills, accurate drawings, free time and quality supplies.
Purchasing ready-made structures is usually more expensive, but they are ideal for the Chevy Niva, do not require lengthy and complex assembly activities and guarantee the reliability and attractive appearance of the SUV. In Moscow and any other city the assortment is extensive, and don’t forget about the opportunity to order a part via the Internet. The choice is yours.
Making a drawing
Before you make a power bumper with your own hands, you will need to carry out painstaking preparation.
It can be represented in the form of the following stages:
- First, the standard product is dismantled. Try to make it so that it is not damaged and can be used on another machine;
- Take measurements carefully. This is a responsible procedure. Accuracy is important here if you want the power bumper installation to be hassle-free once it's made;
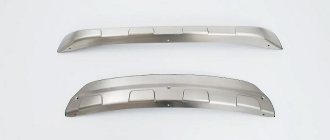
Drawing of a power bumper for UAZ 469
- When making a power bumper with your own hands, drawings are necessary - you won’t be able to do without them. Therefore, scour the Internet - you will probably find something suitable there. Be sure to make sure that the dimensions on the found drawing correspond to those that you removed from your car;
- If you don’t find anything suitable on the Internet, you will have to draw your own drawings. This is a job that requires certain knowledge. If you don’t feel strong enough to handle it, try asking one of your friends who is good at drawing.
Bumper tuning using available building materials
Before you begin, you need to decide on the method of completing the task. To get a unique body kit, you can tune the car’s factory bumper or make a new product from scratch.
The first solution to the problem is simpler to implement, since here all the main connecting and fastening elements of the body kit remain original. The second option is more complex and requires precision, patience and a lot of free time from the performer.
Let's consider step by step each of the options for tuning and manufacturing products.
DIY bumper tuning
Before starting tuning, the body kit must be removed from the car and cleaned of dirt and dust. The technology for tuning the rear and front bumpers is identical. In those places where it is planned to modify the product, it is necessary to glue the pieces of polystyrene foam, the central part must be sealed with masking tape, and cardboard must be secured at the edges, which will prevent the spreading foam.
Next, the product is filled with polyurethane foam, taking into account the fact that when it dries, it increases in volume. After it has completely dried, you need to give the body kit a new shape using a knife and sandpaper. Then it is treated with fiberglass and epoxy resin, putty is applied and sanded again with sandpaper.
The final stage of tuning will be priming and painting the resulting product.
A more difficult task is creating a body kit from scratch. Let's look further at how to make a bumper with your own hands from available building materials.
Foam bumper
The simplest material to process is polystyrene foam. Polyurethane foam is a more difficult material to process, according to experts.
Before you start working, draw a sketch of the product you want to get as a result, or find a ready-made drawing on the Internet. Having a visual aid in front of your eyes will make it easier to complete the task and not spoil the material.
How to choose a bumper?
The first step is to decide why you need a power bumper and whether you need it at all. If you are one of those who like to drive through the forest, mountain, dirt roads or even off-road, where the risk of breaking off a regular front bumper is incredibly high, then you simply need enhanced protection. If you want to install such an addition to the field just because the car looks beautiful, you should not chase heavy, reinforced bumpers; a low-quality bumper will be enough. Well, if you participate in competitions or like to use your car as a tank, then it’s worth spending a little money and purchasing top-level protection. When choosing a power bumper, you should pay attention to the following:
- The material from which it is made;
- Construction;
- Additional bumper features.
Basically, all high-quality products are made from high-strength steel, and in addition are coated with a protective layer of paint to prevent corrosion.
When purchasing, you should pay attention to what design the bumper is. It can have different shapes designed for different machines and operating conditions. And it may have several additional functions, for example, optics protection. The headlights may be damaged if they hit a branch or stone, while the front bumper is not affected by such impacts. Typically, the front power bumper is equipped with a platform for a winch. A winch is a very useful device for off-road vehicles, so even if you don’t have one, try to choose protection that is compatible with the installation of an electric winch. Pay attention to the towing eyes and attachments to the vehicle frame.
The rear bumper is often immediately equipped with a gate for attaching a spare tire. They are more expensive, but nevertheless it is more functional. The front bumper may not be compatible with the skid plate already installed. In this case, it will have to be replaced by selecting the necessary spare part.
Some of the best body kits are produced by the RIF company. This manufacturer has quite a lot of options for different configurations on the Chevrolet Niva, so choosing the right product will not be difficult. RIF products are reliable and durable.
Decorative design of bumpers
In fact, the craftsman is engaged in the decorative design of the car bumper even at the manufacturing stage. Painting the product in the desired color can be considered such “decor”. It can match the color of the car body tone-on-tone or be contrasting. Remember that the drying time of paint directly depends on its chemical properties and can be several hours or even several days. The same applies to anti-corrosion agents.
Pay attention to the always winning black color. It can even be suitable for decorating a car whose body is painted in light colors. This combination will emphasize the peculiarity and uniqueness of the car. If the color of the car itself is also dark, consider a color called metallic. It will even help hide minor defects and scratches.
One of the modification tools is covering the bumper with film. It's economical and beautiful. Another advantage of film is the ability to replace a boring background with another in a couple of hours: film is a thin and pliable material. At the same time, it is not recommended to consider covering only part of the bumper; special film should be used over its entire surface.
Making a car bumper for an UAZ, in addition to having the necessary material and tools, also requires some skill, several hours (at best) or days of free time. The design stage (production of drawings and models) cannot be neglected, since it is when creating a sketch that an error in calculations or measurements can be noticed and corrected in time.
Do-it-yourself purchase and installation of a power bumper
One of the options for purchasing such equipment for your SUV is to purchase a ready-made bumper. Often this option is quite sufficient, especially in cases where this is done solely for the sake of a beautiful appearance. If you are pursuing only an aesthetic goal, you should not cook the bumper yourself from scrap materials. It is better to actually purchase ready-made options in the form of beautiful chrome-plated offers. However, the purchase must meet certain quality requirements:
- evaluate the weight of the product being offered to you; real metal cannot be too light;
- any plastic or similar options for power bumpers are money thrown away;
- check the quality of the chrome plating by testing it using one of the known methods;
- Find out in which country and in which company the device offered to you was produced;
- think over the fastening system that you will use in the future;
- use price selection - discard the cheapest and most expensive options.
It is better to make a purchase in a store that offers a large number of options in the assortment. If a supplier or retailer offers you only one possible purchase option, you may want to look for more interesting options. With the help of modern services from online stores and other companies, the range available for your order is limited only by your own imagination. But remember that even the most expensive power bumper in the store will not be the ideal functional solution to your problem.
Preparation of materials and tools
Most often, bumper protection is made of stainless steel. This material is much more practical than other metals. Painted pipes require renewal of the paintwork after several trips. Stainless steel does not require this. With proper care, this metal retains its appearance well. In addition, a stainless steel accessory looks more solid. However, it is worth considering that such metal is much more expensive than other varieties.
In addition, the quality of the connections of individual parts and the overall appearance of the structure will depend on which welding machine will be used during the work. Only a special argon-arc unit can polish and grind pipes into a single whole.
If you don’t have a device such as a pipe bender at hand, you will have to purchase several bend angles. In this case, the angle should be 90° and 45°. The choice of corners depends on the complexity of the design. You may also need a pipe cutter and a grinder.
Bumper manufacturing and installation
After the preparatory phase, we have everything to make a power bumper for a UAZ with our own hands.
The further process occurs according to the following algorithm:
- We make stencils from paper according to the drawings - this is done in order to make sure that all dimensions correspond to reality. In case of an error, you can easily make the necessary corrections.
- We try paper stencils on the car, make marks, and find out which areas require correction.
- After we have made sure that the dimensions in the drawing are correct, we cut out the structural elements from the steel pipe with a grinder.
Making a power bumper with your own hands
- Next you will need to weld the steel bumper and grind the weld seams;
- Standard fasteners are hardly suitable for this purpose - after all, at the moment of impact in a collision, the power bump stop must not only withstand the impact. It is important that it does not fall off - therefore we reinforce the fastenings with a steel plate.
- We paint the resulting product and after it dries, we carry out installation.
Self-made power bumper for UAZ
Manufacturing process of individual elements
Making a stainless steel bumper guard is a process that requires patience. To begin with, it is worth preparing the individual design details. To do this, you need to make marks on the pipes and corners that correspond to the diagram, and then use a grinder to make cuts in the places with the marks. When making protection, one main rule must be observed - symmetry.
When connecting the main pipes and T-shaped jumpers, it is worth leaving a small gap, about 1 millimeter, but no more. To do this, use a pipe cutter. When the preparation of all elements is completed, it is necessary to carefully inspect them and check the symmetry again.
Installing an accessory
How long the kenguryatnik can serve you in the future depends on correct installation. Installation of a kanguryatnik begins with the fact that you measure the side members on your car. Now weld the fasteners to the protection pipes at this distance. These can be plates of approximately 10 mm with M12 holes for bolts.
Now you will need an assistant to finally install the cage. Place it on the front of your car. The fastenings must be level with the side members.
Having measured the fasteners, mark and make holes in them. After this, use bolts to secure the guard to the car. But there is no point in delaying it too much. During the impact, the structure should bend slightly, protecting the frame and body of the car. You can also proceed to installing the rear bumper protection.
First stage
First of all, you should decide on the type of kangaroo. For each class of vehicle there is a specific model. After defining the model, you should make a small sketch.
If necessary, you can contact specialists. They will help you determine which type of protection is right for your car. When the diagram is ready, you need to carefully measure the front of the car. The obtained parameters should be transferred to the diagram. When choosing a kenguryatnik model, it is worth considering that a more complex drawing requires more complex manipulations.
Additional tuning elements
Motorists, trying to give their vehicle a unique design, tune the bumper. Basically, these alterations concern the installation of the following elements:
- Lip. It is a kind of protrusion, which is located at the bottom of the protective structure. It is made of fiberglass and polyurethane foam, as a result of which the lip is primed and painted to match the color of the car.
- Diffuser. Decorative trim for the lower part of the rear bumper. Foamed PVC is used to create it. Markings are created on the material, after which the sheet is heated with a construction hairdryer and the parts are given shape. They prime and paint, and then attach it to the car using sealant.
- Fangs. A decorative element that is installed on both metal and plastic body elements. For mounting on “plastic”, fiberglass is used. To install fangs on iron parts, use metal and a welding machine.
Also, to give the car an individual look, stickers are placed on the bumpers, or parts are covered with carbon fiber.
Protecting the bumper with masking tape
There is a lot of discussion about masking tape on many automotive forums. Protecting the bumper from scratches with this material is simply sealing the surface before long trips. This trick protects well against midges, but is absolutely ineffective against small collisions and flying stones.
In addition to its low efficiency, the use of masking tape has other pitfalls that have disappointed more than one car enthusiast. If the tape is used incorrectly, removing glue from the surface of the paintwork is an almost impossible task. Therefore, here you need to follow several rules outlined below.
Firstly, you need to buy high quality masking tape for these purposes. Secondly, before finishing the bumper, the part must be thoroughly washed and dried. And most importantly, the applied masking tape should not be left on the car for too long. If it stays there for more than a week, it will be extremely difficult to rip it off. And after two weeks, some tapes leave their adhesive on the bumper, which can only be removed by sanding or painting. Well, the last drawback is the unattractive appearance of the wrapped car.