Why polyurethane film? What is the difference between vinyl and polyurethane films?
You can distinguish these two types of films by stretching small pieces of film. Vinyl deforms when stretched, polyurethane film returns to its original position. The composition of the polyurethane film resembles transparent rubber, and, due to its plasticity, it seems to spring back solid objects without visible consequences on its surface. Vinyl film is hard and scratchy; it is used for decorative or advertising purposes; it is not suitable for protecting a car, since it does not have sufficient protection properties.
Even purely in terms of tactile sensations, the polyurethane film is very pleasant, because elastic and pliable, viscous and “non-slip” - therefore, even for the internal surfaces of a car interior, it is preferable. In addition, it is easier to glue - it stretches, and when heated, it stretches very strongly and fits complex surfaces well.
Therefore, both for the exterior and interior, I always use polyurethane, and leave vinyl to advertisers to cover billboards.
So, I've done some DIY wraps on some parts of my car before and usually prefer 3M VentureShield film, like here. 3M VentureShield film is excellent, but time passes and other manufacturers are improving, and after reading the results of practical tests (for example, here), to protect exterior elements, I decided to try something stronger and thicker - instead of 165 microns thick 3M VentureShield, I took Oraguard 280 Stone Guard Film is 230 microns thick, but for interior elements you can use something thinner, because... and the impact on the film in the cabin is not so harsh and gluing a thin film is still much easier, so 3M VentureShield, and even more so, Oraguard 280 Stone Guard Film, are redundant for the interior, and I chose 150 micron Hexis CarPro 150. At the same time, both of these films (Oraguard 280 Stone Guard Film and Hexis CarPro 150) surpass the legendary 3M VentureShield in practical characteristics. This is not so significant and important, but still... By the way, 1 micron = 0.001 mm, i.e. 150 µm = 0.15 mm.
My topic turned out to be quite voluminous, with a lot of photos, so I divided it into 2 parts.
Part 1 - Let's start with protecting interior elements.
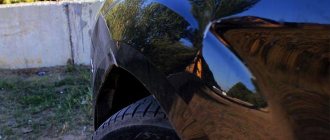
Polyurethane anti-gravel film Hexis CarPro 150 is a transparent self-adhesive film specially designed to protect car bodies. Thanks to its excellent shockproof properties, the material protects the paintwork from chips, scratches, etc. Tests confirm that CarPro 150 is fully resistant to: pinpoint impacts, UV exposure, bending, gasoline, power washes, and pressure washes. According to the manufacturer, service life (based on vertical exposure on the street): from 6 to 8 years. Manufacturer: France Film thickness: 150 microns Cost 2800 rub. p/m
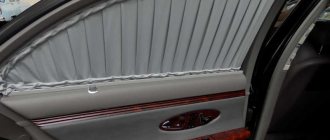
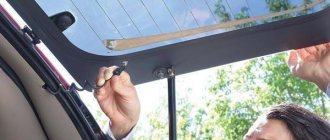
I used this film to protect interior elements where there are a lot of bends and hard-to-reach places, where it is difficult to glue a thick film and there is simply no point: plastic thresholds, varnished surfaces of the center console and doors, places where paintwork from door seals has been rubbed, i.e. in essence - for protection against hands/feet/nails/scratches/scratches.
Detailed instructions on how to glue the protective film, which I took from here, compiled and slightly edited by me, can be found here.
Some nuances and details.
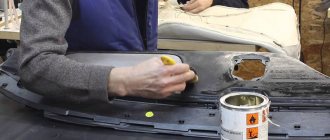
The varnished surfaces on the door handles and armrests, as well as the center console, were already covered with fingernail marks over the year and a half of the car’s life, so I polished it first.
There were no deep scratches, only the varnish needed to be polished, so I didn’t remove the finishing elements from their places first, I did everything right on the spot, but first protected (pasted) the adjacent surfaces with paper tape, tucked in plastic cards - nothing was damaged or stained anywhere . Because I did it without removing it, then polished it by hand. A piece of felt (remnants of an overcoat) with paste for polishing paintwork. I used 2 pastes, one rough, the other for final polishing.
How to properly cover a car interior with vinyl film (photo gallery)
Bored with your car's interior?
There is a simple way to update interior parts, which, if necessary, allows you to return everything to its original condition. Let's consider the process of pasting plastic elements with vinyl (film), and also learn about the most popular colors of this material. Question to AvtoVAZ: Will paint be added to the dashboard or the structure of the plastic changed?
Answer: It is planned to use decorative inserts and cladding with original designs for the Exclusive LADA Vesta package.
Why vinyl film is better than painting
Do you know why car enthusiasts cover the interior with vinyl film rather than spray paint it? There are several reasons:
- the ability to choose complex colors in the form of texture (for example, carbon or wood);
- it’s easier to return parts to their original condition (it’s easier to remove film than paint);
- non-toxic (varnish and paint require a well-ventilated area);
- You can cover parts with film without removing them (this is much more difficult to do with paint).
You can buy inexpensive vinyl film on AliExpress.
Advantages of covering a torpedo with vinyl film
- Easy to clean. The film is easy to maintain and can be compared to plastic. It is wiped with a napkin, rag, treated with cream or polish. Salon dry cleaning will not cause any harm to the vinyl covering.
- Easy replacement. If you want to update the torpedo, the old material can be easily removed. There are no traces left after it.
- No scratches. Unlike varnished plastic, the film does not leave defects or noticeable unpleasant marks from hard objects or nails.
- Stylish appearance. Imitation of leather or wood makes it presentable and expensive, which cannot be said about ordinary plastic inserts.
How to cover the interior with vinyl with your own hands
The film covering process is universal, that is, the instructions are the same for all Lada models (Vesta, Granta, Kalina, Priora, Largus, Niva 4x4 and XRAY), as well as foreign-made cars. Features will only appear during the dismantling of interior parts.
Features of fitting parts:
- when working with uneven surfaces (curved, crooked), it is necessary to stretch the film by heating it with a hairdryer;
- film with textures (carbon, wood, etc.) cannot be stretched too much, the texture will not be even;
- Try to touch only the edge of the self-adhesive surface with your fingers.
- Degrease the front and back surfaces (the film will wrap);
- We apply the film to the part so that it has no tension and is pressed against the surface as much as possible without heating;
- We heat the film and stretch it in all directions. We try to delay as little as possible;
- When working with corners, we lay the film on the edge; it will be laid on the adjacent sides automatically;
- We cut off the excess film around the perimeter. There should be no film on the back of the corners;
- We fold the film to the back side of the part.
Video guide for wrapping parts with film:
An experienced craftsman is able to cover a part with film without removing it, that is, directly on the panel (dashboard).
Interior wrapping: stages of work
The procedure for wrapping vinyl is absolutely the same for all cars - both domestic and foreign. The whole process consists of several main stages:
Preparing parts
Complex parts, the pasting of which requires particularly delicate and filigree work, should be dismantled. After this, wash the parts thoroughly, degrease them and dry them.
Film preparation
Apply the vinyl film to the part you are going to cover for a “try-on”, and then cut a piece of film slightly larger than necessary. You will trim off the excess film at the very end of the work, when the part is completely covered.
Preparation and application of soap solution
Fill a spray bottle with water and add a little liquid soap, then generously spray the surface of the part. Remove the protective paper layer from the vinyl film and also generously moisten the film with soapy water.
Pasting the film
Place the film on the part with the adhesive side down and, using slow, gentle movements so as not to tear, begin to smooth the film with a rubber spatula.
Getting rid of bubbles
If you see air bubbles appearing under the film, disperse them with a spatula, smoothing the surface from the center to the edges of the part.
Processing the edges of the part and drying
Dampen a clean rag with alcohol and treat the edges of the part - this will be needed for further wrapping of the vinyl film. Turn on the hair dryer and dry the part, directing a stream of hot air from the central part of the part to its edges. At the same time, smooth the film with a rubber spatula and a squeegee with a felt tip. Make sure that the vinyl fits as tightly and evenly as possible to the part.
Turning the edges of the film
Gradually stretching and, conversely, tightening the film, wrap its edges and corners. This procedure must be performed very carefully so as not to tear the film. Please note: the higher quality the vinyl film, the higher its elasticity, and the less susceptible it is to accidental tearing.
Final drying
When you are sure that the part is completely covered, dry it again with a hair dryer and wait 10-15 minutes. After this, you can remove the transparent film.
The most popular colors of vinyl film
According to statistics of queries on the Internet, the most popular are:
- carbon film;
- wood effect film;
- matte film;
- gold (for the body);
- "chrome" film;
- mirror film;
- 3D texture.
How do you feel about this kind of interior tuning? What is the best way to finish the interior, with film or paint? Have you ever covered plastic elements with your own hands? What were the difficulties during this operation? Post your options for interior wallpaper and take part in the survey. Make sure that the interior of the car is harmonious and complete; pay attention to choosing seat covers that match the color.
Interior finishing options for Lada cars
Options for tuning the interior with film can be seen in the photo (the work was done using Photoshop specifically for Lada.Online). For comparison, we post three images of modern cars: Lada Priora, Granta, Kalina, Vesta, XRAY, Largus and Niva 4x4:
- Staff salon;
- Wood effect film;
- Carbon film.
How to glue carbon film and do it efficiently
In addition to its aesthetic transformation, carbon serves as a barrier to damage to the car’s paintwork. It is important to understand that it is unlikely that you will be able to decorate a car with real carbon fiber yourself - by carbon fiber we mean a carbon fiber-look vinyl film. This is a simpler coating, but if applied correctly and with high-quality material, it will last 5-6 years.
Synthetic vinyl film can be applied to metal, glass and plastic. It is suitable for both interior and exterior decoration of cars.
Conditions for gluing carbon film on a car
Before gluing carbon fiber, you need to prepare a place to work, as well as a set of tools:
- Vinyl pasting is carried out at positive temperatures up to 20° C in a ventilated dry room;
- It is very difficult to work alone on tuning, so it is better to agree in advance with a partner;
- You will need scissors, a scalpel for cutting the film in hard-to-reach places, a construction knife, a tape measure and a hair dryer for drying the surface, a set of polymer spatulas for smoothing and removing air bubbles.
Wet method
For those new to film wrapping, the wet method will be easier and faster.
Procedure:
- You need to cut a piece of film to the required size, taking into account a turn of 8 mm on each side. In large areas, it is allowed to leave folds up to 5-6 cm.
- The surface is degreased with a soap solution and washed with clean water.
- If there are uneven spots and scratches, then before applying the sticker you need to restore the structure of the surfaces using a primer or automotive putty. It is important to consider the following: if the primer dries in 5-7 minutes, then the putty takes up to several hours, and then it must be sanded with fine sandpaper.
- Afterwards, a soap solution is applied again - the carbon fiber will be attached to it. In order for the film to fit tightly, you must check that there are no contaminants left. And to apply the soap solution evenly, it makes sense to use a spray bottle.
- The film must be applied to the surface, having first removed the backing from it, and pressed step by step onto the paintwork, smoothing with a soft polymer spatula or felt squeegee.
- For fixation, the front part is heated with a hair dryer. The final gluing process should begin from the center of the element, gradually moving to the edges.
Important! Moisture should not be allowed to dry out during the first gluing process, so there is no need to apply the soap solution to too large an area at once.
To properly glue carbon fiber using the wet method, uniform heating must be observed, otherwise both the film and the car’s paintwork will be damaged. The minimum setting of a hair dryer in the range from +50 to +70° C is sufficient.
Methods of wrapping cars with film
There are two ways to glue vinyl film to a car: wet and dry. These methods are similar in the application process, the difference is the application technology.
Wet method
The wet method is more convenient if you are applying it for the first time or with your own hands. Either the adhesive layer or the surface itself is moistened with the solution. This will allow, if necessary, to correctly direct the material when it is displaced on the body. All soap solution and bubbles are removed using a squeegee and hair dryer.
Dry method
Dry carbon fiber pasting has its advantages:
- the film does not move during installation;
- adhesion to the paintwork of the car is higher than with the wet method;
- vinyl stretches less.
Instructions:
- Preparation for pasting using the dry method is not fundamentally different from the wet method. But after removing contaminants with a wet solution, you need to dry everything thoroughly and then treat the surface with White Spirit.
- The film is applied to the element and smoothed.
- Heat the film with a hairdryer over the entire area and gently smooth it again with a spatula.
- After careful smoothing and heating, excess carbon is cut off.
It is worth considering that 3D class carbon films are more durable than 2D and are more suitable for the dry method. High-quality films have special perforations, and these channels help to expel air evenly.
Features of gluing with carbon-look vinyl film
Even the dry method requires drying for 4-6 hours, and a visit to a contactless car wash will have to be postponed for a couple of weeks. Otherwise, the coating will quickly come off or become covered with bubbles.
If you manage to purchase an inexpensive 2D film, then during the installation process it is better to make perforations in it yourself to remove air. For this purpose, you need to heat a thin needle and make holes in the film in a checkerboard pattern at a distance of 3-5 cm.
Using the dry and wet method, you can glue carbon film to plastic inside the car. The principle and procedure is no different from body wrapping. The difficulty lies in the geometry of the elements. In places where it is difficult to go through with a spatula, you need to roll the film with your finger to avoid uneven tension and tears.
The plastic must be cleaned of dirt and be sure to degrease before gluing the film.
After ironing with a spatula and heating with a hair dryer, it would not hurt to fix the edges of the film on the plastic with heat-resistant glue, because It can peel off when turning.
Important! Do not overheat the plastic with a hairdryer; due to high temperatures, the polymer elements can melt and deform.
Covering with corbon-look film allows you to emphasize the individuality of the car without resorting to repainting. Beginners should choose the wet method of fixing the film - it allows you to easily adjust the position of the part. Craftsmen prefer the dry method, which does not require constantly updating the layer of soap solution. The film is suitable for use both outside and inside the car. The main thing is to thoroughly clean and degrease the surface and expel all drops of air during the smoothing process. The finished tuning will last an average of 5 years.
Purpose
Covering a car with this material has both practical and aesthetic meaning. From a functional point of view, gluing carbon film is beneficial in that it protects the car’s paintwork from the effects of external factors, such as precipitation, grains of sand and stones, ultraviolet rays, and chemically active substances. This is especially true for parts exposed to road particles, such as the hood. Externally, the coating in question quite reliably imitates carbon, as evidenced by photos and videos. Therefore, it is usually applied to those parts that are most often represented by carbon analogues, that is, the hood, mirrors, etc. The film can also be used to cover plastic in the interior. Moreover, this coating is much cheaper than the original material. You can learn about the various options for applying film both on body parts and in the interior from photos and videos. In addition, if the hood or other parts already have damage to the paintwork, they can be covered with film to hide the defects.
That is, carbon film has attractive aesthetic qualities and at the same time is strong enough to protect the car’s paintwork from various environmental factors. In addition, this material is suitable for application to various materials, such as metal or plastic, so it can be used both for coating body parts and for interior decoration.
Subject to compliance with operating rules, the service life of carbon film is up to 10 years.
Plasti Dip or refreshing the interior dashboard of a car with your own hands
Hi all. Today my review will be devoted to the interior of the car, namely, “updating” the car’s interior using liquid rubber. You can learn what liquid rubber is and how it is applied from this post, but let’s talk about everything in order.
Order History This story begins when my wife wanted to change the interior color of her car. She was tired of the gray color of the torpedo, and as she said then: “it’s boring.” We decided to eliminate this shortcoming. The first option that came to mind was reupholstering the interior in leather.
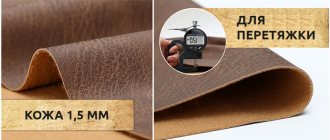
Upholstery with leather Upholstery of a car interior with leather is the most correct, but also the most expensive option. The thing is that the seats and ceiling in the car were in good condition, and we only needed to retighten the dashboard. There was no point in dragging only one torpedo. And besides, it's expensive. Having estimated and considered all the pros and cons, we decided to abandon this option.
Carbon film Since I have extensive experience working with various types of films, it was decided to cover the dashboard of my wife’s car with red carbon film.
I glued it “dry”, that is, without water. This was done for better adhesion of the film to the complex, winding and ribbed panels of the car's front dashboard. The film turned out just wonderfully, I immediately installed it on the car. And the next morning, a not very pleasant surprise awaited me. The fact is that either due to the complex shape of the torpedo, or because the film was overstretched by me during the pasting process, or because of its weak adhesive base, the film blew bubbles. At first they managed to remove them, but literally a day later the story repeated itself. In general, it was decided to remove the film.
Flocking Next, we considered the option of flocking. My good friend told us about it. For those who do not know what flocking is, let me explain - it is covering various elements and interior parts with glue and flock. It looks something like plush or velvet. Flock has many advantages, for example, it is easy to clean, it is durable and can be applied even to complex surfaces. The variety of flock colors is simply amazing.
To be honest, both me and my wife liked the option with flock. We started looking for who does flocking in our city. But unfortunately, we did not find such people. Also, I wanted to purchase a flocker for myself, with the goal of turning it into a small business for flocking car interiors (as I already said, there is nothing like it in our city). But I’ll immediately note that a good professional flocker costs from a thousand dead presidents and more, but you also need to buy the flock itself and the glue for it. In general, I decided to leave this idea for now. NOTE: I didn’t even consider Chinese flockers at all, since their quality leaves much to be desired...
Painting We also considered the option of painting the panel red and then varnishing it.
But, to be honest, we were not impressed with this option at all... It looks somehow cheap (this is my subjective opinion). We also decided to abandon it later.
Stickerbombing While searching for all sorts of options, we even caught our eye on Japanese exotics in the JDM style of stickerbombing.
All this looks very interesting and even somehow fresh, although the idea itself is very simple. But my wife didn’t like this idea. She considered it: “somewhat childish and tasteless.” Perhaps I will implement the idea of sticker bombing in one of my projects. Well, as they say, we continued to search.
Liquid rubber “Plasty Deep” Once, while watching a show on TV from the category “Pimp My Ride”, I don’t remember exactly which one... But in my opinion, there was Chip Foose tinkering with something with an old Buick, and then he solved the whole car drive into liquid rubber. To be honest, this idea interested me (I immediately remembered the movie “Taxi”, where robbers changed the color of cars right in the back of a truck, in a matter of minutes). In general, I began to search and learn about liquid rubber. There is a lot of information about liquid rubber on the Internet. First of all, I found out that this is the development of the American company Perfomix, which has a patent for this technology. The brand under which liquid rubber is produced is called Plasti Dip. In America, these products are widely used. It is very easy to apply to any surface and Plasti Dip applies evenly. Also, liquid rubber is very easy to remove. In general, I showed this “miracle of science” to my wife. In principle, she liked this option. In fact, this is how the search for Plasti Deep in red began. Order, payment and delivery I looked all over the city, all the auto stores and even the car market, but I couldn’t find Plasti Deep anywhere. On the city notice board, I found one painter who wrote that he could bring Plasti Dip to order, at a price of fifty dollars (!!!) for one can. The price tag is completely inadequate, I tell you. In general, I decided to look for Plasti Dip on eBay. There are a dime a dozen options out there. One of these options was Plasti Dip in the red color I needed, which was sold here. In general, I decided to order it. The first problem that beset me was the delivery of goods to our country =(. The thing is that the seller does not send the goods to us. In general, the solution to this problem came by itself. It was decided to contact the delivery company with which we constantly cooperate ". Actually, that's what we did. My wife and I came to their office, filled out all the necessary documents and went home to wait for the goods. I'll immediately note that for the delivery of one bottle of Plasti Dip aerosol, the guys from the delivery company asked for six dollars and twenty-eight cents. The total cost, including delivery, was about twenty-one dollars. We placed the order somewhere in mid-January, and the goods arrived at the end of March.
The opening process After receiving the goods, I disassembled the dashboard in my wife’s car and disconnected the front console from it. After which, I went to the garage. Unfortunately, there are no photographs left from the process of opening the panel, since they were on an old laptop. But the process is actually extremely simple. So, initially I used degreaser to clean the entire console. Then, I marked it on the podium that I use to paint the bumpers. I shook out the can of Plasti Dip and began spraying it onto the surface of the panel. The can should be kept at a distance of twenty centimeters. You need to spray liquid rubber with smooth and slow movements left and right. After applying the first layer of Plasti Dip, you need to wait about an hour, since this layer is reinforcing. Next, you can apply the next layer and wait from four to eight hours (it all depends on temperature conditions). Then, repeat the same procedure three or four more times.
Result I opened only three parts of the panel (the largest and two panels of the steering wheel). There is still rubber in the can (about half), I intend to use it to open the rest of the torpedo. In the meantime, here is the result: This is what the panel looks like in Plasti Dip.
This is the steering wheel panels
After about three months of use, my wife wiped some rubber off the dashboard with her knee.
This is what it looks like
But I can show you how Plasti Dip rubber stretches
As you can see, the rubber stretches very well, very well! One of these days I’ll try to patch up this worn out place with the help of Plasti Dip.
Overall, I can characterize Plasti Dip as a good and budget option for adding freshness to the car interior. The cost of Plasti Deep is reasonable, only twenty dollars per can (a meter of normal leatherette costs more). Also, Plasti Deep is also good because it hides small and medium scratches. In general, I recommend it.
P.S. I will be happy to answer any of your questions. Ask them in the comments! Good mood to you all!
Equipment
To cover a car with this material yourself, you will need the following materials and tools:
- spray,
- stationery knife,
- masking tape,
- construction hair dryer,
- rags
- squeegee made of felt and plastic,
- dishwashing detergent or soap,
- White Spirit.
Before you start covering with carbon film, you should familiarize yourself with the training photos and videos. They will allow inexperienced performers to understand how to glue carbon film. In addition, it is advisable to find an assistant, since gluing with your own hands is difficult to do alone due to the fact that the coating for large parts, such as the hood, has the appropriate dimensions.
Materials and tools for interior wrapping
The first stage is, as usual, preparation. Before you start, make sure you have everything you need:
- Vinyl film - even if you plan to cover just a couple of panels, buy film with a small margin
- Rubber spatula
- Squeegee with felt pad
- Blade (stationary or technical knife)
- Scissors
- Technical (construction) hair dryer
- Spray bottle with water
- Liquid soap or dishwashing detergent
- Degreaser - white spirit or similar
- Alcohol
- Lint-free soft cloths
Application
In order to properly cover with carbon film, you need to follow the sequence of work. Do-it-yourself car wrapping with carbon film begins with preparation. It consists of cleaning the working surface and degreasing it. If there are uneven areas, you should prime them with a primer, since in this case the coating will adhere more tightly to the surface. The material must be cut into fragments for pasted body elements. They are correlated with the parts to determine cutting accuracy.
Next, the coating, without peeling off the base, is applied to the work surface and secured with masking tape. Then the base is removed, stretching the coating to prevent it from sticking. Then spray the surface with a soap solution, leaving no dry areas. After this, the material is applied to the surface and bubbles and liquid are removed from underneath it, smoothing it with squeegees: first with plastic, then with felt. Finally, the coating is heated with a hairdryer and smoothed again. Pasting rounded surfaces involves heating and smoothing the material throughout the entire work process. In any case, it is especially important to warm up critical areas of the film. Warming up allows you to more thoroughly attach the coating to the work surface, adjusting its shape. Heating efficiency is determined by temperature, so low-temperature household hair dryers are not suitable for this purpose. However, overheating is also unacceptable, as it leads to stretching of the material. Warming up is carried out gradually, treating each area. The whole process lasts 5 - 7 minutes. Finally, excess material is trimmed off with a utility knife. The free edges and joints should be treated with sealant to protect them from the mechanical influence of environmental factors. After the gluing is completed, the car is left for a day. During the week, washing can only be done using a non-contact method.
The wet method of film application is discussed above. It is widely used due to its simplicity. In addition to this technology, there is a dry method. Such work is more complex and takes more time, so usually experienced performers apply the film using this method. Application must be carried out at a temperature of at least 22°C in a dry and clean room. The main difference between the dry method and the wet method is that the material is applied to a dry work surface without using a soap solution. Otherwise, the technologies under consideration are similar, but the second is more effective.
You can cover the interior plastic with film yourself using the same methods as the hood and other body elements. The pre-glued parts are dismantled. Before you start covering the interior with carbon film, you should also watch the video.
0 0 vote
Article rating
Stages of interior pasting
Before talking about the process itself, it is necessary to carefully prepare for it. To work you will need:
- construction (professional) hair dryer;
- stationery knife;
- squeegee;
- directly the film itself.
Car interior wrapping is divided into three stages:
- Preparing for work.
- Pasting.
- Fixation.
At the initial stage, the parts to be worked with are cleaned of dust and dirt. Then they are degreased. For this purpose, special means are used so as not to damage the elements.
Please note that the use of aggressive solvents for the degreasing process is unacceptable!
Pasting includes preparing patterns and applying the selected film to interior parts. After laying a layer of film, you need to warm the surface with a professional hairdryer.
Operating temperature should not exceed 110 C. Following the recommendations will preserve the film and effectively remove air bubbles using a spatula. Leveling is done from the center to the edges.
Experts advise: Pasting the interior with vinyl is carried out according to the principle: transition from simple to complex.
It is better to start the process with parts of a simple shape without corners or sharp transitions. Then gradually move on to other parts with complex geometry.
At the final stage, fixation is performed using a hair dryer. Excess material is cut off and the removable parts are installed in place. The price of wrapping the interior with film depends on:
- selected material;
- scope of work;
- urgency of the order.