Clutch malfunctions of a VAZ 2107 car
Several of the most common faults in the operation of the clutch of a VAZ 2107 (seven).
List of malfunctions in the clutch operation of a VAZ 2107 car
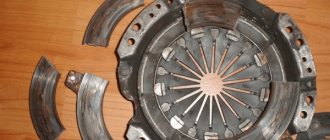
The clutch "drives"
The driver disengages the clutch by pressing the pedal to change gears. In this case, the pressure bearing acts on the petals of the damper (pressure) spring of the clutch “basket”. As a result, the drive (pressure) disk stops pressing the driven disk against the flywheel. The transmission of torque from the engine flywheel to the transmission input shaft is interrupted. In this case, the gears should be switched on easily, clearly, without difficulty. Otherwise (the forward gears are engaged with difficulty, the rear with a crunch and crackling sound), the clutch does not completely disengage (“drives”), the driven disk remains slightly clamped between the pressure plate and the flywheel. The causes of this malfunction in most cases are:
— unregulated drive;
- wear or breakage of the drive disk.
Clutch “slips”
When the pedal is released, the clutch will be engaged. That is, the pressure plate presses the driven one against the flywheel and torque is transmitted from the flywheel to the input shaft of the gearbox. The clutch is constantly engaged at idle, while driving with the gear engaged, and when coasting. If for some reason the driving disk does not fully press the driven disk against the flywheel, the clutch will slip (“slip”) and the driven disk will slip relative to the flywheel. Torque transmission will be intermittent and insufficient. This is especially noticeable when driving uphill, when the driver presses the gas, the engine roars and gains speed, but the acceleration of the car is weak or with some delay. The reasons for this malfunction are as follows:
— the clutch drive is not adjusted;
— wear or oiling of the driven disk.
Jerks and shocks when the clutch operates
The main reasons for clutch-related jerking and knocking in a car transmission when starting off are:
- breakdown of the clutch driven disc (severe wear of the linings, loosening of their fastening, oiling of their surfaces, wear or breakage of damper springs or windows under them);
— scoring on the working surfaces of the flywheel or pressure plate;
— jamming of the driven disk hub on the splines of the input shaft of the gearbox.
Noise when engaging clutch
Noise in the area of the gearbox when releasing the clutch pedal most often indicates wear or breakage of the driven disc (wear, deformation, loosening of its linings, breakage of damper springs) or loosening of the gearbox to the engine.
Noise when disengaging the clutch
If you hear a slight noise or rustling sound when you press the clutch pedal, most likely the release bearing has failed or is nearing the end of its service life. It is advisable to immediately change the release lever, since if it jams, shifting gears will be very difficult, and the wear of the clutch “basket” pressure spring petals at the point of contact with the bearing will be very rapid. It is cheaper to change the bearing right away than to replace both the bearing and the “basket” later.
In addition to a faulty clutch release bearing, extraneous noise may come from the input shaft bearing in the gearbox. It can be heard at idle (the clutch pedal is not pressed).
What to do if signs of a clutch malfunction are detected on a VAZ 2107?
First of all, it is necessary to carry out a visual inspection (how much fluid is in the tank, whether the tube cylinders are leaking) and replace faulty parts. If everything is normal, check and adjust the clutch drive. Read more about this procedure for the VAZ 2107 on the page “Adjusting the clutch drive of the VAZ 2107”.
If the clutch parts are worn, you will have to replace at least the driven disc with the release bearing.
Notes and additions
The clutch on VAZ 2104, 2105, 2107 cars is of a constantly closed type, that is, constantly engaged: when the pedal is released, the driven disk is pressed by the drive to the flywheel and rotates with it, as well as the release bearing and the input shaft of the gearbox. There is a gap of 1.5 - 2.0 mm between the release bearing and the lining of the thrust flange of the clutch basket pressure leaf spring. This gap is selected when the driver begins to press the pedal.
The full travel of the clutch pedal on VAZ 2104, 2105, 2107 cars is 140 mm.
The above clutch malfunctions occur not only on the VAZ 2107, but also on all cars of the classic VAZ family (2101, 2102, 2103, 2104, 2105, 2106).
Source
Signs of a slipping clutch
The driver can detect slippage as follows:
- Difficult gear shifting, a kind of crunching sound.
- The car moves poorly and begins to slip.
- When driving fast in lower gears it jerks (working jerks).
- Loss of power when climbing.
- Vibration or noise occurs.
- Pedal device failure.
Why is this happening?
To understand why the clutch slips on a VAZ 2107, you need to understand its structure and operating principle.
The entire mechanism consists of the following elements:
- crankcase;
- driven disk of the basket;
- riveted friction linings;
- diaphragm spring;
- pressure plate;
- hydraulic clutch release.
The parts are placed in a steel basket; The driven disk contains splines and damper springs that ensure smooth gear shifting.
The operating principle is based on friction between the working parts. The clutch connects the power unit and the transmission and transmits torque from the engine flywheel to the intermediate shaft of the vehicle's gearbox. When you press the pedal, the disc moves away, the connection between the motor and the gearbox is disconnected, and the rotation of the gearbox shaft stops. When the pedal is released, the flywheel and gearbox shaft are connected, and rotation is transmitted to the gearbox.
The coupling device slips for the following reasons:
- Oil leakage, liquid getting on the surface of the basket parts.
- Overheating of the drive disk. When the temperature is exceeded during use, the discs expand. This phenomenon is not noticeable on the go. It is determined during inspection of the part. Soot deposits and fumes are visible on the surface.
- Wear or delamination of friction linings. The elements not only wear out, but can also get burned. An unpleasant odor appears in the car interior.
- Damaged or worn compression spring. If there are defects, the spring is not able to create the required pressure on the disk.
- No gaps in the shutdown hydraulic drive.
- Reduced freewheel parameter.
Experts combine the reasons why this happens into 2 groups:
- The hitch does not fully engage (drive). Due to the increased distance of the pedal to the platform.
- The clutch does not fully engage (slips). The discs slip relative to each other, and the pedal stroke decreases.
How to check whether the clutch is slipping or not
To check the system yourself without special technical devices, perform the following steps:
- Turn on the engine and set it to neutral.
- Release the parking brake.
- Press the gas lever.
- Engage first gear.
- Squeeze the pedal.
- Squeezing is done several times.
When the assembly is operating correctly, the engine stalls. If the engine does not turn off, or there are extraneous sounds (clicks, creaks, knocks) and a burning smell, the clutch is considered faulty. Particular attention is paid to pedal travel. The lever should lower smoothly, without jerking or interruption.
What to do when the clutch slips
Depending on the cause of slipping, the progress of repair and restoration work is determined.
If the fault lies in the pressure spring, it must be replaced with a new one. When the friction linings are worn, the driven disk is replaced. When repairing or replacing some linings, be sure to inspect the gaskets. If they are damaged or have burnt spots, they are also replaced. If oily liquid gets on parts of the driven disk, it is necessary to treat the surface with kerosene or white spirit and clean it with fine-caliber sandpaper.
Grease may get on the surface of the flywheel and pressure plate if the fluid level in the gearbox housing increases excessively or if there is a leak in the rear crankshaft bearing. To solve the problem, carry out visual diagnostics and eliminate the cause of the leak, then clean the parts.
iMarker › Blog › Symptoms of a faulty clutch
When the vehicle is used intensively, various clutch malfunctions may occur. There are malfunctions of the clutch itself and malfunctions of the clutch drive. Clutch malfunctions include:
wear and damage to the driven disk linings; deformation of the driven disk; oiling of the driven disk linings; wear of the splines of the driven disk; wear or breakage of damper springs; broken or weakened diaphragm spring; wear or breakage of the clutch release bearing; flywheel surface wear; wear of the pressure plate surface; jamming of the clutch release fork.
Depending on the type, the clutch drive may have the following malfunctions:
a) mechanical drive
jamming, elongation or damage to the cable; damage to the lever system; b) hydraulic drive
clogging of the hydraulic drive; violation of the tightness of the system (leakage of working fluid, presence of air in the system); malfunction of the working cylinder (damage to the cuff).
Wear and breakdown of clutch structural elements occur mainly due to violation of vehicle operating rules: starting at high speeds, foot on the clutch pedal while driving.
One of the reasons for breakdown or wear may be the limiting service life of the clutch elements. This applies to a greater extent to the clutch driven disc, which has a limited resource. If the operating rules are followed, this element will serve regularly for over 100 thousand kilometers. For “racers” the clutch rarely lasts up to 50 thousand km.
The cause of clutch failure can also be poor quality components. When purchasing spare parts, preference should be given to original parts.
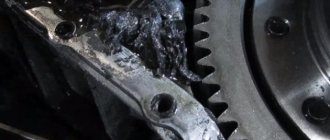
Oiling of the friction linings of the driven disc occurs when oil gets on them due to wear or damage to the oil seals of the engine or gearbox.
Clutch malfunctions are easily diagnosed by external signs. However, one external sign may correspond to several clutch malfunctions. Therefore, specific clutch malfunctions are usually identified during its disassembly.
External signs of clutch malfunctions are:
incomplete disengagement (the clutch “drives”); incomplete engagement (clutch “slips”); jerking when the clutch operates; vibration when engaging the clutch; noise when disengaging the clutch.
Incomplete shutdown is accompanied by difficulty shifting gears while the engine is running, noise, crackling noise when changing gears, and increased free play of the clutch pedal.
“Slipping” of the clutch is characterized by a burning smell from the friction linings of the driven disc, insufficient vehicle dynamics, engine overheating, and increased fuel consumption.
External signs and corresponding clutch malfunctions:
deformation of the driven disk; wear of the splines of the driven disk; wear or damage to the driven disk linings; broken or weakened diaphragm spring; working cylinder malfunction; clogging of the hydraulic drive; violation of drive tightness; jamming, elongation or damage to the cable; damage to the linkage system
How to bleed the clutch
Removing air from the system is necessary after any repair of the central circulation system. It is better to carry out work with an assistant. Bleeding the VAZ-2107 clutch cylinder is carried out in the following sequence:
If necessary, the process should be repeated.
- refusal to turn off;
— rattling (gear clamp);
— noise of the release bearing with the clutch completely disengaged;
— the pedal remains on the floor when turned off;
— excessive pedal tension;
- etc., let’s take a closer look at all these defects
Causes of malfunctions (Methods of elimination)
Incomplete disengagement of the clutch - the clutch “drives”
Signs: difficulty shifting forward gears, reverse gear engages noisily
Increased clearances in the clutch release drive
Adjust the clutch release drive
Warping of the driven disk (end runout more than 0.5 mm)
Straighten the disk or replace it with a new one
Irregularities on the surfaces of the friction linings of the driven disk
Replace the linings or driven disk assembly
Loose rivets or broken friction linings
Replace the linings, check the end runout of the driven disk
Jamming of the driven disk hub on the splines of the drive shaft
Clean the splines and lubricate them with LSC-15 grease. If the spline is worn or crushed, replace the drive shaft or driven disk if necessary.
Breakage of the plates connecting the thrust flange to the clutch housing
Replace the clutch housing with pressure plate assembly
Presence of air in the hydraulic drive
Leakage of fluid from the hydraulic drive system through connections or damaged pipelines
Tighten connections, replace damaged parts, bleed the drive system
Fluid leaking from master cylinder or cylinder
clutch release drive
Replace O-rings, bleed the system
Clogged hole in the tank lid
Clean the hole in the cover, bleed the system
Loss of tightness due to contamination or wear of the front sealing ring of the master cylinder
Clean the O-ring and replace if worn
Loosening the compression spring rivets
Replace the clutch housing assembly with the pressure plate
Distortion or warping of the pressure plate
Incomplete engagement of the clutch (clutch slipping)
Signs: insufficient acceleration when pressing the accelerator sharply, loss of power is felt when driving uphill, fuel consumption increases, engine overheats
No gaps in the clutch release drive
Increased wear or burning of the friction linings of the driven disk
Replace friction linings or driven disk assembly
Oiling of the friction linings of the driven disc, flywheel surfaces and pressure plate
Thoroughly rinse oily surfaces with white spirit and eliminate the causes of oily discs.
Master cylinder compensation hole clogged
Rinse the cylinder and clean the compensation hole
Damage or jamming of the clutch drive
Eliminate causes of jamming
Jerking when the clutch operates
Jamming of the driven disk hub on the splines of the gearbox drive shaft
Thoroughly rinse oily surfaces with white spirit and eliminate the causes of oiling
Unacceptable wear of the friction linings of the driven disk
Replace the linings with new ones, check for damage to the discs
Jamming in the clutch release drive
Loosening of the driven disk linings due to loose riveting
Replace faulty rivets, if necessary replace with linings
Surface damage or warping of the pressure plate
Increased noise when disengaging the clutch
Worn, damaged or leaking clutch release bearing
Wear of the front bearing of the transmission drive shaft
Increased noise when engaging the clutch
Breakage or loss of elasticity of the driven damper springs
Replace the driven disk in the disk assembly
Breakage, loss of elasticity or jumping off of the clutch release fork spring
Replace the spring with a new one or secure it securely
Inadmissible gap in the splined connection of the driven disk hub and the drive shaft of the gearbox (noise can also be heard when the clutch is disengaged)
Clutch master cylinder VAZ 2107
The VAZ 2107 hydraulic clutch drive is the best option for rear-wheel drive vehicles. An important role in the hydraulic drive system is played by the clutch master cylinder (MCC).
Purpose of the GVC
The GCS converts the force of pressing the pedal into working fluid pressure (WF), which is transmitted through pipelines using the working cylinder piston (WCC) to the fork rod. As a result, the latter rotates on a hinged support and moves the pressure bearing, turning the clutch (MC) on or off. Thus, the GVC performs two functions:
Operating principle of the GCS
To create pressure in the hydraulic system you need:
The VAZ 2107 MS drive uses brake fluid (ROSA DOT-4 is recommended), which practically does not compress and does not have a negative effect on rubber products.
The piston moves through a rod connected to the clutch pedal. The pressure in the system is created by analogy with a medical syringe due to the fact that the piston and the hole through which the gas is ejected have different diameters. The system differs from a syringe in that the GCS provides for the forced return of the piston to its original position. In addition, the heating of the fluid and moving parts during operation is taken into account.
The GCS works as follows. Working fluid through hole 19 is supplied from the tank into the working cavity 22 in front of the piston. When you press pedal 15, pusher 16 moves and, resting against piston 7, moves it forward. When the piston closes holes 3 and 19, the pressure of the liquid in front of it will begin to increase sharply and will be transmitted through the pipelines to the RCS piston. The latter will turn the fork through the pusher, and its front ends will move the clutch with the release bearing (VP) forward. The bearing will press on the friction spring of the pressure plate, which, moving towards the VP, will release the driven disk, and the clutch will disengage.
When the pedal is released, the reverse process will begin. The pressure on the piston will disappear, and due to the return spring 23 it will begin to move to its original position. At the same time, the RCS piston and the fork return spring will also begin to move in the opposite direction and create pressure in front of it, which will be transmitted back to the RCS through the pipeline. As soon as it becomes greater than the force of the return spring of the GCS piston, it will stop. Through the bypass channel in piston 21, the inner surface of the floating sealing ring 20, which acts as a check valve, will be under pressure. The ring will flatten and block the bypass hole 3 in the cylinder body. As a result, a slight excess pressure will remain, which will remove all the play resulting from wear of the pushers, fork eyes and release bearing. As the temperature in the working chamber of the cylinder increases, all parts and working fluid will expand. The pressure in front of the piston will increase, and it will move back a little, opening compensation hole 3, through which excess liquid fluid will flow into the tank.
This explanation is necessary in order to understand how important it is to monitor the serviceability and cleanliness of the GVC. If the compensation hole in the piston or housing becomes clogged, the temperature inside the cylinder will quickly rise, which will create excess pressure in the master cylinder. It can squeeze out the gaskets and fluid will begin to leak. The pedal will become stiff and the O-rings will wear out faster.
Location of the GVC
Since the pusher must be positioned horizontally and fit exactly into its piston, the GCS is mounted on the front partition of the engine compartment on the left side. It is impossible to install it any other way - it is screwed onto two studs welded to the partition. No additional conditions are required to dismantle it. Access to the fastening nuts, pipeline fittings and reservoir hoses is provided by simply lifting the hood lid. At the same time, the main brake cylinder should not be confused with the main brake cylinder (MBC), which is located nearby, a little further from the sidewall of the left wing. The GTS is larger and more complex; more tubes fit into it.
Selection of GVC for VAZ 2107
The best option for replacement is to purchase a GCS designed specifically for classic VAZ models. Clutch master cylinders from UAZ, GAZ and AZLK vehicles are not suitable. The same applies to foreign analogues - foreign cars with rear-wheel drive are equipped with GVCs, which only highly qualified specialists can adapt to the VAZ 2107 (different sizes, different threads for pipelines, different pipe configurations). However, you can easily replace the original cylinder with a GCS from a VAZ 2121 and from a Niva-Chevrolet.
Manufacturer's choice
When purchasing a new GVC, you should focus on products from trusted Russian manufacturers (AvtoVAZ JSC, Brik LLC, Kedr LLC), the Belarusian company Fenox, which is adapted to our conditions and is affordable. The average cost of GVC is 600–800 rubles.
Table: comparative characteristics of GVCs from different manufacturers
| Manufacturer, country | Trademark | Cost, rub. | Reviews |
| Russia, Tolyatti | AvtoVAZ | 625 | Original GVCs are made with high quality and are more expensive than analogues |
| Belarus | Fenox | 510 | Original GVCs are inexpensive, made with high quality, and are popular among drivers |
| Russia, Miass | Brick Basalt | 490 | Improved design: the absence of a technological plug at the end of the cylinder and the presence of an anti-vacuum cuff increases the reliability of the product |
| Germany | AND THOSE | 1740 | The originals are of the highest quality. The price is tied to the EURO exchange rate |
| Germany | HORT | 1680 | Original GCS are reliable and durable in operation. The price is tied to the EURO exchange rate |
| Russia, Miass | Cedar | 540 | The original GVCs do not cause any particular complaints |
Recently, there have been many counterfeits of well-known brands on the market. They can be distinguished by their low-quality workmanship and low price relative to their original analogues.
Repair of clutch master cylinder VAZ 2107
If problems arise with the GVC, it must be removed from the car, disassembled, defects eliminated, assembled and reinstalled. The work can be performed by any car owner with minimal plumbing skills. If you don’t have such skills, it’s easier to change the cylinder assembly. To repair and replace the GCS, you will need the following tools and materials:
Dismantling of the main central circulation system
To dismantle the VAZ 2107 GCS, you will need to perform the following steps:
Disassembly of the main central circulation system
Before disassembling, you need to clean the GCS from dirt, smudges, and dust. The disassembly itself is carried out as follows:
Replacing rubber o-rings
It is recommended to change the rubber O-rings each time the GCS is disassembled. To do this you need:
GCS assembly
Installation of GCS
Installation of the GCS is carried out in the reverse direction of removal. Pay special attention to the correct installation of the pusher in the piston and uniform tightening of the fastening nuts.
Clutch repair on a VAZ car
The article describes in detail the process of disassembling, repairing and reassembling the clutch on a VAZ car. The article describes in detail the process of disassembling, repairing and reassembling the clutch on a VAZ car.
The clutch plays one of the most important roles in the movement of the car and at the first signs of malfunctions in its operation, it is necessary to begin repairs immediately, otherwise inaction can lead to dire consequences, then it will take much more money and time for repairs. Before removing this mechanism, you will need a clutch diagram; study it in detail for further repairs and an understanding of the operating principle.
We removed and repaired the clutch disc on a VAZ 2110, similar equipment is installed on the 2111 and later models of these cars, but on the VAZ 2112 there are some differences and improvements, in particular, modifications were made: the springs of the damper of the driven disc and the drive part of the clutch, but the essence of the repair remains similar.
Bleeding the clutch
After repairing or replacing the VAZ 2107 GCS, the clutch needs to be pumped. This will require an inspection hole or overpass.
Selecting and filling working fluid
ROSA DOT-3 or DOT-4 brake fluid is used as the working fluid in the VAZ 2107 hydraulic clutch drive.
RJ is poured into the GCS tank, located in the engine compartment on the front bulkhead. To correctly fill the system, before filling, you need to loosen the air bleeder fitting on the working cylinder by one or two turns and tighten it after the liquid begins to flow out without gas bubbles. The tank must be filled to the appropriate level.
When will we start repairing the clutch slave cylinder?
The clutch slave cylinder has a special location, and is traditionally located on the clutch housing. The design of the clutch slave cylinder does not differ fundamentally on different models and brands of cars. That is why the entire principle of repairing or replacing the clutch slave cylinder is the same, both on new foreign cars and on ancient domestic cars.
In order to make it possible to independently repair or replace the clutch slave cylinder, you need to know the device itself and the technology for disassembling it. This procedure (disassembly) of this mechanism is quite simple if you observe certain aspects when trying to penetrate inside the entire device.
Directly in the cylinder body there are several very important elements, the failure of which cannot guarantee the successful operation of the entire clutch system.
Thus, the following are located in the cylinder body: a piston, a pusher, sealing rings, a spring and an air release fitting.
In general, a complete replacement of the clutch slave cylinder assembly is the last resort when there is no other way out. This is because existing repair kits are already equipped with the most wear parts. And yet, recently the quality of rubber parts leaves much to be desired.
The first sign of malfunction and malfunction of the clutch is the failure of the clutch pedal or its too soft movement. But still, this is not a reason to immediately begin repairing the hydraulic drive. In order to lower your passions and emotions a little, you need to completely bleed the clutch hydraulic drive.
Problems can arise when air is detected in the brake fluid while bleeding the clutch hydraulic drive. If this happened, then you need to think about where it could have come from. Often, if air appears in the hydraulic drive, this indicates a leak in the rubber seals.
Bleeding the hydraulic clutch is quite simple. A hose must be connected to the bleeder screw on the working cylinder. Its other end must be lowered into a container with brake fluid. After this, you need to fill the clutch master cylinder reservoir with the same brake fluid from a container.
We recommend: How long will a car battery last?
Next, you need to press the pedal until the formation of air bubbles stops. If the formation of bubbles does not stop, then it is necessary to begin repairing the hydraulic drive itself.
Until this point, you need to check for traces of external fluid leakage, which may be on the pipeline, both cylinders and at the joints.
How to change the Lada slave cylinder yourself?
To work you will need the following set of tools:
- Pliers.
- Open-end wrench “17”.
- Head "13".
It is more comfortable to carry out the repair process on an inspection pit or overpass. If this is not possible, the front part of the machine must be jacked up and placed on supports, having previously secured the rear wheels with shoes. Further work is carried out on the following transitions:
- Loosen the nut of the hose tip in the RC plug using a 17-mm open-end wrench.
- Using pliers, disconnect the tension spring.
- Unbend and remove the cotter pin at the end of the pusher using pliers.
- Using a 13mm socket, unscrew the two bolts securing the cylinder to the gearbox housing.
- Disconnect the bracket that was secured with bolts.
- Having removed the pusher from the fork, take the RC in your hand and, using a 17mm wrench, completely unscrew the tip nut and remove the hose.
- Replace the clutch slave cylinder on a VAZ 2107, and immediately tighten the hose tip to avoid loss of brake fluid.
- Attach the new part in reverse order.
A certain part of car enthusiasts prefer to drain the old brake fluid before surgery, believing that this will allow them to get rid of dirt in the system. Be that as it may, you will have to bleed and adjust the clutch in any case.
How to bleed the clutch control system?
For the quality of transmission operation, the absence of air in the system is important, which is why bleeding is done. The procedure is similar to bleeding the brakes. An assistant is needed to complete the work:
- Fill the reservoir on the master cylinder with brake fluid.
- Place a rubber hose of the appropriate diameter onto the fitting. Place the other end of the hose in a container with some liquid.
Clutch master cylinder - design, repair and replacement
If we simplify the formulation of the actions performed by the clutch drive, it will sound like this - the transmission of torque from the motor to the corresponding gearbox shaft with the ability to disable and then softly engage after switching to the desired gear. Nowadays, designers have not yet come up with anything more effective for achieving this goal than a hydraulic clutch drive. The diagram and principle of operation of the described device is simple: a depressed pedal acts on the clutch cylinder rod, which, accordingly, using hydraulic fluid located in the tank through tubes, activates, through the working cylinder, the fork and the release bearing.
Failure of the clutch drive occurs for several reasons, one of which may be a faulty clutch master cylinder; in order to repair it, it is advisable to understand its structure, signs indicating the inoperability of the mechanism, methods of repair, and if repair is not possible, then how to make it replacement.
Device
Possible malfunctions and their diagnosis
Repair work
If the pedal fails, in order to avoid unreasonable disassembly of the cylinder, it is worth initially pumping the system and expelling air from there that could get in when the liquid in the tank drops below the minimum permissible level. If this does not help in principle, it is worth starting repairs. For this case, there is a repair kit for the clutch master cylinder on sale, which, depending on the make of the car, contains the main wearing parts: cuffs, return spring, rod, retaining ring, etc.
The master cylinder is located under the clutch pedal. Depending on the car model, dismantling will have to be done either from the engine compartment or from the car interior, having previously dismantled the floor covering in the driver’s area. Having removed the clutch master cylinder, we begin disassembling it, after which we need to wash all the parts. During the subsequent inspection, after disassembly, it is worth paying special attention to the body and the condition of the rod and mirror; if there are visible scuffs, this may indicate the appearance of wear in the cylinder or wear of the rod. In general, experienced craftsmen recommend changing all the parts in the repair kit, especially the cuffs.
Replacing the clutch disc
The driven disc is a consumable that must be worn out for the rest of the clutch to work properly. Problems with the driven disk are wear of the friction linings, damper springs, and splined connection to the gearbox shaft. When inspecting, you need to pay attention to the condition of the rivets (they should not protrude above the surface of the friction circle), the presence of cracks, rust in the center, and traces of oil. And an important sign of a problem will be a burning smell - the friction material is burning due to clutch slippage.
DIY master cylinder repair
To carry out the work, the entire assembly will have to be completely dismantled, having first disconnected all the pipes and drained the liquid from the system. You should also prepare in advance a repair kit for the clutch master cylinder, which includes all parts subject to wear. Despite the fact that the “composition” of the clutch master cylinder is not complicated, it is advisable to carry out the work by persons who have at least minimal experience in plumbing work. If the question of how to remove the clutch master cylinder is completely unclear, it is better to abandon repairs yourself and simply replace the cylinder with a new one.
After dismantling, you can begin disassembly, which should be done in a clean and well-lit place. Having disassembled the cylinder, all its parts are thoroughly washed with brake fluid - it is unacceptable to use solvents or gasoline for this purpose. It is also advisable to wash all parts from the repair kit that are planned to be used before installation. It is advisable to start removing the clutch master cylinder in the morning, especially if serious problems with the hydraulic drive were noted during the operation of the car - it may well turn out that the cylinder will not be suitable for repair, and you will urgently have to purchase and install a new one. You can watch the video to see how to replace the cylinder with your own hands:
Removal and repair
Regardless of whether the owner decided to restore the GVC or preferred to buy a new one, the first step is to dismantle the old one. To work you will need:
- set of spanners;
- medium sized screwdriver;
- pliers;
- brake fluid for topping up;
- repair kit for clutch cylinder VAZ-2107 (in case of repair);
- small container for draining brake fluid.
The sequence for removing the clutch master cylinder is as follows:
Clutch drive and its types
The drive is designed for remote control of the clutch directly by the driver from the passenger compartment. Pressing the clutch pedal directly affects the pressure plate.
The following types of drive are known:
The first two types are most widespread. Trucks and buses use a pneumatic-hydraulic drive. Electrohydraulic is installed in cars with a robotic gearbox.
Some cars use a pneumatic or vacuum drive booster to make driving easier.
Mechanical drive
A mechanical or cable drive has a simple design and low price. It is unpretentious in maintenance and consists of a minimum number of elements. The mechanical drive is installed in passenger cars and light trucks.
Mechanical clutch drive
Mechanical drive elements include:
The cylinder repair is complete, what next?
After replacing the clutch master cylinder or repairing and reinstalling the old one, it is almost always necessary to bleed the clutch system. This is a necessary measure to eliminate accumulated air bubbles, the presence of which is not allowed in the hydraulic drive system. During repairs, air inevitably enters the system, and if it is not removed, clutch problems will soon arise. The whole pumping procedure is not so complicated and does not require much time. If the replacement was carried out at a service center, its mechanics use heavy vacuum pumps to remove air from the cylinder, and bleeding of the system is not required.
For bleeding, it is necessary to provide free access to the master cylinder, and for this it will be more convenient to drive some vehicle models into a pit or lift them on a hydraulic lift. New brake fluid is poured into the reservoir, a transparent tube is put on the fitting, the end of which is lowered into a container with the same working fluid. By rhythmically operating the clutch pedal, the hydraulic drive is pumped until the release of air through the fitting stops completely. After this, the fitting is tightened and the car is ready for use.
Despite the apparent “insignificance” of this procedure, the operating principle of the clutch master cylinder does not allow the hydraulic drive to function normally in the presence of air. If bleeding is not performed, even after replacing the unit with a new one, all the characteristic signs of a malfunction of the clutch master cylinder will very quickly begin to appear, negating all previously applied efforts.
Clutch slave cylinder repair
Repair of the clutch slave cylinder must begin with its removal and disassembly. For this you need a vice and a bench tool. After removal, you need to place the working cylinder in a vice to make it more convenient to disassemble it.
Initially, you need to remove the protective cap along with the pusher. After this, it is necessary to remove the piston and remove the retaining ring located on the piston. You need to remove the O-rings and spring from the piston. After this, it is important to clean the air outlet fitting and all the holes that are in the cylinder.
Next, you need to make sure that there is no mechanical damage to the cylinder bore and the outer surface of the piston. If there is any mechanical damage to the spring, it must be completely replaced. All O-rings, rubbers and protective caps must be replaced with new ones. After this, you need to rinse all parts with clean brake fluid.
We recommend: 7 best antifreeze liquids
For washing, gasoline, oil, and diesel fuel are excluded, since this may cause swelling of all rubber parts that were subject to washing. For the hydraulic drive itself, it is necessary to use high-quality brake fluid. The assembly itself, as well as the installation of the working brake cylinder, will be carried out in the reverse order.
There should be no extra parts left after the cylinder is fully assembled. There can only be those that were not used from the clutch slave cylinder repair kit. After a complete repair of the clutch master cylinder has been carried out, or only the working one, it is imperative to bleed the hydraulic drive.
Repair or complete replacement of the clutch slave cylinder is a necessary procedure in case of certain malfunctions in the clutch. With all this, you can either completely replace the entire working cylinder, or partially replace only those parts that have been damaged.
If more serious problems occur that have not been addressed in this article, then the root of the problem is not just one slave cylinder, but may be damage to the entire mechanical clutch system.
Thus, if you look at all the above recommendations, you can note that partial repairs or complete replacement of the working brake cylinder are not complicated procedures and can be carried out even at home.
There is one piece of advice that can extend the life of both individual elements - the clutch slave cylinder, and the entire clutch system of the vehicle. It’s enough just to monitor your “iron horse”, take care of it, and most importantly, change the oil on time for an even better one.
Subscribe to our feeds on social networks such as Facebook, Vkontakte, Instagram, Pinterest, Yandex Zen, Twitter and Telegram: all the most interesting automotive events collected in one place.
How is the clutch master cylinder constructed?
The clutch system performs the function of briefly disconnecting the internal combustion engine from the gearbox. As a result, the transmission of torque from the power unit to the drive shaft of the transmission stops. This system includes many components. One of them is the clutch master cylinder, which we will talk about today.
What is he?
This mechanism is a small casting made of cast iron steel with a flange for attachment to the body. On its top there is a plastic tank with a lid. It is attached to the body using a threaded fitting. Thanks to this mechanism, a special fluid enters the clutch master cylinder. Inside the cast iron part there is a piston with a cuff and an o-ring. There is also a spring resting on the check valve. It compresses the piston to the extreme right. When these parts are heated, expansion occurs, and accordingly, the liquid in the system must go somewhere. For these cases, there is a special compensation hole through which it enters the tank from the cylinder cavity.
How does the VAZ 2107 clutch master cylinder work?
This mechanism is designed in such a way that each time you press the clutch pedal, it moves forward using a pusher. And when the piston closes the hole, the pressure in the cylinder increases. Thus, the fluid flows to the working cylinder and disengages the clutch. When the pedal is released, a similar action occurs, only in reverse order. The liquid flows back - the valves open, the spring compresses and it moves from the working cylinder to the main one. If the pressure level drops to a point below the spring compression force, the first part closes and more pressure is generated in the system. This is necessary to sample the gaps of the mechanical part of the drive.
If the pedal is released abruptly, then the liquid will not completely fill the space behind the piston. Then a vacuum occurs in the clutch master cylinder. Because of this, the liquid will flow from the plastic tank through the bypass hole directly into the piston. Then it passes through the piston head and fills all the space that appeared in the part after the vacuum. At the same time, the liquid removes the edges of the cuff and pushes the spring plastic aside. And again, if it becomes more than normal, all of its excess passes through a special compensation hole back into the tank.
This is exactly how the VAZ clutch master cylinder is designed. In conclusion, I would like to note several ways by which you can independently identify the breakdown of this mechanism:
General information
In order for the replacement of the VAZ 2107 clutch slave cylinder to be justified, it is good to know its purpose and the first signs of a malfunction. The torque transmission system on classic VAZ models is driven by a hydraulic drive, the main task of which is to transmit force when pressing the clutch control pedal.
In turn, the hydraulic drive consists of two cylinders: the main and the working. When the pedal is applied, pressure is created in the main center, as a result of which the brake fluid is pumped through the valve into the working cylinder (WC). The latter activates the rod, which squeezes the fork, thereby selecting gears.
Traditionally, the control center is located on the gearbox housing and secured with two bolts, so it can only be reached from under the bottom of the car. The operation of both cylinders depends on the presence of brake fluid, so you need to monitor its level, especially since this is not difficult to do - the container is located in the engine compartment.