Self-recovery methods
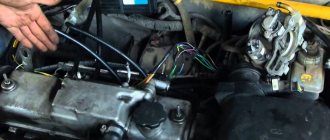
To get to the reflector, the headlight removed from the car must be disassembled. The first option involves repeatedly passing the hot air of a hair dryer over the seam. The second option involves leaving the headlight in an oven preheated to 100°C for 20 minutes. After opening, all parts are cleaned of sealant residues, washed without using alcohol-containing liquids and dried.
The sealant holding the headlight components together begins to deteriorate when exposed to temperatures above 75°C.
Using metallic tape
Let's start with how to restore the reflector on a headlight using tape foil. All you need is metallized tape, purchased at a hardware store for about 30 rubles. Its adhesive base copes well with high and low temperatures, and the aluminum film is very wear-resistant.
In order to obtain a smooth surface with a minimum of seams after gluing the tape on the reflector, first, pieces of the most suitable shape are formed from several strips. Then remove the protective film and carefully stick it on. The whole procedure takes about half an hour.
Immediately before gluing, the surface must be degreased.
Advantages of the method: durability, low cost, ease of implementation.
Disadvantages: when gluing, irregularities and seams remain, which impair the properties of the reflector.
Using metal foil
Aluminum foil is highly reflective, which allows it to be used in the restoration of headlight reflectors. You will also need some epoxy resin. To maintain a perfectly smooth surface of the foil, the entire pattern is made from plain paper. Then the parts are duplicated from aluminum sheet, a thin layer of resin is applied to the reflector and glued, removing excess resin.
Advantages: withstands any temperature changes.
Disadvantages: being between the metal foil and the plastic base, epoxy glue lacks air and takes a very long time to dry. It is almost impossible to remove dried glue. Therefore, such a reflector is not suitable for repeated restoration. With the advent of tape foil, this method is practically not used.
Using chrome paint
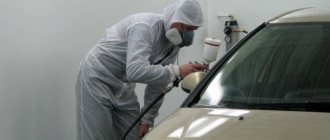
Headlight reflector repair using chrome paint is the most popular. No need to cut and glue anything. Paint is sprayed onto the degreased surface of the reflector from a can of white chrome until a uniform, uniform layer is obtained. After painting, the headlight is dried according to the instructions on the can.
Benefits: Provides a smooth surface. You can even spray paint onto metal tape, thus increasing the reflective effect.
Disadvantages: does not tolerate high temperatures. You should try to find heat-resistant chrome paint.
DIY crafts for car enthusiasts
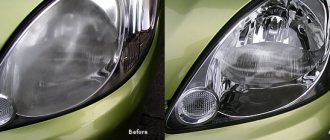
In this article I want to talk about how to restore and tidy up cloudy, yellowed or burnt-out headlights.
Over time, the protective, factory layer on the headlight wears off and after that the plastic of the headlight itself begins to become cloudy and yellow. And accordingly, they begin to shine much worse, and at the same time blind oncoming cars at night, even if they are on low beam.
But such headlights can be revived; there are two methods of resuscitation, 1 - sanding and varnishing, and 2nd method - sanding and polishing.
I recommend using the sanding and varnish method, since the second method of polishing headlights is short-lived and after a certain time you have to renew it, that is, polish it again.
Headlight repair begins in the same way for 2 methods, that is, we take sandpaper with a grain size depending on the condition of the headlight glass, that is, if the headlight is all scratched and looks very outdated, then we start with 240 sandpaper, then we take 600, then 800. When working with 600 and 800 grit sandpaper, moisten it with water or even pour water on the headlight and rub it with sandpaper.
It is better to process with sandpaper manually, without any grinding machines. Since when working with grinding machines you need skill, because during such work the plastic glass of the headlight heats up too quickly and with slight overheating it immediately becomes cloudy, after which you will not be able to do anything and you will have to throw out the glass.
But after this, the actions in the two modes of action diverge...
If we are going to varnish, then we don’t take more than 800 sandpaper, because if we take and process 1000 or 2000, there is a high probability that the varnish will flow and to prevent this from happening, 800 sandpaper will be enough for us.
We make the surface uniform so that it looks like frosted glass, then let the headlight dry, or you can dry it a little with a simple hairdryer.
We take a degreaser and wipe the entire headlight with it.
Then we take a can of varnish and apply the first layer, do not pour too much from the can, just apply a thin, uniform, normal layer. After that, wait 10 minutes and apply the same second layer of varnish.
All these procedures involving the application of varnish must be carried out in a room with a temperature of plus 18 degrees. Next, we just let the headlight dry and you can put it on the car, if you removed it, of course :). Which varnish to use, everyone has different opinions, there are many different varnishes, so I leave this to your choice.
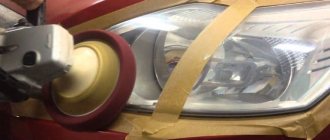
And if we are going to polish, then after 800 it would be advisable to go through another 1000 and a little 2000 sandpaper to make the surface uniformly matte and only after that start polishing the headlight. We take an abrasive polish, set the polishing machine to the lowest speed and start polishing, polishing with care without overheating the headlight glass. Constantly touching it with your hand so that it is a little warm, not hot. And for those who are not sure, I recommend polishing by hand, it will take longer, but it will also be more reliable.
When polishing headlights, there is only one advantage that this procedure can be performed in a cold room. Well, that seems to be all for now, if you have any questions, write in the comments.
Popular;
- Another unusual way to polish a headlight.
- How to simply varnish your headlights.
How to polish car headlights- An easy way to restore dim headlights
- A simple way to tint headlights using tights
- DIY chemical polishing of headlights with acetone
- Do-it-yourself headlight polishing
- What to do if the headlight fogs up
How to restore headlight clarity
When I began to understand the reasons that led to the clouding, I found out that there could be several factors:
Hot environment
There are some types of headlights that get very hot, which has a bad effect on the integrity of the plastic. Usually it is the fog lights that get very hot, and in modern cars they often try to combine low beam, high beam and fog lights into one plastic housing. As a result, it turns out that initially transparent glasses begin to melt and eventually become cloudy.
Depressurization
In normal condition, the headlight is completely sealed to prevent dust and dirt from getting into it, because... all this can clog the plastic protection and make it opaque.
A common cause of damage to seals is mechanical impact. Even if there was a slight impact, and the lamp appears to be undamaged, small cracks and microcracks could still form. For dust, even such a small factor is not a hindrance. As a result, the headlight gradually begins to dim. With such damage, usually only one headlight darkens.
Poor quality plastic
Low-quality plastic begins to become cloudy simply due to low-quality components or incorrect technology. You can, of course, try to fix the matter by polishing, but often this will not lead to any significant changes. Most likely, you will just have to buy a new headlight.
To solve the problem of clouding due to the cases listed above, you need to remove the headlight for polishing, and this is already a whole task...
My foglights are installed separately, and I couldn’t find any chips or cracks during a visual inspection, so I decided to try to solve the problem at low cost, namely, try to polish the outer surface of the headlight.
From plans to action
Nowadays there are a lot of different detailing centers and service stations that offer a wide range of services, including restorative polishing of headlights. The price range is also very wide. Since I have always liked to take care of the car myself, I decided to first try to restore the headlights without resorting to the services of specialists. I didn’t want to overpay for something I could do, especially since I wasn’t sure that external polishing would solve my problem. If it doesn’t work out, then I’ll turn to professionals.
What can I use to restore the former transparency of headlights?
For me everything is very simple. I buy all auto chemicals and car care products from only one proven brand. This is a manufacturer with a very long experience and excellent quality of goods, the company is ABRO.
So, for my venture I will need ABRO headlight restoring polish
and a microfiber cloth from the same company.
First you need to thoroughly wash the headlights and wipe them dry.
Then, take a little restoring polish and, using a clean napkin, rub it into the surface of the headlight in a circular motion.
After this, you need to remove the remaining polish and rub the headlight until it shines. Surprisingly, I didn’t even have to repeat the procedure.
However, if the turbidity is strong, then the process can be repeated several times until the desired effect is achieved. After reading the instructions, I learned that the polish is recommended to be used every 3 months to maintain the proper appearance of the headlights. Since the bottle has a volume of 273 ml, and it took very little product to restore my headlights, when using ABRO restoring polish
once every 3 months, such a bottle should last for a long time.
Here is a simple, fast and budget-friendly way to restore the former shine of your car headlights using a proven product from ABRO.
ABRO IS THE NAME TRUSTED AROUND THE WORLD
Purely beautiful
Here is the most striking example. By wiping the headlights with a napkin or rag, the owners literally abrasively treat the polycarbonate from which the lenses of modern headlights are made.
This material resists impacts better than glass, but it wears out quite quickly, and this process can be either natural (chips and scratches appear during use) or caused when we try to wipe the headlights with something
The consequences are that the plastic becomes cloudy. But we repeat: the fact that the headlight loses its attractive appearance is not so bad - it’s much worse that the quality of its work also decreases. Polishing can solve the problem, but only partially and temporarily. To extend the life of the coating, avoid barbaric cleaning methods.
It is best to wash off all contaminants with a stream of water (a plastic bottle, a hole in the roof - and here you have a simple but effective washer). And God forbid trying to clean plastic headlights from the outside, and especially from the inside, with aggressive chemicals - this also threatens to damage the material, and polishing may no longer help.
Methods for restoring headlight reflectors
It is possible to return the mirror surface to headlight reflectors. There are special tools for this:
- metallized tape, which is usually used for gluing foil joints;
- self-adhesive with a mirror coating like Oracal (Oracal);
- aluminum foil, which must be glued to the reflector with glue;
- special paint for headlight reflectors.
The main thing is to wash, remove rust, and degrease before restoring the mirror surface.
Method for restoring stickers of foil, film, tape:
- Prepare materials, scissors, screwdriver, knife.
- Clean the surface to be restored and degrease.
- Cut the tape to the required length, first stick it on smoother surfaces, and use your fingers to expel the air.
- Cut tape for the concave surface and stick it on.
If you choose foil gluing, you will need epoxy glue. Glue the foil onto this glue. The drying time of the glue is long.
The disadvantage of using glue is that when the light bulb in the headlight heats up, the release of harmful substances from the glue begins, which fogs the headlight glass. After about 3 months the glass becomes dull.
Painting the headlight reflector
This method is easier and more convenient. No need to fuss with glue. You need to buy spray paint in a can in the color white chrome. You also need to buy aerosol varnish in a can.
Application order:
- Degrease the surface, dry it, apply one coat of varnish by spraying.
- Let the varnish dry. Shake the paint can and apply the chrome mirror paint evenly.
- Wait about ten minutes and spray the second coat.
- Allow to dry completely.
There is also a way to create a mirror look using silver powder.
The operating procedure is as follows:
- Degrease the reflector. Apply one coat of black nail polish.
- Let dry.
- Take the powder with your finger, it’s called silver powder, and rub it into the painted surface.
- Rub in until the black varnish is visible.
Maybe there are some other ways to restore the shine of the reflector and headlights, please share in the comments. Thank you for reading the article.
How to make car headlights more transparent
When a car owner discovers that the headlights on his cars have lost their shine and are clearly cloudy, he needs to carefully inspect them. Depending on the degree of contamination or damage to the glass, a decision is made on the nature and volume of work required.
In case of heavy contamination, without damaging the surface of the lens, it is enough to wash the headlights using special detergents for glass surfaces. In some cases, with simple rubbing, without much effort, with toothpaste with whitening properties or GOI No. 1 paste, which is used for finishing and has low abrasive ability.
The decision to polish the optics is made after an inspection reveals chips, deep scratches or a network of small cracks in the plastic headlights. When planning to increase the transparency of the lighting fixtures on a car, the driver needs to decide how this will be done. There are two options:
- take the car to a service center so that specialists can handle it;
- polishing headlights with your own hands, this option is possible if the car owner is confident in his abilities, especially since this will significantly save money.
Having decided to carry out such repairs at home, the driver must seriously prepare for this work. Assess the condition of the lens surface in the headlights, choose a means for polishing the optics, and determine the order of actions for different methods of restoring headlights. In the photo and video you can see what features you are likely to encounter when performing such work. It is useful to read reviews from car enthusiasts with recommendations on which headlight paste or varnish is best to choose.