Daytime running lights in Hyundai Solaris
Hyundai Solaris, as a rule, uses daytime running lights using LED bulbs. The beam of light in them is directed directly onto the road in front of the vehicle. Therefore, they are much more convenient and efficient than conventional headlights. A car with such lights is more visible on the road, which significantly reduces the risk of a collision.
LED lamps for car
LED elements are more economical than halogen elements - less fuel is required to produce energy for their operation. This is a very important advantage in modern economic conditions.
Application of LED lamps
What to choose
When replacing optics on Solaris, you cannot use kits with higher power ratings than recommended by the manufacturer. The brightness of the road lighting will not increase, but the car's electrical wiring will be constantly under overload. It is recommended to purchase lamps of the established parameter, which are on the list of recommended ones for a particular car.
Factory analogues used for Hyundai Solaris have the following characteristics:
- 55/60 – power indicator for high and low beam;
- H4 class (type) of the base;
- L/L (long-life) resource.
It is possible to install LED elements that can replace standard halogen optics.
If the choice remains with halogen lamps for near and far optics, the following models can be installed in conventional headlights:
- Bosch Plus 90. Features an increased resource with standard performance.
- Philips Long Life EcoVision. Has a low cost.
- Narva RangePower +110. Brightness increased by 10%.
- Philips VisionPlus, X-treme Vision. Maximum illumination area, provide white light.
Philips Longlife EcoVision
Low beam bulbs for Hyundai Solaris manufactured by Philips, especially the Longlife EcoVision variety, are in great demand when replacing standard lights. The halogen flask is made of quartz glass, resistant to ultraviolet radiation. Standard parameters of the EcoVision line:
- minimum service life – 100 thousand km;
- heat resistance (for filament 2650 ºC, glass 800 ºC);
- vibration resistance;
- waterproof 100%.
The lamp bulb of the EcoVision range has a pressure 10% higher than that of standard lights, which produces a more powerful light beam. Quartz material maintains reliable operation of automotive optics even when drops of water fall on its surface, if the headlight housing has cracks.
When installing lights, it is recommended to change them in pairs to obtain the necessary symmetry of lighting.
Philips Vision Plus
The Dutch manufacturer Philips produces a line of halogen lamps labeled Vision Plus, where the lighting temperature is as close as possible to the 3500 K value of xenon light.
In optical instruments, quartz glass is used for the bulb, and the base is chrome-plated. Road lighting at night is improved due to the length of the light beam, compared to standard lamps, by 12-15 meters. All elements are installed in their standard places.
Philips X-Treme Vision
Models from the manufacturer Philips for Solaris X-Treme Vision have increased light output (+130%), the luminous flux for a narrow spectrum is more saturated. This provides good illumination of the road at night.
Among the shortcomings, some motorists note that the lamps do not sufficiently illuminate the roadsides, due to the strict beam of light from the main lights and the operation of the standard reflector. The service life corresponds to the declared one - this is at least 100 thousand kilometers.
Bosch Plus 90
All lighting devices from Bosch (country of manufacture Germany) comply with the manufacturer’s stated parameters of illumination, power and operating life. For Solaris low and high beam, the range of Bosch Plus 90 optics is considered one of the best.
Consumables are packaged one at a time and in pairs. The flask is standard colorless; a distinctive feature of the original product is a blue stripe on the top of the body.
Marking 90 means the light output is 90% higher than that of models from other lines of the manufacturer. This ensures better visibility at night and a larger area of roadside illumination. The spectrum is as close as possible to daylight.
The high beam does not blind oncoming drivers; the illumination values comply with the rules and are 0.4 lm for daytime lights, and 0.7 lm for high beams.
Narva Rangepower 110
The Polish manufacturer Narva uses quartz and refractory glass for the bulb and chrome-plated metal for the base. Halogen models of the Rangepower 110 class provide optimal illumination of the track in any weather. Installed instead of the standard Hyundai Solaris lamp of any year of manufacture.
The lamps in the Rangepower 110 headlights are designed for 100 thousand mileage, the bulb is resistant to UV radiation, the glass does not darken during prolonged use.
The Narva optics range is used for low beam and high beam, and is installed as lamps in Solaris PTF. The cartridge corresponds to the standard location.
How to replace lamps
Changing a light bulb is quite easy; no special knowledge or skills are required. The tools you will need are a standard motorist kit. Before replacing daytime running lights or any others (installing LED lamps, etc.), you will need:
- Place the car on a level surface in a well-lit place;
- turn off the ignition;
- secure the open hood;
- remove the terminals from the battery.
Replacing DRL, fog and side lamps has some technical differences. All optics are connected as standard.
When installing, you must wear textile gloves: do not touch the flask with your hands.
Low beam
Inspecting the headlight housing under the hood and removing dirt are the first steps before replacing the low beam lamp on a Hyundai Solaris. The work takes place in stages:
- Remove the protective cover. There are special petals installed on it; when turned from right to left, the clamps come out of the groove, and the block is easily removed.
- The assembly contains a block that needs to be removed: pull the housing towards you, slightly moving the connector, freeing the block from stuck contacts.
- Move the connector to the side.
- The headlights are held in the headlight by a special connector, the protrusion of which is fixed in the headlight housing. Press the latch and release one end of the connector.
- Remove the old part and install the new element.
Replacing bulbs in Hyundai Solaris DRL headlights
It happens that it becomes necessary to change the light bulb in the DRL headlight. Despite their reliability and durability, this sometimes happens. In this case, you can seek help from qualified specialists at a car service station or do it yourself.
Replacing a lamp yourself is a simple process. It is quite capable of any neat and savvy person, even without the skills of an auto mechanic.
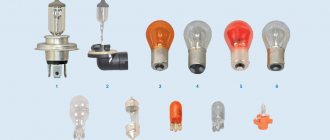
Bulbs for Hyundai Solaris
Before you get started, you will need to stock up on the following set:
- socket wrench 10;
- flat screwdriver;
- replaceable lamps.
WD-40 to make it easier to unscrew the screws.
Replacing headlight bulbs is done as follows:
- We find the screw that secures the bumper on the wheel side and spray it with WD-40 anti-corrosion aerosol to make unscrewing easier. You should wait until the drug eats away the dirt and rust on the screw.
- Unscrew the screw using a screwdriver or a 10 mm wrench.
- We disconnect the side latches of the bumper and bend the side panel so that a hand can fit into the resulting gap.
- By sticking our hand in there, we can get to the cartridge. Replacing the lamps requires unscrewing it and removing it, which we do by moving our hands counterclockwise.
- Once the socket has been removed, the lamps can be replaced. We remove the damaged light element and put a new single-pin LED in its place.
- We put our hand into the gap behind the side of the bumper and put the socket with the new LED in place, turning it clockwise.
- We close the bumper latch, returning the side panel to its place.
- We screw back the screw that secures the bumper. At this point, the replacement of lamps in the headlights of the daytime running lights can be considered complete.
As you can see, replacing lamps in Solaris headlights is a fairly simple matter. It is completely within the capabilities of every careful person, even those without experience in solving such problems. This method is the simplest and least labor-intensive. You can, of course, use traditional methods, which involve trying to get to the lamps from below. This includes all the fun of spending time under the car, removing the trim and reaching for the chuck.
Features of choosing and replacing low beam lamps, PTF and dimensions on Hyundai Solaris
Hyundai Solaris is distinguished by the high quality of standard optics in new cars. Most often these are Osram products operating in the yellow spectrum. The Solaris low beam lamp is combined with a high beam spiral and is located in one housing. The standard type of elements is H4, the declared power is 60 Watts for high beams and 50 for low beams. Many motorists prefer to replace their original optics with more powerful ones even before the end of the service life of the factory components, choosing more powerful consumables that operate on the border of the white and yellow spectrum.
What to choose
When replacing optics on Solaris, you cannot use kits with higher power ratings than recommended by the manufacturer. The brightness of the road lighting will not increase, but the car's electrical wiring will be constantly under overload. It is recommended to purchase lamps of the established parameter, which are on the list of recommended ones for a particular car.
Factory analogues used for Hyundai Solaris have the following characteristics:
- 55/60 – power indicator for high and low beam;
- H4 class (type) of the base;
- L/L (long-life) resource.
It is possible to install LED elements that can replace standard halogen optics.
If the choice remains with halogen lamps for near and far optics, the following models can be installed in conventional headlights:
- Bosch Plus 90. Features an increased resource with standard performance.
- Philips Long Life EcoVision. Has a low cost.
- Narva RangePower +110. Brightness increased by 10%.
- Philips VisionPlus, X-treme Vision. Maximum illumination area, provide white light.
How to replace lamps
Changing a light bulb is quite easy; no special knowledge or skills are required. The tools you will need are a standard motorist kit. Before replacing daytime running lights or any others (installing LED lamps, etc.), you will need:
- Place the car on a level surface in a well-lit place;
- turn off the ignition;
- secure the open hood;
- remove the terminals from the battery.
Replacing DRL, fog and side lamps has some technical differences. All optics are connected as standard.
When installing, you must wear textile gloves: do not touch the flask with your hands.
Low beam
Inspecting the headlight housing under the hood and removing dirt are the first steps before replacing the low beam lamp on a Hyundai Solaris. The work takes place in stages:
- Remove the protective cover. There are special petals installed on it; when turned from right to left, the clamps come out of the groove, and the block is easily removed.
- The assembly contains a block that needs to be removed: pull the housing towards you, slightly moving the connector, freeing the block from stuck contacts.
- Move the connector to the side.
- The headlights are held in the headlight by a special connector, the protrusion of which is fixed in the headlight housing. Press the latch and release one end of the connector.
- Remove the old part and install the new element.
The protrusions on the base will prevent the new bulb from being installed correctly. Two of them should be directed downwards, one upwards.
Before correcting the optics, you should check that the running lights turn on automatically. The fuse located on the block in the engine compartment (main unit) is inspected. The additional fuse in the Hyundai Solaris is located under the steering wheel on the left.
Dimensions
The main feature of replacing side lamps in Solaris is that the car owner may need surgical forceps when working. The following lamps are installed in the front headlight:
- head light with H4 base;
- side lights marked W5W with a power of 5 W;
- direction indicators type РY21W.
Replacing bulbs in both headlights is done the same way. The difference is that access to the left headlight of the Solaris is blocked by the fuse box: this is where surgical forceps are required. When replacing dimensions, it is enough to use the algorithm:
- Disconnect the battery terminals.
- Remove the back cover from the case by turning it counterclockwise.
- The marker lamp socket is removed from the housing; you need to pull the housing towards you.
- The old gauge is removed and a new one is installed.
Sometimes the driver needs to unscrew the two screws that secure the headlight unit when replacing the dimensions on the left block.
Solaris leaves the assembly line with an H27W/2 fog lamp installed in an L-shaped base. As a replacement, the manufacturer recommends using either standard optics or an analogue of the GE-881, 21 Watt. It is possible to replace the Hyundai Solaris fog lamp with fog lamps from the Narva company, in particular, model 48054.
Replacing bulbs Hyundai Solaris (RB), 2010 - 2021
The information is relevant for Hyundai Solaris (RB) models 2010, 2011, 2012, 2013, 2014, 2015, 2021, 2021 model years.
| Lamps used on cars | |
| Purpose | Type |
| Low/high beam lamp | H4 |
| Turn signal lamp | PY21W |
| Rear turn signal lamp | P21W |
| Front fog lamp | GE881 |
| Fog lamp in rear light | PR21W |
| License plate lamp | W5W L/L |
| Reversing and additional brake light lamp | W16W |
| Front position lamp | W5W L/L |
| Tail and brake light lamp | 5W/P21 |
| Luggage compartment lamp | W5W |
| Interior lamp | FESTOON |
You will need: flat-blade and Phillips-blade screwdrivers.
To replace the low/high beam headlight , perform the following steps.
1. Turn counterclockwise and remove the low/high beam and side light lamp covers.
2. Disconnect the wiring harness connector from the low/high beam lamp.
3. Remove the spring clip from the groove on the reflector and fold back the clip.
4. Remove the low/high beam bulb. 5. Install the low/high beam lamp in the reverse order of removal.
To replace the side light , do the following.
1. Turn counterclockwise and remove the low/high beam and side light lamp covers.
2. Remove the side light lamp shade from the reflector.
3. Remove the lamp from the lampshade. 4. Install the side light bulb in the reverse order of removal.
On the day of replacing the front turn signal , perform the following operations.
1. Turn the turn signal lamp socket counterclockwise and remove the lamp socket from the headlight.
2. Press the lamp, turn it counterclockwise and remove it from the socket. 3. Install the front indicator lamp in the reverse order of removal.
To replace the side turn signal , follow these steps. 1. Slide the turn signal light forward in the direction of travel of the vehicle and remove it from the opening in the fender.
2. Turn the socket counterclockwise and remove it from the turn signal lamp.
3. Remove the lamp from the socket. 4. Install the side turn signal lamp in the reverse order of removal.
To replace the rear fog light (reverse light bulb in the right rear light), perform the following steps. 1. Unfasten the fasteners and open the cover of the service hole in the side lining of the trunk. 2. Turn the lamp socket counterclockwise and remove it from the lamp housing.
3. Press the lamp, turn it counterclockwise and remove the lamp from the socket. 4. Install the lamp in the reverse order of removal.
To replace the rear turn signal , follow these steps. 1. Unfasten the fasteners and open the cover of the service hole in the side lining of the trunk. 2. Turn the rear turn signal lamp socket counterclockwise and remove the socket with the lamp from the lamp housing 3. Press the lamp, turn it counterclockwise and remove it from the socket. 4. Install the rear turn signal lamp in the reverse order of removal.
To replace the brake light/tail light bulb, follow these steps. 1. Unfasten the fasteners and open the cover of the service hole in the side trim of the trunk. 2. Turn the lamp socket counterclockwise and remove the lamp socket from the lamp body. 3. Press the lamp, turn it counterclockwise and remove it from the socket. 4. Install the lamp in the reverse order of removal.
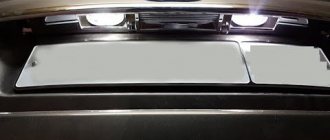
To replace the bulbs in the license plate lights, perform the following steps. 1. Turn the license plate lamp socket counterclockwise and remove the lamp socket from the lamp housing. 2. Remove the lamp from the socket. 3. Install the license plate lamp in the reverse order of removal. 4. Replace the lamp in the other license plate light in the same way.
Hyundai Solaris - repair and replacement of bulbs and headlights
The Korean model, beloved by Russian drivers, does not break down very often. One of the common causes of breakdowns, which can be eliminated with your own hands without calling for service, is the replacement of optics - headlights and side lights.
In addition to replacing standard equipment, sometimes there is a need or desire to improve a sedan or hatchback and install some modern lighting solution - license plate or door lighting. A fairly simple tuning will significantly change the appearance of the car.
Replacing lamps in the rear light of a Hyundai Solaris hatchback
As we already wrote above, the rear courtesy lamps are different in sedan and hatchback bodies. To replace them you will need to remove the lamp.
In the hatchback, instead of the P21W reverse lamp, a W16W bezelless lamp is used, all other lamps are the same.
To remove the rear light, we need a Phillips screwdriver with which we need to unscrew the 4 screws securing the rear light to the body. The flashlight is held on by clamps; to remove it you just need to pull it.
Once the lamp is removed, you can begin replacing the lamps.
First we change the fog lamp. We turn the socket counterclockwise, take it out, press on the bulb and pull out the lamp. We install a new one and insert the cartridge back. Rear fog light bulb P21W.
Next, we replace the W16W reversing lamp. We also turn the cartridge counterclockwise and pull it out of the socket. We remove the lamp by pulling it by the bulb and install a new one. If you want to install an LED reverse lamp, then the W16W lamp base is identical to the W5W lamp base. The differences between them are in power.
In the same way, we replace the turn signal lamps PY21W and the rear brake signal lamps and parking lights P21/5w.
This completes the lamp replacement process. If you have any questions, you can leave them in the comments.
What lamps and light bulbs need to be purchased?
Any repair work must begin with the preparation of equipment and parts. Optics and lighting must be purchased only in the original, since any problem with the lighting devices increases the risk of danger for the driver and passengers.
The Korean manufacturer installs the following lighting fixtures in its cars:
- in block headlights only halogen lamps for high and low beam, article number H4, with a power of 60/55 W are used;
- for turn signals you will have to purchase lighting fixtures with article number PY21W and a power of 21 W;
- The side lights are equipped with bulbs with article number W5W and a power of 5 W.
Who the manufacturer of the lamp is in this case is not important, the main thing is the coincidence of powers and names. The headlight bulbs are halogen, so work on replacing light fixtures should only be done with clean gloves.
If you touch the glass with your fingers, traces of sebum will remain on it, which will subsequently cause darkening. The lamps quickly become cloudy, regardless of the care taken when installing them, and the luminous flux power decreases sharply. This needs to be monitored and troubleshooted in a timely manner.
Surprise when replacing a side lamp on a Solaris
Replacement may be a little difficult due to the special headlight. Therefore, you may need a surgical instrument.
Such a trifle as replacing a side light bulb on a Hyundai Solaris, for cars of other models, can cause certain difficulties. Especially if you have no experience in servicing the machine yourself. Solaris also prepared a surprise when servicing the optics, but dealing with it is quite simple.
Ratings of side light lamps
Marker bulb in the headlight.
The Hyundai Solaris front headlights are equipped with:
- halogen headlight lamps with H4 standard socket, power 60/55 W,
- direction indicator lamps with a power of 21 W, type PY21W ,
- side light lamps with a power of 5 W with the designation W5W .
The design of the headlight block allows you to quickly replace any of the lamps, but on the driver's side, access to the left headlight is complicated by the fuse box.
You can use diode lamps.
Replacing headlights on a Hyundai Solaris
The headlights of a Korean sedan or hatchback can be replaced with your own hands in a garage; the work will take from one to one and a half hours, depending on the skill of the technician.
Replacing the light bulb in the front headlight of a Hyundai Solaris is carried out in the following order:
- Remove the headlight protective cover. To do this, you will need to turn it counterclockwise with a little force. You should not help yourself with tools, for example, a knife or a screwdriver, as you can damage the glass;
- then the block of wires is carefully separated from the light lamp;
- we find the spring retainer. You need to press it, release it from alignment with the reflector hook and pull it towards you, upward;
- the lamp is removed and replaced with a new h4, its cost for the Korean model will be 250-300 rubles. During installation, it is necessary to adjust the direction of the light flux.
The sequence of actions when replacing a taillight on a Hyundai Solaris does not change. A separate operation will be replacing the terminal on the Hyundai Solaris headlight and replacing the headlight range control. Connecting it will be a simple task if the design of lighting devices has already been studied. It has three wires: blue is responsible for control, pink is connected to the positive terminal, black is connected to the negative terminal.
The headlight itself can also be changed independently. Replacing the front headlight unit of a Hyundai Solaris is performed in the following sequence:
- the front bumper is dismantled; without this operation, the headlight cannot be changed;
- we find the latch, the wire block is separated from the connector of the lighting device;
- the lower mounting block of the headlight to the body is removed using a 10mm wrench;
- a new headlight is installed, then all parts are attached in the reverse order.
When replacing a rear fog light for a Hyundai Solaris, the same sequence of actions must be followed.
Headlights in Hyundai Solaris
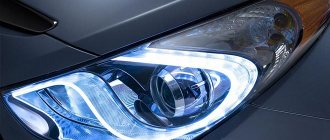
The headlights in the Hyundai Solaris are made in an elegant style. It would be appropriate to say that truly high-quality car lighting equipment has a significant impact on the driving process, and is also the key to increased safety and preservation of the health and life of the driver and passengers.
The teardrop-shaped headlights are located at the corners of the Hyundai Solaris. In addition to its aggressive appearance, this placement makes it possible to effectively regulate the geometry of the light flux. By the way, the direction of the beam is controlled from inside the car using the dashboard.
This is interesting: What is error P0420 and how to fix it?
The Hyundai Solaris has the possibility of not only standard adjustment, but also adjustment of the headlights depending on driving conditions and the number of people in the car. It is known that the presence of additional luggage or cargo makes the clearance between the bottom of the car and the road surface less. This factor must be taken into account when adjusting the headlights in the Hyundai Solaris. In addition, adjusting the lighting in such conditions will help reduce the likelihood of dazzling drivers of oncoming vehicles.
Mounting the front headlight in the Hyundai Solaris and its varieties
The front lighting fixtures on the Hyundai Solaris are fixed in four places and secured with three bolts and one mounting clip. The lower part of the headlight is equipped with special protrusions, which are used to securely attach it to the car body.
The turning and lighting lamps are located in a common compartment under a common cover, but the marker lamp is located separately and is fixed in a hole specially designed for this purpose. The placement and shape of the headlights in the Hyundai Solaris does not depend on the body and modification of the car and is always identical.
This feature greatly simplifies the choice of lighting equipment to replace with a Hyundai Solaris. The same headlights are available for both the hatchback and the sedan. It would be appropriate to say that all trim levels of this car are equipped with fog lights. The only exceptions are the classic version of the Hyundai Solaris and Optima.
A car's rear lights vary in shape and include side lamps, brake lights and turn signals. In addition, depending on the type of body, they can also be different. All three lighting fixtures are fixed using special bolts and mounting clips.
Replacing dimensions on Hyundai Solaris
The topic of replacing side light bulbs on a Hyundai Solaris is constantly debated in professional communities; it raises questions even among experienced car owners.
Replacing a Hyundai Solaris parking lamp or turn signal requires the ability to independently disassemble the parts. It is practically impossible to do without removing the bumper, especially from the front side. Equipment you will need:
- wrenches with heads 10 and 12;
- surgical clamp (tweezers);
- extension.
The work must be done in the following sequence:
- The cover of the compartment for the side lights in the headlight is removed. The battery is removed (for ease of work).
- The fuse block is released; this will require removing the 10mm bolts and caps. For convenience, you can first remove the battery.
- Next, unscrew the bolts securing the box (10 wrench). We bend the block.
- The terminal is removed from the headlight, it is moved to the side so that it does not interfere with work;
- At the last stage, you need to rock the socket with the side light lamp out of the flashlight housing. After replacement, we perform all operations in reverse order.
Replacing lamps in the rear light of a Hyundai Solaris sedan
Replacing lamps on a sedan will not cause you any special problems. If you decide to change all the lamps you will need:
- P21/5w lamp or two-pin brake and side light lamp
- Lamp PY21W yellow single-pin lamp with a regular base used in a turn signal
- PR21W red single-pin lamp installed in the rear fog lamp
A detailed guide to replacing lamps in a sedan
We open the trunk lid and see a decorative cover that covers the back of the headlight.
We press the latches and lift the cover up so that it does not interfere with us replacing the lamps
The base of the lamp used is indicated opposite each socket, so you will not be able to confuse and install the wrong lamp.
Take the cartridge and turn it counterclockwise. We take out the socket with the P21/5w lamp, pressing the bulb, turn the lamp in the socket counterclockwise and pull it out. Install the new lamp and screw the socket back.
Next, we remove it in exactly the same way and change the turn signal lamp PY21W. Pay attention to the type of lamp base; it can be with a regular or offset base.
It remains to replace the fog lamp lamps (left headlight); on the right side, a reverse lamp is installed in its place.
If you have any questions, you can ask them in the comments.
Tuning lighting for Hyundai Solaris
Among the most frequently chosen tuning methods you can see:
- replacing standard optics with xenon;
- installation of rear fog lights with LED running lights;
- LED inserts in the rear bumper;
- tuning rear lights;
- installation of LED turn signal modules.
Not all operations can be carried out independently in a garage; rather, it will be possible to change only the taillights or install a backlight on the bumper. The rear lights of the Hyundai Solaris, which can be tuned quite quickly and simply, will perfectly complement the exterior of the car. Many people like the updated restyling. Most often, drivers install halogen lamps around the license plate.
This additional lighting is both convenient and attractive. In addition, additional lighting in the cabin is popular. The lights are changed in the same sequence in which the headlights are replaced.
Hyundai Solaris optics do not require serious expenses from the car owner, with the exception of complex types of tuning, the cost of which can be up to 40 thousand rubles. Cheaper DIY solutions will be just as attractive.
Replacing headlight bulbs on Solaris
Replacing the front headlight on a Solaris will not cause any difficulties; it will require a minimum of preparatory work.
Anyone with the tools and limbs that grow from the right places can change a headlight with their own hands. Video material
The video will clearly show how to remove the headlight from the car