The ignition switch is the main element of the engine starting system. But it is also susceptible to various types of damage, especially when it comes to domestically produced cars.
In this article we will look at how the ignition switch works and functions using the example of the VAZ 2110. We will also talk about its malfunctions and how to eliminate them.
Design features of the device
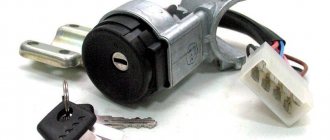
The design of the “tens” ignition switch includes:
- the castle itself (larva);
- key;
- locking device;
- contact Group.
The cylinder with a key is used to prevent unauthorized access to the ignition system. They work on the same principle as a regular door lock. We insert a key of a certain configuration into the well and gain access to start the engine. In addition, the first time you turn the key, we unlock the steering wheel, disabling the mechanical locking mechanism.
The main device that we access by inserting the key into the ignition switch is the contact group. With its help, electricity from the battery is supplied to the starter and coil.
The main components of the castle
Before describing the ignition switch device, you need to know that this unit did not appear in the car right away. Since it is most often used to start the starter, which was not introduced into the car design in the early stages. The first cars were started by a curved lever inserted into the front of the car, which directly rotated the crankshaft.
The ignition switch is usually called the basic switching element that provides power directly to the electrical systems and helps to minimize battery discharge while parking or parking a vehicle.
Most lock models are structurally divided into mechanical and electrical units. The mechanical block includes the lock cylinder. This cylindrical device hides a mechanical “secret” consisting of cylinders and springs arranged in a certain order. This ensures that a unique key is required for a particular lock.
We recommend: Renting special equipment - dump truck, nuances and features of this process
The second block is equipped with a group of electrical contacts. Their connection to each other is carried out according to a certain algorithm, which depends on how much the key is turned.
The built-in lock, in addition to rotating the module with contacts, helps lock the steering wheel . This operation involves a locking plug installed in the structure. When installed at the extreme initial point, it moves out of the lock body and is fixed in a special groove located on the steering column. In popular VAZ models, the factory installs the following types of locks:
- KZ-813;
- 2108-3704005-40.
The design of the ignition switch requires the presence of several required parts. The main components of the nodes are the elements:
- casing;
- bracket;
- contact node;
- "secret" of the castle;
- shell;
- pin retainer.
The secret interacts rigidly with the cable and is mounted inside a large spring. The first end of the spring is fixed on the lock body, and the second - on the cylinder. Thanks to the built-in spring, the lock spontaneously returns to its original position.
The design of the lock is designed both for rotation and for fixing it in any position. For this case, the cylindrical driver is equipped with a through radial channel. It has spring-loaded balls on both sides. After turning at a certain angle, the balls fall into the hole, which allows you to fix the structure in this position.
The contact unit developed by the engineers includes two elements: a static block with connecting contacts installed on it and a rotating disk with mounted plates. Electricity is released through the plates when the driver turns the key. Typically there are six or more contacts on the block with outputs to the rear side. Most locks produced today are equipped with blade contacts with a single connector. The group of contacts included in the lock and located inside the case is designed to trigger the following components:
- electric starter;
- ignition system;
- signaling devices.
Monitoring the performance of the group is usually carried out with a plug-in test lamp. However, before this operation, experts recommend testing the cables suitable for the connector for possible damage. If insulation problems are identified, they must be corrected.
How does the ignition switch work?
When the key is removed from the lock, the locking mechanism is activated. A spring-loaded pin fits into a special hole in the steering shaft, locking it in one position. In order to unlock it, you need to insert the key into the hole and turn it to the first position.
At the same time, certain contacts are closed, supplying voltage to the main electrical appliances. The starter in this position is de-energized.
When we move the ignition switch to the second position, the contact group supplies voltage to the engine starting device. The starter begins to rotate, driving the crankshaft of the power unit. This is how the “tens” ignition switch works in such a simple way.
The operating principle of the VAZ ignition switch: features and nuances
The easiest way to consider the algorithm for the operation of the protection system is on the basis of our beloved domestic automobile industry. The operating principle of the ignition switch of a VAZ 2110 or any other model of the Volzhsky Automobile Plant is identical, only the design of the device changes, and not radically.
As a rule, the key can be in three positions:
- 0 – almost all electricity consumers in the car are turned off, only in this position can the key be removed and inserted;
- I – in this position, various devices are connected to the battery, for example, you can turn on the headlights, radio, windshield wipers, etc., the key can be fixed in this position and cannot be removed;
- II is probably the most important position, as it activates the engine starter. When translated to this position, the key then returns to I on its own.
In older models, the so-called “classics”, there may be another lock position, marked as “III”. It mechanically locks the steering column.
As we have already said, the algorithm for the operation of the protection system in VAZ cars is very similar. So, for example, the operating principle of the Kalina ignition switch is almost no different from the VAZ 2110, VAZ-2111, VAZ-2112 and others.
We recommend: Procedure for draining antifreeze from the cooling system - where is the drain plug
It would not be amiss to mention such an interesting feature of the above-mentioned models as blocking the restart of the starter when the engine is running.
Moreover, the operating principle of this ignition switch function is implemented in such a way that even if an attempt to spin up the engine fails, additional manipulations must be performed - move the lock to position 0 and only then can it be switched back to II.
So, our dear readers, you probably already understood that the function of the ignition switch is reduced to fairly simple actions - switching various groups of electrical contacts that are responsible for their consumers in the car.
Of course, this brief overview of this unit does not pretend to be a comprehensive technical treatise, but it still allows us to understand the essence of its design.
What can happen to the ignition switch
There are not many faults with the device in question. The ignition switch itself, the contact group or the locking mechanism may fail. Each breakdown has its own symptoms.
If, when inserting the key into the hole, you notice that it is difficult to get in, or the core does not turn (does not turn completely), most likely the lock itself has become unusable.
If the steering shaft does not unlock in the first position, the fault should be sought in the locking mechanism. Well, when the lock works properly, but the ignition does not turn on, or turns on but the starter does not function, the problem is clearly in the contact group. Let's try to deal with each of the problems.
Replacing the ignition switch on a VAZ car
To carry out repair work to replace the ignition switch of a vase, we will need: a screwdriver, a tester and a thin awl. Once you have everything you need, you can begin the repair. On all classic VAZ cars, the ignition switch is located at the bottom, on the left of the steering column. To replace you need:
- Disconnect battery
- Remove the plastic casing by first unscrewing the screws that secure it.
- Then unscrew the two screws securing the ignition switch to the bracket.
- We insert the key and set it to position 0 to disable the anti-theft device.
- Insert the awl into the hole in the bracket and press the latch. Then we take out the lock itself.
- After removal, it is recommended to mark the contact wires so that nothing is mixed up the next time you connect.
Removing the ignition switch on a VAZ-2106 begins with disassembling the steering column casing. We unscrew the five bolts and remove its halves. Before you begin disassembling the electrical part of the lock, it is very useful to disconnect the battery by removing the negative terminal or unscrewing the switch bolt. After this, remove the spring retaining ring from the back of the lock body and remove the contact group. We move it to the side so that it does not interfere, and we begin to remove the lock itself.
It is secured in the steering shaft bracket with two bolts, after unscrewing which nothing happens. It is useless to try to remove the lock from its socket if you do not know about the special stopper. It is located on the lock body under the bracket. We press this stopper into the lock with a thin screwdriver through a small hole in the bracket. Further, according to all the instructions, the lock should be pulled out freely, but this does not work.
An obstacle that is not described anywhere is the anti-theft rod. Even though it is in a “disconnected” state, it still clings to the steering shaft. To remove the lock, you have to manipulate the key. In different positions of the lock cylinder, the anti-theft device also moves and is recessed as much as possible when the key is in the “Starter” position. After a few minutes the lock can be pulled out of the bracket.
Here is the time to write that assembly of the unit should be carried out in the reverse order of removal. And in general, this will be true. First you need to insert the new lock into the bracket, recessing the latch and holding the key in the starter position, tighten the fastening bolts, then connect the wires. Particular attention must be paid to this, because an incorrectly connected contact group can damage the starter or ignition system. We reconnect the wires from the old group to the new one one at a time, checking the numbers on the contacts. After this, we assemble the steering column casing.
On the car, the ignition switch is located on the driver's side, mounted on the left side of the steering wheel on the steering gear bracket, under the instrument panel.
First of all, you need to get rid of the decorative casing of the steering shaft, unscrew the fastening screws and remove it. We performed similar actions when replacing the steering shaft.
After removing the decorative casing, unscrew the two screws securing the ignition switch to the body, then insert the key into the lock and turn on the “0” position, which turns off the anti-theft device. Through the hole in the bracket, press the lock lock with a thin awl and remove the ignition switch from the mounting socket. This completes the repair work to remove the ignition switch.
On VAZ 2108 and higher models, a package with wires is connected to the lock, that is, nothing needs to be marked and the possibility of mixing up the wires when installing a new switch is completely eliminated. Well, on VAZ 2107 and lower models, this is not the case, each wire is connected separately, so when removing each wire, it must be marked so as not to be confused during further installation.
To replace the contact group of the ignition switch, you need to use a thin screwdriver or an awl to pry the retaining ring from the edge and remove the contact part. When installing a new contact part, orient it so that terminals “15” and “30” are on the side of the locking rod.
At this point, the repair work is completed, install the new ignition switch in the reverse order of removal, connect the wires, transferring the markings from the old switch to the new one. The pinout or connection diagram of the VAZ ignition switch wires is quite simple and understandable, so every car enthusiast can carry out repairs or replace a spare part without the help of car service employees.
Lock and blocker
If you discover a problem in the operation of a lock or locking mechanism, it is better not to experiment. Even if you manage to repair them, the problem will certainly manifest itself later.
It is better to buy the mechanism assembled and replace it. Moreover, it is not that expensive. The cost of the device is about 900 rubles. After spending this amount, you will definitely forget about problems with the ignition switch for several years.
How to check a contact group
Primary diagnostics of a group of contacts can be performed without dismantling work. To do this you will need an ohmmeter or multimeter.
The verification algorithm is as follows:
- We de-energize the vehicle's on-board network by removing the negative terminal from the battery.
- We find the lock connector. Let's disconnect it. The contact group of the VAZ-2110 ignition switch has 8 terminals: 4 upper and 4 lower.
- We turn the key to the first position and measure the resistance between contacts 30 and 15. It should be zero.
- We set the key to the second position and measure the resistance between contacts 30 and 15, and then between 30 and 50. For a working device, the resistance should be zero. If the device gives different indicators, you will have to repair or replace the ignition switch contact group.
As you can see, diagnosing this node is not particularly difficult. Go ahead.
Diagnostics and replacement
The diagnostic procedure can be combined with device replacement. You can change the KGZZ either in a garage or ask for help at a service station. The first option in this case is more preferable, since replacing the ignition switch contact group is not a particularly difficult task that almost anyone can handle. Moreover, you don’t have to pay for it.
So, how to check and how to replace the KGZZ (the procedure may differ depending on the design features of the car):
- First you need to dismantle the plastic protective cover of the steering wheel; as a rule, it consists of two parts - upper and lower. Using a screwdriver (usually with a Phillips blade), you need to unscrew the bolts that secure the plastic, and then carefully remove the parts of the protection.
- Once you do this, you can gain access to the lock itself. You will need to disconnect the connector with the cable from the socket with the backlight bulb.
- After dismantling the lock itself, you will need to bend the latch that secures the plastic cover. You can use a slotted screwdriver to disconnect. Having done this, you can disconnect all the other fasteners one by one.
- After these steps are completed, you will need to remove the plastic cover from the lock itself.
- Then, when the cover is removed, you will also need to disconnect two more latches in it, this will allow you to disassemble it and gain access to the KGZZ. You can also use a screwdriver at this stage.
- Having done this, you can dismantle the KGZZ itself with the diode elements from the cover. There are convex contact elements on the light source; if they are acidified or have carbon deposits on them, you can try to treat them with fine-grained sandpaper. If necessary, the KGZZ is completely replaced with further installation in the lock. The procedure is repeated in reverse order.
1. Disconnect the latch and remove the cover.
2. Remove the cover from the device.
3. Remove the KGZZ and replace it.
How to remove the ignition switch
If the ignition switch, contact group is faulty, or the lock is broken, further testing of the device can only be carried out after its dismantling. In order to remove the assembly, you will need the following tools:
- key to “10”;
- screwdriver with Phillips bit;
- hammer;
- chisel.
The procedure is as follows:
- Using a size 10 wrench, unscrew the nut of the negative battery terminal clamp. We remove the terminal.
- Using a Phillips screwdriver, unscrew the 5 screws securing the plastic steering column cover. Remove both halves of the protection. On the steering column you will see the ignition switch assembly itself. It is attached to the shaft using two clamps connected to each other by bolts without heads. Don't be alarmed, this is done in order to protect the car from theft.
- Using a chisel and a hammer, carefully knock down these bolts (the metal from which they are made is quite soft).
- Disconnect the connector with wires from the lock.
That's basically it. Now the lock is ready for subsequent diagnostics and repairs.
How to change the ignition switch of a VAZ 2110: ignition switch diagram
Having dealt with possible malfunctions of the ignition switch, let’s move on to methods and methods for eliminating them. More precisely, we will consider how to carry out diagnostics, what is the ignition switch connection diagram, how to connect the ignition switch, etc.
Before starting repair work, it is necessary to carry out diagnostics using a tester by removing the ignition switch:
- Having disconnected the negative terminal from the car battery, unscrew the casing around the steering column;
- having disconnected the ignition switch connector, insert the key into the lock and move from position I to II., while measuring the resistance between the contacts using an ohmmeter (the data must correspond to certain values given in a special table);
- The ignition switch and contact group are operational - the resistance value is 0 Ohm.
Removing the ignition switch:
- Having removed the negative terminal from the battery, use a screwdriver to unscrew the fastening bolts and remove the steering casing (the casing is divided into two parts);
- Having removed the front part of the lock and disconnecting the plug with power wires from it, disconnect the specified plug with wires from the relay;
- Having set the key in the ignition switch to position “0”, you can begin to dismantle it;
- unscrew the fastening screws and remove the lock;
- use a tester to diagnose the malfunction;
- Having identified a malfunction, proceed to repair work and reassemble the device in the reverse order.
The contact group is located deep in the lock body. Its functionality is checked using a special test lamp. It is recommended to first check for damage to the cables leading to the lock.
Ignition switch and replacement of contact group using the example of a VAZ 2110:
- use a screwdriver to move the fixing latches to the side;
- dismantle the old contact group and replace it with a new one;
- install the latches in place.
However, in some vehicles the wiring may be connected directly to the terminals. For this reason, when installing a new element that has this type of wiring connection, a connection diagram will be required (you need to study the manual or special technical literature for a specific car model).
How to remove the ignition switch contact group
Dismantling the lock is only half the battle. Now you need to remove the contact group. This is not difficult to do. This procedure requires a thin slotted screwdriver. With its help, you need to bend two plastic latches that secure the group of contacts to the metal body of the lock. After this you can safely disconnect it.
In order to repair the ignition switch contact group, it must be disassembled. A thin screwdriver will also come in handy here. We take it and bend the two latches on both sides of the lid.
When the cover is removed, inspect the condition of the contacts. If they are slightly burnt or oxidized, this may be the cause of the problem. Clean the contacts with fine sandpaper. Under no circumstances use a knife or file for these purposes. This way the unit can be completely damaged.
If the lead plates are in very poor condition, it is better to replace the device. The price of the ignition switch contact group for the VAZ-2110 is about 80-100 rubles. Agree that it is not that expensive to make the unit work like new again.
Replacing the ignition switch contact group also does not require any additional skills. Simply attach it to the device body and snap the latches. Next, connect the connector with the wires and install the lock on the steering column. But there is one nuance here. For installation you will need new bolts with break-off heads (4 pcs). You can buy them at any auto store. The bolts are tightened until their heads break off. After this, you can install the cover on the steering column.
The procedure for disassembling the lock
Before starting work, you should prepare the necessary set of tools. The kit will come in handy with a Phillips screwdriver, a set of keys, a narrow chisel or punch, and round nose pliers with curved ends for gripping. Provide yourself with easy access to the lock and adequate lighting.
At the initial stage, the entire device assembly is removed. The protective element of the plastic casing is sequentially dismantled, the lock is unscrewed and pulled out. To avoid errors during reassembly, mark the installation location and purpose of each wire. Take the time to take a legible photo.
Be sure to evaluate the terminal block with the wires inserted. If cracks or traces of melting are detected, feel free to remove each wire from its socket and replace it with a new part.
We recommend: Rules for towing a car
There is no clear answer to the question of how to remove the ignition switch contact group. It all depends on the design features of the device. Let's consider dismantling the required element using the example of the VAZ model of the 10th family:
- Disconnect the backlight wires if present.
- Disconnect the decorative cover at the top of the device by unlatching the latches around the perimeter.
- Disconnect the contact group. Usually the fastening is also carried out in the form of several clamps.
After removing the part, you should examine the condition of the contacts. Minor oxidation can be removed by simply sanding with medium-sized sandpaper. Do not rush to reassemble. Try to simulate a launch right on the scale.
If burnt contacts are detected or if it is impossible to identify a visible defect, the part should be replaced without regret.
When performing reassembly, consider the sequence of operations. A well-installed lock should not only perform its functions, but also not move with each turn of the key. Please pay attention to the following points:
- the mounting bolts are firmly tightened only if the outer part under the steering wheel is properly installed;
- make a test rotation of the steering wheel without a key to make sure that the locking device is working properly;
- When selecting bolts, do not forget about the ease of access to the lock for potential burglars.
When completing all work and connecting the wires, check that the harness is securely fastened. If everything is done correctly, the first test run will allow you to hear the rustling sound of a running engine.
Don't forget the relay
It also happens that the lock is working properly, but the ignition does not turn on, and the starter does not respond at all to turning the key. In this case, you should check the relay. It's called the ignition relay. This device serves to protect the lock contacts from burning when electrical equipment is turned on.
The ignition relay is located in the additional mounting block of the vehicle. To get to it, you will need to remove the plastic panel on the center console to the left of the passenger seat. There are three relays and three fuses. The device we need is usually on the right.
To check whether the relay is working, install one of the neighboring devices in its place, turn on the ignition and try to start the starter. If it starts to spin, replace the faulty device.