Exhaust system of VAZ-2110
Exhaust gas system
a – without converterab – with converterc – exhaust gas flow diagram1 – exhaust pipe mounting bracket2 – gasket3 – exhaust pipe4 – muffler suspension cushion5 – additional muffler6 – muffler pipe connection clamp7 – main muffler8 – rear muffler suspension cushion9 – oxygen sensor ( Lambda probe)
10 - three-component neutralizer11 - additional muffler housing12 - inlet perforated pipe13 - blind partitions14 - exhaust perforated pipe15 - main muffler body16 - left perforated pipe17 - front blind partition18 - middle blind partition19 - rear blind partition20 - rear perforated pipe21 - right perforated pipe
The exhaust system consists of an exhaust manifold, a exhaust pipe 3, an additional 5 and a main 7 muffler. The exhaust manifold and exhaust pipe mounting bracket 1 for 8-valve engines (2110 and 2111) are interchangeable with parts from Samara. The exhaust system of the 2112 engine is distinguished by an exhaust manifold and a downpipe.
On most cars equipped with an injection system, the exhaust pipe is equipped with an oxygen sensor (lambda probe). A three-component neutralizer is additionally installed in the exhaust system of these vehicles. Mufflers and neutralizer are non-separable units and when they fail, they must be replaced with new ones.
The exhaust manifold is cast from cast iron. A metal-reinforced heat-resistant gasket is installed between it and the cylinder head. The exhaust pipe is attached to the exhaust manifold on four studs (for the 2112 engine - on six). The connection is sealed with a heat-resistant gasket. The receiving pipe is made of stainless steel. It is attached to the power unit using a bracket with a clamp covering both outlet pipes.
The exhaust pipe is pivotally connected to the pipe flange of the additional muffler or neutralizer (for models where it is provided). Between the flanges there is a metal-graphite ring with a spherical outer surface. The inner surface of the flanges is also spherical, and they are tightened with spring-loaded bolts, which allows the muffler pipe to move (without losing its tightness) relative to the exhaust pipe when the power unit oscillates relative to the body.
To reduce noise and better thermal insulation of the body, the additional muffler has a protective cover. For vehicles with a neutralizer, an additional muffler is available with a shortened front pipe.
The neutralizer is designed to reduce emissions of carbon monoxide, nitrogen oxides and unburned hydrocarbons into the atmosphere. For this purpose, two ceramic blocks with many pores, coated with so-called afterburning catalysts: rhodium, palladium, platinum, are used. Passing through the pores of the neutralizer, carbon monoxide is converted into low-toxic carbon dioxide, and nitrogen oxides are reduced to harmless nitrogen. The degree of gas purification in a working neutralizer reaches 90-95%. For normal operation of the converter, the composition of the exhaust gases (in particular, the oxygen content in them) must be within strictly specified limits. This function is performed by the controller, determining the amount of fuel supplied depending on the readings of the oxygen sensor
The neutralizer and oxygen sensor are very sensitive to lead compounds - both of them are quickly “poisoned” and stop working, which, accordingly, leads to an increase in emissions of toxic substances. Therefore, if your car is equipped with a neutralizer, its operation, even short-term, on leaded gasoline is strictly prohibited. A faulty ignition system can also cause the neutralizer to fail. If sparking is missed, unburned fuel enters the converter, burns out and sinteres the ceramics, which can lead to complete blockage of the exhaust system and engine shutdown (or severe loss of power).
The main muffler is located after the additional muffler and is connected to it using an O-ring with clamps (as on the Samara). The mufflers are suspended from the body brackets on four rubber pads.
HdSxozARNdCZoZ0rmlIZmTSTN29TNdkrbraqebaqo3I5Ndk9etIUo3AwmLs6nl5wnl5SFlEwN2GVh4OUMDIuhRk4gDA4h3QSnlOuOBu0gBAypbefebaqebAsmLIQFlCsFlGwnlKxOB0rm2cWoDKrF JcZgBk2hJgZgBm4GJszhBarbraqebaqMdC0mj1QMb1ZNd90HjeZhBi4hBq0gZg4eR48F2SxoZ4=
Description of individual components
To make the structure of such an element as the discharge system clearer, it is necessary to give a detailed description of all components:
- Neutralizer. A unit designed for effective purification and suppression of emissions of harmful substances into the environment. When driving, a car produces substances such as non-combustible hydrocarbons, oxide compounds of nitrogen and carbon. The work of this system is aimed at eliminating them. The design itself is a combination of two ceramic-type components. The surface of these components is coated with special afterburning catalysts, which include rhodium, palladium and platinum. These substances make it possible to purify exhaust gases emitted into the environment by almost 100%;
- Lambda probe. It is a special sensor whose task is to control the composition and amount of fuel that enters the engine. The lambda probe thereby controls the purifier. If the lambda probe does not work properly, then the entire output assembly will quickly become unusable, after which it will have to be replaced;
- Reception pipe. Designed for forced removal of exhaust gases from the cylinders of a power unit. The pipe is made of stainless steel, and its fastening to the collector is carried out using special pins, of which there are four in total. The studs guarantee reliable fastening of the two outlet pipes and the element. In order to combine the exhaust pipe and the neutralizer, as well as an additional muffler, hinged fasteners are used;
- An exhaust manifold. A component that is cast from pure cast iron. The manifold is secured with four studs in the exhaust pipe. Heat-resistant gaskets reinforced with metal are installed between the manifold and cylinder heads.
- Silencers. Necessary for effectively suppressing the exhaust rate of burnt gases. This is necessary in order to significantly reduce the noise level in a type of transport such as the VAZ 2110. The distribution device in this part of the unit is carried out as follows: the additional one is followed by the main one. These two components are connected to each other by clamps and sealing rings and are covered with a special casing on top.
Resonator VAZ 2114
What role does the exhaust system of the VAZ 2114 play?
This is one of the most important components of a car's exhaust system. Its main task is to reduce the noise level produced by incoming exhaust gases. Another task is to smooth out the vibrations that arise due to the timing of the engine, creating a direct flow of gases. This is necessary to prevent the formation of back pressure in the exhaust pipe, which would reduce engine power.
Structurally, it is made of four chambers through which perforated pipelines pass; they also perform a connecting function for the resonator chambers. Perforation consists of holes of a certain, strictly calculated size. The walls of the chambers and pipes are a resonant pair, which has its own oscillation frequency different from the oscillation frequency of the exhaust gases. And in each chamber these frequencies are different. As a result, massive low-frequency vibrations are smoothed out, flow directions are aligned, and mid- and high-frequency vibrations are damped.
As a result of working in such an aggressive environment, we should not forget that the exhaust gases have a very high temperature and chemical activity, and also in conditions of increased vibration, the resonator, as well as the muffler on the VAZ 2114, quite often becomes unusable. Signs of such malfunctions may include:
- a ringing or rattling sound from under the bottom of the car, they also say about this sound - the muffler is rattling, this is the result of the fact that the internal part has burned out and even collapsed, and small parts are dangling in the flow of gases;
- the volume of escaping gases increases because the broken resonator does not perform its functions;
- possible reduction in engine power due to a violation of the geometry of the internal surfaces and significant braking of the exhaust gases.
Replacing a faulty resonator, as well as replacing a VAZ 2114 muffler with your own hands, is quite possible. Due to its structural complexity, the resonator is not repairable, so the best option is to replace it with a new one. It’s easy to find out how much a resonator costs for a VAZ 2114. Its price ranges from 800 to 1500 rubles. For such a serious device, on the normal operation of which the calm atmosphere in the car depends, this is not much. By the way, the price of a muffler for 2114 also fluctuates within these limits.
After a new resonator has been purchased and the car has been installed in the pit, you can begin the process of replacing the broken part:
In order not to be distracted during the process of dismantling exhaust system parts, you need to prepare in advance:
- WD40 fluid
- new clamps with fasteners
- metal sealing rings
- new resonator gasket
— two keys on “17” and an amplifier for keys
- Apply WD40 liquid to the connecting bolts tightening the clamps on both sides of the resonator and allow time for it to penetrate into all the cracks, 10 - 15 minutes.
- Install a stand under the catalyst in advance so that after removing the clamps connecting the catalyst to the resonator, it does not sag and damage the mountings with the exhaust pipe. Make a stand for the resonator in the same way, since it will need to be unscrewed on both sides.
- Take pre-prepared keys and unscrew the fasteners on the catalytic converter side. Be prepared for the fact that this will require quite a lot of effort.
- Unscrew the fastenings on the other side, from the muffler side, releasing the gasket between the muffler and the resonator.
- Remove the old resonator.
- When installing a new resonator, first tighten the bolts on the catalyst side, but not completely.
- Then connect the muffler to the resonator, after inserting a new metal O-ring. When connecting, check the tightness of the gasket so that exhaust gases do not leak out.
- Tighten the fastening bolts on the catalytic converter side.
When replacing the resonator, it would be useful to change the rubber suspensions, which reduce vibrations of the muffler while the car is moving.
Features of operation and types of mufflers
There are two types of mufflers used in modern cars: resonant and direct-flow. Both can be installed in conjunction with a resonator (pre-silencer). In some cases, a straight-through design can replace a front muffler.
Resonator device
Structurally, the muffler resonator, which is also called a flame arrester, is a perforated pipe located in a sealed housing, divided into several chambers. It consists of the following elements:
- body (has a cylindrical shape);
- thermal insulation layer (exhaust gases have a very high temperature);
- blind partition (to turn the flow of gases);
- perforated pipe;
- throttle (allows you to change the cross-section of the exhaust gas flow).
Resonant muffler design
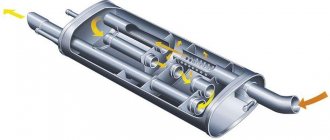
Unlike the preliminary muffler, the main resonant muffler is more complex. It consists of several perforated pipes installed in a common housing, which are separated by partitions and located on different axes (see Fig. Silencer in section):
- front tube with perforation;
- rear tube with perforation;
- inlet pipe;
- anterior partition;
- middle septum;
- posterior septum;
- exhaust pipe;
- body (oval section).
Thus, a resonant muffler uses all types of transformation of sound waves of various frequencies.
Features of a direct-flow muffler
The main disadvantage of a resonant muffler is the effect of creating back pressure, which occurs as a result of redirecting the flow of exhaust gases (when it collides with partitions). In this regard, many motorists tune the exhaust system by installing a direct-flow muffler.
Direct flow muffler
Structurally, the direct-flow muffler consists of the following elements:
- sealed housing;
- exhaust and inlet pipe;
- perforated pipe;
- soundproofing material - fiberglass is most often used, which is resistant to high temperatures and has good sound-absorbing properties.
In practice, a straight-through muffler has the following operating principle: one perforated pipe passes through all chambers. Thus, there is no noise suppression by changing the direction and cross-section of the gas flow, and noise suppression is realized solely through interference and absorption.
Due to the unhindered passage of the exhaust through the direct-flow muffler, the resulting back pressure is very low. However, in practice this does not provide a large increase in power (from 3% to 7%). On the other hand, the car has a characteristic sports car sound, since the noise-absorbing technology present in it only eliminates high frequencies.
The comfort of the driver, passengers and pedestrians depends on how the muffler works. So, during prolonged use, increased noise can cause serious inconvenience. Today, installing a direct-flow muffler in a structure for a car moving within city limits is an administrative violation that threatens with fines and an order to dismantle the device. This is due to exceeding the noise limits specified by the standards.
The operation of the engine in vehicles, if we talk about internal combustion engines, is associated with the production of quite loud noise. But the driver, his passengers, and people on the street practically do not hear this noise effect.
This was not always the case. The first cars running on internal combustion engines were very noisy and created a lot of smoke, and therefore this became a real problem. But after some time they came up with a solution.
Every modern car is necessarily equipped with a muffler. Already from the name it becomes obvious that the main function of mufflers is to dampen and suppress noise and sounds arising from a running engine.
The exhaust system is quite complex, despite the apparent simplicity of its functions. It consists of several elements, one of which is a resonator. Car enthusiasts have questions regarding it. They are interested in what it is, why it is installed and what tasks it performs in the operation of the exhaust system and the entire car.
High-quality direct-flow exhaust system VAZ 2110-2112
Gas66 electronic ignition system diagram. diagram ignition system gas 66
Car tuning is not only work to improve and modernize its appearance. Tuning includes all work that improves the performance of a car. An integral thing when boosting an engine is the installation of a direct-flow exhaust system. Moreover, this moment cannot be treated carelessly.
The direct-flow exhaust system of the VAZ 2110-2112 facilitates the exit of exhaust gases, and accordingly makes the engine run easier, relieves the load from it and increases its power.
Many people simply install a direct-flow muffler (rear), fortunately, there are many offers on the market of ready-made “direct-flow” muffler, as they are popularly called, which are installed on standard mounts.
Such a muffler does not give any result other than a menacing sound, because it has standard pipe diameters and, accordingly, throughput. Yes, it has some effect, but it is almost unnoticeable. In order to achieve a tangible result, it is necessary to change the entire exhaust system completely.
The first thing to be replaced is the exhaust manifold and the exhaust pipe (“pants”). Instead of these two parts, a “spider” is installed - a part that combines both the functions of the exhaust manifold and the exhaust pipe.
Ideally, the spider should have a polished inner surface of the pipes and equal distances from each of the four entrances to the exit. The outer diameter of the pipes installed at the factory as a standard exhaust system is 42-44 mm.
The direct-flow system involves the use of pipes with a diameter of 48-50 mm. This size difference increases throughput by 30%. Agree, the difference is significant.
Instead of a standard resonator and catalyst, it is best to install an intermediate pipe. They are available for sale, but their fastenings do not always correspond to those on the exhaust pipe, so they often have to be reworked.
That is, the flange can be cut off from the old catalyst and welded into an intermediate pipe. If you do the installation yourself, then take into account the fact that such work must be done only “in place” - the flange must be turned exactly at the angle at which the mating part of the “pants” is located.
To do this, connect the cut flange to the pants, align it with the intermediate pipe and place several welding points. After this, you can remove the intermediate pipe and completely weld the flange connection.
At a time when the VAZ engine experiences heavy loads, during sudden acceleration or driving at high speed, it experiences strong vibration, which is transmitted to the exhaust system.
As a result, severe wear of the exhaust system occurs, which threatens breakage and cracks. To prevent this from happening, it is best to install a metal compensator, or as it is also called - corrugation.
A metal expansion joint is welded in place of one of the pipe gaps, preferably as close to the “spider” as possible. To do this, you need to cut a piece of pipe 30 mm shorter than the length of the corrugation, and install a metal compensator in its place, so that it fits 15 mm onto the pipe on each side.
After this, weld the joints. All work must be done in the same way as with the flange - first, grab the corrugation by spot welding in the installed state, then remove the part and weld it completely.
Installing the rear part of the straight-through muffler is a separate matter. As a rule, all standard direct flows on the VAZ 2110-2112 have the same appearance. If you want to really stand out, you can install a universal forward flow.
So you can select almost any limit switch based on appearance, sound, diameter of the incoming pipe and the material from which it is made - black steel, alloy or stainless steel. When installing a universal direct flow, you will have to contact a service station so that they weld an incoming pipe of the required diameter to it, and possibly trim the bumper.
Installing a direct-flow exhaust system on a VAZ 2110-2112 is not just a whim, but a necessary necessity if you really decide to increase the power of your car.
https://youtube.com/watch?v=_0bn3osJgYU
Types of car mufflers
Cooling system VAZ 2110 8 valves injector
Modern mufflers are divided into three types: dissipative, reactive and combined.
In turn, the above types are divided into two types: direct-flow and labyrinth.
Dissipative (absorbing).
They belong to the type of direct-flow mufflers and have a simple design.
Consist of:
- Housings;
- Perforated pipe;
- Inlet and outlet pipes;
- Special heat-resistant sound-absorbing filler;
- Steel mesh;
- All this is connected by all-welded joints.
The principle of operation is simple - sound-producing exhaust gases enter a chamber from a perforated pipe where they are absorbed by heat-resistant sound-absorbing material, resulting in the energy of sound vibrations being converted into thermal energy. Mineral wool, metal shavings, and glass wool are often used as such materials.
The advantage of such a muffler is that, depending on the design, it allows you to increase engine power by 5 - 7%, because there is practically no resistance to the exhaust gases escaping.
The disadvantage is increased noise, so such products are primarily tuning and are rarely used on ordinary cars, as a rule, only on sports cars.
Structurally, absorbing silencers can be:
- Strongers or “louvered core glasspack”. They are a pipe with metal petals pressed inside. They are considered ineffective in terms of purging and are rarely used. Mistakenly installed instead of a catalyst.
- With internal diffuser. Not expensive products that have their pros and cons. In terms of noise reduction, they are more effective than other analogues, but in terms of purging, it’s the opposite. The only tangible plus here is the low price.
- With perforated cones of different lengths, treat them as a combined solution. The cones are welded into the main perforated pipe, which significantly reduces noise and at the same time the flow of gases is quite satisfactory for many.
Reactive.
The operating principle of such mufflers is based on the effect of damping reflected waves from each other, which leads to a reduction in noise.
In this design, filling material is not provided; instead, additional pipes, chambers and partitions are welded into the body, chaotically reflecting from which sound waves are damped.
But such mufflers can rarely be found on tuning and sports cars, since their design does not allow achieving good results in terms of aerodynamics, the reason being the high turbulence of the exhaust gases.
Also, in terms of design, reactive analogues are complex and therefore are mainly manufactured in factories.
Diagrams and brief characteristics of reactive mufflers are presented below.
Combined.
This form embodies design solutions from reactive and dissipative mufflers. For example, you can take devices with perforated cones (see above).
They have good efficiency in terms of noise reduction, but in terms of gas flow, the performance is low.
Malfunctions on VAZ cars of the tenth family
AvtoVAZ specialists conducted research, the results of which revealed that the car body, being a closed structure, has its own peak harmonics and can resonate at a certain frequency. To suppress spurious frequencies emitted by both the vehicle engine and those shielded by the body, it is necessary to use the range from 60 to 400 Hz, corresponding to medium and high engine speeds. A change in noise characteristics can be caused by making minimal changes to its design.
The most difficult noise to deal with is at low frequencies. From a technical point of view, it is impossible to combine tuning the exhaust system of a car and combating noise. You can maintain maximum power with a direct-flow muffler, and reduce the sound to a comfortable volume with a factory one.
Owners of VAZ 2110–2112 most often encounter breakdowns, burnouts and leaks in the exhaust system. Incorrectly set ignition, excessively rich mixture and pipe corrosion are the main causes of burnt out exhaust pipes. This defect is accompanied by knocks and pops, which indicate burnout of metal parts. A sign of burnout may be smoke from the exhaust pipe, indicating an overly enriched fuel mixture that is burning in the exhaust pipe.
Car muffler malfunctions can be caused by various reasons - pipe burnout, system leakage, breakdowns
The appearance of knocks on the body in the area where the muffler is located indicates mechanical defects in the part - changes in geometry, destruction of the rubber band, suspension or damper cushion. Eliminated by identifying the location of the breakdown and troubleshooting. Worn parts are replaced with new ones.
Muffler gaskets
The gas junction formed between the rear and additional mufflers is insulated using a rubber gasket or O-ring. In addition to the main function of closing the gap, it is also used to eliminate the movement of the pipes of the part relative to each other.
Rubber O-ring located between the car muffler flanges
The appearance of carbon deposits under the bottom of the car at the joints of the exhaust pipe sections indicates damage to the gasket. Ruptures of the sealing ring are accompanied by the appearance of an unpleasant smell of exhaust gases in the vehicle interior and a sharp grinding noise that occurs during operation of the power unit.
Their replacement
A damaged exhaust system sealing ring cannot be restored - it can only be replaced with a new one. The gasket can be replaced manually in a few minutes.
The exhaust pipe flanges are secured with small bolts. Due to prolonged use, they can become covered with dirt and rust, which makes them difficult to unscrew. You can unscrew the bolts using a special tool or a grinder.
The exhaust pipe flanges are secured with bolts that need to be unscrewed
After unscrewing the bolts, the resonator tube is carefully retracted to the left.
After unscrewing the bolts, the resonator pipe is carefully moved to the side
The old O-ring is located on the resonator pipe. The rubber product is easily pryed off with a flat screwdriver and removed.
The old o-ring is removed from the resonator pipe manually or using a screwdriver
Carbon deposits are removed from the flanges with a wire brush and sandpaper.
Carbon deposits from the muffler flanges are cleaned with a wire brush or sandpaper.
A new O-ring is installed on the resonator tube flange. The exhaust pipe flanges are connected with a clamp, and the main muffler pipes are also connected to each other.
The new muffler gasket is installed on the flange, after which the muffler is tightened with clamps
The cermet ring adjacent to the muffler gasket is fragile, and therefore when replacing the sealing ring, care must be taken so as not to destroy the ceramic
How to reduce exhaust noise
Electrical diagram of VAZ 2110 injector 16 valves
A sound wave can travel in space much faster than gases, therefore, in the design of a muffler, its noise reduction circuit is of great importance. Physical vibrations from sound waves are transmitted to the walls of the exhaust system, and its design is made in such a way that it converts the sound wave into thermal energy, which the exhaust pipe, like a radiator, releases to the atmosphere.
Reducing the noise level of a muffler cannot be achieved without creating some kind of resistance to the exhaust gases, as a result of which part of the engine power, quite insignificant, is spent on overcoming this resistance. To minimize the power loss that noise reduction inevitably leads to, a direct-flow muffler has been developed.
It has a minimum of partitions, does not interfere so much with the passage of exhaust gases and reduce their speed, which is why it sounds completely different.
Removing and installing the catalyst
Removing and installing a catalytic converter on a VAZ 2115 is a relatively simple task. The procedure itself is carried out in several stages:
1. Using keys “17”, unscrew the fastening of the catalyst to the exhaust pipe of the exhaust manifold. We take out the bolts and spring washers;
2. Place a suitable stand under the catalyst. The fact is that the catalyst on the VAZ 2115 car is not fixed with the help of any rubber hangers, and therefore, in order for it not to fall on your head, after unscrewing the fastening bolts, it must be secured somehow. This can be done either by installing a stand under it, or by temporarily securing it with wire;
3. Now unscrew the catalyst from the inlet pipe of the additional muffler and carefully remove it.
We install the new catalyst in the reverse order.
How to repair a muffler
If your car's muffler requires repair or complete replacement, it is not recommended to do this work yourself, since there is a high risk that you will only worsen the condition of the exhaust system, and possibly the entire vehicle as a whole. In order to prevent such a situation, contact only specialized car services. In our car service center, qualified specialists with the necessary competence in the field of working with exhaust systems will competently diagnose the exhaust system of your car, and, if necessary, repair or install a new muffler in the shortest possible time.
IMPORTANT! Do not delay repairs, as this may worsen the condition of the entire exhaust system and entail additional costs. If you encounter any malfunction in the exhaust system and you need to diagnose it, repair it or replace the muffler, then our salon specialists will be happy to help you with this, since we carry out all types of this work!
If you encounter any malfunction in the exhaust system and you need to diagnose it, repair it or replace the muffler, then our salon specialists will be happy to help you with this, since we carry out all types of this work!
| Name | Price |
| Car diagnostics on a lift | For free |
| Repair of standard muffler | from 500 rubles |
| Resonator installation | from 600 rubles |
| Installing a flame arrester | from 1200 rubles |
| Replacing corrugations | from 1500 rubles |
| Replacing rings and gaskets | from 300 rubles |
| Exhaust manifold replacement | from 2,500 rubles |
| Replacing the lambda probe | from 500 rubles |
| Crack repair | from 500 rubles |
TYPES OF SOUND-ABSORBING ELEMENTS
Silencers in cars can be active, which is a fairly simple device, or reactive. In the first case, vibration-resistant materials that can withstand high temperatures are used for their production.
Active devices are the most popular because they are easy to use. Their significant disadvantage is their rapid contamination. Silencer reactive devices consist of complex elements of resonator chambers.
As for the rear noise-absorbing chamber of the car, its structure contains many compartments that contain a special filler. It is necessary to reduce the sound of exhaust gases when the car engine is running. Modern car mufflers can use several technologies for absorbing background noise and purifying emitted gases at the same time.
They can contain many different materials that provide maximum reduction in the sound of exhaust gas flows, their toxicity level and temperature.
Burnouts in a small resonator
Diagram of VAZ 21099 injector 8 valves engine diagram
Repairs can be carried out independently. First of all, you need to remove the muffler resonator or other parts of the exhaust system. For simplicity and convenience of operations, such work should be carried out in a pit or on an overpass. This work can be both simple and labor-intensive, since many problems arise due to the fastenings of these parts: they were most susceptible to corrosion and stuck to each other. Experts recommend spraying the fasteners with a special liquid such as WD-40 before starting such work.
In practice, it has been proven that the use of such products gives maximum effect. A large number of these types of sealants and fiberglass fabrics are made from silicone materials; they can withstand high temperatures, some up to 1000 degrees. If you have carried out routine repairs using fiberglass, then it is advisable to start the engine after installing the resonator and warm it up for thirty minutes.
20.2.5. Exhaust system of VAZ-21114 and VAZ-21124 engines
Exhaust systems for vehicles with VAZ-21114 and VAZ-21124 engines
A – catalytic collector of the VAZ-21124 engine B – catalytic collector of the VAZ-21114 engine 1 – gasket 2 – oxygen sensor 3 – catalytic collector body 4 – bracket 5 – plug (used when installing one oxygen sensor)
6 – heat-insulating screen of the steering mechanism 7 – bracket 8 – intermediate pipe 9, 13 – suspension cushions of the main and additional muffler 10 – additional muffler 11 – clamp 12 – main muffler
On VAZ-21114 and VAZ-21124 engines, catalytic converters are used, made integral with the exhaust manifold (cat collectors).
There are threaded holes in the upper and lower parts of the collector for installing oxygen sensors. On engines designed for exhaust gas toxicity in accordance with Euro-2 standards, the oxygen sensor is installed only in the top hole, and in this case a plug 5 is screwed into the bottom hole. If the engine is made in accordance with Euro-3 standards, a second one is installed in the bottom hole an oxygen sensor similar to the first one.
The junction between the catalytic collector and the engine cylinder head is sealed with a metal gasket.
An intermediate pipe flange is attached to the lower flange of the catenary collector through a metal-reinforced gasket. The other flange connects the intermediate pipe to the flange of the additional muffler using a spherical joint. A metal-graphite ring with a spherical surface is placed between the flanges, and an internal spherical surface is made in the flange of the additional muffler.
The additional muffler, which is installed on cars with VAZ-21114 and VAZ-21124 engines, is interchangeable with the additional muffler installed on cars of the “tenth” family that do not have a neutralizer in the exhaust system.
The main muffler is the same for cars of the “tenth” family with one body type.
Removal of exhaust system elements is shown on a car with a VAZ-21124 engine.
Removing the intermediate pipe
We carry out the work on an inspection ditch or on a lift.
EXECUTION ORDER
| to contents | next page 20.2.6. Electrical equipment of cars with VAZ-21114 and VAZ-21124 engines |
Copyright 2007-2020 All rights reserved. All trademarks are property of their respective owners.
Article rating:
VAZ 2112 exhaust system Link to main publication
Related publications
Timing marks VAZ 2115
Step-by-step process for replacing a muffler
Depending on which element requires replacement, the order of work should be carried out strictly individually. Let's start in order.
Downpipe
Work to dismantle the “pants” should be carried out in the following order:
- We lubricate the joints of the studs and nuts with WD-40, so that in the future everything can be easily unscrewed.
- We unscrew the 6 nuts that secure it, and on the neutralizer side we loosen the spring-loaded connection.
- Next, we replace the “pants” with new ones, or repair the old element.
- Don't forget to put a new gasket between the exhaust pipe and the manifold. We also install a new sealing ring for the neutralizer.
- Inspect the springs for damage.
- We press the “pants” to the manifold, pressing the gasket tightly.
- We tighten all the nuts, as well as the spring-loaded bolts connecting to the converter.
Neutralizer
We treat the connections with lubricant for better dismantling. Then we unscrew the spring-loaded bolts from the pants to the neutralizer (see above). We unscrew the two bolts that secure the neutralizer to the resonator.
If the old bolts are still in good condition, then you can use them again, and if their condition does not allow them to be used, we install new ones again
Please note that when installing new fastening nuts to the resonator, self-locking elements should be used to prevent them from unwinding on their own. When replacing the neutralizer, be sure to change the connecting gasket, since gases through the old element will more easily escape. When fixing the bolts, first of all we attach the bolts that secure the resonator, and only then the “pants”.
Resonator
The resonator is secured to the neutralizer using a floating flange with two bolts; to dismantle we unscrew them (see above). Fixation to the muffler is carried out with a crimp clamp with an o-ring inside using two bolts and nuts. If difficulties arise when unscrewing these bolts, then the joints must be treated with WD-40, liquid wrench and cleaned from traces of rust
And if after this they still do not unwind, they need to be cut off with a grinder. We unscrew all the bolts.
Remove the muffler clamp and ring. We remove the resonator from the rubber bands, look at their condition and, if necessary, replace them. Next, we hook the new or repaired resonator onto rubber bands, paying special attention to its location so that the pipe running from the resonator to the muffler is parallel to the ground. If you find traces of rust, wear or mechanical damage at the connection between the resonator and the neutralizer, lubricate it with high-temperature sealant. Then we fix all the connections and tighten them with new bolts and nuts.
Muffler
Main muffler. This is what it looks like at 160,000 km, editorial car. Pictured is the 8-valve version
- We replace the muffler on an inspection pit or a lift.
- Since the muffler is connected to the resonator only using an O-ring in a flared pipe and compressed with a clamp fixed on two bolts, we inspect this connection for the presence of corrosion and the general condition of the bolts.
- We treat it with WD-40 or liquid key.
- If the connection gives in, then unscrew the bolts or cut them off with a grinder.
- Then we remove the clamp, inspect it and decide whether to replace it with a new one or continue using it.
- We move the flared pipes apart and remove the sealing ring. Since it is graphite, it should not stick or stick to the metal.
- Next, remove the muffler itself from the rubber bands and move it to the side.
- We check the condition of the rubber holders and, if they are damaged, cracked or stretched too much, replace them with new ones.
- We fix the new muffler first with rubber bands, then install the O-ring and clamp everything with a clamp and tighten it with bolts.
Thus, the work on replacing the muffler can be considered completed.
Replacing the resonator on a VAZ 2114
In the terminology of car mechanics and drivers, the word muffler most often means the entire complex of pipes and chambers that make up the exhaust system of a modern car, hence the expression - muffler resonator.
However, this is not the case. The exhaust system of the VAZ 2114 consists of four components:
- the exhaust pipe, it is attached directly to the exhaust manifold, takes on all the main fire, chemical and vibration impacts from the exhaust gases and is therefore made only from alloyed, high-strength steel
- a catalyst, it is needed to burn excess oxygen in its chambers, which are made in the form of ceramic honeycombs, the surface of which is covered with a platinum-iridium film, upon contact with which oxidation and afterburning reaction occur and reduce the level of toxicity of passing gases
- resonator, in some sources it is called an additional muffler, but this is not a designation accepted in professional circles
- The muffler acts as residual sound absorption and removes toxic exhaust gases outside the car body
Sports resonator VAZ 2114
Exhaust system elements
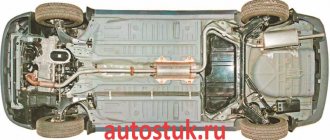
In order to understand what the exhaust system on a VAZ-2112 is, you need to know all its elements:
Visual arrangement of exhaust system elements.
- Receiving pipe (they are also called “pants” - approx.).
- Neutralizer.
- Resonator (additional muffler - approx.).
- Main muffler.
Exhaust system breakdowns
Among the possible breakdowns in the exhaust system, the following facts can be highlighted:
- Mechanical damage to the exhaust system can be solved by welding these parts.
Crack in the gander area where exhaust gases escape
Downpipe, catalytic converter and resonator
The downpipe is painted with heat-resistant paint to prevent corrosion
Next in the exhaust diagram is the exhaust pipe. In carburetor engines it is just a pipe, but in injection engines a terrible part is integrated into it - a catalytic converter. The exhaust pipe on stock tens is attached to the exhaust manifold through a flange, a heat-resistant reinforced gasket using four or six bolts. The connection between the exhaust pipe and the catalyst is made in the form of a corrugated nozzle with a ferrule. The pipe must be made of heat-resistant steel of a certain grade, and in most cases this is the case on conveyor vehicles. If the car is more than ten years old, most likely the middle part has already been replaced, so you can only guess about the quality of the steel from which it is made.
Ideally, a steel pipe is painted with heat-resistant protective paint to prevent inevitable corrosion at least for a while. Often, the paint on pipes that come in spare parts kits is more decorative than protective. Therefore, when replacing, many people tend to install a stainless steel pipe. There is no point in changing its diameter, and stainless steel will extend the life of the part quite significantly. If it is easier with carburetor engines, then in later engines with an injection system you need to take into account the catalyst, which is worth saying a few words about separately.
Catalysts began to be installed not to make life more difficult for motorists, but to reduce the level of harmful components in exhaust gases. The main task of a working catalyst is to burn fuel that did not burn during engine operation. By and large, it is designed in the same way as any resonator type muffler. The gases pass through a fine mesh or set of plates on which a thin layer of platinum-containing substance is deposited. By reacting with the exhaust gas, the surface of the working parts of the catalyst heats up to a temperature of 500-600 degrees, helping to ensure that the remaining fuel burns out as it passes through it. The average response threshold of catalytic plates or grids is 300°C.
And here the most uninteresting part begins. The catalytic layer of the device cannot process an endless amount of unburned fuel, bringing it to Euro standards. Therefore, to control the situation, an oxygen sensor was installed on the exhaust. The lambda probe measures the amount of oxygen in the exhaust gases, and if the catalyst is not able to process the required amount of gases, the probe sends a signal to the electronic control unit. The ECU, in turn, adjusts the composition of the mixture so that the amount of CO output corresponds to the norm.
When replacing the exhaust pipe, it is better to use a stainless steel spare part.
But this correction does not always benefit the dynamic performance of the engine. More precisely, it prevents the motor from working correctly. If the catalytic layer is completely burnt out, the lambda probe shouts “guard”, and the ECU turns on the “Check Engine” light. In this case, it is necessary to replace the catalyst completely, since it is a non-separable unit and cannot be repaired. It costs as much as the entire exhaust system combined.

