Material characteristics
This model is a cylinder shape that is mounted under shock absorbers and suspension springs. Different materials of manufacture, density and dimensions of spacers for increasing ground clearance are determined by the purpose of installation on the front or rear of the car body. As a rule, the choice of one spacer or another does not depend on the make of the car: most parts are universal.
The material used to make parts can be divided into metal (steel or aluminum) and non-metal (polyurethane, plastic). Metal spacers are mounted under the spring, and non-metal spacers are mounted above the spring.
To have a clear idea of the subject, you can watch the installation of a spacer to increase ground clearance with your own hands in the video.
How to install spacers on a car with your own hands + Video
To install the spacers, you will need a lift, overpass or inspection pit. If you don’t have any of this, you can get by with a jack and 2 support posts. You will also need a set of wrenches and a suspension spring remover. The procedure for installing spacers on various types of suspension is described below. Before starting work, carefully read the article on safety precautions for car repair and maintenance, this will help you avoid injuries and injuries.
Installation of spacers on MacPherson suspension
- Unscrew the CV joint nut, then raise the front of the car using a lift or jacks and stands and remove the wheels. If the decorative cap prevents you from getting to the CV joint nut, then remove one wheel without lifting the other side of the front of the car. Ask an assistant to engage first gear (there is no need to start the engine) and press the brake pedal all the way. Then perform the same operation on the other side.
- Pull out the cotter pin and unscrew the nut securing the tie rod pin in the shock absorber strut. If for some reason you cannot reach the nut, turn the steering wheel in the opposite direction. After unscrewing the nut, remove the pin from the strut using a puller, which can be purchased at any auto store. Do not try to knock out the pin with a hammer, as you will damage the threads and have to replace the entire tie rod end. Unscrew the nut that secures the ball joint, push the lower arm down and remove the steering knuckle from it. Place a wheel or other support under the stand; this will allow you to install the spacer without removing the brake caliper.
- Unscrew the nuts that secure the shock absorber strut to the car body. Do not drop the stand as this may damage the brake hose. Carefully lower the strut until the support bearing studs come out of the body. After this, position the stand in such a way as to avoid tension or kinking of the brake hose. Place the spacer on the support bearing and tighten the nuts. For spacers 1 cm thick, there is no need to tighten the nuts.
- Carefully lift the rack until the support bearing studs fit into their holes. Tighten the nuts. Do not use nuts with plastic inside; they will not provide adequate support for the post and spacer. Therefore, use two regular metal nuts. If the studs are not tall enough to tighten two nuts, grind one of the nuts down to half the thickness and use it as a locknut. Place the steering knuckle onto the CV joint shaft. Have an assistant press the brake pedal and tighten the CV joint nut to the torque specified in your vehicle's repair instructions, then be sure to tighten the nut using a hammer and chisel.
- Reinstall the tie rod end, tighten the nut and install the cotter pin. Insert the ball joint into the lower arm and tighten the nut. Install the wheels and tighten the wheel nuts or bolts. Lower the vehicle to the ground and tighten the wheel nuts or bolts. Adjust camber and toe. This can be done either at any car service center or independently.
What is it for?
There are two reasons for raising the vehicle's ground clearance:
- off-road driving;
- sagging of springs over time.
To restore the spring to its original position, special spacers are used. The ideal option would be to replace old springs with new ones at a service station; however, car owners widely practice installing spacers to increase ground clearance with their own hands. If previously, increasing ground clearance was achieved by introducing tennis balls into the springs, now car dealerships sell special spacers of various thicknesses.
Higher, and higher, and higher: how and why to raise the car body with spacers
What is clearance?
If you think that the ground clearance of a car, also known as ground clearance, is the distance from the lowest point on the bottom of the car to the supporting surface (road surface), then you are mistaken... This lowest point is sought for measurement not over the entire area of the bottom of the car, but only on its so-called “central part”. The concept seems vague, but there are simple formulas for calculating it. There is no point in delving into them. For ease of understanding, the “central part” of the average sedan, used to determine ground clearance, looks something like this (marked in red):
Articles / Popular questions What is the geometric cross-country ability of a car? Owners of serious SUVs criticize modern crossovers for their low cross-country ability - including geometric cross-country ability. And often, I must say, quite deservedly. What is geometric... 13401 0 4 10/09/2017
As we can see, many points of the lower part of the body (suspension elements in the wheel area, marked with arrows, mudguards, sill plates, muffler tips and some others) are not taken into account when determining ground clearance and can (and do turn out to be!) noticeably closer to the asphalt than that point , which is taken as a reference when determining the official value of ground clearance. And if you consider that the factory clearance figures for foreign cars are most often valid only for an empty car, without cargo or passengers, then you shouldn’t be surprised when a city car scrapes its bottom on a completely harmless dirt road on the way to the country.
As a result, many car owners, who are not ready to buy an SUV or at least a crossover, seek to “raise” their sedan in order to make it more versatile. By installing tires with a larger diameter from the list of sizes allowed by the manufacturer, an honest centimeter and a half height is gained, however, purchasing new wheels is expensive, and some sizes are even rare. Therefore, the method of raising the body with spacers has gained significant popularity. Let's look at its features, pros and cons.
Spacer design
Spacers are divided into front and rear, differing in design. For a full “lift”, necessary to increase the vehicle’s cross-country ability off asphalt, all four are installed. But sometimes they make do with a pair of rear ones for partial lifting, which is usually required when there are frequent suspension breakdowns and the bottom touches uneven roads from carrying heavy loads in the trunk or three passengers on the back seat.
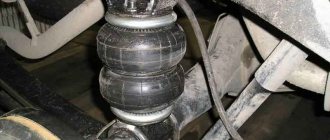
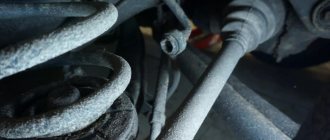
Front spacers (we are talking about MacPherson suspension) are installed between the shock absorber strut support and the body. They are rings made of hard plastic or aluminum. Rear spacers are installed between the body and the spring of the rear axle or beam. They look like “steering wheels” made of dense rubber or polyurethane with a diameter corresponding to the diameter of the spring.
What does a spacer change?
A spacer mounted above the A-pillar mount raises the body above the A-pillar, thereby increasing the angle of the lower A-arm. As a result, the body and those “clinging” parts that were actually lower than the official ground clearance figures (sills, bumper edges, mudguards, etc.) “rise” above the road by the size of the spacer (value “B” in the picture). It is important to note that the position of point “A”, located on the lever in the area of the ball joint, does not change. Where you would have caught a stump or cobblestone under the lever on a non-lifted car, you will catch it on a lifted one. The lift of point “A” can only be increased by installing wheels of larger diameter.
The picture above is of the front axle of the car. In the case of the rear axle, everything is not so clear. No, if the rear axle also has an independent suspension - the same MacPherson strut or multi-link - then the effect of increasing the ground clearance will be exactly the same as in the first case. However, if the rear of the car has a “cart design” (a U-shaped torsion beam or a continuous drive axle), then the effect of increasing ground clearance does not occur even in the central part. The body is raised above the bridge, and the gap between the bridge and the road remains unchanged.
However, this does not mean that rear spacers in the case of dependent or semi-independent suspension are useless. The body still rises, which means the likelihood of the back of the sills, bumper or muffler touching the ground on bumps is reduced.
Of course, like any abnormal intervention in the car’s design, installing spacers is a double-edged sword. She gives one thing and takes away another...
The first thing you will probably lose is the chassis warranty. In addition, you must clearly understand that the suspension behavior initially calculated by the engineers will change. Cross-country ability will increase slightly, but at the same time, the vehicle's handling at high speeds and during maneuvers will inevitably deteriorate. However, widespread practice shows that if you don’t get carried away with height, but limit yourself to 15-20 millimeters that are considered the most reasonable for a sedan or hatchback, then the negative impact will not be too significant.
In the case of tired, sagging springs, which, for example, there is no money to replace yet, spacers of small height will not provide additional lift at all, but will only return the original position of the body in relation to the asphalt. Although this measure is, of course, temporary: neither “shrunken” springs nor dead shock absorbers can be healed by any spacers.
Installing spacers
If you nevertheless decide to install spacers, we will tell you about the technical nuances of this procedure, which will allow you to evaluate your capabilities and decide on the order of its implementation.
To install spacers on the front of a car with MacPherson struts, it is necessary to completely remove the two front struts. There is no need to disassemble the removed stands.
In the standard upper supports, the mounting studs are extended. To do this, you will have to knock out the original studs, and hammer in longer ones from the kit in their place. Another way is to screw threaded extensions onto the original studs, which are often included with spacers. After this, the spacer is “clapped” onto the extended fasteners, and the rack together with it is installed in place.
Articles / Popular questions What is dependent and independent suspension, and which one is better? Modern test drives have taught us the concepts of “dependent and independent suspension”, and the second in most cases does not remain without its share of praise, and the first - without a shadow of reproach. In separate… 29905 3 7 11/27/2017
All of the above is a fairly simple task that a handy car enthusiast with a suitcase of wrenches and a jack can handle without much difficulty. However, what was an ordinary task for fathers and grandfathers, today can cause horror among their descendants, and in this case, it is probably better to entrust the procedure to an unofficial car service... Moreover, after the “lifting” the suspension geometry changes, and a mandatory procedure for adjusting the angles will be required descent and collapse.
Installing the rear spacers, oddly enough, is somewhat more difficult than the front ones. Formally, it seems simpler: you need to completely remove the springs, pre-compressed with special ties, and push them back in with spacers. However, this is only half the battle.
You will still have to lengthen the shock absorbers, because due to the changed suspension geometry, the working stroke of their rods will shift. In a static position, they are extended almost all the way, which when working on rebound (for example, when a wheel falls into a hole) causes a hard impact. Therefore, the shock absorber must be extended by the thickness of the spacer (or better yet, plus another ten millimeters). This is done in three ways.
The first is replacing the shock absorber with a longer one, from a different car model, but with similar upper and lower mounts. You can find out about the existence of such on the thematic forum for your car. It depends on your luck, because extended shock absorbers suitable for what is called “bolt-on” may simply not be available in nature. In this case, the second method is practiced - lengthening the shock absorber rods using extensions, often called “soldiers”. And the third is extending the shock absorber from below by installing eye extensions.
The version with “soldiers” is attractive due to its simplicity and some technical aesthetics. However, the search for a “pair of soldiers” may take a long time: the product is not popular, and the quality of those sold is not always the best. An excellent option is the services of a responsible turner and thermal specialist. The first one will carve your extensions, and the second one will harden them.
It is no worse to lengthen the shock absorbers not from the rod side, but from the eye side. A U-shaped extension is bolted to the original eye, and it, in turn, is attached to the moving elements of the suspension. But eye extensions, like “soldiers”, are not sold everywhere, they are not universal, so finding the part you need for your car can be difficult. In this case, a rough, but quite workable option is often practiced. A new eye, cut off from a faulty similar shock absorber, is welded to the shock absorber eye through a metal extension made of a profile pipe. Sometimes adjustable extensions are also made: the second eye is attached to the original one through two welded coupling nuts and a threaded rod made from a strong bolt from the cylinder head.
In any case, do not forget that the installation of spacers, despite its popularity among the people and relative harmlessness, is still not an event approved by the manufacturer of your car. During the warranty period, you may get into trouble with official servicing, and improper installation of spacers coupled with lengthening the shock absorbers can cause a lot of trouble.
Survey
Are you happy with the ground clearance of your car?
Your voice
Total votes:
Pros and cons of the clearance operation
Is there really a need to tune the suspension, and will such a change damage the car? Before installing aluminum spacers under the springs, let’s pay attention to the positive aspects of the changes:
- protection of the rear suspension, underbody and crankcase from breakdowns;
- protection of the rear wheels from impacts on the fender liner;
- increasing the vehicle's off-road capability.
The disadvantages of installing a spacer under the springs with your own hands include:
- failure of the lower shock absorber mounting;
- additional load on the bottom bracket;
- car instability on an icy surface;
- impairment of vehicle controllability due to a shift in the center of gravity;
- rapid wear of steering parts;
- imbalance of wheel alignment.
After tuning, the car owner needs to pay more attention to the suspension in general and shock absorbers in particular.
What to choose?
What are spacers made of to increase ground clearance? The choice of material depends on the design of your machine. In the front compartment of the car, spacers made of metals are mounted: steel or aluminum alloys. It is recommended to place rubber or plastic products under the rear springs.
Which spacers are best for increasing ground clearance? Firstly, you cannot install any spacers over 30 mm thick. Secondly, polyurethane products can cause damage to the body by steel bushings due to rapid wear.
Aluminum products are the most reliable, although they cause corrosion at points of contact with the body. In practice, plastic spacers have shown themselves to work well to increase ground clearance, without revealing any serious shortcomings. Rubber material is the cheapest, but is prone to tearing, deformation and rapid wear.
About the body and suspension lift
What it is
Spacers are special devices that reduce the compression stroke of a car's suspension springs or lift the car body above the shock absorber strut. Spacers are also installed between the body and the frame (if any), but here there is a completely different approach and specialization.
Externally, the elements most often resemble flat thick washers (if they are made of metal) or rubber or polyurethane low cylinders. The thickness of the spacers determines the amount of increase in ground clearance. In both cases, they are designed for a load many times greater than the load on one of the car's shock absorber struts.
Installation Rules
To properly make spacers for springs with your own hands, you need to take into account some nuances:
- Setting the ground clearance above 30 mm leads to wheel alignment problems.
- It is not recommended to install metal products that have not been pre-treated against corrosion.
- It is recommended to raise the front of the body by no more than 20 mm.
- The rear compartment of the body is raised by no more than 30 mm.
- If the shock absorber is not located next to the spring, spacers should be mounted under the springs and shock absorbers to balance the structure.
Front installation procedure
How to install spacers to increase ground clearance in the front part of the body? To do this, follow the recommendations:
- We lift the car with a jack, remove the tire, disconnect the braking system and the stabilizer link.
- We install other bolts of the required size on the rack (the old ones do not fit in length).
- We fix the spacer to the bolt and assemble the entire structure to its original state.
For greater clarity, you can see the diagram for installing a spacer to increase ground clearance with your own hands in the drawings.
Rear installation procedure:
- We disconnect the thresholds under the loading compartment lid and the rear door area.
- Move back the rear seats.
- We remove the panels and leave one body.
- We remove the wheel.
- We install the bolts according to the example of the front part of the body.
- We assemble the structure in reverse order.
If the word “jack” causes you vague anxiety, and the idea of the location of the bolts seems unclear, watch the procedure for installing a spacer under the springs in the video.
Selecting a kit and installing spacers on the car
Let's start with the fact that the spacer can be made of different materials, as mentioned above. In this case, there are polyurethane front strut spacers (installed between the body and the strut).
On the one hand, the material is durable, but the bushings are steel. When driving, polyurethane wears out, and steel elements can damage the body. In turn, aluminum spacers are more reliable, but this material is quickly affected by corrosion. Against this background, plastic spacers look the most durable.
One way or another, the main thing is to buy spacers to increase the ground clearance of good quality, and also that they are designed for a specific car. Such kits are more expensive, but they have an acceptable service life and usually there are no problems with their installation.
In any case, no matter what material you purchase, it is important to know how to install spacers to increase ground clearance. Let's look at this in more detail.
- First of all, to install the spacer on the front strut yourself, you need to lift the car, remove the wheel and the strut itself completely. On some machines this is no problem, while on others you have to remove a lot of elements and panels.
- After removal, it is often clear that the standard strut bolts are short for additional padding. The solution to the problem is to use similar bolts of longer length.
- Having secured the spacer, assembly is carried out in the reverse order. If the strut spring is not put in place, you first need to support it to reach the mounting hole (a jack is usually used as support).
- Installing spacers on the rear pillars also involves replacing the standard elements with thicker ones. It is better to install such spacers using rubber ones; they do not damage the body and are not subject to corrosion. If the material is different, then nuances may arise.
- To install the elements, you need to remove the trim and lining in the trunk, jack up the rear wheel and remove the rear pillar. Once the post and support are removed, bolts are usually also needed to install new, longer legs.
- Let us add that if there is a risk of poor fixation of non-standard bolts, which often do not have a sealing skirt, you can simply weld the bolts to the rack. The final step will be installing the spacer and reassembling it.
Bottom line
When creating a car, design engineers calculate every millimeter, establishing a certain balance between the parts and assemblies of the vehicle. Any change made to the design of a car in order to improve technical characteristics introduces a certain imbalance into the overall structure.
It is not always possible to increase the cross-country ability of a car designed to drive on asphalt. No matter how hard you try to change or improve the condition of the suspension using various manipulations, you will not be able to improve the design to the condition of an SUV. Either buy an SUV, or resign yourself to driving on city highways.