Running in the engine after replacing rings and bearings
and how labor-intensive this process is.
All the rules noted in the article will help you ensure reliable and efficient operation of the car for a long time.
Moreover, inexperienced, just novice drivers have no idea why a break-in is necessary after any engine repair. Well, in this article I will try to touch on all the important aspects of this issue.
It should be noted that the first stage of engine break-in may not take place in motion, but in place. This will take you 2 or 3 hours.
At the same time, if necessary, adjust the ignition or power systems. Then follows the process of running the engine in motion.
The duration of the process in motion should be at least 2-3 thousand kilometers. However, the user also needs to be aware of the following things:
- When starting the engine for the first time, do not forget to fully charge its battery.
- Warm up the engine before the first trip at idle speed to 80-90 degrees, while making sure that there are no leaks of technical fluids.
- Then, when the engine cools down to 40-50 degrees, warm it up again, and repeat the procedure, if possible, up to 10 times.
- For the first 1000 kilometers, exclude engine operation at high speeds (no more than 3500-4000 rpm) and under high loads (do not transport more than 2-3 people).
- After a (cold) start, it is important to warm up the engine, especially for the first 400-500 km. you should drive along the highway. Thus, you will achieve maximum “working” lapping of the rings and pistons.
- If the traffic occurs mostly in the city, then it is necessary to avoid running the engine at fairly low speeds, i.e. It is advisable not to drive under pressure.
- Find the documents for the car and read the car manufacturer’s recommended speeds for a process such as gear shifting;
- Avoid long climbs.
productive engine running-in after replacing rings
within the recommended 2-3 thousand kilometers, of course, it will require an oil change. Moreover, its quantity must be constantly monitored!
It is also advisable to ensure that the oil filter is also in new condition or do not forget to replace it after break-in.
If necessary, the idle speed and valves are adjusted, and the timing chain is tensioned.
It is important to know that if there are various knocks or other extraneous sounds, you should quickly find their cause.
I would also like to advise drivers not to drive at a certain speed during the break-in process - above 80 km/h for the first 1000 km. and at a speed of 90 km/h for the second 1000-2000 km.
Try to avoid both prolonged and sharp acceleration and prolonged periods of sitting in traffic jams by changing gears in a timely manner.
In general, many experienced motorists and experts advise running in the engine gradually, without loading it. Treat the car as if you just picked it up from the factory.
Run-in is carried out, as a rule, so that the new rings “get used” to the overall system of the car. If the procedure is carried out incorrectly, unpleasant surprises await you.
For example, oil can get into the air purifier, which over time can lead to such drawbacks as quite high fuel consumption, in addition, sometimes problems with starting the car, etc. may arise.
In conclusion, I would like to draw the attention of motorists to the fact that such an event as an effective engine run-in after replacing the rings
is always carried out, and this process is also necessary in cases when a new vehicle is put into operation, or when any repair work has been carried out on the engine.
PS. Proper running-in of the engine after replacing the rings (be careful when using profanity in the story)
Tags: how to properly break in an engine, engine break-in
- Related Posts
- What to fill with antifreeze or antifreeze. What's better?
- Where does antifreeze go from the expansion tank?
- We select antifreeze according to the make of the car. Choice of antifreeze
Engine overheating
It is also possible that the engine gets very hot after replacing the rings. Most often this is accompanied by increased vibration.
- shrinkage of compression rings;
- erasing liners;
- roller wear.
If problems are observed with engine thrust, it is necessary to conduct a superficial diagnosis. The valve seals are inspected; it is important to check the position of the rings. The gaskets must be in place, there should be no large cracks or bulges. The upper liners must be clean without obvious abrasions.
The belt and rollers are also subject to inspection. When replacing rings, you can ask a specialist for more information about the cylinder measurements. There is special equipment for measuring the ellipse of elements. The technician inspects the gaps in the locks. If the engine overheats on a regular basis, the rings will have to be changed urgently.
When is it needed?
First, let's figure out when it is required. Naturally, the answer will be - after replacing the piston rings, but not everything is so simple here. People often argue that not in all cases it is necessary to break in the engine. For example, there is a fairly stable idea that if no grinding has been done, then running in is not required. Unfortunately, it is not. Let's look at why this is a false statement.
In any case, if you removed the piston, it means you did some work to replace parts. In our case, the piston rings were changed. Accordingly, no matter how correctly and carefully you install them, at first they will be a foreign body in the engine. This will happen until the rings rub against the piston and cylinder. You need to understand that break-in is necessary in any case when new components are installed in the engine.
Why is lapping important?
It’s worth noting right away that any motorcycle needs running-in, regardless of the year of manufacture. It allows you to tighten threaded connections, cables, gaskets, reduce friction between components and eliminate micro-irregularities.
For example, if the running-in of a scooter after replacing the piston was carried out incorrectly, fuel consumption will increase, the rings will quickly wear out, the motor will begin to overheat, and the dynamics and power of the device will decrease. Therefore, experienced riders do not recommend ignoring the procedure, because the consequences will be unpleasant.
How to break in after replacing piston rings
Before you begin the break-in procedure, you need to prepare the car. A few steps to follow:
- Charge the battery;
- Before heading out on the road for the first time, first start the engine and wait until it warms up to 80 degrees Celsius. After this, you need to turn it off and wait until the engine cools down to 40 degrees Celsius. Then the engine warms up again to 80 degrees. You need to perform 8-10 such cycles. This is necessary so that preliminary “grinding in” of the parts occurs, caused by their expansion as a result of heating;
- After completing the preliminary step, inspect the car and engine. You need to make sure that there are no leaks of antifreeze, oil or other liquids. If a problem is identified as a result of the inspection, it must be corrected;
- Choose the right section of road to drive. It is better that this is a route with a small number of cars and no elevation changes, that is, it is necessary to exclude entry to and from the slope. You also need to minimize the likelihood of getting stuck in a traffic jam.
Important: The book on technical operation of a specific car model may discuss the issue of engine break-in. Be sure to read and follow the manufacturer's recommendations.
Experts recommend running in the car engine after replacing the piston rings for 1,500 kilometers. The break-in process itself should take place, on average, at 2500 rpm; it is better to do it in third gear. This recommendation will allow you to optimize the process of “grinding in” the rings to the piston and cylinder.
It is better to cover the first 300 kilometers in one ride. A country track is ideal for grinding in. The next 1,200 kilometers must be covered in the same mode, but no matter how many trips, that is, operation can be carried out in a schedule that is comfortable and familiar to the driver.
Important: After traveling 1500 kilometers, it is necessary to replace the oil filter and oil.
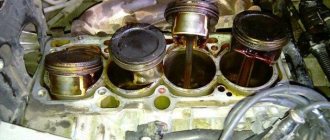
Which parts of the piston group wear out faster?
The piston rings, skirt and pin holes are primarily subject to wear.
As a result of friction against the inner surface of the cylinder, the rings wear out along the outer diameter, and due to friction against the ends of the piston grooves, along the height.
The first piston ring and the first piston groove wear out the fastest, since this joint operates under the most severe temperature, abrasive and load conditions, often with insufficient lubrication. Rings usually wear out faster than grooves. They lose their elasticity and gradually collapse.
In the piston grooves, the lower end wears the most, since this surface is almost constantly in contact with the rings and is subject to increased pressure from them.
The ends of the piston pin work inside the bosses, and its middle part works in the upper head of the connecting rod. The degree of wear of these elements is determined by the size of the actual gap between them and the pin. To do this, measure their diameter at the points where they interface with the holes. If the results are outside the acceptable limits, the piston and pin must be replaced.
The holes in the piston bosses wear unevenly, so over time they take on an oval shape. If their size does not exceed the established norm, the shape is corrected with a reamer to the size of a repair pin of a larger diameter. The diameter of the connecting rod upper head bushing is also increased.
The wear of the skirt is evidenced by numerous scuffs on its side surfaces, an increased gap between the lower part of the throne and the cylinder walls (more than 0.5% of the liner diameter).
The gap size is measured using a feeler gauge or indicator bore gauge in different parts of the cylinder - in the less worn lower part and the more worn middle part. This is done by retreating 5-10 mm from the lower edge of the front or rear side of the piston skirt.
The piston must be replaced if the following phenomena are observed:
- Large gap between piston and cylinder liner
- Numerous scuffs on the piston skirt
- Damage (scratches, cracks) on the bottom and hot zone of the piston caused by disruption of the combustion process of the fuel-air mixture
- Uneven wear and deformation of the grooves for the piston rings (as a result, the rings vibrate intensely, increased oil consumption and blow-by gases are observed)
Engine repair is a rather complex and time-consuming process. There are not many master mechanics who can perform it efficiently, while complying with all factory tolerances and requirements. Only extensive experience in engine restoration can help eliminate the possibility of engine-fatal errors and save your time and money. If all operations are performed correctly, the repaired engine will be no different from the new one.
Removing the engine
The engine should be thoroughly cleaned before operation if possible. Due to the accumulated dirt and grease, removing bolts and disconnecting components will be a messy and unpleasant job.
Visual inspection
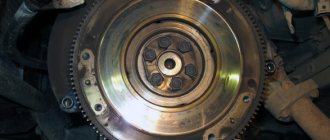
Verifying the engine number is necessary to ensure that you are working with exactly the engine described in the documentation. Carry out a visual inspection of the engine. Check for fluid leaks before draining them and mark the leak locations. Check for any signs of overheating, cracks or exhaust blow-by on the block. Also check to see if there is a thick layer of sealant squeezed out from previous work. Inspect the external components on the engine. Inspect the belts for signs of wear by rotating the pulley and listening for any unusual noise. Inspect the flywheel for wear.
3. We disassemble and evaluate the feasibility of engine repair
The exhaust manifold is removed if it has not been removed previously. Exhaust manifold bolts or studs can be severely damaged by corrosion, you need to be careful not to damage them. The use of special lubricants is advisable when loosening threaded connections. Heat may be required for very tight bolts.
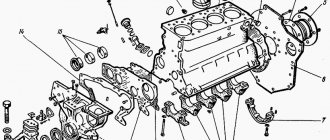
The remaining parts of the engine are removed. The oil pan, valve covers, and then the cylinder heads are dismantled. You can now get a first idea of cylinder wall wear by looking at the cylinder walls. There is a point at the top of the cylinder where the piston rings stop as they move the piston upward. The top does not wear, so this indicates the original bore diameter. It is necessary to check the minimum tolerances with the documentation to ensure that the engine can be restored.
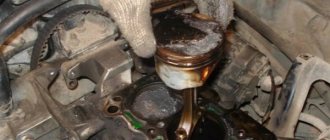
Next, remove the pistons and connecting rods assemblies. Parts must be marked so that they can be returned to the same cylinder from which they were removed.
The crankshaft is removed and inspected. After removal, use plastigauge plates to measure the gaps between the liners and the crankshaft. Inspect the shaft for cracks and any signs of overheating. Measure the journal diameter, radius, taper and runout of the crankshaft. Compare this with the dimensions and tolerances specified in the repair manual. You should also inspect the necks
Types of running-in
There are usually two types of running-in. They need to be distinguished. After all, correct use of this procedure can increase the resource by up to 20%. This is a very good indicator that will allow you to save on further engine maintenance.
Typically, break-in is understood as a procedure that is performed after a major overhaul of the engine. As a rule, in this case, all the main components are completely replaced, usually only the block and its head are left. In this case, you get an almost new motor. But in order for the parts to get used to each other, a thorough running-in is required. Large services use special stands for the initial procedure. This is impossible in a garage, so you just need to carefully monitor the operating mode of the engine while traveling.
Another point is a partial overhaul of the engine.
. This includes the break-in we analyze after changing the piston rings. Here you need to monitor the process a little less, but there are some nuances that simply need to be taken into account. Also, usually in this case, the mileage for grinding in is shorter, which speeds up the process. Below we will consider in more detail all the listed varieties, so you are guaranteed to avoid mistakes after repair.
Running in a new outboard motor. An article about how to break in correctly.
Have you purchased a new motorboat engine and are looking forward to trying it out? The first thing you need to do with the engine after purchase is to break it in. No manufacturer can guarantee the perfect alignment of the inner cylinders with the piston rings and the fit of other parts to each other.
Important! There is no single guide to running in a boat motor for all models. This article discusses general recommendations and important points. Read the manufacturer's instructions about running in your engine and oil proportions!
Proper running-in of a new outboard motor helps to grind in all parts of the engine. This reduces the risk of motor wedge and increases its service life.
Instructions for running in chainsaws
There are two types of break-in procedures, which are carried out on a new tool, and on a chainsaw after a major overhaul of the engine. A new chainsaw needs to be run in with an average load, since idling the engine helps reduce the engine's life. In order not to harm the tool, and at the same time carry out the procedure for grinding in rubbing parts correctly, you should ensure a gentle load on the chainsaw.
Running in the engine of a gas powered tool is carried out in the following way:
1. Setting the supply of the fuel-air mixture in an enriched form. To do this, you will need to adjust the carburetor. The process of starting the unit is described in detail here 2. The carburetor is adjusted by moving the adjusting screws L, H and T 3. Initially, the maximum engine speed is reduced by 600-700 rpm from the maximum value. To reduce the speed, you need to loosen screw H 4 with a slotted screwdriver. To determine the number of revolutions at idle, you need to use a tachometer. How to check the speed of a chainsaw with a tachometer is described here 5. If it is not possible to check the speed with a tachometer, then the adjustment should be carried out according to the instructions. Sawing operators need to purchase a tachometer to measure the speed, since the carburetor will regularly need to be adjusted for normal operation of the unit 6. Without a tachometer, adjustment is made by moving screw H a quarter turn in the rich direction. You can determine the increase in fuel supply by the sound of the engine 7. After completing the break-in stage, you will need to fine-tune the carburetor using a tachometer
How to do it correctly?
Before starting the process, you need to carry out a number of actions that are mandatory for any type of work. They are standard and apply in any case. At the very beginning, the following procedures are done:
- Be sure to fully charge the battery;
- Before leaving, you need to carry out the next cycle. We start the engine, heat it to 80°C, then turn it off. As soon as it cools down to 40°C, warm it up again. In total you will need to do 7-10 cycles. During which thermal expansion of parts will occur, as well as their initial preparation;
- After all the above steps, be sure to inspect the engine for leaks of oil, antifreeze and other technical fluids. If we find such a phenomenon, we will definitely eliminate it;
- Regardless of the reason for which the procedure is performed, movement with height differences should be avoided;
- At the last stages of lapping, strictly follow the manufacturer’s recommendations regarding optimal engine operation during travel.
These rules apply to all types of engine running-in, regardless of what you did in the car.
The next 700-800 kilometers
You can drive in the same mode, but not at once. That is, you can freely use the car for business trips, but just do not load it. The last 500 kilometers adhere to the manufacturer's recommended operating mode, but at the same time avoid stressing the engine. After this, the oil and filter must be changed. Then you can safely operate the car in your usual mode.
What to choose: contract engine or overhaul?
Instead of repairs, car owners are increasingly purchasing and installing contract engines - this is 1.5-2 times cheaper.
However, it should be remembered that such units have already exhausted part of their resource. In addition, a vehicle with a non-original engine may have certain problems when registering.
You should consider purchasing a contract power unit if engine replacement is needed very urgently, purchasing new parts is difficult due to their rarity, high cost or other reasons, and also if the engine is severely damaged and cannot be restored.
A working unit cannot be cheap, so experts do not recommend purchasing a contract engine at an attractive price.
Rules for operating a car after engine overhaul
After engine repairs, certain rules must be followed. This is due to the fact that new parts require running-in, especially in modern high-tech turbocharged units.
Such engines are made of alusil, nicosil and similar soft alloys, which is one of the reasons for their short service life - up to 100 thousand km. If car owners neglect high-quality fuel and oils, the service life of the engine may decrease further.
Lining the cylinder block helps to avoid such problems.
The key to proper engine operation is running-in: mandatory warm-up for 5-10 minutes before each trip, as well as restrictions regarding high speeds, sudden acceleration and braking, transportation of goods and towing trailers.
The running-in period is 10-15 thousand km. After this, the load on the engine gradually increases.
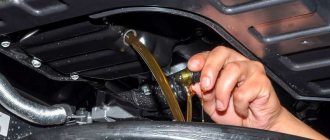
During the break-in period, the engine oil is changed four times: after 500, 1000, 1500 and 2000 km. This is done so that wear products formed during the running-in of new parts are removed from the system.
The full running-in is completed 10-15 thousand km after the overhaul. After this, you can switch to the recommended service interval and increase the load on the engine.
Recommendations for engine operation
The engine life depends on many factors, but in order for it to work as long as possible, you should change the oil in a timely manner, monitor its quality and the quality of the fuel, change the fuel and oil filters, do not overload the engine, and also eliminate any malfunctions in a timely manner.
The main reason for engine failure is failure to comply with the regulations for changing oil and filter elements.
Considering that in our country the quality of fuel and roads is not always the best, engine oil quickly oxidizes, and foreign particles enter the engine through clogged filters. As a result, increased wear of parts, coking of lubrication channels, etc.
Oil ceases to perform its lubricating and protective functions by 10 thousand km. mileage, so it is recommended to update even the most expensive and high-quality fluid no later than this mark.
A big problem for car owners is the presence of a large number of counterfeit products on the market. The basis of counterfeit oils bottled in canisters from well-known manufacturers is low-quality mineral raw materials.
Modern turbocharged power units especially suffer from counterfeits: the lubrication system channels become clogged, numerous scuffs appear on parts, oil starvation and jamming occur.
First launch after major overhaul
The first start of the internal combustion engine is carried out according to the following scheme:
- Fill in engine oil. It will take 10 minutes for the lubricant to fill the system. The oil filter is left dry to avoid air lock.
- Connect the fuel pump or supply fuel manually.
- Open the throttle manually if there is no automatic drive.
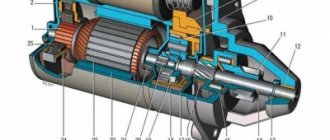
- Start the starter.
- Spin the motor up to 2000 rpm.
- Leave to idle for 15 minutes until engine rotation becomes stable at operating temperature.
- Turn off the unit and wait for it to cool completely.
Similar article: Correctly changing engine oil in a car engine
During startup, the pressure in the lubrication system is monitored. The indicator signal for 4 s indicates incorrect engine assembly. We urgently need to turn off the engine! If the pressure quickly stabilizes, the internal combustion engine is warmed up to operating temperature.
There should be no leaks upon visual inspection. In the first 3 minutes, the engine may knock: the hydraulic compensators are being pumped or the cups are running in. In the future, the sound should become uniform, without vibration. The appearance of a burning smell and slight smoke for the first start is normal - the assembly lubricants are burning through.
If the internal combustion engine is operating stably, start running-in. In order to properly run in the engine after a major overhaul, you need to understand the nuances of the test.
Why does the engine eat oil?
Sometimes, after replacing the oil scraper rings, grease continues to be wasted unnecessarily. In this case, the reason is probably not only in the rings. This usually happens when there are problems with valve stem seals.
This part can be found on the valves. They remove excess lubricant from them and prevent it from entering the combustion chamber. It is recommended to immediately replace the caps during any engine overhaul so as not to disassemble the engine twice.
. Sooner or later the engine has to be repaired. In this case, running in the engine after replacing the piston rings is simply necessary. This work must be done correctly in order to significantly increase the service life of the repaired unit.
Guys, who knows, can you help me break in the ring after replacing it, how to do it correctly and how long does it take?
How long to run an engine after a major overhaul?
How long it takes to run-in after an engine overhaul depends on the test method. An incorrectly carried out test leads to jamming of the motor on the first day. To avoid breakdowns, you need to act carefully and follow the prescribed inspection regime.
On average, the grinding-in of internal combustion engine parts lasts 3000 - 8000 km. You can determine the readiness of the engine by its responsiveness and torque: after pressing the gas pedal, the car cheerfully takes off and confidently accelerates at full speed.
Step-by-step instructions for replacing rings and valve stem seals
The decarbonization process removes small deposits. In case of severe wear, a complete replacement of all piston rings and valve stem seals is required:
- The necessary parts are selected in accordance with the make of the machine. You should give preference to original spare parts so as not to bother again later.
- The spark plugs are unscrewed, the cover is removed, and then the entire cylinder head (cylinder head). The oil is drained and the oil pan is unscrewed. Next, the connecting rod caps are unscrewed and the pistons are pulled out.
- Use a puller or a screwdriver to remove the old rings. Using old pistons, the landing grooves are cleaned. It is done carefully with an unnecessary ring. Their installation should be carried out only after connecting the piston to the connecting rod.
- Of all the piston rings, the oil scraper rings are installed first. All operations must be done by hand. On box-shaped ones with a spiral spring, the expander lock rotates 180° relative to the ring lock. For composite ones, the spring is installed first, then the lower plate and the upper one. The plate locks rotate 180° relative to each other.
- After installing the remaining rings, it is necessary to evaluate the appearance of the cylinders. In case of severe wear, boring and honing are performed.
- Place the pistons in their places, screw on the connecting rod caps and the oil pan.
see also
Comments 27
if the pistons are old (that is, there has been no major repairs), then 500 km is enough, and then at least until the cutoff!
and I still couldn’t get through the break-in after replacing the rings... T__T
and how does it feel without running in? how far have you run?
who the hell knows) I’ll never get around to measuring the compression) 7-8 thousand
how does it feel? and how long did it take for it to start to pile on?
I didn’t have enough patience) and the carbs at that time were not yet properly tuned, they drove normally only after 3k revolutions
okay) I just changed the rings and head on mine, in about 20 minutes I’ll do the first launch and, as luck would have it, I have to go straight to the highway and head to another city. I’m wondering how long I’ll last)))
Well, I think 90 is not too hard to go without overtaking and it will be fine
I will try. ok let's go finish it
I replaced the rings on mine, drove about 500 km, changed the oil, now I drive in normal mode, rev the engine to 3.5 in every gear, at first there were overtones after 3000, now everything has returned to normal, the sounds are gone, the car drives boldly, cheerfully...
Oil selection and frequency of replacement
It is worth considering in more detail the issue of replacing lubricating consumables after a power plant overhaul. First, this must be done after 500 km. Then after 1000 and the last time after 2000 km. Use high-quality motor oil recommended by the manufacturer. After the specified kilometers have been covered, drain the used mixture and flush the engine. When running in, take into account the oil viscosity:
- in summer 15W40;
- in winter 5W30;
- in the intermediate season: 10
What types of engine running-in are there?
Proper engine running-in is an important component of success. It is important to understand that there are several types of break-in:
- After major renovation. Run-in after a major overhaul assumes that all engine components need to be ground in, since most of them are changed (usually, after a major overhaul, only the cylinder block and its head remain). That is, in fact, a new engine appears before the driver. It is better to run it in at a service center using special equipment;
- After a partial overhaul of the engine and replacement of some components. This includes running in after replacing the piston rings. This run-in is performed directly on the road. There are rules that need to be followed and these will be discussed below.
It is worth noting that when overhauling an engine in a “garage,” drivers often perform a run-in “in combat conditions,” that is, on the road, without using special equipment. This is not entirely correct and can lead to a decrease in the service life of the motor.
Source