What kind of fuel pumps are installed on VAZ 2110/2112 cars
VAZ 2110/2112 cars, depending on the year of manufacture and the type of engine installed, may differ in the method of supplying fuel to the cylinders.
Table: features of fuel supply systems to engine cylinders depending on vehicle modification
| Model/ modification | Year of issue | Engine volume, cm3 | Number of valves, pcs | Injection system |
| VAZ 21100 | 1996–2000 | 1500 | 8 | Carburetor |
| VAZ 21101 | since 2004 | 1600 | 8 | Injection |
| VAZ 21102 | since 2004 | 1500 | 8 | |
| VAZ 21103 | since 2001 | 1500 | 16 | |
| VAZ 21103M | since 2001 | 1500 | 16 | |
| VAZ 21104M | since 2001 | 1600 | 16 | |
| VAZ 21120 | 1999–2008 | 1500 | 16 | Injection |
| VAZ 21121 | 1999–2008 | 1600 | 8 | |
| VAZ 21122 | 1999–2008 | 1500 | 8 | |
| VAZ 21124 | 2004–2008 | 1600 | 16 | |
| VAZ 21128 | 2004–2008 | 1800 | 16 | |
| VAZ 21123 | 1999–2009 | 1600 | 16 |
Only the first modifications of the VAZ 2110 were equipped with a carburetor injection system. From the factory they were equipped with mechanical fuel pumps of the DAAZ brand (catalog number 2108–1106010). Previously, they had proven themselves well on cars of the Sputnik and Samara series.
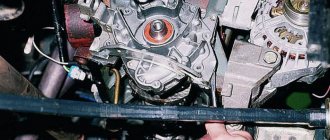
A mechanical fuel pump was installed in the engine compartment of the VAZ 2110 to the right of the engine valve cover, and was driven by the camshaft.
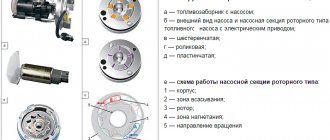
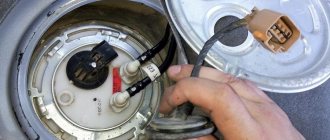
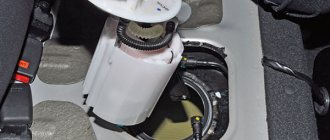
All injection VAZ 2110/2112 are equipped with submersible fuel modules. The design of such a module includes:
- electric fuel pump;
- coarse filter;
- fuel level sensor.
The fuel module is installed directly into the vehicle tank. In other words, the gas pump is completely immersed in gasoline. Injection VAZ 2110/2112 were and are equipped with electric fuel pumps of domestic, joint or imported production. These are products of the Utes, Pekar, Saratov plant, as well as the world famous one, the pumps of which are equipped in all modern VAZs. The catalog number of the stock electric pump is 2112–1139009. There are also modifications whose numbers have two additional digits: 02 or 03. Depending on them, products may differ in length and diameter.
Design features of fuel pumps for carburetor and injection fuel injection systems
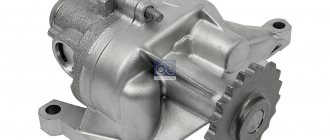
Mechanical fuel pumps, which were installed on the first modifications of the VAZ 2110/2112, have a simple design. It is based on a set of membranes made of special rubberized fabric that is resistant to the chemical action of gasoline. The pump body has two valves: inlet and outlet. The membranes are driven by a rod (pusher). It is driven by a cam mechanism rotated by a camshaft.
Such a mechanical fuel pump can serve for decades until the drive rod wears out or one of the membranes breaks. And even then, if this happens, you can replace these elements in half an hour.
The first modifications of the VAZ 2110 with a carburetor injection system were equipped with mechanical fuel pumps
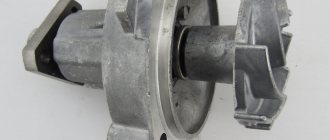
With an electric fuel pump, things are much more complicated. Its design is based on a small electric motor. It is no different from a regular one, although it works completely immersed in gasoline. The pressure in the system here is created not by a membrane (although there are such pumps), but by a specially shaped impeller mounted on the electric motor shaft.
The service life of the electric fuel pump is 150–200 thousand km. But it can fail much earlier. The main cause of breakdowns when the resource is not used up is additives added to gasoline, as well as various kinds of mechanical impurities. The former destroy the brushes and commutator, while the latter clog the valve mechanisms.
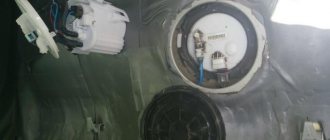
In the injection VAZ 2110/2112, the fuel pump has an electrical design and is part of the submersible fuel module
Signs of a faulty fuel pump VAZ 2110/2112
Signs of pump malfunction appear the same, regardless of its design and type of injection system. These include:
- difficulty starting the engine;
- unstable engine operation at idle speed (vibration, tripping, stopping of the power unit);
- failures during acceleration in motion;
- reduction in power and traction qualities of the engine;
- absence of the characteristic sound of a fuel pump starting (for injection engines);
- presence of traces of fuel leakage (for carburetor power units).
Determining a fuel pump malfunction on your own is quite problematic, because the first three signs, which are the main ones, may indicate other problems in the fuel system, such as:
- fuel filter clogged;
- problems with sensors for mass air flow, throttle position, oxygen level, etc.;
- clogging of one or more nozzles;
- failure of the pressure regulator.
In addition, similar symptoms are observed when problems with ignition occur. It can be determined that the cause of the listed symptoms is the fuel filter by checking the device.
Signs of breakdown
There are several situations in which the pump or its components can be at fault. This will definitely have to be checked. Otherwise, you can spend a lot of money buying and installing a new fuel pump, but in the end it turns out that the problem is completely different.
- The engine will not start. This is not a clear sign of problems with the pump, but still. Therefore, first check the condition of the spark plugs, the presence of a spark, and the absence of traces of oil on them. Also check the electronic control unit.
- Pressure inside the fuel system. If the pump is operating normally, it will create a pressure of 3.2 bar. Depending on the type of engine in your VAZ 2114, the characteristics may differ slightly: For a 1.5-liter engine, the optimal values are 285-325 kPa;
- For a 1.6-liter engine, these characteristics in optimal operating mode will range from 375 to 390 kPa.
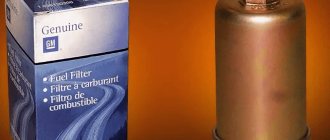
New and old coarse filter
We recommend: Inflating tires with nitrogen - real benefits or a marketing ploy?
Many people purchase the entire fuel module assembly at once, which includes a filter, sensor, float, intake chamber and the pump itself. Such a purchase will cost approximately 3,000 rubles. It is much more profitable and practical to buy a separate pump, which costs up to 1000 rubles. This is due to the fact that when the pump fails, the remaining elements almost always remain intact and are fully suitable for further use.
Mechanical replacement
If you find problems with the fuel pump, you can try to repair it yourself, or replace it with a new one. In the first case, it is better to buy a repair kit. It includes all the elements of the device that can fail: valves, gaskets, diaphragms and pusher.
If you decide to replace the pump assembly, it is even easier.
After dismantling the faulty device, you need to:
- Install new gaskets and pusher.
- Place the pump in place and secure it with nuts.
- Connect the fuel line hoses and secure them with clamps.
- Press the manual primer lever several times to fill the pump with fuel.
- Start the engine and check its operation.
A new fuel pump is installed on new gaskets
Checking the electrical circuit
Unlike a carburetor engine, where the fuel pump is mechanically driven, on the injection VAZ 2110/2112 a special relay and fuse are responsible for the operation of this device. Therefore, before moving on to diagnosing the pump itself, it is necessary to check the indicated elements. If any one of them is faulty, the pump will not work at all.
Turn on the ignition without starting the engine and listen. When the fuel pump is running, it emits a characteristic “whistle” when started. If it is not there, it means that either the pump itself has failed, or one of the elements of its power supply circuit has failed.
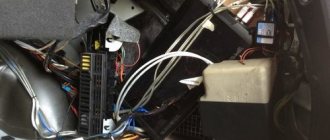
The pump relay and fuse are located in an additional mounting block located inside the vehicle's center console. It can be accessed by removing the plastic trim (near the front passenger's left foot). It is secured with several screws. Under the cover you will find three relays and three fuses. Typically, the fuel pump circuit protection elements are located centrally.
The relay and fuse are located in an additional mounting block under the cladding
To check the fuse, remove it from its socket and “ring” it with a tester. If necessary, replace it, observing the rating (15 A). It is unlikely that it will be possible to check the relay for functionality without special equipment. But you can take another relay, for example, the radiator fan (far left), and install it in place of the one being diagnosed. Turn on the ignition and listen to see if the fuel pump starts working. If yes, buy and install a new relay. If the problem persists, continue diagnostics.
To check the fuel pump relay, you can install the radiator cooling fan relay in its place.
Cause of fuel pump failure
There are usually two reasons. The first is severe contamination of the fuel filter. the second is the car owner’s habit of driving with a half-empty tank.
We have figured out the purpose and location, now I bring to your attention instructions for replacing the fuel pump, that is, further we will talk about how to replace the VAZ fuel pump with your own hands
.
1. First of all, you should prepare the car for this procedure; to do this, use a rag to clean the engine, cylinder block, and the fuel pump
from dust and dirt using white spirit or a special cleaner.
2. For the next stage, you will need two M8 bolts to plug the holes in the hoses, since when they are disconnected, fuel will leak out.
3. Next, using a Phillips screwdriver or an “8” wrench, loosen the fastening clamps that hold the fuel hoses and remove the hoses from the fuel pump fittings.
Now you can actually plug the ends of the fuel hoses with the previously prepared M8 bolts.
4. Replacing a VAZ fuel pump
continues and the next step will be to remove the fuel pump; to do this, unscrew the two fastening nuts that secure the fuel pump to the cylinder block, using a key set to “13”.
5. When everything is ready, you can begin to remove the fuel pump from the studs, while paying attention to the condition of the gasket and, if necessary, replace it.
6. Remove and clean the heat-insulating spacer from dirt and dust, just as in the previous case with the gasket; if necessary, replace the gasket located between the cylinder block and the heat-insulating spacer.
Checking the fuel rail pressure
But even the fact that the fuel pump starts pumping when the ignition is turned on does not mean that it is working properly. The main indicator of its operation is the pressure in the system. You can check it using a regular pressure gauge with a measurement limit of 5–7 atmospheres, which is used to measure tire pressure. In addition, you will need a piece of gas-resistant hose with an internal diameter of 9 mm and two clamps of the appropriate size.
The verification procedure is as follows:
- We relieve the pressure in the system. To do this, disconnect the negative terminal from the battery. We remove the plastic lining of the additional mounting block, which contains the relay and fuse for the gasoline pump. We remove the fuse from the socket. Connect the removed terminal to the battery. We start the engine and let it run until it stalls. After that we put the fuse in place.
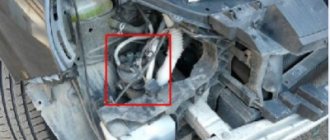
- On the fuel rail we find a fitting specially designed for measuring pressure. Using the wheel valve cap, unscrew the spool valve from the fitting.
The fitting is designed specifically for measuring pressure
- We put one end of the hose on the fitting and secure it with a clamp. We connect the second end to the pressure gauge and also secure it with a clamp.
- Turn on the ignition and wait for the pump to pump fuel into the system.
- We look at the pressure gauge readings.
A regular tire pressure gauge is suitable for measuring fuel pressure in the rail.
For engines with a volume of 1500 cm3 it should be 2.8–3.2 atmospheres, and for power units with a volume of 1600 cm3 – 3.6–4 atmospheres. If the device indicators are lower, the pump is unsuitable for further use.
Removing, installing and replacing the fuel pump
The first thing to keep in mind is that all work on the car’s fuel system must be carried out with the negative terminal of the battery disconnected. It would also be a good idea to do this with an empty fuel tank, especially since with the fuel module removed it becomes possible to clean the bottom of the gas tank from sediment.
The second thing it is advisable to do is to remove the pressure inside the fuel lines so as not to get a stream of gasoline in your face or into the interior of the car. This can be done using a measuring nipple on the fuel rail and a thin screwdriver.
To work you should prepare:
- curved and flat screwdrivers
- key for 17
- head for 7
- rags
Sequence of work
- Raise the rear sofa.
- We unscrew the two screws that hold the cover that blocks access to the fuel module, and disconnect the electrical connector from it.
- Using a 17mm wrench, unscrew the two fuel lines connected to the pump, being careful not to lose the O-rings, and move them to the sides.
- Newer models have clips on the pump; to remove them, press them and pull the tubes towards you.
- Using a 10mm socket, unscrew the 8 nuts that secure the pressure plate in a circle, holding the entire fuel module.
- Carefully remove it through the hole in the gas tank, having first released the fuel level sensor float.
If there is a new assembled module in stock, install it in the reverse order. If it is necessary to replace individual components: the fuel pump itself, the level sensor or the primary filter mesh, we do this by disassembling the fuel module housing and removing the corresponding parts.
This procedure is unlikely to cause any difficulties - everything is quite obvious.
For a new type of fuel pump, you need a 10mm socket and a ratchet, similarly unscrew the ring in a circle and press out the fuel line clamps.
We recommend: How to check the expansion tank plug
Performance check
Checking its performance will help make sure that the fuel pump has failed. For this you will need:
- screwdriver with Phillips bit;
- a piece of gas-resistant hose (50–80 cm) with a clamp;
- key to 17;
- empty 2 liter plastic bottle;
- a piece of insulated wire;
- stopwatch.
Performance testing is carried out as follows:
- We remove the back seat. We lift the carpet and find the gas tank hatch under it. Unscrew the two screws (diagonally).
- Once you remove the hatch, you will see the top of the fuel module. Using a 17 wrench, unscrew the nut of the outlet fitting. We put a hose on it and secure the connection with a clamp. We lower the other end of the hose into an empty bottle.
- Disconnect the pump power connector. Using a piece of wire, we supply power to the positive contact of the device from the corresponding battery terminal. We connect the negative one to ground.
- We begin counting the time from the moment the pump starts.
A working fuel injection pump for a VAZ 2110/2112 should pump 1.5 liters of fuel in one minute. If this indicator is lower, the pump must be replaced.
Replacing the fuel pump on a VAZ 2110 injector
Before replacing the fuel pump on a VAZ 2110 with an injector injection system, you should prepare a new spare part and the tools necessary for the job. With the right approach, the procedure itself will not take much time, 20–30 minutes, a maximum of an hour if things don’t go quite smoothly.
Tools
The set of tools for replacing a fuel pump is small, but should be on hand so that during the repair process you don’t have to run around and look for a suitable wrench or screwdriver.
When dismantling and installing a new fuel pump you will need:
- a wrench for loosening the terminals on the battery, the size depends on the installed fasteners;
- flathead and Phillips screwdrivers;
- key to 17;
- tubular wrench or deep socket 7 with ratchet or wrench.
Having prepared the tool and a new part, you can begin metalwork.
How to choose a new part
The standard fuel pump installed on injection engines has catalog number 2112-1139009. If desired, you can replace it with a similar part from other manufacturers. In some cases, such a choice will be dictated by the greater reliability of analogues, in others - by relatively affordable cost.
The following are offered for replacement:
- Bosch 0 560 454 035, which has higher quality and wear resistance;
- Fenox EFM33006O7 with low cost;
- Ween 192-0262, inexpensive like Fenox;
- Pekar 2112-1139009 - will be slightly more expensive than the previous ones, but cheaper than the original;
- ATS 53453 has a higher cost, but car owners do not complain about the quality.
Which one is better, the car owner will have to choose on his own, based on his own preferences, requests, and availability of funds.
Removing the old fuel pump
The procedure for dismantling the VAZ ten electric fuel pump is standard for the entire family of the series.
Step by step steps to eliminate the faulty part:
- The terminal on the battery is disconnected.
- The pressure in the fuel system is checked and, if necessary, released through a special valve on the ramp, covered with a protective cap.
- The rear seat cushion is removed and the trimmed part of the carpet is moved away.
- The hatch cover is retracted to the side. To do this, unscrew two mounting screws.
- The power supply is disconnected by separating the wire block from the connector.
- The fuel line clamp is loosened or removed.
- Use a key to unscrew the two lines from the fuel pump.
- The gaskets at the ends of the fuel lines must be replaced.
- The 8 fastening bolts are unscrewed.
- The pressure ring is removed and the fuel pump housing is carefully pulled out.
- The seal is removed and inspected. If necessary, it is replaced.
Particular attention should be paid to compliance with safety regulations, including fire safety.
Installing a new
Installation of a new electric fuel pump is carried out in the reverse order.
The following actions are performed sequentially:
- The seal is installed.
- The new pump is carefully inserted.
- The pressure ring is installed and 8 fastening bolts are tightened.
- The fuel lines are screwed on.
- The power supply is connected to the connector.
- The hatch cover is installed and closed with the folded carpet flap.
- The rear seat cushion is installed.
- The battery terminals are connected.
When installing, remember that the arrow stamped on the housing must be directed backwards.