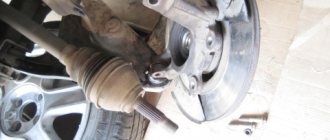
When a bearing fails, it begins to “hum” at speed. And that means it needs to be changed. Replacing the front wheel bearing on a Renault Logan consists of two steps: remove the steering knuckle, press out the hub and bearing. The second operation is the most difficult. It must be carried out using special tools. As for the rear hubs, the bearings are pressed into the drums. The drum is easy to remove, but getting the bearing out of it will not be easy. Let's consider all the steps in order.
How to understand that a wheel bearing needs to be replaced on a Renault Logan
Of course, the part is very, very specific, and replacement is not easy, so before work you should make sure that the problem lies in this particular unit. There are several options for how a wheel bearing can manifest itself and it’s time to change it:
- Noise at speeds of 80 km/h. This is the most typical symptom that indicates a bearing.
- Knock on small bumps. This means that the bearing has already died and is about to jam; there is no need to delay replacing it.
- The car begins to “run” along the road. It becomes difficult to catch it, the whole point is that the bearing begins to play.
To check it, we drive the car onto a flat surface, place rollers under the rear wheel on both sides so that when the front wheel is lifted, our Logan does not go anywhere. After lifting, we swing the wheel in different directions, the bearing will immediately show itself. It is advisable to watch together, so that one wanders and the other looks, because it is problematic to perform this operation alone without a certain skill.
Symptoms of failure
Owners of Renault Logan 1st generation identify faulty wheel bearings based on the following symptoms :
- While driving, a dry crunching sound is heard from the wheels. This means that the bearing rollers move along the broken cage, their location is uneven. The sound of rolling spherical elements is clearly audible in the cabin; it cannot be confused with something else. This is the first of the symptoms; if it occurs, you should not delay repairs.
- When the clip wears out more, vibration appears , which is transmitted first to the steering wheel, and then to the entire body of Logan 1. This state of affairs becomes dangerous; at any moment the wheel can jam , which will lead to dire consequences. In this case, it is better not to tempt fate and replace the failed hub element.
- When driving, Renault Logan pulls to the side , you have to constantly steer , as this happens when the wheel alignment is done incorrectly. This happens because the bearing of one of the wheels is faulty and is slightly jammed.
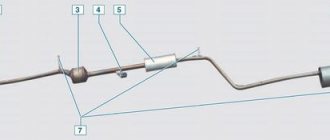
1 — steering knuckle;
2 — mounting ring for wheel speed sensor (on a car without ABS it is not present); 3 — hub bearing; 4 - retaining ring; 5 - wheel hub All three cases are almost guaranteed to indicate problems in the hub. As soon as at least one of the signs appears, urgently go to repair your Renault Logan 1.
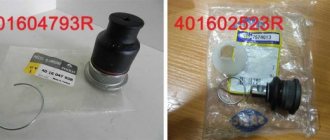
Analogs
There are a number of analogues that can and are recommended to be installed on Renault Logan instead of the original factory bearing. As for quality, those listed below are in no way inferior to those made at the manufacturer.
So, first, let's look at analogues of the wheel bearing for Renault Logan with ABS function:
| Manufacturer's name | Catalog number | Average price in rub. in the Russian Federation |
| Dello | 30600105470686 | 900 |
| Denckermann | W413279 | 1200 |
| Master-sport | 6561-SET-MS | 1350 |
| Automotor France | ABR5580 | 1400 |
| Breckner | BK26004 | 1500 |
| Bta | H1R026BTA | 1650 |
| Asam | 30454 | 1750 |
| SCT | SCP 6561 | 1750 |
| Mapco | 26150 | 1800 |
| Hans Pries | 700 546 755 | 2000 |
| ABS | 202027 | 2100 |
| SNR | XGB.41371.R00 | 2100 |
| Kraft Automotive | 4105029 | 2600 |
| Optimal | 701 837 | 3000 |
| Stellox | 43-28402-SX | 3000 |
| Febi | 26887 | 3300 |
| Ruville | 5584 | 3600 |
| SWAG | 60 92 6887 | 6300 |
Thus, it can be seen that there are quite a few analogues that can be installed in place of the factory front wheel bearing with ABS.
Now, let's look at the list of analogues that do not have ABS:
| Manufacturer's name | Catalog number | Average price in rub. in the Russian Federation |
| Kamoka | 5600006 | 850 |
| Bta | H1R006BTA | 860 |
| Febest | DAC37720037-KIT | 875 |
| Dello | 30770102050779 | 880 |
| N.K. | 753910 | 900 |
| Cx | CX 101 | 960 |
| Denckermann | W413235 | 1000 |
| Kraft Automotive | 4105125 | 1000 |
| Starline | LO 03596 | 1100 |
| Breckner | BK26001 | 1200 |
| Master-sport | 3596-SET-MS | 1300 |
| Meyle | 16-14 309 0353 | 1300 |
| ABS | 200002 | 1300 |
| Febi | 05528 | 1300 |
| Outlog | RS1041 | 1300 |
| Optimal | 700 310 | 1300 |
| Ashika | 44-11001 | 1400 |
| Denckermann | W413088 | 1500 |
| Ruville | 5516 | 1600 |
| SWAG | 60 90 5528 | 1600 |
| Coram | CR016ZZ | 3000 |
There are also a lot of analogues of the factory front wheel bearing without ABS and plenty to choose from. As can be seen from the table, the main pricing policy fluctuates around 1,300 rubles, which is cheaper than the original part.
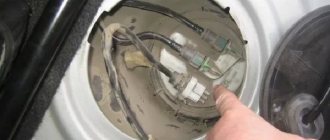
Rear hub
The rear wheel bearing on Renault Logan is double-row, roller. The part comes in two types. The difference is the physical dimensions.
Dimensions
For cars assembled before 2013
| External diameter, mm | Inner diameter, mm | Length, mm |
| 52 | 25 | 37 |
For cars assembled since 2013
| External diameter, mm | Inner diameter, mm | Length, mm |
| 55 | 25 | 43 |
There are no design differences due to the presence of an anti-lock braking system.
Life time
The original rear wheel bearings are designed to last more than 100 thousand kilometers on average roads.
Articles of original spare parts
In the catalog of original parts, the rear wheel bearings for Renault Logan are indicated by the following codes:
| vendor code | Note | average price |
| 77 01 205 812 | For cars assembled before 2013 | 1824 |
| 77 01 205 596 77 01 210 004 | For cars assembled from 2013 (inclusive) | 2496 3795 |
Analogs
You can get original spare parts cheaper if you purchase SNR products:
- for cars manufactured before 2013 - FC 40570 S06;
- for cars manufactured since 2013 - FC 41795 S01.
Other replacement options with prices are shown in the table.
For cars assembled before 2013
| Manufacturer | vendor code | average price |
| ABS | 200004 | 1641 |
| ASAM SA | 30450 | 820 |
| AUTOMEGA DELLO | 110108710 | 1553 |
| BAUTLER | BTLB406 | 906 |
| BRECKNER | BK26202 | 636 |
| BTA | H2R002BTA | 1294 |
| CAR BEARINGS | GHK045L028 | 518 |
| CORAM | CR025 | 567 |
| CX | CX597 | 1099 |
| DENCKERMANN | W413092 | 2006 |
| DODA | 1060200284 | 825 |
| ERSUS | ES7701205812 | 687 |
| ESPRA | ES138504 | 847 |
| EURO REPAR | 1623954980 | 1341 |
| F.A.G. | 713630300 | 1501 |
| FEBEST | DAC25520037KIT | 879 |
| FEBI | 5538 | 1112 |
| FLENNOR | FR791201 | 1220 |
| FRANCECAR | FCR210243 | 1487 |
| GALLANT | GLBE111 | 628 |
| GMB | GH025030 | 960 |
| IBERIS | IB4256 | 901 |
| IPD | 303030 | 1503 |
| JD | JEW0098 | 585 |
| KLAXCAR FRANCE | 22002Z | 1318 |
| LYNX | WB1173 | 1140 |
| MAGNETI MARELLI | 361111181790 | 2246 |
| MAPCO | 26102 | 921 |
| MEYLE | 16146500001 | 1845 |
| MOOG | REWB11479 | 1692 |
| NDM | 1000053 | 726 |
| NIPPARTS | N4711064 | 1030 |
| NPA | NP51103522 | 673 |
| NTY | KLTNS071 | 1079 |
| OPTIMAL | 702312S | 1122 |
| PEX | 160660 | 932 |
| PILENGA | PWP3525 | 645 |
| PROFIT | 25013525 | 625 |
| PROFIT | 25010869 | 691 |
| QML | WB0516 | 1116 |
| SAT | ST7701205812 | 928 |
| SFEC | GR000431 | 819 |
| SKF | VKBA3525 | 1429 |
| STELLOX | 4328020SX | 817 |
| SWAG | 60905538 | 1092 |
| TORK | TRK0592 | 690 |
| TORQUE | DAC25520037 | 978 |
| TRIALLI | CS908 | 1008 |
| TRIXET | D1004BR | 1394 |
| WENDERW | WEPK004 | 585 |
| ZEKKERT | RL1135 | 866 |
For cars assembled since 2013
| Manufacturer | vendor code | average price |
| ABS | 200010 | 1466 |
| ASAM SA | 70820 | 1177 |
| AUTOMOTOR FRANCE | ABR1558 | 801 |
| BTA | H2R016BTA | 1574 |
| CORAM | CR038 | 1144 |
| CX | CX102 | 1028 |
| F.A.G. | 713630050 | 3222 |
| FEBEST | DAC25550043KIT | 1442 |
| FEBI | 5526 | 1085 |
| FLENNOR | FR790296 | 2285 |
| GALLANT | GLBE114 | 762 |
| GMB | GH0048R5 | 1004 |
| GSP | GK0976 | 1088 |
| ILJIN | IJ231001 | 1953 |
| IPD | 303027 | 1684 |
| JD | JEW0079 | 690 |
| KLAXCAR FRANCE | 22007Z | 1235 |
| MAPCO | 26124 | 1341 |
| MEYLE | 16146500008 | 2294 |
| MOOG | REWB11451 | 2080 |
| N.K. | 753918 | 1479 |
| NTY | KLTRE016 | 903 |
| OPTIMAL | 702426 | 2072 |
| PATRON | PBK6658 | 1177 |
| PROFIT | 25010976 | 884 |
| SCHIGERD | SCH293 | 500 |
| SFEC | GF000564 | 999 |
| SKF | VKBA3495 | 3249 |
| SKF | VKBA6658 | 2118 |
| SKF | VKBA976 | 2082 |
| STARLINE | L000976 | 1350 |
| STARMANN | RS7307 | 1413 |
| STELLOX | 4328037SX | 765 |
| SWAG | 60919897 | 1934 |
Self-replacement
Necessary tool
- 30 mm socket head;
- knob 0.5-1 m long;
- wheel chocks;
- jack;
- car stand;
- wheel wrench;
- screwdriver;
- vice;
- circlip pliers;
- cup puller.
Video of bearing replacement for Renault Logan
A more accessible process can be seen in the video. The entire repair is shown in detail, from removing the hub to pressing in the bearing. Operations are performed with specialist comments:
Note:
In order to replace the front bearing and not perform a wheel alignment after that (without a wheel alignment), it is necessary to remove the Renault Logan front strut assembly with the steering knuckle, additionally unscrewing the swing arm and the upper support bolts under the hood. For information on how to remove the front strut from a Renault Logan, read the article on replacing the upper support.
Front suspension
General view of the front suspension structure: 1 — suspension subframe; 2 — suspension arm with silent blocks and ball joint; 3 — steering knuckle with hub and bearing; 4 — shock absorber strut; 5 — anti-roll bar
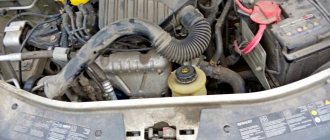
It uses independent suspension and MacPherson-type front struts, consisting of springs and telescopic shock absorbers, which are designed to dampen wheel vibrations when driving without transmitting them to the body. The shock absorber strut is attached to the body at its upper end through a rubber-metal base, and at the bottom to the front hub using a welded bracket and two bolts.
Bearings, calipers and brake discs are installed on the outside of the hub. The front hubs are attached to the lower control arms via ball joints. The shock absorber is located in the shock absorber. In the middle of the shock-absorbing strut there is attached a thrust cup, into which a twisted shock-absorbing spring placed on the strut rests. The top of the tire also rests against the support cup.
Renault Logan front suspension structure (view on the car): Front shock absorber strut structure: General view of the front suspension subframe:
The subframe, which is like a suspension frame, is attached to the car body with four power bolts. At the rear, brackets (5) are attached to the subframe for attaching the anti-roll bar. The suspension arm (1) is attached to the subframe with two bolts (3).
Front suspension arm: Anti-roll bar:
The stabilizer bar (7) of the transverse stability has a bent shape and is made of special steel. Using brackets and rubber pads (8,9) it is attached to the subframe. Its ends are connected to the suspension arm.
Front wheel hub assembly:
The wheel bearings installed on models with ABS are different from the bearings on models without ABS, and cannot be interchanged. The bearing nuts are the same.
https://www.youtube.com/watch?v=tA18P6ihPcc
Wheel bearings wear out over time, which can lead to poor handling. Raise the car on a lift. Check for free play in the bearings by trying to move the wheel back and forth on the hub. Also turn the wheel and make sure that it rotates smoothly without jamming.
Bearing replacement
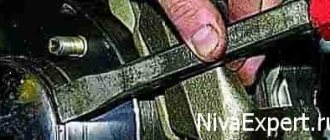
To remove the old bearing, you must first remove the retaining ring. Use tongs.
Remove the ring and knock out the bearing
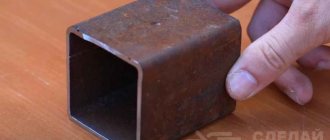
The bearing itself can be knocked out, for which the drum is placed with the flat side down. Use, for example, a board with a round notch. The diameter of the mandrel that will be needed here is 49 mm.
Currently reading: Why the Renault Logan engine does not start: looking for the reason
The seat for the new bearing is cleaned and lubricated (litol, cyatim). The drum should be facing up. Pressing is carried out using a mandrel. In this case, it can only touch the “outer” ring of the bearing.
Anyone who violates the last requirement will have to buy another bearing. The first step uses snap ring pliers. The main thing is to be able to return the “stopper” to its place!
Bearing replacement - sequence of operations:
- Use a wrench or wrench to loosen the wheel bolt.
- Then loosen the hub locknut.
- We jack up the car, completely tighten the wheel bolts with a wrench and remove the wheel. IMPORTANT: for the safety of the work, it is recommended to first loosen the nuts and only then lift the car with a jack.
- Now remove the block. We unscrew the two nuts with an 18mm wrench, then loosen the pads with a screwdriver, inserting it inside the caliper.
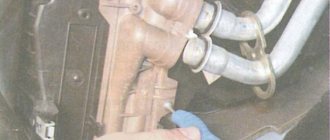
- Next, loosen the bolt with a 16mm wrench that holds the steering tip. Then we knock it out with a hammer or use a puller for the steering tips. Then immediately unscrew the two bolts with an 18mm wrench, which secure the fist to the stand.
- We release the ball joint from the fastening.
- Now we completely twist all the steering knuckle fasteners with a wrench, using an extension on the wrench.
- Remove the ball and steering rod from the knuckle.
- Then we dismantle the entire rotating mechanism.
- We remove the brake disc, then we will work on the hub itself.
- We clamp the body of the turning mechanism in a vice, now press out the hub with a puller or knock it out using an attachment in the form of a removable head from a key, or use a press.
- We remove the element from the fist, one of the inner rings will remain on it, the rest will remain inside the body.
- We dismantle the protective washer from the p/sh.
- We dismantle the inner race; to do this, we move the race with a chisel to engage the puller.
- We tighten the clip with a puller.
Advice:
If you don't have such a puller, do it differently. Using a grinder with a small disk, you can trim the holder on the hub and split it with a chisel.
- Now we remove the remaining parts of the old part. Let's start with the retaining ring and remove it this way.
- All that remains is to knock out the outer race, as was done before, or use a puller.
Or in this way, through instruction (for more details, see the end of the article).
- Then we clean the mounting surfaces from dirt and wipe the parts with a rag. The seating surfaces must be lubricated; Litol is used for this.
- We are starting to install the new product. First, install the sensor washer from the anti-lock system, as in the photo.
It is important to know:
When installing the bearing, orient its end with the black magnetic stripe towards the anti-lock braking system sensor holder.
- Insert the ring correctly, the photo shows the required alignment. Sensor holder 1 is opposite a special groove in the steering knuckle 2.
- We fit the new bearing into the mounting hole, evenly, without distortions. Using a manual puller, we press the part into the body, or we hammer it with uniform blows through the attachment in a vice.
- The next step is to install a retaining ring in the knuckle body.
- Now we press the hub into the new bearing until it stops (into the hole).
- We assemble the unit in reverse order. After installing the outer snap ring and hub, we attach the brake rotor and screw the knuckle in place to the strut, ball joint and tie rod. At this point the replacement is considered complete.
- After assembly, check the smooth rotation of the wheel; noise and bearing play should disappear.
- To ensure that there is no play, the installed bearing is adjusted according to the axial clearance.
- It is recommended to do a wheel alignment, as the bolts on the strut were unscrewed.
It is important to know:
When pressing, the forces of the puller or press, or impacts through the attachment, should be directed only at the end of the outer race of the new part.
Tools:
- wheel bolt wrench
- head at thirty, eighteen, sixteen
- key for eighteen, sixteen
- power wrench
- penetrating lubricant
- jack
- flat screwdriver
- wire
- hammer
- Torx T40
- flat screwdriver (impact)
You do not have any of the above tools, I recommend buying a tool from the manufacturer Jonnesway https://jonnesway-ukraine.com.ua/kljuchi/razvodnye/
How not to miss the moment of changing the wheel bearing on Logan
These elements of the front suspension are subject to extreme loads throughout the entire operating period. And it's not just the poor road surface; temperature changes, chemical reagents and moisture also cause a reduction in the service life of the part.
A certain part of motorists, who consider themselves experienced, prefer to change the rolling unit after 60-80 thousand kilometers. They explain this decision by the important role of ball bearings in the process of driving a car, because any minor breakdown of the structure can lead to an accident.
It goes without saying that experienced car enthusiasts accept conclusions about replacing a faulty front wheel bearing on a Renault Logan after certain diagnostic operations:
- Raise the front wheels one by one using a jack.
- By rotating the wheel, determine the presence of extraneous noise; if it is present, this may indicate a breakdown of the rolling unit.
- Take the wheel in your hands and shake it horizontally and then vertically. The presence of significant play indicates a faulty ball bearing.
Currently reading: Renault Logan 1.6 8 valve engine
While driving, it is important to pay attention to the appearance of a hum when turning; its presence indicates the initial stage of destruction of the part. In the case where noise in the area of the hub rolling unit is present even when driving on a straight section of the road, you should not delay it and urgently attend to replacing it.
Diagnostics of the ball joint condition
Symptoms of the need to pay attention to the Largus ball joint are:
- there was a need to apply additional force when turning the steering wheel;
- driving over bumps, for example, a speed bump, is accompanied by a knocking sound from the front suspension;
- Uneven tire wear was detected;
- entering a turn is accompanied by extraneous sounds coming from the wheel arches;
- the steering wheel turns with a creaking or grinding sound;
- the car has become less obedient when entering a turn;
- When driving over bumps, controllability partially decreased and the car became unstable.
If you have the above symptoms, it is recommended to use the following algorithm for finding a ball fault.
- Hang it in front of Largus.
- Take the tire from above and below.
- Check that there is no play. To do this, you need to shake the wheel in a vertical plane. It should be borne in mind that the cause of movement may be not only the ball joint, but also worn steering tips or stabilizer links.
The main load-bearing element of the ball joint is the pin. It is made of high carbon steel. On one side of the finger there is a sphere, which is located in a metal case. It is filled with polymer or grease. To prevent moisture, dirt and dust from entering, a protective cuff is placed on top. Abrasive particles and water pass through the boot freely if it is damaged. The sphere and its seat are subject to intense wear, and the lubricant dilutes and ceases to perform its functions
Therefore, when diagnosing a ball, it is important to pay attention to the condition of the boot. If cracks, punctures, holes or other holes are found, the support must be replaced.
Short recommendations
When choosing a new part to replace the front wheel bearing for a Renault Logan car, carefully study the condition of the packaging and the presence of preservation lubricant. It is important that the part does not jam when rotating. There should be no traces of corrosion on the body; the same recommendations apply when changing the Logan support ball bearing. It is better to purchase spare parts in certified stores, and a price below 1,500 rubles should be alarming.
During repairs, it is worth checking the condition of all elements of the front suspension. Socket heads can be used as mandrels. If you have doubts about your abilities, then it is better to entrust the stage of pressing the ball bearing to the masters. After the repair, the wheel alignment needs to be adjusted at a service center.
Bearing installation
First, the bearing is pressed in, then the retaining ring is installed, and then the hub is pressed in. In this case, a screw puller or a hammer and mandrels are used.
Tips for the ABS version
For trim levels with ABS, there are rules:
- Before installing the bearing, the sensor ring is installed. The legs of the ring “look” inward;
- Grooves 1 and 2 must match (see photo);
- The magnet on the bearing should “look” inside the fist.
What needs to be done before replacing a Renault Logan wheel bearing? It is advisable to clean the bearing seat. The hub also needs to be prepared: the burrs left from the chisel are ground off with a needle file. Be sure to apply lubricant (lithol, etc.).
Front axle
Replacing the Renault Logan front strut support and bearing
How is the wheel bearing replaced on the front axle? The Renault Logan is jacked up on one side with its own hands. You also need to unscrew the hub nut. In general, the replacement process is almost no different from the previous case, but there are some nuances here. For example, to remove a bearing you need to disassemble the steering knuckle.
This can be done using a standard set of keys and sockets. After removal, the steering knuckle is clamped in a vice. Next, use a hammer to carefully knock out the hub. To avoid damaging the element, use a mandrel of the appropriate diameter. Having taken out the hub, we will find part of the inner ring on it. We are also replacing it with a new one.
Next, the bearing is pressed out, followed by its replacement and installation. As in the previous case, the seat is thoroughly cleaned and treated with lithol. The fist socket is also coated with lubricant. After installing the part, the hub is pressed in until it stops. The inner ring is supported by a stand. The steering knuckle is installed in the reverse order. After completing the work, check the correct installation and reliability of pressing of the elements. The caps must be carefully secured and the wheels must be parallel to each other. Otherwise, rolls are possible when turning.
Direct repair and replacement of the front wheel bearing on a Renault Logan 1.4-1.6
Before replacing the bearing, familiarize yourself with the design of the front suspension and bearing assembly.
- Steering knuckle housing;
- ABS sensor holder;
- Replacement part (ball bearing);
- Retaining ring;
- Front hub.
We prepare the tool according to the list:
- A set of locksmith wrenches and sockets;
- Screwdriver, hammer;
- Round nose pliers, vice;
- Puller (if possible);
- Torque wrench (optional).
Bearing in the front hub
The process of replacing the front wheel bearing is labor-intensive and requires certain knowledge and skills. So, you will need quite a lot of tools: a set of large heads, screwdrivers and keys, as well as a medium-sized crowbar and two jacks. It is worth noting that the process of replacing a bearing with and without ABS is almost no different. For cars without ABS there is no hole for the speed sensor.
At the first stage, remove the wheel: engage the handbrake and first gear, unscrew the hub nut (key “30”). Loosen the four screws, and then use the jack.
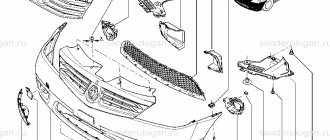
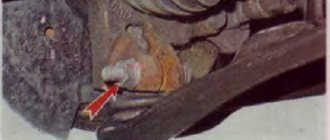
Replacing a Renault Logan wheel bearing is not complete without removing the wheel arch liner. First, remove the bumper shield (two pistons and three screws). Then you need to get to the point marked by the arrow.
All fender liner mounting points
When the piston at the “important point” is removed, go through the remaining elements. These are four screws (1 and 2), two pistons in the front, as well as a self-tapping screw and pistons near the mudguard.
To remove the plastic, you will need a Torx key (T20 and T30), as well as a flat-head screwdriver.
In configurations with ABS, the following steps are carried out: disconnect the connector, remove the cord from the grooves (see photo), disconnect and remove the sensor.
The cord must be taken out of three grooves
All that remains is to remove the steering knuckle. But this operation is a long one.
How to replace it yourself?
Having understood the types of bearings for Logan and the selection of spare parts for replacement, you can move on to repairs. Below we describe in detail how to replace the front bearing on a Renault Logan.
Attention! On Renault Logan equipped with ABS, only a bearing with a magnetic ring should be installed. Otherwise, the ABS sensor will not be able to work correctly.
Before carrying out the operation, you need to stop the car using locking stops or a handbrake. To work, you will need a set of tools - they are listed below.
Tools:
- chisel;
- vice;
- jack;
- hammer;
- Torx T 30 and T 40;
- mandrel 49mm;
- pliers to remove retaining rings;
- keys and sockets 13, 16, 17, 18 and 30 mm;
- lubricant (Litol-24 is suitable).
Bearing replacement:
- Using a 30 mm socket, unscrew the lock nut located in the central part of the wheel, then loosen the wheel rim fastenings.
- Place a jack under the hood so that the two front wheels are in the air.
- Remove the wheels.
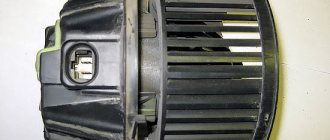
- Remove the wheel speed sensor by loosening the clip and unfastening the pad.
- Using keys 13 and 18, remove the guide with the caliper from the brake pads, then attach the latter to the suspension spring.
- Torx T 40, unscrew a pair of hub screws holding the brake disc, then remove the element (the parking brake must be released).
- Remove the fastening elements of the shield from Torx T 30 and remove it.
- Having secured the pin with a T 30 wrench, remove the nut that holds the tip hinge on the knuckle lever (16 wrench). Remove the finger from the lever with a special tool or an ordinary hammer.
- Remove the nut and bolt that connect the steering knuckle to the ball joint. Remove the ball pin from the steering knuckle.
- Remove the steering knuckle from the bracket by unscrewing its fasteners, then remove the spare part along with the hub.
For further work, a vice is needed, and it is better to carry out all manipulations indoors - for example, in a garage. It will be necessary to press out the parts. This is a rather labor-intensive process, and to carry it out you can contact a car service specialist.
If you decide to act on your own, follow the instructions below.
Continuation of work:
- Clamp the fist with a vice, then press out the hub by hitting the end part with a hammer (this is done through a mandrel/head of the required size). The inner ring cannot be removed.
- Using a flat-head screwdriver, engage the protective washer of the bearing seal and remove the part.
- Clamp the hub flange in a vice, install the chisel in the gap between the ends of the ring and the hub.
- Hit the chisel with a hammer, pushing the inner bearing race away from the hub.
- When sufficient clearance appears, remove the inner ring with a puller.
- Using pliers, remove the retaining ring of the rolling unit.
- Press the ball bearing out of the knuckle using a cup puller or a mandrel with a hammer.
- Remove dirt from the seat and, if possible, treat it with a file. Place the sensor mounting ring in the steering knuckle so that its tabs are directed inward. The sensor holder should fit into the groove of the knuckle.
- Lubricate the hole, install the support washer with the cup puller screw.
- Place the bearing in the knuckle connector and place the puller cup on the end part.
- Press in the new spare part so that the puller washer rests on the fist.
- Place the retaining ring and press the hub into the bearing - the puller cup rests against the inner end. rings.
- Carry out further steps in reverse order.
The principle of replacing a car's rear wheel bearing is largely similar.
We looked at how to replace the wheel bearing on a Renault Logan - using the instructions provided, you can make the replacement yourself. The replaced spare part should not jam during rotation and there should be no play
Also, during the work process, it is recommended to pay attention to the degree of wear of other parts of the front suspension - if they are severely damaged, they should also be replaced
Front wheel bearing dimensions
Sometimes there are cases when it is impossible to buy a bearing and sellers offer to name the size in order to choose the right one. 90% of motorists do not even know how it is calculated and that such a criterion exists.
Currently reading: Car diagram - Renault Logan
Also, some manufacturers offer hardened bearings, which have a significantly longer service life. A standard part can travel up to 30,000 km, but the hardened version can last up to 50 thousand km.
So, the size of the front wheel bearing is 37x72x37 mm.
Thus, you can find and select an analogue for installation on Renault Logan.
Subtleties of crimping
The Renault Logan wheel bearing puller looks the same as the puller for AZLK-2141. The drawing is presented below.
Special tools from the AZLK plant
When working, follow two rules:
- When you press the bearing into your fist, cup 3 (72 mm) presses on the bearing;
- If the hub is being pressure tested, cup 4 (62 mm) is used.
In the first case, the spacer rests on the fist. In the second, it puts pressure on the hub.
The same thing needs to be done when working with mandrels. First, the mandrel presses on the “outer” ring, and when crimping the hub, on the “inner” one. Do the opposite and the bearing will fail.
Parts Specification
First of all, you need to choose the right bearing. To do this, you need to know the article number of the Renault Logan wheel bearing. Cars with and without ABS will require different bearings. In the first case, in place of the rubber seal of the bearing there is a special magnetic strip, which is not on the bearing for a car without ABS. If such a bearing is installed on a car with an anti-lock braking system, the ABS will not work, as indicated by the corresponding indicator on the panel.
Removing the bearing
Using a vice and a thin mandrel, you will need to knock out the hub (see figure). In this case, the bearing is destroyed.
The old bearing will be destroyed
The outer bearing race is then knocked out of the knuckle. But first remove the retaining ring.
Let's consider all the steps in order:
- We separate the hub and fist (mandrel d=36.5);
- Using circlip pliers, remove the ring from the knuckle recess;
- We use a d=65 mandrel to knock out the outer ring.
Each step has a photo.
We got rid of the bearing by half
Now let's remove the extra part from our hub.
First, remove the washer covering the rubber seal. Next, move the bearing ring using a hammer and chisel.
Down with the other half of the bearing
At the last stage you will have to use a puller.
Step-by-step instruction
1. While the car is on wheels, tear off the wheel nut on the side where you will change the bearing. Thirty head nut. The tightening force is quite large, so take a more powerful wrench.
You can also spray the nut with penetrating lubricant before unscrewing it.
2. We tear off the wheel bolts, jack it up, unscrew the bolts and remove the wheel.
3. Completely unscrew the hub nut.
4. If you have a car with ABS, then you need to disable the sensor. We take out the sensor; it is attached to a spring.
For convenience, bend the ABS wire mounting bracket slightly upward.
5. Now we need to unscrew the steering tip and move it to the side. We showed this earlier.
6. Now we need to remove the brake caliper. We spread the pads using a flat screwdriver (do not press the screwdriver into the working surface of the pad).
7. Unscrew the two bolts securing the caliper bracket from the rear and remove it. Eighteen head bolts.
After removing the caliper, we tie it to the rack with a wire.
8. Unscrew the two screws securing the brake disc and remove it. Fasteners for Torx T40.
The screws must first be tapped with a hammer through the adapter and sprayed with penetrating lubricant.
9. Often, after unscrewing the brake disc mounting screws, it does not come off. In this case, gently tap with a hammer and it will come off.
10. Unscrew the nuts securing the knuckle to the strut. We hold the head of the bolt with an eighteen key, and unscrew it with a wrench with a head.
We don't remove the bolts yet.
11. Unscrew the bolt securing the ball joint. We hold the head of the bolt with a sixteen key and unscrew the nut using a wrench with a head.
After unscrewing the nut, remove the bolt. Often the bolt gets very stuck. Spray with penetrating lubricant, place the socket and knob on the bolt head and twist back and forth for several minutes. After such manipulations, the bolt should come out.
12. Remove the ball pin from the fist. We hammer the wedge into the cut where the ball pin is inserted, and then, by hitting the lever with a hammer, the pin should come out.
13. Remove the drive from the hub. If it gets stuck, spray it with penetrating lubricant and lightly help with a hammer.
14. We take out the bolts securing the hub to the rack and we have it in our hands.
15. It is advisable to unscrew the protective casing; it is secured with three bolts. When unscrewing, these bolts often break, so if you can press out the bearing without removing the casing, do not remove it.
16. Next are two options. First, take the hub to a service center and the guys at the press will change the bearing in ten minutes and not for a lot of money. Second, try to press and press the bearing in a vice yourself.
If you choose the second option, I want to tell you a few nuances. You will need to select various spacers and mandrels to replace the bearing in a vice. First you need to press out the hub. After pressing out, usually the inner race of the bearing remains on the hub. You can carefully trim it with a grinder and split it with a chisel.
The bearing must be pressed out and pressed through the outer part. There are also nuances to pressing the bearing if you have a Logan with ABS. I recommend watching the video lesson from 8 minutes in more detail.
When you press the hub, you need to focus on the inner race.
After replacing the bearing, reassemble in the reverse order. If you have any questions, please ask them in the comments.
Video lesson
Price of a new Renault Logan hub element
A reliable manufacturer is the FAG plant, whose products cost from 2,500 rubles. up to 5000 rub. The next price segment is from 1,700 rubles. up to 2500 rub. For this price you can buy a high-quality or poor-quality bearing, depending on your luck. Better manufacturers: SNR, SWAG, NTN. As a rule, bearings with ABS are 1.5-2 times more expensive.
No.Manufacturer / CountryArticle (catalog number)Price 2020, RURFeaturesSnap ringBearingHub mounting boltsInstructions
| 1 | FAG Germany Analog | 713 6300 30 (without ABS) 713 8013 10 (with ABS) | 1400, 3800 | — | — |
| 2 | FEBI Germany Analog | 24315 (with ABS) | 3000 | — | — |
| 3 | SKF Sweden Analog | VKBA 3596 (without ABS) | 1400 | — |