Replacing Daewoo Nexia drive belts - complete instructions with photos
Replacing Daewoo Nexia belts is not a complicated procedure that can be easily done on your own.
Daewoo Nexia has two drive belts. One belt is responsible for driving the generator and power steering pump, the second is responsible for the air conditioning compressor. The generator belt on the Nexia is tensioned by moving the generator, but to tension the air conditioning compressor you will have to tension a special roller. The manufacturer itself requires replacing drive belts every 60 thousand kilometers. See below for all instructions with details and photographs. If the alternator belt is not replaced in time, the battery will not receive the necessary amount of energy for normal operation. Over time, this can simply “kill” the battery. An undercharged battery will not last long. And if the cause of the battery discharge is not eliminated, it will have to be thrown away or recycled. In any case, unnecessary financial costs that no one needs.
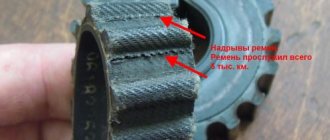
The first sign of wear on the Nexia belt is a characteristic squealing sound from under the hood. If tensioning the belt does not give any results, then it is time to change the belt. The belt also needs to be replaced if peeling, fraying or cracking of the rubber appears. To replace the alternator belt , which is also responsible for rotating the power steering pump pulley, we perform the following operations:
We check the tension of the generator belt (when you press your finger on the belt between the generator and power steering pump pulleys with a force of about 10 kg/s, the belt deflection should be no more than 10-15 mm).
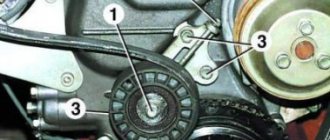
To tension the belt, use a 12mm spanner to loosen the bolt securing the generator to the tension bar, see photo below.
Using a 12mm spanner, loosen the nut of the lower mounting bolt of the generator, holding the bolt from turning with a wrench of the same size.
We insert the mounting blade between the generator housing and the cylinder block boss under the coolant pump. Use a spatula to move the generator away from the cylinder block, tensioning the belt.
When replacing the alternator drive belt and power steering pump on a Daewoo Nexia equipped with an air conditioning system, you will first need to remove the air conditioning compressor drive belt.
To replace the belt, move the generator to the cylinder block with the upper and lower mountings of the generator loosened and remove the belt from the generator pulleys, crankshaft and power steering pump.
Install the belt in reverse order.
Replacing the Daewoo Nexia air conditioner belt is carried out in a pit or overpass, since access to this part of the auxiliary drive is only from the bottom of the machine.
Remove the right mudguard from the engine compartment. First of all, check the tension of the air conditioning compressor drive belt.
When you press your finger on the belt between the crankshaft and compressor pulleys with a force of about 10 kg/s, the belt deflection should be no more than 5-8 mm.
To tension the belt, use a 14mm spanner to loosen the nut securing the tension roller axis. See the photo below for clarity.
Using a 12mm spanner, rotate the adjusting bolt clockwise to tighten the belt.
After tensioning the belt, tighten the nut securing the tension roller axis.
To replace the Daewoo Nexia air conditioning belt, loosen its tension by rotating the adjusting bolt counterclockwise with the nut securing the tension roller axis loosened.
Now we can easily remove the belt from the pulleys.
Install the belt and mudguard of the engine compartment in the reverse order.
Source: ruauto99.ru
When is it necessary to replace the Daewoo Matiz alternator belt?
On a Daewoo Matiz, replacing the alternator belt will be required in the following cases:
- when the engine is running, a strong whistling sound appears;
- when the battery is fully charged, the indicator shows a low charge level;
- Visual inspection of the part reveals mechanical damage and sagging.
If the belt is sagging, then first it should be tightened. But this is a temporary measure that will allow you to travel another hundred or two kilometers. Then you will still need to replace the Daewoo belts.
To tighten the belt on a Daewoo Matiz, you need to perform the following operations:
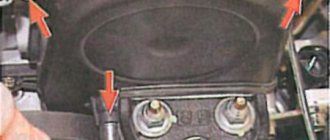
- Raise the hood and remove the coolant reservoir.
- Then take a 12mm wrench and loosen the mounting bolt at the top of the generator.
- We hold the bolt with a ratchet wrench and at the same time tighten the belt with a screwdriver.
- Tighten the bolt.
After you have tightened the belt, you need to start the engine to make sure there is no whistling.
Checking the condition and replacing the alternator drive belt and power steering pump Daewoo Nexia N150
Tools:
- Mounting blade
- Screw jack
- Wheel key
- Medium flat screwdriver
- Torque wrench
- Open-end wrench 7 mm
- Straight box spanner 10 mm
- Straight box spanner 12 mm – 2 pcs.
- Straight box spanner 14 mm
- Straight box spanner 17 mm
- Ratchet wrench
- Extension
- Head 4 mm
- Head 10 mm
- Hammer medium
- Beard
Parts and consumables:
- Alternator and power steering pump drive belt
1. Check the tension of the generator belt (when you press your finger on the belt between the generator and power steering pump pulleys with a force of about 10 kgf, the belt deflection should be 10-15 mm).
2. To tension the belt, use a 12 mm spanner to loosen the bolt securing the generator to the tension bar.
3. Using a 12mm spanner, loosen the nut on the generator lower mounting bolt, holding the bolt from turning with a wrench of the same size.
4. Insert the mounting spade between the generator housing and the cylinder block boss under the coolant pump. Use a spatula to move the generator away from the cylinder block, tensioning the belt.
5. When replacing the alternator and power steering pump drive belts on a vehicle equipped with an air conditioning system, you must remove the air conditioning compressor drive belt as described here.
6. To replace the belt, slide the generator towards the cylinder block with the upper and lower mountings of the generator loosened and remove the belt from the generator pulleys, crankshaft and power steering pump.
7. Install the belt in reverse order.
The article is missing:
- Photo of the instrument
- Photos of parts and consumables
Source: carpedia.club
Procedure for replacing the Daewoo Matiz alternator belt
If previous manipulations on your Daewoo Matiz did not have any effect, replacing the alternator belt will be the next step. This is a difficult procedure, which is carried out in the following order:
- Raise the hood and drain all the coolant from the reservoir into a previously prepared container. You can take a simple plastic bottle.
- We find the pipe that connects the tank and the throttle valve. Using pliers, clamp the clamp on it and disconnect the hose.
- We lower the freed end of the pipe into the prepared container. The liquid will not flow out immediately because there is no pressure in the system. You need to start the engine and do not turn it off until the coolant stops flowing.
- Remove the battery terminals. This is a safety measure to avoid getting an electric shock.
- Disconnect the second pipe and lift the power steering reservoir.
- We move the expansion tank to the side, move the clamp clamp, and then disconnect the lower hose.
- We remove the tank to free access to the generator.
- Loosen the mounting bolts at the top and bottom.
- We remove the drive belt and install a new one.
We recommend
“Which timing belt is better: a review of the best manufacturers” Read more
Then all the components need to be mounted in the reverse order. All the same operations must be done to adjust the alternator belt on the Daewoo Matiz.
If you have the opportunity to use an overpass or pit, then the work of replacing the Daewoo generator belt is greatly simplified. If not, then use the procedure described above.
Replacing the timing belt n-150 8 cl generator only
- Font size: More Less
- Subscribe to updates
Replacing the timing belt on n -150 8 valve. GL, 2011 release. No attachments. Generator only.
After using Ksyusha for a year and a half, with a mileage of 58 thousand km, I decided to change the timing belt. Knowing that the valves bend when the marks are set incorrectly, I read the Murzilka and surfed the Internet in search of a detailed photo report. I didn’t find it, so I’m presenting it the way I did.
1. Placed the car on a horizontal surface, using the handbrake and fifth speed. Loosened the right wheel bolts, jacked it up and removed the wheel.
2. Opened the hood and removed the negative terminal. Then I disconnected all the clamps and hoses so that I could remove all this rubber entrails in one go (you can read more here, but it’s not difficult)
3. Using a 13mm wrench, loosen the upper bolt of the generator. There is no need to try to unscrew the lower one, it is already weakened. Then you need to use some kind of lever to move the generator to loosen the generator belt. We remove the belt.
4. Using a 10mm wrench (a ratchet head), unscrew the upper plastic cover of the timing case.
Let's sum it up
Taking into account the above information, it becomes clear that replacing the timing belt of the Daewoo Nexia, or rather the timing belt, is a mandatory and responsible procedure. At the same time, it is important to change the belt not only according to the regulations, but also to take into account certain factors that can shorten its service life.
One way or another, if necessary, work on replacing the timing belt on a Daewoo Nexia can be done with your own hands in a regular garage. Of course, certain skills will be required (it is important to be able to correctly set timing marks, drain and refill antifreeze if necessary, replace the pump, etc.).
If it has been determined that any element needs to be replaced or replacement will be required soon, in parallel with replacing the timing belt, additional work should be carried out to replace worn or failed elements.
Ignoring this rule for complex replacement may cause the old roller to jam, as a result of which the new belt will still be torn off with all the ensuing consequences.
In what cases is replacement necessary?
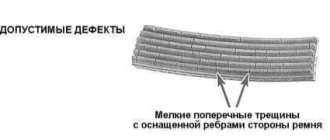
Manufacturers of Daewoo Nexia with 16 valves recommend replacement after 60 thousand mileage or six years, whichever comes first. Approximately the same resource is provided for the timing belt. But the timing belt experiences heavy loads, so it is sometimes changed more often. Since each time you replace it you have to remove the air conditioner belt, this is an excellent opportunity to check its condition. The Conder belt is also available for inspection when replacing the generator drive belt.
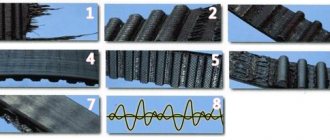
The air conditioner belt needs to be changed if the following defects occur:
- delamination;
- cracks;
- code threads are damaged;
- there are traces of oil.
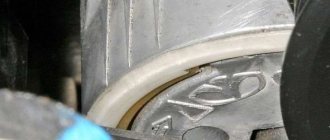
Removed worn air conditioner strap
A sign of replacing the Conder belt may be a whistling, knocking and humming noise on the right side of the car when the engine is running. In this case, you should check the condition of all parts. If defects are found, they should be replaced.
Alternator belt (without PG) Nexia 1.5 5PK870-Gates (Korea) — 163 hryvnia
| Quantity: | — + |
| vendor code | 5PK870-Gates (Korea) |
| Automobile: | Daewoo Nexia 1.5 |
| Manufacturer: | Gates (Korea) |
| Original code: | 96144932 |
| Code: | 99685 |
| Are available | (1 PC.) |
| Delivery throughout Ukraine | |
| upon receipt | |
WE CHECK BEFORE SHIPPING
EASY - Return or exchange
≡ The ZAZ-SHOP store has been operating since 2010 and recommends:
- Check the completeness of the delivery upon receipt of the goods
- Check the compliance of the received order before signing the receipt certificates
- Before replacing the alternator belt (without PG), check that the product with number 5PK870-Gates (Korea) matches the Daewoo Nexia car
- Do not trust installation to incompetent specialists
- When replacing yourself, use the tips published in a special Blog for repairing Daewoo and Chevrolet.
Alternator belt (without PG) Daewoo Nexia.
We offer a wide range of spare parts for Daewoo Nexia of original and licensed production, as well as direct deliveries from our warehouse to anywhere in Ukraine. The alternator belt (without PG) has the original manufacturer code 5PK870-Gates (Korea).
- Fast delivery to Kyiv, Dnepropetrovsk, Kharkov and throughout Ukraine. Pickup is possible from a warehouse in the city of Zaporozhye.
To select other products, you can use the catalog. The store offers branded products for quality servicing of Daewoo Nexia cars.
The original code 5PK870-Gates (Korea) is used to repair the Daewoo Nexia.
Reliability has long been appreciated by thousands of drivers from all over Ukraine. Only here catalog number 5PK870-Gates (Korea) can be purchased at a low price of 163 UAH. You can select any part using the Daewoo Nexia spare parts catalog.
- We ship by carrier Nova Poshta or Intime. We can ship today if you place your order before 4:00 p.m.
Call and get a free consultation right now. We can also recommend that you leave an order on our website if you are unable to call back.
The price is indicated on the website in hryvnias and may differ on the day of placing the order. Buy guaranteed from a reliable store!
- ZAZ SHOP is a portal that will be useful to everyone. The site has everything about Ukrainian folk cars that have conquered the market with their quality and price.
The ZAZ-SHOP store will allow you to quickly purchase spare parts for Daewoo Nexia cars necessary for repair and maintenance.
Taking into account your wishes and financial capabilities, they will help you choose the best option for components for reliable and safe operation of your car. Delivery is carried out to any region of Ukraine by the services “Nova Poshta”, Intime and SAT. Join us!
Replacement instructions for 16 valve cars
It is better to carry out all disassembly/assembly work on an inspection pit or overpass. If such conditions cannot be created, then you can use a jack to lift the front of the car.
Required Tools
- The key is "19".
- Socket head on "8".
- Special device for mounting the strap.
- Knife.
- New consumable.
- Clean rags.
For Daewoo Nexia you need to purchase a Conder belt with catalog code 96486813, 96182007, size 13x825 mm.
Original consumables for Nexia
Stages
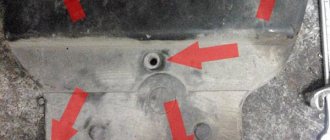
- We begin work by unscrewing the bolts on the crankcase protection. You don’t have to completely remove the protection; just unscrew the bolts from the front. This opening is enough to carry out the replacement.
- After unscrewing the fastening bolts on the right side of the engine protection, you need to move the protection closer to the wheel.
- The air conditioner strap is not reused, so it can be cut with a knife instead of being removed.
- Next, we disassemble the tensioner mechanism, checking the parts for defects.
- All defective parts must be replaced.
- Next, we mount the tension roller and put on the Belleville washer. We only tighten the nut without tightening it completely.
- Before installation, wipe all surfaces with a clean cloth to prevent the product being installed from slipping.
- For ease of installation, a special device should be installed on the crankshaft pulley, thanks to which the product is put on the crankshaft pulley. First, the part is put on the Conder compressor pulley. It is then passed under the crankshaft pulley and installed on the mounting fixture.
- In this case, the gearbox must be set to neutral.
- By turning the crankshaft pulley by the mounting bolt in a clockwise direction, the belt must be guided into the pulley groove until it is completely put on. As soon as this happens, the strap tension will weaken.
- When the new consumable is put on and the mounting device is no longer clamped, it is removed.
- Next, you need to turn the crankshaft one turn and check that the belt lies correctly in the pulley grooves.
- Having put on the Conder drive belt, use the adjusting bolt to set the required tension. You can check the tension by pressing the upper part of the belt between the air conditioning compressor and the crankshaft. The correct tension will be if, with a force of 10 kg, the belt bends by 5-8 mm.
- Now you can finally tighten the tensioner nut.
- Next, the removed parts are installed in reverse order.
- This concludes the procedure.
Installed new air conditioner consumables
All that remains is to start the 16 valve Daewoo Nexia to check that the air conditioner is working properly.
The procedure for replacing the timing belt on a Daewoo Nexia car, with a DOHC 16 valve engine, with photos and videos
Daewoo Nexia 2005, DOHC 16 valve engine, scheduled timing belt replacement after 60,000 km. mileage On this engine, when the timing belt breaks, almost all the valves bend, so it is better not to delay the replacement. We definitely change the pump because the belt is tensioned by it and as soon as we touch it the o-ring will definitely leak. To replace it, we will need a special key for 41. Its price is 500 rubles, but if the procedure is one-time, it can be made from metal 1 mm thick and bent as in the photo. One time is enough. As well as a universal pulley holder, the tool is not required, but it is more convenient with it.
First of all, we buy everything you need: pump, belt, tension and idler pulley.
In Nexia, the engine under the hood occupies almost all the space and this promises us some difficulties. It is very inconvenient to unscrew the front engine mount, but putting it back in place is even more fun. I always remember several times the mother of the Uzbeks who installed this engine like that.
Unscrew the intake pipe.
And an air filter with pipes.
We remove everything that bothers us. We also drain the antifreeze and remove the upper pipe.
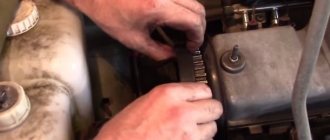
Before removing the alternator belt, loosen the three bolts holding the power steering pulley. If you don’t do this right away, then later you will remember not only mom, but also dad, trying to stop the pulley and break the bolts.
We loosen the tension bolt of the generator and, moving the generator towards the engine, remove the strap.
We jack up the car, remove the right wheel and the plastic mudguard, if there is one. We see the crankshaft pulley and the air conditioner tension roller.
Loosen the roller nut and unscrew the tension bolt as much as possible, then remove the air conditioner belt. The nut is in the top photo.
We unscrew three bolts for 12 of the power steering pulley and four for 10 of the upper protective cover of the timing belt.
And we shoot last.
We jack up the engine through a plank by the pallet, but not by the air conditioning compressor. We unscrew the two nuts securing the engine mount to the spar and the two bolts to the engine mount. It won't be easy with them, but the cardan will save us. Remove the engine mount.
Using the crankshaft pulley bolt, be sure to rotate the crankshaft clockwise until the marks on the camshafts match.
Unscrew the crankshaft pulley. If there is no special stopper, we put a partner behind the wheel, turn on the fifth speed and force him to press the brake, while at the same time, with a slight movement of the hand, we unscrew the crankshaft pulley bolt. After the pulley is removed, we see that the crankshaft marks match.
We unscrew the two 10mm bolts and, not forgetting the latch on the left, remove the lower protective cover of the timing belt.
We unscrew the two bolts securing the power steering pump and move it slightly to the side. There is no need to remove the bolts.
Use a hexagon to loosen the three bolts holding the pump. In the photo two are invisible, but there are two holes in the protective metal protection, approximately where the arrows are. In the following photos they will be visible when the iron protection is removed. Hitting them with a hexagon is very inconvenient, but you will have to suffer.
Using a special wrench 41, turn the pump until the timing belt loosens and remove it, insert it between the power steering pump and the engine.
We turn out the bolts of the camshaft pulleys, as well as the idler roller. The video in the photo has already been filmed.
We remove the pulleys and remember that on the intake camshaft the pulley is marked with the letter “I” and the exhaust valves with the letter “E”
We unscrew the three bolts of the tension roller and remove it.
We unscrew two bolts at the top and two at the bottom, one of the bolts is located on the right side of the air conditioning compressor, it is very inconvenient to photograph and remove the metal protection. You'll have to rack your brains a little to get it out.
We unscrew the three bolts of the water pump, those that are hidden under the protection. We remove the pump. We place a basin under the engine, since some of the antifreeze remains in the block and when dismantling the pump it will pour onto the ground.
We clean the seat and wipe it dry. Lubricate the pump's o-ring with a thin layer of sealant and put it in place. We turn it as counterclockwise as possible. We do not tighten the bolts too much since it still needs to tension the timing belt. We install iron protection, idler and tension rollers, and then camshaft pulleys. We check that all marks match. We install a new timing belt. The descending branch of the belt must be tensioned. Therefore, we first put the timing belt on the crankshaft pulley, then on the idler pulley, exhaust camshaft pulley, and so on.
Let's start stretching. We put a special key on the pump and turn it clockwise and look at the arrow on the tension roller, it should coincide with the mark.
Once we have achieved the desired result, tighten the pump bolts. Temporarily install the crankshaft pulley. We turn the crankshaft two turns and check that all marks match and the timing belt tension. If everything is in order, we proceed to assembly. We put all the parts in place in the reverse order of removal. You will have to suffer with the engine mount, which I warned you about at the beginning of the article. For this unforgettable adventure, we once again thank the Uzbeks who created the Daewoo Nexia with a sixteen-valve engine.
Fill in all the fluids and start the engine. After a few minutes of bliss from the work done, you can close the hood and forget about replacing the timing belt for another 60,000 kilometers.
If anyone is interested, the dealer manual says that the timing belt requires replacement after 64,000 kilometers or 4 years of operation, whichever comes first.
Now you can easily change the timing belt on your beloved Nexia, as well as offer your services to friends and be known among them as a real auto master.
How to Tighten the Alternator Belt on a Daewoo Nexia ~ AUTOINTERLINE.RU
Daewoo Nexia Cherry Ksyushka Borzhurnal Replacing the alternator belt. Killed the belt whistle!
Given to me this weekend is really very rude)))
Some time ago I was very struck by a whistle coming from under the hood. I talked with local drivers, Ksyusha's owners, they advised me to replace the belt or tighten it. Well, there you will need to look further down the road. Since I had already rolled back 30 thousand and looked at the appearance of this belt, it was decided to replace it. I bought 300 rubles at the market in Nefteyugansk.
And so let's go.
I had to torture myself not in terms of replacement, but in terms of whistling. I changed it after 10 minutes. In this case, he began to whistle again, as if he was starting with gas. I picked it up as if everything was fine, I start to whistle for literally 5 seconds, then it disappears, I don’t whistle. I thought that maybe this would calm down and there would be norms, but for now I was dealing with other things (but that's a separate topic in later posts).
So on Sunday I started blowing and whistling again!
and then my patience ran out
Pulling the belt further than the person is not an option; you overtake it and the bearings in the generator jump. Here they told me that there was a special liquid for violins and so on. etc. I bought this thing, came to work, took off the belt, sprinkled it on the inside of the pulleys, put the belt on, and tightened it.
I type and what do I hear? The awakening is such that the more the ears in the pipe rotate, the more you press the pedal, the louder the whistle. And besides, the whole belt became so sticky. and the pulleys are like greased with mastic.
Then he began to blame the generator itself, the bearings. But after he sat down, drank tea, cooled everything down, he decided to wash all the boats anew, wash the belt with soap and put everything in its place.
How to tighten the Daewoo Nexia alternator belt
Daewoo Nexia
Replacing
the alternator belt
is easy and simple with my VKontakte page.
- Replacing Timing Chain Nissan X-Trail T31
- Suzuki expands its self-charging hybrid models
- The standard on-board computer of the VAZ 2114 does not work
- After How Many Km Does the Timing Belt Need to be Changed?
- How to Remove the Instrument Panel on a VAZ 2101
- Until what year was the VAZ 2112 produced?
Daewoo Nexia 1.6 alternator belt replacement
The Auto_Repont channel will help you repair your car yourself. Overall, it worked just as well. I drive in, gas, no whistle, nothing. I'm happy))))!
the next day I get up, start over, I'm still leaving. But then this evil whistle appears after Ksenia spent half a day in the box at work. I don't know what kind of patient this is. Today, 04/28/13. got under the hood, look what happened to the belt. And why is it so weak that it bends 1.5-2 cm. Although it should be 1-1.5 cm, the manual says so. In general, I tightened it, tightened all the nuts, put everything in place, started it and didn’t hear a whistle or noise))). Which I really liked)))).
And so I will monitor the changes.
Thank you very much for your advice!
Good luck and smooth, calm roads)))) Price: 300 ₽ Mileage: 30,700 km
38 wishes4
I have the following situation: I changed the alternator belt, drove 6 km, there was no whistle. In the morning the car started up, all the rules warmed up, they gave you some gas to get out, and it whistled until 2.5 thousand / min, then stopped. Maybe it's just a matter of tightening it up?
- How to Remove Skoda Rapid Radio
- How to Start a Scooter After Winter
- When to change the oil in a Nissan Almera automatic transmission
- How to Paint Camelons on a Car
- Removing Steering Rack Honda Accord 7
- Replacing the Cabin Filter Nissan Pathfinder
Adjusting the tension of the generator belt
Difficulty level: 2. Completion time: 0.5 hours.
When adjusting, do not overtighten the generator belt, as this can lead to failure of both the belt and the generator itself.
Sequence of operations:
1. Place the vehicle securely on a level surface (see “Standard Operations”).
2. Disconnect the wire from the negative terminal of the battery (see “Standard operations”).
3. For ease of work, remove the central air duct and the resonator of the intake system. Using a slotted screwdriver, loosen the clamps of the four branch pipes of the central air duct, then use a 10-mm open-end wrench to unscrew the self-tapping screw and the nut securing the central air duct resonator, and then remove the air duct and resonator.
4. Using a 12mm spanner, loosen the tightening of the adjusting rack fixing bolt.
5. Holding the lower axial bolts of the generator mounting from turning with a 12-size spanner, use a second 12-size spanner to loosen the nuts of these bolts so that the generator can rotate on the axle bolts.
6. To increase the belt tension, use a mounting paddle to press the generator away from the cylinder block.
7. Use a 12mm spanner to tighten the fixing bolt.
8. We check the tension of the generator belt (see above).
9. Using a 12-mm spanner, tighten the nuts of the lower axial bolts of the generator.
Source