The concept of “kenguryatnik”, or “little kangaroo”, is widespread in the world thanks to Australia. This is a loose translation of the phrase “Roo Bar,” which translates to “kangaroo bars.” Initially, such grilles were used to protect the front of cars from kangaroos, which often unexpectedly crossed the road, as moose do in our country. Initially, this invention appeared in America, and not in Australia - there, farmers hung a structure made of pipes on the bumper of a car in order to be able to disperse cows from the road that were blocking the passage. There, the “kenguryatnik” was called the “cattle dump”. After this, the device became popular in Europe and only then became widespread in Russia and the CIS, where it began to be called by several terms: “kenguryatnik”, power body kit, yoke.
"Kenguryatnik" on UAZ: do-it-yourself manufacturing and installation
The concept of “kenguryatnik”, or “little kangaroo”, is widespread in the world thanks to Australia. This is a loose translation of the phrase “Roo Bar,” which translates to “kangaroo bars.” Initially, such grilles were used to protect the front of cars from kangaroos, which often unexpectedly crossed the road, as moose do in our country. Initially, this invention appeared in America, and not in Australia - there, farmers hung a structure made of pipes on the bumper of a car in order to be able to disperse cows from the road that were blocking the passage. There, the “kenguryatnik” was called the “cattle dump”. After this, the device became popular in Europe and only then became widespread in Russia and the CIS, where it began to be called by several terms: “kenguryatnik”, power body kit, yoke.
Materials and tools
First you need to make an approximate calculation of the length of the pipes, for this:
- the dimensions of the front part of the car are measured with a tape measure;
- the results obtained (width, height from the bottom of the bumper to the hood) are noted on the drawing;
- the pipe flow rate for internal jumpers is calculated.
In any case, pipes must be purchased with a reserve.
According to the obtained dimensions, the pipes are cut with a grinder and joined together with a minimum gap (˂ 1 mm). For this it is better to use a trimmer. By the way, they can cut pipes instead of an angle grinder.
Read more: Spoiler for Kalina station wagon: choosing a model
Next, you need to check that all parts are identical so that the right and left parts of the structure are symmetrical.
According to the drawing, measurements are taken and the places where all elements should be welded are marked with a marker. First, they are simply “grabbed” by welding, the seams are ground, symmetry is checked again, and then they are finally welded.
When the kenguryatnik is ready, it is bolted, usually to the side members or cross beam.
When purchasing a structure, first of all pay attention to the cost of the element. There is a large selection of kangurins, and their price ranges from 50 to 3 thousand dollars. Keep in mind that buying a structure that costs between $50 and $100 will not do you any good. The fact is that cheaper options do not have reliable pipe welding.
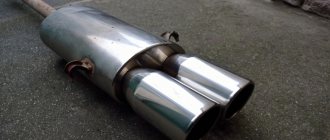
The lower part of the structure must be made of steel pipes
Secondly, choose an element whose lower part is made of steel pipes rather than plastic inserts. They will protect the parts at the front bottom of the machine. Thirdly, buy a part that does not require drilling additional holes during installation. Before doing this, consult with the seller, show your car and ask to choose the appropriate option.
And lastly, carefully check the kengurin’s documents. Ask the seller to provide the warranty for the part, passport and installation instructions.
Design and purpose of the “kenguryatnik”
The power bumper is a structure made of metal pipes attached to the front of the vehicle. It serves to protect the head lighting equipment, hood, radiator grille and some other elements while driving through wooded or rough terrain. In the harsh climatic conditions of the middle zone, the “kenguryatnik” is relevant when driving through deep snowdrifts. Protection saves you from unexpected encounters with animals crossing the road while driving in conditions of limited visibility.
The power bumper has also become a decorative element of the car - you can find a variety of fog lights on it, often in large quantities; winches and other attachments are placed on it.
For UAZs, given their off-road qualities, the “kenguryatnik” is rather a necessity. The device does not cause any particular inconvenience, but it is practical and looks attractive.
Design Features
“Kenguryatnik” cannot be a structure made of pipes of different sizes, bent in any shape, as many folk “craftsmen” think. This is a device that increases the passive safety of a car when involved in an accident. When hitting a pedestrian, the latter will receive fewer injuries, will not hit the hood and then the windshield, which means the car will not receive damage. Therefore, homemade power bumpers are not welcome. Their production must be carried out by specialized organizations that have permits, certificates and other regulatory documents.
In practice, this is rather an exception to the rule - a minority of car owners turn to such organizations. Structurally, the device must consist of metal pipes and rods welded together, bent in a certain way. They are hollow in shape, their diameter must be at least 28 mm and no more than 110 mm.
Materials used and types of “kenguryatniks”
The front protection grilles are made of stainless steel. This metal was not chosen by chance - it is one of the most durable alloys that reliably protects car elements from damage. We must not forget about corrosion resistance - the metal is not susceptible to rust. Car enthusiasts often use aluminum pipes - they are cheaper and easier to process, but their protective characteristics are low due to the softness of the metal.
There are two main types of “kenguryatniks” on UAZ. The first is extended, used to protect the radiator grille, bumper, front fenders and head lighting equipment. The second type is made in the form of a horseshoe, protecting only the bumpers and radiator grille.
Installation permission
Recently, the rules for using “kenguryatniks” on all cars, including UAZ, have become stricter. This concerns accidents involving pedestrians. If in a minor collision the injuries are minor, and the power bumper even protects against them, then in a serious impact the device can cause fatal wounds. For this reason, “kengurins” on UAZ vehicles are illegal, but they are not completely banned.
According to the new legislation, car owners do not have the right to install power bumpers on their cars. Traffic police officers may issue a fine for them. But the law also states that the ban does not apply to all body kits without exception. The following types are prohibited:
If the alternative bumper is no larger than the standard one and is supplemented with a protective arch, then it can be installed on any car - traffic police officers will not have any questions.
The car owner who has installed a power bumper must be aware that his actions lead to changes in the design of the vehicle. For such procedures, you must have a special permit; it is issued by the traffic police.
The PTS must contain a note about all changes made. Having documentary evidence, you don’t have to worry about fines.
Categories of "kenguryatnikov"
Body kits are divided into main groups:
Car owners may be subject to fines for self-made structures. They are not certified and not provided by the manufacturer. This means that safety is not confirmed in any way, the device has not been tested and is manufactured without meeting technical specifications.
Measurements and drawing preparation
Making a power bumper with your own hands is not that difficult. The design of the power bumper is quite simple. Manufacturing is quite doable in a garage. As an example, you can try to look for images of similar vehicles with self-welded kenguryatniks.
Or you can just use your imagination and try to sketch the drawing yourself. The design is quite simple, so such work should not cause any problems. Just sketch out a rough drawing on paper. But you should remember, the more intricate it is, the more difficult it will be to make.
The simplest type of kenguryatnik is an ordinary slightly curved pipe with several plugs on each side. But this is only local protection, which can only protect the bottom and engine compartment of the car during minor obstacles on the road. For example, if you hit a curb.
You can also make a more complex protection that covers the entire front part of your car. Making such a guard will be a little more difficult, but with it the car will look better and the protection will be more complete.
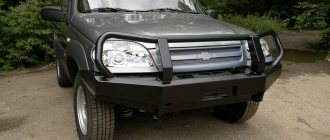
The picture shows the simplest and most common type of do-it-yourself cage:
Next, you should start from the size of your car and what you want to see on it:
- Using a tape measure, measure the height and width of the car. This is necessary to calculate the size of the protection. You should start from the bottom of the bumper and up to the hood. Then you can transfer everything to the drawing;
- Now you can calculate the number of pipes. It is advisable to purchase pipes with a small margin.
The list of materials and tools will depend on which models of power bumpers you prefer. The simplest and most common option is pipe kenguryatniks. To make them you will need:
- Steel pipes (approximately 60 and 40 in diameter for large and small bends);
- Bulgarian;
- Welded corners;
- Pipe bender or special angles at 45 and 90;
- Trimmer;
- Bolts;
- Welding machine.
It is better to choose pipes from stainless steel. They look much better than other types of pipes. And even if you paint them, it will still look much better. Moreover, after each off-road trip, the pipes will most likely have to be tinted.
You can use sheet metal as an addition. This already depends on the design. But it’s better to avoid plastic elements, unless you have decorative protection.
This is interesting: Car radiator mesh – protection or decoration?
Making a do-it-yourself kenguryatnik
UAZ cars are popular among fishermen, hunters and extreme sports enthusiasts - people who use their off-road characteristics. Driving over rough terrain may require special equipment, such as a winch, which means you can’t do without a power bumper. On the car accessories market you can purchase a ready-made version - the RIF brand is popular.
But car enthusiasts usually prefer to make body kits themselves - there is nothing complicated about it. Power bumpers for UAZ Patriot, “loaf” or UAZ 469 can be quickly made with your own hands. For this, there are ready-made drawings, step-by-step instructions with photos and detailed video materials.
Advantages of a homemade design
It is believed that a reinforced bumper made by yourself is better than a purchased analogue. One cannot ignore the fairly high cost of off-road equipment. But what attracts car enthusiasts is the opportunity not to save money, but to create an original design that is ideally suited to the UAZ. Using ready-made drawings, you can always make your own changes, modifying someone else’s design, improving it.
Kenguryatnik on UAZ 469
Many owners of UAZ 469 cars are also passionate fans of hunting, fishing, off-road driving, rough terrain, forests, and swamps. Selfless love for your vehicle forces you to improve it in every possible way.
In order to increase cross-country ability and protect against difficult driving conditions, drivers additionally carry out tuning of their car. One of the tuning components is the installation of a beautiful and useful protective bumper grille, called a body kit, kenguryatnik on the UAZ 469 or simply kengurin.
Design and purpose of the kenguryatnik
This tuning element is a reinforced hinged structure. The entire grille in the form of metal arcs is made of medium-section pipes. The most popular among car owners are UAZ 469, Patriot, Bukhanka, and the pipe diameter is 50-55 mm. Smaller cars are equipped with grilles with a pipe diameter of 40-45 mm. The entire structure is chromed or nickel plated on top.
Particularly advanced SUV owners blacken their grilles with a special compound. This enhanced system actively protects:
The entire car is protected by a guard against collisions, running into trees, stumps, haystacks, and animals during pursuit. It protects the entire front part of the car from deformation when turning over or falling into ravines, holes, or rivers. This is reliable protection against body breakdowns in direct contact with solid obstacles, when diving into icy slush and ditches clogged with mud.
Device Features
Some people who are far from tuning mistakenly believe that the body kit is assembled from pipes of various sections that came to hand by chance, bent at random, in an arbitrary configuration. Such thoughts are far from the truth. This design is a complex engineering structure. It effectively increases the passive safety of the car when involved in any accident.
If, God forbid, a car hits a pedestrian, the person receives significantly less injury and damage to the body. It will not be dragged over the hood or windshield, the surfaces of the car will remain intact, and the pedestrian will remain unharmed. Traffic police inspectors do not like homemade devices of this type and punish drivers for such creativity.
They have the right to produce only certified enterprises, whose specialists have undergone special training, they have permission, regulatory documents, and a special license. However, car owners rarely turn to such professionals.
Materials used and types of kenguryatniks
Factory grilles, designed to protect cars, are made from steel pipes and rods, bent in a certain way, professionally welded together. In this case, stainless steel is used. The inside of the pipes is hollow; their cross-section is allowed at least 28 mm and maximum 110 mm. Stainless steel is an alloy that is one of the most durable and reliable.
With a body kit, all major automotive components are well protected from damage. The metal is not subject to corrosion. Many car enthusiasts, in order to save money, make their own protection from aluminum pipes. Such material is lighter, cheaper, and easy to process and bend. However, the protective properties of such a body kit are very questionable. It mainly plays a decorative role.
Materials and tools
To make a car guard with your own hands, you will need maximum attention, patience and the necessary tools. You must prepare:
- pipes with a diameter of 40 and 60 mm;
- welding machine;
- Bulgarian;
- pipe bending tool;
- bolts of various diameters;
- stubs.
Before making a kenguryatnik with your own hands, take measurements of the height and width of the front of the car. Record all received data on an improvised drawing. According to the diagram, you must calculate the number of pipes that will be used for jumpers. It's best to do this with a small margin.
After cutting, fold the pipes in the shape of a kangaroo. Make sure that there are no large gaps between them, and the future kenguryat will have an attractive appearance. Next, the edges of the pipes need to be cleaned of burrs. After this, begin welding the pipes, observing their planned location. If you plan to make the kengurin slightly curved on the sides, then the outer pipes need to be given the required shape before welding. Once you have finished connecting the products, attach the cage to the front of the machine.
In order for a homemade kengurin to have a modern appearance, it will need to be painted. To do this, buy paint designed specifically for working with metal. Apply 2-3 layers of the composition. Between each layer, pause for 1 hour. After applying the final coat, wait at least 6 hours. At the end, all that remains is to coat the painted pipes with clear varnish.
The last step will be installing the part. Attach the structure to the car again and mark the places for drilling on the body. After this, make holes with a drill and secure the part using bolts. To prevent the cage from starting to wobble over time, apply anaerobic sealant between the holes and bolts. Treat the kengurin itself with an anti-corrosion agent to extend its service life.
First, on the materials. It is best to make the structure from polished stainless steel. It not only looks cooler, but is also much more practical. You will have to touch up painted pipes after each trip to the country or fishing. Stainless steel does not have such problems, although it is more expensive, but it will save you from unnecessary hassle in the future.
Pipe diameter is 50 - 55 mm for SUVs, for regular cars 40 - 45.
The quality and appearance of the structure will depend on which welding machine you use. Only an argon-arc apparatus will allow you to make seams that you can grind and polish as if it were a solid pipe. If you do not have a pipe bender, you will have to purchase several corners (bends). You may need corners at 90 or 45 degrees, it all depends on the complexity of the design you choose. You may also need a pipe cutter.
Is it possible to install kengurin
Certified and factory body kits can be quite legally installed on a UAZ vehicle for further operation on the country’s roads. This product meets all design requirements and technological production standards, so its use as protection by road services is not prohibited.
All types of kenguryatniks made independently are prohibited if they have not been tested, are not officially registered, and do not meet technical specifications.
Buying a UAZ 469 kenguryatka main nuances
It is not difficult to buy a kenguryatnik for UAZ 469. They are sold at car markets, car shops, and on portals for selling spare parts on the Internet. It is important to provide for all the details that will protect your car. When buying a body kit, you should not contact dubious persons on the market. Fraudsters often operate there, passing off counterfeits as quality goods.
It is best to pay attention to products from domestic and international, the most famous manufacturers. Such suppliers' equipment always has a warranty period. The products of such enterprises are always certified in international standardization and certification systems. They attach certificates and test reports.
For UAZ 469 you can often find models of front bumpers, the design of which initially included the presence of kengurin. Many body kits of this model are equipped with mounting sockets for mounting additional optics.
Benefits of a ready-made solution
When purchasing a ready-made body kit, the car owner can be sure that the product was manufactured by a certified manufacturer and that all documents are in order. No one will stop him along the way and will not file a claim for violating traffic rules. If you purchase a cheap fake, you can get into big trouble in the form of a fine, dismantling, and in some cases, confiscation of the car.
Cost of kenguryatnik
All body kits sold in the Russian Federation have a wide price range. Often the cost of a protective frame for a UAZ 469 car is strongly tied to the region of our country. In Moscow, prices are 30-40 percent higher than in the Urals. In Vladivostok they differ significantly from Kaliningrad.
On average, on portals for selling spare parts in Moscow, the cost of a good kenguryatnik varies from 5 thousand to 20 thousand rubles. It all depends on the material, configuration density, processing, painting. The type of body kit is also important - extended or horseshoe-shaped.
Assembly stages
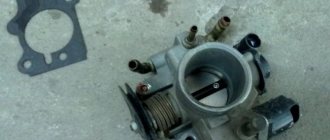
Trying on fastenings
After purchasing all the parts, you can start making the front bumper protection. First, you should mark the pipes and corners, so that you can then cut them correctly and evenly with a grinder. When working with this power tool, do not forget to wear protective equipment (gloves, goggles). Don’t forget that the design should be perfectly symmetrical, so everything needs to be cut as carefully as possible, and then check all the parts together.
Lay out the parts on a flat surface the way you plan to weld them, and get ready to use the welding machine. Start connecting the structure from the bends - this will make it easier for you to sand them. If it is necessary to connect T-shaped jumpers to the base of the pipe, the gap should be no more than a millimeter. To achieve this, you will need a pipe cutter.
Combine all the elements together to make one product. Again, check everything for symmetry using a ruler or tape measure. Next, thoroughly sand all joints and any uneven surfaces.
Next, you can degrease the kenguryatnik, cover it with the chosen paint and leave it to dry. If you are using polished stainless steel pipes, after welding the parts, you just need to rinse the product and dry it.
How to make a kenguryatnik with your own hands
Some car enthusiasts firmly believe that a self-made guard on a UAZ 469 looks better and has greater functionality. Indeed, making a body kit is not difficult these days. The Internet now provides many sketches, drawings, and technical literature for the manufacture of protective grilles.
In addition, you can install additional headlights in a row and other specific equipment at any time. Sometimes the owner needs a winch on the bumper or special mechanisms. Farmers use their machines as tractors, so they install towbars.
To make your own body kit, you need materials, tools and equipment:
Having understood the Internet drawings, any home craftsman will be able to make a good kenguryatnik for his car. Subsequent interaction with road services will have to be decided independently.
Tools and materials
In progress
To make front bumper protection, you will need a certain set of tools and materials. The complexity of the work and the aesthetics of the final result depend on the latter. Also, the selected material will affect the strength of the structure to protect the car.
Taking these factors into account, it can be noted that polished stainless steel pipes are considered the optimal material for creating a cage. You can also choose regular metal ones, subsequently painting them in the desired color. Please note that self-applied paint may not adhere well, so the structure will have to be repainted periodically, namely after each collision with an obstacle.
Particular attention should be paid to selecting the diameter of the pipes. For SUVs, the optimal option is considered to be a diameter of 50-55 mm, and for small cars a diameter of up to 40-45 mm is better.
In addition to the pipes you will need:
- argon-arc welding machine, which allows you to create the most aesthetically pleasing and invisible seams (additional grinding will completely remove them);
- pipe corners or pipe bender;
- grinder for cutting pipes;
- end trimmer for metal pipes (you can do without it).
Tags: kengurin, 33036-8022010
Comments 39
It is prohibited to install on vehicles of categories M1 and N1 structures that protrude forward relative to the bumper line corresponding to the outer contour of the vehicle’s projection onto the horizontal plane of the supporting surface, made of steel or other materials with similar strength characteristics. This requirement does not apply to structures provided for as standard equipment of the vehicle and (or) that have undergone conformity assessment in the prescribed manner,
as well as metal grilles weighing less than 0.5 kg, intended to protect only the headlights, and the state registration plate and its fastening elements.
The PTS must indicate the OTTS No. on the basis of which the vehicle is allowed on the roads of the OP. You look for this OTTS by number, and read what your model can be equipped with. But as far as I remember, the UAZ-3962 never came from the factory with kengurin, they were only on some modifications of the UAZ-3303, UAZ-39094 and luxury UAZ-2206.
Thanks for the detailed and complete answer! I don’t have my PTS handy, I’ll look at it at home.
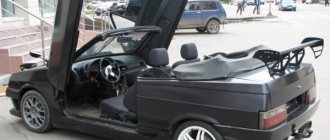
— in the design of the loaf, the kangurin pipe does not protrude beyond the bumper. The standard bumper comes after the kangurin and is the most protruding point.
UAZ-3962, also known as a medic, I think had the poorest equipment, and I actually have “cargo van” written on my title, so you can definitely forget about the decorations.
I had a kengurin like this, unlike the 469 UAZ kengurin, it protrudes beyond the bumper line. And the UAZ-3962, like the UAZ-2206, is certified as a passenger vehicle, so the “cargo van” body type is a mistake or malicious intent of the inspector, for which now you have to pay an increased tax, like for a truck. Yes, and TR CU 018/2011 says. A vehicle with no more than eight seats, not counting the driver's seat, intended for the transport of passengers and cargo, belongs to the category: M1, if the product of the number of passengers provided for by the design by the conditional mass of one passenger (68 kg) exceeds the estimated mass of the vehicle being transported simultaneously with cargo passengers; N if this condition is not met.
The UAZ-3962 has at least 7 passenger seats (3 benches with two seats each and a driver's seat on the right), therefore, even according to the above formula, the UAZ-3962 cannot be a truck, since the load capacity of the UAZ-3962 is usually indicated at 800 kg .
Why do you need a kenguryatnik?
Kengurin is most often installed on a modern car in order to stand out from the crowd and to prevent the bumper from breaking in the event of a frontal impact.
Protecting a part designed to deform and soften the impact during collisions is, albeit a largely illogical, but still justified solution.
In this case, the question arises of how to make a kenguryatnik with your own hands. The easiest option is to take the drawings of any cradle you like from the Internet, slightly adjust the dimensions of the fastening unit in accordance with the design of your car and carry out protection according to them.
Installation of kengurin
The service life of the accessory largely depends on proper fastening.
Measure the distance between the side members of your car and, at the same distance, weld two thick pipes to the kengurin that go to the side members. Attach fastenings to the ends of these pipes; plates, about 10 mm with holes of M10 or M12 bolts, will do.
The entire structure must be attached to the front of the car (with a gap of 10 mm from the bumper). In this case, the fastenings should be located directly opposite the side members. Next, through the mounting holes, make marks for the holes on the side members. All that remains is to drill holes in the side members and bolt the kengurin to the side members.
Remember that there is no point in strongly securing the cage, because upon impact, the structure should bend, and thereby protect the frame and side members of the car from damage.
We hope that our instructions on how to make a kenguryatnik will be useful for you and will help in making your accessory.
Kenguryatnik on Niva - what is it like and how to make it yourself? + Video
The kenguryatnik is installed on the Niva to protect the vehicle from serious damage in collisions and accidents. In addition, this design, often called kengurin, gives the car visual appeal and makes it original.
1 Do you need a kenguryatnik?
Kangurin is understood as a front or rear mounted system installed for decorative and protective purposes. It is able to protect the car from scratches and damage when driving on rough terrain, where tree branches and bushes can spoil the appearance of the car.
Thus, installing a gimbal on your Chevy is a smart move. You protect yourself and your car, and also give the vehicle a truly unusual and elegant look, spending a minimum of money on tuning the Niva.
2 Materials for making kangurin and its varieties
In most cases, the structures we are interested in are made from stainless steel alloys. Sometimes kangurins are made of reinforced plastic. But domestic tuning enthusiasts still prefer to decorate their Chevrolet Nivas with metal products, which give the car a memorable, slightly aggressive look.
Plastic structures are nothing more than a beautiful decorative detail of a vehicle. They do not perform a protective function. But stainless steel products, which are highly resistant to corrosion and have excellent strength characteristics, look perfect on a Chevy and protect the car from many troubles. Metal structures, in addition, can be made much more attractive. To do this, it is enough to coat the attachments on a Chevrolet with nickel or chromium. As a result, kengurin will have a noble matte or chic glossy appearance.
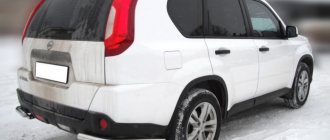
Kengurin on Niva made of stainless steel
There is another opportunity to make the kenguryatnik unusual - to cover it with powder paint for external tuning of the Niva. It can have almost any shade.
Protective structures on the Chevy Niva are divided into rear and front. At the same time, the first ones are not particularly popular. Rear kangurins are mounted very rarely. Although in their functionality they are no different from the front suspensions. Frontal cages are usually divided into several types based on design features. On a Chevrolet Niva you can install the following types of protective structures:
According to the pros, the most reasonable step is to install the second type of structure on the Chevy Niva - with a grille and a pipe. They perfectly protect the car and everyone who travels in it on any off-road terrain.
3 Buy or make it yourself - that is the question?
The protective structure on the Chevrolet Niva at first glance looks elementary. It consists of pipe products connected into one structure. But here n
What you need for work
A stainless steel kenguryat will look very good on a car of any color. But stainless steel is much more expensive than regular steel. A logical question arises: what will you use to cook it with? Therefore, it would be better to weld a structure from sections of ordinary steel pipe using a semi-automatic machine. If you paint it “Snow Queen” and cover it with car varnish, it will also look good. If this option is suitable, you need to have the following materials and tools.
How to do it without a pipe bender
Many people know that when bending a steel pipe without special tools at the bend, it can become flattened or even break. Of course, you can buy several corners from a pipe of the required diameter. But this will increase the number of welding seams, and their processing is very labor-intensive. There is a simple way to bend metal pipe that avoids unnecessary expense and unnecessary processing. You can carefully bend a steel pipe as follows.
Manufacturing process
Having made markings on the prepared pipes and angles of the same diameter as the pipes (if you have a pipe bender, you won’t need the angles), you can begin cutting pieces of the required length with a grinder. The main thing to remember is the overall symmetry of the design. When connecting T-shaped jumpers to the main pipes, try to leave minimal gaps (no more than 1 mm). To do this you will need a pipe cutter,
After preparing all the elements, check again that all parts used are identical.
Next, measure and mark the places where the structural elements and jumpers will be welded, this will allow you to save time when welding.
After marking, tack the parts by welding. Start with the folds, as it is much easier to polish and sand the seams while the fold is separate from the main structure. After this, grab the bent pipes to the base. After the next check for symmetry, weld everything using argon-arc welding.