A crack or chip in the windshield is an unpleasant moment for every motorist, because driving with damaged glass becomes unsafe due to glare. In addition, the crack may become larger over time and in this case only replacement will help. Fortunately, new technologies are being created and windshield repair is possible. There are several effective ways to fix chips or cracks on your windshield yourself at a minimum cost. Read more about how to repair a windshield, and will be discussed in this article.
DIY windshield repair
The main causes of glass damage – glass profi assistant
Damage to the glass is possible as a result of a blow to it. A sharp rise in temperature can also lead to this. Therefore, in cold weather, when it is too frosty outside, you should not overheat the interior.
As for the weather being too hot, do not use air conditioning to cool it down. To fix problems, you can successfully use a windshield chip repair kit.
While the crack is small, you should immediately seal it with transparent tape, so it will not increase as a result of vibration, as well as shocks from potholes. The main thing is to prevent fine dirt and dust from getting into the microcrack. As a result, the effect of the crack repair fluid may be reduced.
Specialists use glass profi to eliminate small cracks. It is important not to use other cheap means for this. This can cause deterioration and problems with simple glass repairs.
Action of Glass Profi
- Damage is repaired.
- The development of cracks stops.
- Transparency is restored. The same applies to the optical characteristics of glass.
How to get rid of cracks or chips using Glass Profi
It’s very simple, without any problems, to get rid of cracks and chips on your car windshield:
- you should glue the adhesive disk - all air bubbles are carefully smoothed out;
- it is necessary to glue the pedestal using an adhesive disk;
- polymer for repairing windshields is poured into the suction cup through a pedestal.
Next, it is inserted into the syringe, into the suction cup pedestal, and the piston rises completely. Then it is lowered in several stages. All that remains is to remove the adhesive stick from the glass, using a blade as an assistant.
Why use Glass Profi?
Drivers know that it is quite easy to damage the windshield. And in this case, a windshield repair kit is simply irreplaceable. It will help get rid of chips, cracks, and scratches on the glass. The same goes for abrasions.
Small troubles can develop into a serious problem, so any such damage should be repaired as quickly as possible. To do this, you need to change the windshield, but this is quite expensive. Therefore, the best solution is a polymer for repairing windshield cracks. With its help, it becomes possible to independently eliminate damage to the windshield.
Sequence of work
| Sequencing | Description of actions |
| Attach adhesive disc | |
| Glue the pedestal to the adhesive disc | |
| Pour the polymer into the suction cup through the pedestal | |
| Remove the adhesive disc from the glass and drop polymer into the crack | |
| Remove polymer residues |
The kit contains the parts necessary for repair, so you will not need to purchase anything additional. The kit will help you quickly eliminate damage such as chips and cracks - almost professionally, at a decent level.
Many advantages make the set quite popular and in demand. It instantly heals all possible disorders and prevents cracks from developing. In addition, the rate of hardening and hardening is quite high. Optical properties are restored.
The same goes for the transparency of the windshield. The set is quite simple to use. The cost is affordable. The kit contains everything you might need. It is quite convenient to use. There is no need to be an expert or have a wealth of knowledge.
Video
This product is intended exclusively for repairing windshields. It is not suitable for side and rear. The inside of the windshield is laminated. This is not provided for in other car windows.
Using a polymer, it is possible to eliminate star-shaped defects. The same applies to cracks and chips - a maximum of thirty centimeters. Thanks to the tools that are included in the kit, it becomes possible to spend a minimum of time in order to eliminate all the troubles that have arisen.
Read more
How to avoid windshield damage
There are several recommendations that, if followed, can reduce the likelihood of cracks and chips on the windshield:
- Maintain a maximum distance from trucks on the road. The same goes for cars with the “Ш” sign;
- avoid driving on uneven roads, especially in a car with a hard suspension;
- If even small pebbles get into the glass, stop immediately and inspect its surface;
- when replacing a windshield, give preference to original parts;
- monitor the operation of the air conditioning system to prevent sudden temperature changes;
- Adjust the heating power of car windows smoothly in winter.
How to avoid catching a stone in your windshield
Compliance with all these rules will not give a 100% guarantee, but will significantly reduce the likelihood of defects appearing on the windshield. Good luck on the road, dear motorists!
Which glass chip repair kit to buy: advice from motorists
1. I bought a more expensive set
“I drive on the highway very often, and accordingly I’ve hit the windshield more than once. And I know first-hand what to do with a chip on glass. At first I saved money on windshield repair kits, buying them for no more than 250 rubles. Their main disadvantage is the need to peel off the double-sided tape from the glass and maintain constant pressure with a syringe. I suffered and suffered and decided to buy a more expensive set. At first glance, I was impressed with the Chinese-made Super PDR, so I bought it.
The instructions describe in detail what and how to do. The suction cup must be lubricated. After installing the device, fill it with a special compound and slowly screw it in, filling the chip with glue. I didn’t succeed in screwing it in completely, because the chip quickly filled up, the rest seemed to be unnecessary. And only when I put the device away, I realized that I needed to do more, because I saw empty spaces. This time I placed a special film measuring 5 by 10 cm under the device - by the way, it is included in the kit. It turned out much better. I don’t have a special UV lamp; I put the car in bright sunshine. After the composition had hardened, I scraped off the residue.
Compared to cheap sets, I liked this one better. It would be just perfect if the suction cups didn't constantly come off. Even though I followed the instructions and lubricated them constantly. If the suction cups are equipped with latches, this will make the process much easier. You don’t have to do anything additional (lubricate, hold, etc.).
2. Enough for one more time!
“This spring I was driving to my dacha, not bothering anyone, and then bam! There's a stone in your windshield, from a tractor ahead on the sidewalk!
I had to stop, cover it with tape and go online with the question: “What to do if a small chip appears on the glass.” In search of a life-saving repair kit I came across Ebay Windscreen Windshield Repair Tool DIY Car Auto Kit Glass For Chip&Crack.
I was impressed by the composition of this set:
- detailed instructions telling in pictures what to do;
- tube of glue;
- syringe;
- blades;
- pedestal;
- 2 stickers;
- 5 films.
The tube contains a clear liquid resin similar to superglue. A very useful blade with a stop (for removing glue residues), which can still be useful in everyday life.
So, my impressions. The chip, of course, did not evaporate, but the surface of the glass became uniform and did not differ at all from other areas to the touch. The chip will definitely not spread, dirt will not get in. I managed to keep the original glass, which I am very pleased with. In my case, the set is enough for one more time. The consumables remain, and now I know how to do it all just as well as the professionals.”
3. Didn't have to change the glass
“About 3 years ago, a stone hit the windshield - like most drivers, it came from the wheel of the car in front. I thought that everything would have to change. Every day I looked at the chip and expected a cobweb from it. There was no desire or time to look for original glass at all. I didn’t know what to do with a small chip on the windshield. Friends at a car service center advised me to buy a “DoneDeal” windshield repair kit.
They added that this is not a problem at all, and everything will work out for me, and without damaging the household budget. I went to buy. Once I purchased it, I studied the kit’s instructions and ran to the garage to make it.
The substance (resin) is transparent. Despite this, the treated area is visible, but it does not bother me. Dirt spoils visibility much more. 3 years have passed, no cobwebs or cracks. I can confirm the manufacturer’s words about the strength of the resin.”
4. Saves even from large cracks
The set gave rise to slight doubts, I thought that I would suddenly order it and nothing would work out. Money down the drain. After reading a whole bunch of rave reviews about this set, I plucked up the courage to buy it. The kit includes: a special substance for filling the chip, an adhesive disk, a suction cup, a syringe and a blade for removing the adhesive disk.
I spent about 15 minutes on the job; I didn’t even expect that car repairs could be done so easily and quickly. It took me longer to read the instructions.
Later I found out that even car repair shops buy the set I chose to repair clients’ cars. The set is in demand among professionals for good reason. Because it can cope with a wide variety of problems, including improving the structure of glass. And this, in turn, will make the glass more transparent and save it from destruction in the future. The manufacturer also claims that the composition can eliminate cracks up to thirty centimeters. And I believe him."
The final stage
Well, now we have dealt with the question of how to repair a chip on the windshield yourself. All that remains is to complete the work by polishing the surface. To do this, use a special polish and a napkin. Apply the liquid to the glass and perform the polishing process in a circular motion for 5-10 minutes. After this, carefully inspect the glass again for any defects. It is not advisable to go to a car wash in the next few days after the repair.
The likelihood of stones hitting the windshield can be reduced by keeping a distance behind the cars in front, since, in most cases, it is from under the wheels of other cars that stones and other objects that can damage the windshield fly.
Chips and cracks on the windshield: repair or replacement
Every car owner should know how to repair a cracked windshield, because scratches and chips often appear on the windshield, especially if you drive on the highway at high speed. At any second, a pebble could fly out from under the wheels of the car in front onto your windshield. Neighbor's children playing in your yard may accidentally break your car windshield. Or you yourself accidentally drop a wrench on it. Of course, sanding and polishing will help remove a small chip. But if the scratch is deep, these procedures will not help.
Many car owners do not pay attention to cracks: there is minimal visibility - and that’s okay. Experts do not recommend doing this, because the problem will not disappear on its own. A little time will pass, and there will already be a huge stripe on the windshield, which will be impossible to eliminate.
To install a new windshield, you will have to spend a large amount of money. An alternative solution is timely repair of the crack. In some cases, when there are many cracks or they are large, the only possible solution is to replace the glass. The fact is that repairs in this case can cost the same as buying new auto glass.
It is also important to remember that after repairing a large windshield crack, it will become less durable. In most countries, there are standards with the help of which a specialist determines whether it makes sense to repair auto glass or whether it is better to replace it
For example, in the United States, the first thing that is taken into account is how long the damage is. Repair of a windshield crack is carried out when its length does not exceed 6 cm.
According to the law in our country, you can drive a car if the car glass on the passenger side is damaged. When it cracks in the area of the windshield wiper on the driver's side, the car owner must either repair the cracked windshield or replace it completely. Of course, in this case no one will prohibit you from using the car, but it will be impossible to pass a technical inspection.
If you do not repair a windshield crack, it will begin to glare, impairing your visibility. In the evening and at night, the headlights of oncoming cars will be refracted. All this will lead to the fact that driving a car becomes unsafe.
Note! If you are going by car to a Western European country, but have not repaired a cracked windshield, you will not be able to cross the border. To avoid such a situation, chips and other defects should be repaired in a timely manner. If you want to avoid repair work, you can replace the glass with a similar one, but made in Russia or China
However, some experts are sure that this cannot be done. They explain this by saying that cheap Chinese or domestic analogues are much worse in their characteristics than the original. After some time, such auto glass will be rubbed by the windshield wiper blades, because it is not strong enough and cannot withstand aggressive mechanical stress.
If you want to avoid repair work, you can replace the glass with a similar one, but made in Russia or China. However, some experts are sure that this cannot be done. They explain this by saying that cheap Chinese or domestic analogues are much worse in their characteristics than the original. After some time, such auto glass will be rubbed by the windshield wiper blades, because it is not strong enough and cannot withstand aggressive mechanical stress.
What to do if a crack appears on the windshield? Even though the chip is small and it may seem that nothing is blocking your view, you should still take action and decide whether to repair the cracked auto glass or install a new one. The second option is preferable if insurance covers all expenses and you do not have to spend personal funds.
The glass was damaged and you decided to entrust the repair of the crack to specialists at a service station? Then, before you start moving, you need to repair the damage with adhesive tape.
Why can you drive only after the chip is protected with tape:
- if such a measure is taken, then a small chip will not turn into a huge crack;
- All kinds of dirt, midges and the like will not penetrate into the chip. Otherwise, it will be impossible to repair the cracked windshield.
When the crack is sealed, you should drive as carefully as possible, without sudden braking. If you accidentally drive over a curb or drive too fast, the crack may grow.
Budget kits for repairing cracks and chips in a car windshield
Today you can find a huge number of various repair kits on sale. Moreover, there is both inexpensive and premium equipment. The following kits have gained the most popularity among car owners:
- GlassProfi
The kit allows you to repair a windshield crack if its size is no more than 3 cm. The kit consists of a polymer, a suction cup for fixation, a syringe, an adhesive disk, and a blade. Using an adhesive disk and a suction cup, you can place the syringe as tightly as possible to the damage and then inject the polymer there. After 3-4 hours it will harden and the chip will disappear. After this, you should wipe the car glass with acetone to remove any remaining polymer composition. - Windshield Repair Kit
Windshield Repair Kit. The set consists of a syringe, adhesive mixture, protective films, an adhesive disk, and a suction cup pedestal. Designed to repair cracks not only in regular but also in tinted car windows. An adhesive disk is placed in the area of the chip, a suction cup-pedestal is attached to it, and the polymer composition is placed into the damage using a syringe.The operating principle of the set is vacuum. When the polymer composition fills the chip, the air completely leaves it. A special composition tightens the crack. The advantage of this kit is the high speed of repair. Therefore, it can be used if you have little time, for example, when you need to repair auto glass right on the highway. The restoration procedure will take only 15–20 minutes.
The kit is enough for 2-3 uses. It will also help prevent the defect from growing. This set is quite popular among car enthusiasts.
- Done Deal DD6584
The operating principle of the kit is similar to the previous one. Consists of a syringe, a pedestal, an adhesive disk, and a suction cup. Its main feature is that the polymer is 5 times stronger than auto glass. It contains acrylic acid. That is, you need to work carefully so that the substance does not get on your hands or eyes. If you are repairing a cracked windshield in the summer, park your car in the shade. The car glass should not be hot: to cool it down, wipe it from the inside with a cloth soaked in water. In winter, the glass should be heated before starting repair work. - Permatex
The kit consists of a syringe, stand, adhesive composition. With its help you can eliminate any chips. Designed for quick repairs in road conditions. The composition cannot be used for filling cracks. Repairing chips can only be done on a clear sunny day. Keep in mind: the adhesive may damage the paintwork. Therefore, you should protect the hood by covering it with something. Once repairs are complete, wait 30 to 40 minutes before removing the syringe from the cradle. This time is necessary for the composition to harden. - Wiederkraft WDK-65182
The kit consists of a polymer composition, a suction cup, an injector, as well as repair plates and a scraper. Restoration must be carried out indoors. Once the adhesive has been applied, park the car in direct sunlight to allow the polymer to harden.
Windshield chip and crack repair
The procedure is performed as follows:
- All glass is cleaned of small fragments, dust and dirt.
- The technician assesses the damage. If the chip is in the shape of an asterisk with rays longer than 1.5 cm, then a small hole is drilled at the end of each of them.
- The glass is blown and filled (under high pressure) with a transparent polymer material.
- An ultraviolet lamp is directed at the “patient”, thanks to which the polymerization of the injected composition is completed.
- The glass is dried and the remaining polymer is removed from its surface. After this, the surface is thoroughly polished.
And everything would be fine. But the success of the event to fix chips and cracks is not always guaranteed. It all depends on many factors that are worth discussing before spending money on repairs.
What is needed for repair
To eliminate chips and cracks on the windshield, you need to prepare a minimum of repairs. What is included in this repair minimum is described in the table below.
Table. Automotive glass repair equipment.
| Inventory, photo | Description |
| Flashlight and mirror | Needed to identify possible air bubbles in the polymer. You can also use a flashlight to determine the boundaries of the damaged area. |
| Bridge and injector | Designed for introducing optical glue onto a damaged surface. It is advisable to use a metal bridge, since they have no restrictions on the period of use. |
| Scriber | A special tool used to expand the damaged area. Also, using a scriber, the glass is cleared of tiny fragments. |
| Ultraviolet lamp | An ultraviolet lamp is used to accelerate the hardening process of the polymer. It makes auto glass repairs much faster. |
| Drill | An electric drill is needed to drill holes along the edges of the cracks. Along with the drill, you also need a diamond drill. |
| Liquid polymer | Glue with a short drying time is excellent for repairs. The polymer must be transparent, just like glass. |
Note! To treat glass, you need cleaning fluid and wipes. Without pre-treatment of the glass, the polymer will not be able to strengthen sufficiently.
Types of automotive glass adhesive
Auto glass adhesives are classified according to their intended purpose:
- for gluing the shield;
- for repairing chips, cracks, potholes.
The chemistry differs in composition and transparency, so the same glue cannot be used to fix glass and repair chips.
What glue to use when replacing a windshield:
- polyurethane composition;
- silane modified polymer.
The classic option is polyurethane glue. It is most often used when installing shields in most car repair shops. The technology requires careful processing and preparation of frames. If the surface is uneven or there is no primer on the glass, the composition will not adhere properly. This will lead to leaks along the contour of the shield and corrosion.
The polymer composition does not require special preparation, quickly crystallizes and adheres firmly to any surface. This glue is almost impossible to tear off, unlike polyurethane glue.
For glass installation
Polymer adhesive-sealant does not require special treatment of the mounting surface. Before work, you should clean the frames, sand them with sandpaper and degrease them.
When purchasing a composition, you should pay attention to the following parameters:
- resistance to humidity, temperature and other destabilizing conditions;
- declared adhesion time;
- crystallization time and strength of seams;
- elasticity during body vibrations;
- required temperature during application.
When choosing a polyurethane glue, you should ask the seller for a primer for car glass, which improves adhesion, and also inquire about additional products that will help with self-gluing.
When purchasing materials, you should be guided by the following rules:
Choose glue from well-known companies that guarantee high quality products and contain complete instructions for use. Request from the seller a certificate for the product offered
This will confirm its quality and protect you from purchasing a counterfeit. Pay attention to the electrical conductivity of the sealant. It should be close to zero
This parameter will protect the car owner from stray and static electricity. Beginners should pay attention to the crystallization time of the glue. You should not choose quick-drying options, as they crystallize in a few minutes and require special skill when gluing glass.
To eliminate defects on glass
Polymer adhesive for glass that eliminates cracks and small chips must meet the following requirements:
- Provide high transparency after crystallization.
- Be fluid to penetrate the crack body.
- Be highly resistant to moisture and maintain transparency when exposed to sunlight.
To repair defects on glass yourself, it is better to purchase special kits. They include a suction cup frame, a dispenser, a transparent film, a blade and a metal needle for cleaning out dirt from the pothole. To install a frame with suction cups, you will need to first degrease the glass.
Types of glue for repairing cracks on the windshield
It must be remembered that for such work you will need special glue. The use of universal super glues can lead to the formation of yellow discoloration on the damaged area.
We list the types of such products:
- Photopolymer UV glue. This is an innovative product in the chemical industry. It is particularly durable, long service life, and able to function normally at critical temperatures. Also, the main advantage when working with glass is the transparency of this substance. The greatest effect can be achieved when exposed to sunlight.
- Acrylic glue. This is one of the popular types. It is resistant to harmful chemical environments, moisture, has excellent adhesive properties, and is non-toxic. When sealing cracks and chips in auto glass, a transparent type of acrylic adhesive is used. Its disadvantage is the long drying time.
- Glue balm. It is based on fir resin and resin. It is a glassy mass to which a solvent has been added.
- Balsam. Has excellent adhesion and dries quickly. Durable material that is not afraid of high temperatures. Its disadvantage is that after completion of the work, a yellow speck remains on the surface.
- Balsam M. A modernized version of the previous substance. It retained all the advantages of regular balsam and added the transparency of the resulting material to its advantages.
For high-quality treatment of the damaged area, one, even ideal, glue will not be enough.
Tools needed:
- injector, for filling voids in a chip or crack;
- an electric drill to drill holes to relieve surface stress;
- applicators for fixing the injector on glass;
- UV lamp for drying;
- scriber for removing excess glue.
You also need to stock up on a vacuum cleaner or pump to remove dust, dirt from the recess, and cleaning wipes.
How to hide a crack with your own hands
Silicone glue. The glue is applied directly from the tube or you can use a medical syringe. After application, allow the glue to dry. This may take from 12 to 24 hours. To be on the safe side, apply clear varnish.
Transparent nail polish. If the crack is very small and thin, use varnish. Just apply it to the crack itself.
Stationery tape. If you don’t have a lot of time to repair the crack, just cover it with tape on both sides. This will prevent the crack from growing.
If you do not want to hide the crack, but want to repair it, you will need the following materials and equipment:
- Photopolymer glue;
- Glue injector;
- Electric drill;
- Ultraviolet lamp (UV) for drying glue;
- Scriber;
- Applicators;
- Liquid and wipes to remove dirt and moisture;
- Pump to clean the edges of the crack from dirt and dust;
How to stop a crack in your car windshield
This situation can happen to anyone when the wind element is damaged.
How to stop a crack in your windshield? First, conduct a visual inspection of the damage:
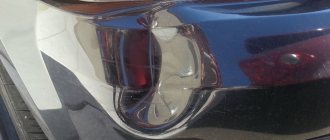
- If the defect reaches the edge of the glass, it cannot be restored. The only solution is to install a new one, because even if you seal the damage with tape, the repair will not be successful. However, if the chip does not reach the edge by at least 5 cm, glass restoration is possible.
- To stop a crack in your windshield, you need to determine how deep it is. So, a chip can affect one or two layers, or a crack can go right through. Take a needle and run it from the inside along the glass. Does the needle slide along the crack? This indicates that the inner layer is not damaged. Otherwise, the defect is through. Then it will not be easy to restore, but it is possible.
If your windshield is cracked, how can you stop the crack? First, apply adhesive tape to the chip to prevent dust and moisture from getting into the damage. Otherwise, it will be very difficult to restore the glass. When the crack is through, use duct tape to seal the defect on both sides.
After this, you can continue driving the car. It is recommended to carry out restoration work as soon as possible.
Experts advise eliminating the defect immediately. Otherwise, due to the fact that the body vibrates, the chip will become larger, and as a result, restoration will be more complicated or even impossible.
Note! You should drive a car with a cracked glass carefully, avoiding uneven roads and potholes. Otherwise, the crack may reach the edge of the wind element.
To stop a crack in your windshield, make a small hole along the edges of the crack.
This is the only way the chip will stop growing. Do not forget that glass is fragile, so you need to act carefully. Do you have any experience with this type of repair? Then it is better to seek help from a specialized car service.
To stop a crack in your windshield, make a small hole along the edges of the crack. This is the only way the chip will stop growing. Do not forget that glass is fragile, so you need to act carefully. Do you have any experience with this type of repair? Then it is better to seek help from a specialized car service.
If you are going to stop a crack in the windshield on your own, you need to choose a special drill. Standard high-speed steel drills cannot be used. Special tools are suitable for working with ceramics and glass. Typically, such a drill is made with diamond coating. How to choose drill diameter? It should be slightly smaller than the size of the chip.
You can stop the damage from spreading if you carry out repair work right away. Drill a hole at low speed. Clean the glass in advance with acetone or a solution of water and soap. When the defect is not through, we also drill a shallow hole. Otherwise, drill through the glass. While working with a drill, you should constantly wet the hole with a solution of water and soap or acetone. Move in such a way as to avoid sudden impacts or sudden movements.
Important! It is necessary to drill a hole not in the chip, but at a distance of a couple of millimeters from it, opposite the edge of the defect. If you try to drill directly into the damage, you will most likely not be able to stop the crack in your windshield.
The chip will begin to grow. When the hole is ready, lightly press on the damaged area so that the crack enters the hole; this result is called a “bull’s eye” among auto mechanics.
How to work with a drill so as not to make the hole deeper than necessary? To do this, use a special rubber stop for the drill. This will allow you to drill to the desired depth. When the defect is multi-ray, holes are drilled for each beam.
Diagnostic features
Even if minor damage appears on the glass, you should not panic right away. This can all be repaired. Of course, the effectiveness of repair largely depends on the size of the crack or chip, so diagnostics are initially needed. Inspect the defect and assess the damaged area to assess the plan for further work.
Windshield diagnostics
If the crack is single, then you can deal with it yourself , without resorting to the help of specialists. But if there is multiple damage, then you need to consult a specialist. It is likely that restoring such glass will cost much more than replacing it. Once the decision to repair has been made, you can begin the preparatory stage.
Inspection of a crack in the windshield
Crack repair
Having all the tools, we move on to the process of repairing cracks on the windshield with our own hands:
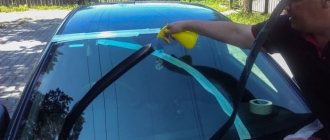
To get started, clean the crack from dirt and dust. Use a pump for this. It is recommended to clean thoroughly, because... The quality of repair work depends on this.
Next you need to reduce the stress on the glass. This is necessary to prevent the crack from getting larger. Use a drill to get the job done. It should be drilled at a distance of 2 mm in the direction of the crack expansion. Apply pressure and bring the crack to the drilled hole.
Using a scriber, clean the edges and cracks. Next, take a napkin and soak it in a special liquid, and wipe the area of the crack. Wait until completely dry.
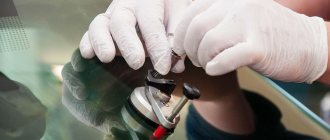
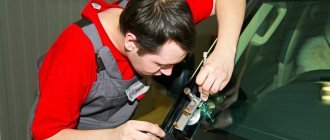
Attach the injection bridge support. To firmly install the bridge, lubricate the suction cup with Vaseline. The bridge must be located exactly above the crack.
The next step is preparing the injector. After removing the oil seal, lower the piston down. Add a few drops of glue to the injector (the glue will restore the strength of the glass). Use the plunger to lift the glue to the top edge of the cylinder.
Put on the seal. Attach the injector with glue to the bridge. Do this using applicators. Check the center, it should be completely above the crack. Fill the entire crack cavity evenly with glue. Raise the piston and hold for one and a half minutes. Lower it down.
IMPORTANT: the injector must be positioned parallel to the windshield.
Remove the injector and bridge when the crack is filled with polymer.
Place an ultraviolet lamp over the crack. Hold it for three minutes for the glue to polymerize.
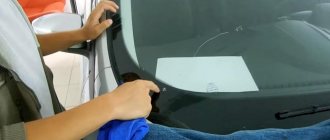
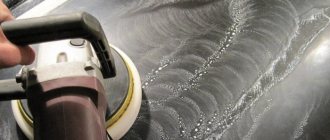
To begin the last step, make sure the glue is completely cured. Use glass polish to successfully polish glass. Shake the polish and apply a drop onto the crack. Use a napkin to wipe the glass for five to seven minutes.
This will complete the work. There will be no cracks left and you will not have to pay for expensive repairs at the service center. For a high-quality repair result, take the work seriously.
DIY glass repair
The algorithm of actions in this case is as follows:
- First of all, the broken glass is carefully cleaned of external dust and dirt.
- Then a hole is drilled in it, located at a distance of approximately 5 mm. from the visual edge of this crack. It should be taken into account that glass is very fragile, and therefore any incorrect movement or excessive pressure on its surface can inevitably lead to a sad outcome: it will either burst or sharply increase the size of the crack. Because of this, it is necessary to drill glass strictly perpendicular to its surface, and not at an angle.
- Then the defects and the fresh hole are filled with polymer autoglue using, as we have already emphasized, a special pump. When the glue dries (this process can be accelerated), the surface of the glass is thoroughly polished.
If all these stages of work are carried out correctly, the former crack will be almost invisible. To repair a chip, approximately the same operations are performed sequentially. If the chip has the shape of a “bull’s eye” (rounded) or a crescent, there is no need to process the glass with a drill. The main thing is that the polymer glue fits tightly into the void of the chip. After drying, the repaired glass is carefully ground.
So, all the main stages of independent work on repairing a crack in glass were sequentially considered. If it appears on your machine, you can try to fix it yourself. However, do not exaggerate your capabilities, because improper processing of glass, especially during the process of drilling it with a drill, can completely ruin it. It’s better not to experiment, or to do it on unnecessary glass, so to speak, filling your hand. Good luck!
How dangerous are cracks?
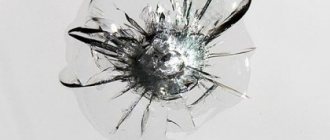
The windshield is designed to withstand strong vibration loads from headwinds and temperature changes. It is also capable of withstanding a moderate impact during an accident and severe pressure over its entire area. But glass remains glass and fragility remains the most serious drawback: with sudden temperature changes and pinpoint impacts of hard objects (crushed stone on the road, a nut, a pebble), a chip, pothole or crack can form on its surface.
How dangerous is this? Since the structural integrity of the glass is compromised, it can no longer withstand severe stress. Vibration and tension of the power frame of the body when the car is moving, small mechanical shocks, strong gusts of headwind and temperature changes begin to increase this crack, weakening the glass structure. This leads to the fact that it can simply fall apart from hitting a curb, not to mention a minor accident.
Naturally, breaking the integrity of the glass is dangerous for the driver and passengers of the car and can lead to an accident and serious injuries. In addition, the spreading crack prevents the driver from seeing the road clearly and creates a feeling of discomfort.
Another problem: it will be difficult to pass a technical inspection at the traffic police if there is a crack in the windshield of your car. In any case, you will have to fix it or replace the glass in order to receive a maintenance ticket.
The easiest way to solve the problem of a cracked windshield is to replace it. But this is an expensive pleasure: you need to find and buy glass, or order it at a service station, and you won’t be able to install it yourself - it requires trained craftsmen and professional equipment.
An alternative solution is to repair glass yourself. You just need to stop the crack from growing. But such repairs only make sense if the crack:
- It is small in size and occupies no more than 10-30% of the glass area;
- does not interfere with the driver's view;
- did not reach the edge of the glass (at least 5 cm from the edge).
If these conditions are present, you can try to repair the glass and make it last for some more time. But, in any case, this is a temporary measure - sooner or later, glass replacement is inevitable.
Car windshield repair
Professionals recommend carrying out glass repairs in an ambient temperature range of 20 to 30 degrees.
Step 1: Thoroughly clean cracks and chips. At the first stage, it is necessary to clean the crack and the edges of the chips from dirt and dust using a pump. A vacuum is also necessary to avoid rubbing dirt on the glass.
This is very important, since the quality of your glass repair depends on the thoroughness of your cleaning. When cleaning, move across the crack, not along it.
Step 2. Fixing the crack. Next, use a drill to make a hole at a distance of about 2 mm from the edge of the crack in the direction of expansion
Carefully press on the glass. It is necessary that the crack “reaches” the drilled hole
Now the crack will not “spread” any further.
Step 3. Sanding the damage. Using a scriber, we carefully clean the edges of the chips and the area of the crack. We moisten non-woven cloths with a special cleaning liquid and rub the prepared area of glass. Let it dry.
Step 4. Preparing the glue. Prepare photopolymer glue in accordance with the instructions indicated on the package. Before buying glue, check its expiration date, since the optical properties of the glue are lost when it ages.
Step 5. Installation of the injection support. The injection support is a bridge that looks like a small suction cup circle
It is important that the bridge is well secured to the glass. To do this, lubricate the suction cup with Vaseline and place it exactly above the crack.
Step 6. Preparing the injector for use. Remove the oil seal, then lower the piston down. Add a couple of drops of glue into the injector (up to 6 drops). Use a piston to lift the glue to the top level of the cylinder and thread the seal. We use applicators to install the injector with glue on the bridge. Its center should clearly coincide with the center of the crack or chip. We evenly fill the entire crack cavity with polymer. The injector should be positioned correctly parallel to the glass. Raise the piston up, hold it for one and a half minutes, then lower it down. When the crack or chip is completely filled with glue, remove the injector and bridge.
Step 7. Hardening of the glue. So that the glue hardens, that is, polymerizes, set the ultraviolet lamp for 3-4 minutes. In the absence of a UV lamp, the glue can be dried in the sun, but in this case the process is doubled.
Step 8. Polishing the glass. Make sure the glue is completely cured before you start polishing the glass. For polishing, it is recommended to use a special glass polish. Apply a drop of polish to the place where there used to be a crack. Polish thoroughly with a cloth for about 7 minutes.
The car glass repair has been completed.
The advantage of doing your own glass repair is its low cost compared to a complete glass replacement at a car dealership. If the repair is carried out properly, cracks and chips will not be noticeable; in addition, there is no need to fear that unfixed cracks will spread throughout the entire glass. However, the defect cannot be completely eliminated, and during the sale it should be pointed out to the buyer, as this can be easily identified at any service station.
Windshield repair
There are several important conditions when repairing a windshield. First of all, you need to make sure the quality of the polymer used. The fact is that not all products from well-known manufacturers are suitable for our harsh climate. But as soon as everything is at hand, you can start working. The processes for repairing chips and cracks separately are described below.
Repairing a chip on the windshield
It is worth noting that repairing chips is much easier than eliminating cracks. Moreover, you can buy special tools for repairs in auto stores. Below step-by-step instructions describe the repair process in detail.
Step 1. To work, you will need a special kit for repairing windshield defects. You can purchase such a set at any auto store.
Windshield repair kit
Step 2. Inspect the syringe and make sure that the adhesive substance in it has not frozen.
Liquid polymer in a syringe
Step 3. You will also need sticky circles, an adapter and a pin.
Sticky circles, adapter and pin
Step 4. The chip is small, so our kit can easily handle it. Before work, clean and degrease the surface.
Cleaning the glass surface before repair
Step 5. Stick a plastic circle on the windshield so that the chip is in its center.
Fixing a plastic mug
Step 6. Glue the plastic adapter on top and press it firmly for a few seconds.
Gluing a special adapter
Step 7. Insert the syringe with polymer glue into the adapter.
Installing a syringe with polymer glue
Step 8. Pull the plunger out of the syringe to a certain point. At this moment all the air will come out of the chip.
Creating a vacuum in the cleavage cavity
Step 9: Lower the piston by applying slight pressure. Then repeat the procedure 4-5 times or until no air bubbles come out.
Lowering the syringe plunger
Step 10. All information is provided in the instructions. Once all the air is out of the chip, carefully trim the Velcro from the windshield.
Detailed instructions for repairing a chip
Step 11. This is what the chip looks like after the repair procedure.
Windshield after chip repair
Step 12. The polymer takes quite a long time to dry in the sun, so use an ultraviolet lamp if possible.
The windshield is ready
Auto glass crack repair
There are many similarities between repairing a crack and a chip in your windshield. But in the case of cracks, the process becomes more complex and painstaking. All actions, conditionally divided into several stages, must be performed indoors.
Step 1: Carefully inspect the crack to determine the drilling point.
Inspection of the damage site
Step 2: Make a small indentation.
Mark on glass for drilling
Step 3. Drill a hole no more than 1.5-2 mm deep.
Making a small indentation
Step 4: Thoroughly clean the surface with a brush. You can use an old toothbrush.
Cleaning the surface with a toothbrush
Step 5. Insert the scriber into the hole you made and lightly hit it with an object. This is necessary to obtain a bull's eye.
Getting the bull's eye effect
Step 6. Lightly press the hole from the inside until a characteristic click appears. This is necessary so that the crack reaches the “bull's eye”, that is, the drilling point.
Pressing the hole from the inside
Step 7: Drop a little glue onto the crack to see how it will fill.
Applying polymer to a crack
Step 8: Continue filling the crack with polymer. Do everything carefully, using a little glue.
Filling a crack with liquid polymer
Step 9. Glue the spilled areas with special translucent plates.
Gluing a translucent plate
Step 10: Fill the crack in small sections until you reach the bull's eye.
Filling a crack with glue
Step 11. Now drop a little polymer on the border of the filled and unfilled area, and then lightly press the drilled hole from the inside.
Pressing the drilled hole from the inside
Step 12: Continue pressing down on the inside of the glass until the entire cavity is filled with glue. This is a slow process, so you need to be patient.
Pressing the glass until the crack is completely filled
Step 13. If necessary, add another drop of polymer composition.
Application of polymer composition
On a note! You can’t drip on the bull’s eye itself yet, as it serves to remove air from the crack.
Step 14 : Install the injector. It must be installed in such a way that the drilled hole is exactly in the middle of the rubber band that is located in the injector itself.
Installing a bridge with an injector
Step 15. Fill the injector itself with a few drops of polymer, and then screw it back in, as seen in the photo.
Filling the injector with polymer
Step 16. Wait 3-5 minutes until the polymer from the injector fills the hole in the windshield.
Filling the bull's eye with polymer
Step 17. Remove the injector and apply a translucent plate.
Installation of a translucent plate
Step 18. Install an ultraviolet curing lamp.
Connecting an ultraviolet lamp
Step 19. After polymerization, remove excess polymer with a special blade.
Removing polymer residues with a special blade
Step 20. The repair is complete. As you can see in the photo, it is impossible to see traces of a crack with the naked eye.
This is what the windshield looks like after repair.
Damage classification
However, it is also possible that a chip will degenerate into a scratch: along with the body, the glass also “plays” on uneven surfaces. And a chip is nothing more than a stress concentrator, a place that can serve as a starting point for the formation of a crack.
Each of the defects is eliminated according to a purely individual scenario. For example, unless you stop a crack, it is useless to seal it. The chip takes up a much larger square in both directions, which means it requires a jewelry approach. After all, the distorted areas of glazing, as well as the careless appearance of the treated location, are not of the slightest interest.