Need to know
You can add a heater to the car’s heating system yourself; to do this, you need to buy an additional heating element. Or you can try and make it yourself; for these purposes you will need a second radiator and a housing for a new heating element, which can also be made at home.
Where to put
- In the distance between the front seats where the tunnel is located.
- Under the front seat.
Suitable Models
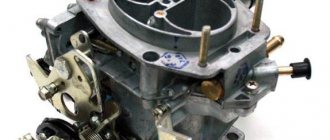
- Technomaster-8110.0500.10 and 8110.0700.10 (Tolyatti). Its price varies within 3000 rubles.
- Helios, Xeros and Zenith (Eberspächer) - are more expensive, from 3500 rubles.
How to install
The additional heating element is mounted under the front passenger seat.
- Depressurize the engine cooling system.
- Connect the durite hoses of the new heater into the section of the cooling system, so that they do not touch the exhaust pipe of the muffler and the steering elements.
- Make 2 holes of 19 mm each for the pipes in the engine shield.
- Place the heater pipes into the interior under the floor covering.
- Lead the pipes out from under the floor covering near the frame near the passenger seat.
- Secure the pipes using clamps to the additional stove.
- Fill the expansion tank with 2 liters of coolant.
- Check the systems for airiness and remove it if necessary.
- In addition, you can put a special button for an additional stove on the dashboard.
Negative aspects of installing an additional stove in the cabin
- An increase in the heat capacity of the cooling system entails slow heating of the coolant.
- The characteristic noise of the stove in the cabin will be added, since now there will be two of them working.
- The air flow from the stove will raise dust from the interior.
- In the warm season, hot hoses under the floor covering will additionally heat the interior of the car, but there is a way out of this situation - install a tap in the engine compartment when making changes to the cooling system.
- If you do not install another heater regulator and heat dissipation to the side, then there will be no uniform heating, but only one part of the interior will become very hot.
Installing a second heater radiator on a VAZ-2109 will be advisable only in areas with very low temperatures in winter, where the basic heater, despite its proper operation, does not cope with the task and the car does not warm up properly.
Installing an additional pump
The main negative quality of the basic heating element of the VAZ-2109 is its low efficiency at idle speed. This problem can be solved by installing an additional pump (additional pump) in the cooling system.
Purpose
By installing an additional pump 09, you can increase the efficiency of the stove at idle speed. The base heater blows warm air at idle, and hot air only when driving. This means that fluid circulation in the engine cooling system is poor. Installing an additional pump makes the coolant move much faster, including at idle, therefore, during a stop, hot air will blow from the stove, and not warm as before.
Which additional pump is better to choose?
The most common and proven options are additional pumps from GAZelle or Bosch. These elements do not have any problems with leakage.
Installation of an additional pump from a GAZelle on a VAZ-2109
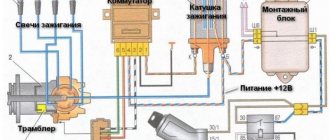
- Pump for GAZelle
- Relay. You can take a relay with normally open contacts 2105, 2108 - starter or ignition relay and bridge contacts 30 and 86.
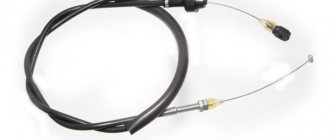
- Reinforced hose.
- Cooling.
- Several clamps.
Progress
- Wait for the antifreeze to cool completely and drain it.
- Unscrew the 4 top screws on the pump, where the impeller is located, and coat the rubber gasket with sealant.
- Secure the pump to the studs near the battery.
- Disconnect the coolant wire hose to the heater from the outlet pipe of the cylinder head and connect it to the horizontal pipe of the pump.
- Connect the hose of the connected S-shaped hoses (located in the cabin between the tap and the radiator) to the vertical branch pipe.
- Connect the second end to the head of the block, in the previously removed place of the base one.
- Pull all the clamps and do not forget to tighten the drain plug in the block.
- Fill the coolant to the maximum and check for leaks.
- If necessary, tighten the clamps.
- After running the engine for half an hour, bring the antifreeze level to normal.
Installing an additional pump from a GAZelle is very popular among VAZ owners, as it has only positive aspects. The car will be properly heated even at idle speed, and the price of the issue is about 2000 rubles. depending on the price of the purchased part.
The pump (water pump) is the main element of the cooling system of any car. The actual service life of the water pump in VAZ 2108–099 models varies widely - from 40 to 100 thousand kilometers. You can replace and repair the pump yourself. The procedure is simple, but labor-intensive - it will take three to four hours to complete the work.
How to install an additional pump on a VAZ 2110 stove
In the cold season, almost all drivers think about the efficiency of the stove in their own car. There are a large number of cars in which the stove does not provide the best heating of the interior while the engine is idling. This problem is quite successfully solved by installing an additional pump on the VAZ 2110 stove. Let’s try to figure out what kind of pump it is and how it is installed?
Why do you need an additional pump?
If you are the owner of this car, you will probably notice that hot air from the dampers can only be observed when the engine speed reaches at least 2000 rpm.
When operating at idle speed, the heater fan blows out only warm air. The thing is that the speed of circulation of antifreeze throughout the entire cooling system depends on the rotation speed of a conventional pump, and the faster the circulation occurs, the higher the temperature of the tubes located in the heater radiator.
The problem is solved by installing a special mechanical device - an additional pump, which accelerates the circulation of coolant and helps maintain the interior temperature even when the engine is idling.
At first glance, it would seem that such a system was invented by ordinary garage craftsmen who simply made their lives easier by trying not to change the root of the system’s design. However, this is not the case, because this technology has been successfully used for a long time even on world brands such as BMW or even Mercedes Benz.
How to install an additional pump?
Before you begin work, you need to purchase everything you need. This list includes:
- Electric pump from a Gazelle car. He will be that very pump.
- A relay in which the contacts are normally open. The starter relay from the VAZ 2108 is ideal for this.
- Hose clamps in quantity of at least 5 pieces.
- Reinforced hose. The length of the piece must be at least 1 meter (with a margin).
Now drain the antifreeze from the radiator and cylinder block. By the way, this is an excellent opportunity to change antifreeze if necessary, so you can also include new antifreeze in the list above.
To improve the efficiency of the pump, remove the four screws from the pump and remove the top housing. There is a gasket inside that needs to be thoroughly treated with sealant and the whole thing assembled. However, now the housing must be secured using long bolts and nuts. This way you will ensure the best tightness of the future pump.
The location of the pump installation is chosen by the driver independently. In this case, there is only one main requirement: the pump must be connected to exactly the hose that leads to the stove radiator. Otherwise the pump may be damaged.
There are enough studs for mounting the pump under the hood, so there should be no problems with the placement of the pump.
Now the most important thing remains - to turn on the additional pump. The power will be supplied from the recirculation valve, so the circuit will be as follows:
- Disconnect the white and yellow-blue wires from the recirculation valve. The first wire is connected to relay contact number 85, and the second to contact 30. Contacts 30 and 86 must also be connected using a jumper.
- Contact number 87 is connected to the wire of the pump itself. To check the operation of the pump, just press the button. Everything else just needs to be connected to ground. If it rotates, then everything is done correctly.
All hoses must be connected using sealant. After carrying out the work, fill in antifreeze and check the functionality of the pump. It is recommended to repair any detected leaks. This is how you can easily install an additional pump from a gazelle on a VAZ 2110 car.
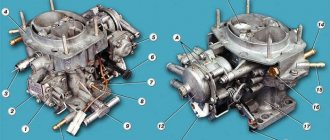
Purpose and design of the pump
The water pump is the most important element of the engine cooling system. Its main function is forced circulation of coolant through two circuits - small and large. On an unheated engine, antifreeze circulates in a small circle - from the water jacket of the engine to the radiator of the cabin heater and the carburetor cooling unit (or the throttle valve on the VAZ 21099 injector). When operating temperature is reached, the thermostat opens a large circuit and coolant begins to circulate through the main radiator.
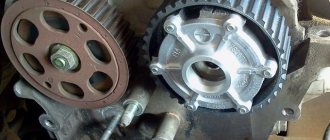
Pump location
The water pump is installed on the right (in the direction of travel) side of the engine under a plastic cover. There is also a gas distribution mechanism that drives the pump toothed pulley through a belt. This arrangement creates a number of problems.
- To inspect the pump you have to remove the plastic casing.
- Due to a leaky seal and a small leak, antifreeze gets onto the belt, which quickly fails.
- If the bearing is severely worn, the shaft may jam, and the timing belt may jump off or break. In 90% of cases this leads to pistons hitting the valves, and subsequently to expensive repairs.
The coolant pump is installed on the right side of the engine
For these reasons, it is necessary to periodically (every 10–15 thousand kilometers) inspect the gas distribution mechanism for belt tension and pump performance.
Troubleshooting
Malfunctions of the water pump on front-wheel drive VAZ models manifest themselves as follows.
- Extraneous noise appears on the right side of the engine, increasing with increasing speed.
- Traces of coolant (not to be confused with engine oil) form near and under the timing belt assembly.
- A puddle appears under the car, and the level of antifreeze in the expansion tank drops noticeably.
- The electric cooling radiator fan turns on more often than usual in any weather.
The protective cover is attached to the engine with three bolts
Practice shows that most car enthusiasts discover the problem at the penultimate and final stage of wear, when the antifreeze has already leaked to the ground or the pump shaft has jammed.
It is quite difficult to clearly identify the sound of worn water pump bearings against the background of a running engine. The problem is compounded by noise from other faulty components, such as knocking valves. Therefore, at the first suspicion, you should remove the plastic timing case by unscrewing three bolts with a 10mm wrench and diagnose the pump as follows.
- Carefully inspect the area around the water pump gear and timing belt for traces of coolant.
Traces of coolant under the pump indicate an antifreeze leak
After complete wear of the bearing, the pump shaft may become distorted.
These symptoms can appear individually or simultaneously. You can detect oil seal wear when the bearings are working (there are traces of antifreeze, but there is no shaft play), and vice versa. In any case, the pump should be removed and, if necessary, disassembled or replaced.
The method for identifying a faulty water pump is the same for versions of a car with a carburetor and an injector; there is no difference.
Video: operation of a faulty pump
Replacing the water pump
The pump replacement process can be divided into four stages.
- Preparation of tools and devices.
- Partial disassembly of the timing belt assembly and removal of the pump.
- Purchase a new pump and high temperature sealant to seal the flange.
- Installing a new water pump and assembling the timing assembly.
If you are not sure that the water pump is faulty, then it is recommended to follow this procedure. There are cases when the coolant leaks due to a worn gasket, but the pump itself is fully operational. Therefore, it is not worth buying it in advance.
Preparing for work
To dismantle and replace the water pump, a standard set of tools:
- set of spanners for 10–19;
- Phillips and flathead screwdrivers;
- ratchet wrench and set of sockets;
- pliers with bent thin lips;
- jack and wheel stands.
To replace the pump you will need a standard set of tools and a liter container of coolant
To clean the engine housing of old sealant, you will need a rag and a small knife. It is recommended to carry out work on a level, well-lit place. An inspection hole or overpass is not needed.
The engine compartment should be well lit during work.
To drain the antifreeze you will need a basin, a funnel and a piece of ordinary hose. Since a certain amount of coolant will be lost in this case, you should prepare a liter of fresh antifreeze for topping up.
Removing the water pump
The procedure for removing the pump is in many ways similar to the technology for replacing the timing belt, except that the crankshaft pulley and the generator drive belt remain in place.
The algorithm for removing the pump from carburetor and injection engines is absolutely the same and consists of the following.
- Unscrew the three bolts holding the plastic timing belt protection and remove it.
After unscrewing the three fastening bolts, the timing belt protection can be easily removed
In order not to disturb the valve timing when removing the belt, marks should be placed on the camshaft pulley and cylinder head.
The bolt plug for draining antifreeze is located on the wall of the cylinder block
A loose timing belt can be easily removed from the top gear
Use a second wrench to loosen the pulley nut.
The water pump and metal casing have three common mounting bolts and are removed together
While emptying the engine water jacket, open the expansion tank cap - the liquid will flow faster.
The water pump is disassembled using a special puller
Inspect the removed pump for shaft play and make sure that the antifreeze flows out through the seal. If desired, the pump can be disassembled using a special puller with two hook-shaped grips. To do this, you need to unscrew the locking screw, pull off the impeller with a puller and carefully knock out the shaft and bearing.
Before pressing out, you need to unscrew the locking screw that holds the bearing in place.
Usually the pump from the “eight” and “nine” is not repaired, but replaced. The reason is the lack of high-quality spare parts - oil seals and roller bearings. It is easier to install a new part in the assembly than to constantly restore the old one.
Video: disassembling the water pump
Choosing a New Water Pump
When purchasing a new pump for the VAZ 2108/09, you need to consider a number of points.
- To avoid mistakenly buying a pump from later VAZ models with a 16-valve engine (it differs in the size of the pulley), take the faulty pump with you to the store.
- Choose a new pump with straight, rather than arched, impeller blades.
Another pump
An additional pump for the VAZ-2107 stove can also improve heating in the car. The pump is usually installed next to the battery and hoses. When installing, you need to remove one hose that comes directly from the unit. Connect this hose to the additional pump. The hose should go from the block to the bow of the pump, and the outlet hose should go to the stove.
We recommend: Lada Vesta SV Cross AMT gearbox: features, reviews, specifications.
Power for the additional pump is taken from the heated rear window button. There is only one positive wire coming from the additional pump motor, and the housing itself is ground.
Powering the pump is simple:
- The very first plug with wires is removed, and the second gray wire, responsible for heating the rear window, will be our basis.
- We wind the power from the pump to it and bring it under the hood.
- To keep the wire more secure, you can solder it.
- After installing the plug back, you can say that the pump is ready for use.
Sometimes an additional pump is installed on the VAZ-2107 stove due to poor air circulation. In addition, at low idle speeds there may be no circulation at all, and the flow of antifreeze to the stove is poor.
Based on the results of operation, the additional heater on the VAZ-2107 will turn on every time the rear window heating is turned on.
But you can connect the pump in another way. To do this, you will need a connector from the injectors/knock sensor from the VAZ. It can be purchased at any auto parts store.
It is necessary to solder two wires to the ends of the connector of the part, after which everything is hidden in the corrugation and sealed with electrical tape.
Separately we bring out the wire for connecting the ground. We find it on a bracket nearby. We carry the harness up, connect the heater resistors to the block, where the plus was taken from.
As a result, when the heating is turned on, another pump is turned on, consuming only 1.5 A in operating mode. In this case, you can not install a relay and connect directly to the positive wire in the block.
Installing an additional pump
The disadvantage of the first front-wheel drive VAZ cars was the poor performance of the interior heater. Until the engine warms up to operating temperature, the cabin is cold. This is due to the design of the small circulation circuit, into which coolant enters in small quantities. The problem is solved by installing an additional electric pump from GAZelle.
An additional electric pump is installed in the stove pipeline
To install an electric pump, you must purchase:
- four-pin relay;
- multi-core wires and a two-pin connector;
- fuse socket;
- hoses and clamps for connection to the cooling system;
- electric pump from a GAZelle car.
The pump is placed on a homemade bracket, screwed to one of the bolts on the mounting flange of the gearbox. The antifreeze is first drained and the thermostat is removed, which will interfere with the installation of an additional pump. This is especially true for the injection model VAZ 21099.
To turn on the pump, a small circuit with a relay is assembled
The insertion is made into the return pipe coming from the cabin heater. In this case, the electric pump will create a vacuum in the heater radiator. To turn on the pump together with the ignition and from a separate button, a simple electrical circuit is assembled. A relay with a fuse is placed in the cabin under the dashboard, and any free button is selected as a switch.
Video: installing an electric pump
Checking the functionality and replacing the water pump on a VAZ 2108–099 is quite simple. Don't forget about preventive measures. You should periodically check the technical condition and lubrication of the pump, and also change the coolant in a timely manner. Under these conditions, the pump will last as long as possible.
Additional electric pump for “nine”
Now the cold weather has arrived and the owner of the VAZ 2109, living in Russia, will again have to face the problem of the stove. Indeed, either the domestic manufacturer initially did not take care of its normal functioning, or this car should have such a system, but the VAZ 2109 with an electric pump, which is installed independently, is more suitable in winter in our country. On a VAZ 2109, installing an electric pump will not take much time and it is enough to know the basic algorithm for carrying out the operation, which will be discussed in our article.
Why and where to install an electric pump on a VAZ 2109
It is clear that no owner wants to freeze in his car all winter. And passengers are unlikely to want to sit in a kind of “refrigerator”, where instead of warming up, you freeze completely. The standard stove of this car, of course, warms, but it does it reluctantly and as if on debt. It's all about its low efficiency, especially at idle, when you're stuck, for example, in traffic jams. Installing an additional electric pump, in this case, solves the problem immediately. In fact, there are many ways to make the interior of your “nine”, but modifying the car’s cooling system by installing an electric pump is the most rational solution.
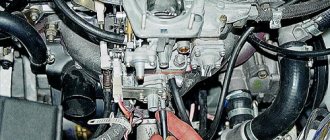
Cooling system and its features
From thermostat 29 to tap 21 there is a “supply hose”. We are not interested in him! The pump is inserted into hose 19. It is connected to the pump supply pipe (part 20).
Everything here is trivial
If we look from under the bottom, we will see two hoses near the partition. We need the one that is fixed closer to the right wheel. And now, instead of hose 19, an assembly is installed: the same hose “21083-8101010-01”, an electric pump, hose “2101-8101204” (to pipe 20). That's all, actually.
Each hose is attached to the nozzles with two clamps. The article number of one clamp is “2108-1300080-10”.
Purchase parts in advance:
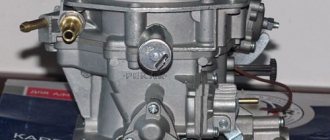
- BOSCH pump 0 392 020 034 or pump 32.3780-01 for Gazelle with 18 mm pipes (important);
- Electrical parts;
- All hoses and clamps;
- The BOSCH pump requires VAZ fasteners: a intake pipe clamp, as well as a bracket for this clamp (all from LADA-2101).
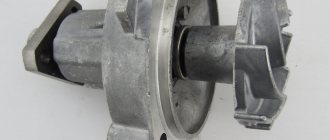
The pump from the Gazelle will have to be modified: the body is disassembled, degreased, the rubber gasket is lubricated with sealant...
GAZ pump after modification
When assembling, use screws with nuts instead of standard self-tapping screws (see photo).
By installing an additional pump on the VAZ-2114, you don’t even have to connect it. Everything will work as before. The main thing is that the pump does not leak, and we have already indicated the solution.
What can it give
So, let’s first find out what an additional electric pump in the VAZ 2109 will give us:
- It turns out that installing an additional pump in a car of this model of the VAZ family can significantly increase the efficiency of blowing warm air into the interior at idle.
Note. In other words, if a standard stove blows hot air only when the car is moving, and only blows warm air at idle, this means poor circulation of fluid in the CO. Modernizing CO by installing an additional pump will allow antifreeze to circulate faster.
- Installing an additional pump, of course, will significantly insulate the interior, but the volume of pumped antifreeze will double. This, in turn, will lead to the fact that the engine will begin to cool down more and you need to take care, in addition, to conserve its heat. In this case, complete thermal insulation of the car will be what is needed, especially since nowadays you can find a huge amount of materials for this in stores.
- An additional pump, of course, gives an irreplaceable effect. On the other hand, this creates an additional load on the VAZ generator, which will also have to be upgraded. The fact is that the “nines” have a slightly weak current converter.
Additional pump: what you need to know
So, if the stove initially works poorly, although it is fully operational, and also if the car is often operated in severe frost conditions, standard heating may not be enough even for a middle-class car.
In the case of a VAZ or old foreign cars, the problem is solved by gluing the dashboard, upgrading the heating system, installing tight dampers, replacing the heater radiator, the heater motor itself with a more efficient one, etc.
However, if all these actions are not enough, then an additional pump for the stove may be the solution. In a nutshell, the auxiliary heater pump is an electric pump that circulates the working fluid of the cooling system in a small circle even when the engine is not running.
This allows you to more actively warm up the interior when the internal combustion engine is running or when the warmed-up engine is turned off, but the driver and/or passengers are in the car (fuel savings and increased comfort).
Also, an additional heater pump helps out when the engine is idling without load (for example, when sitting in a traffic jam) and quickly cools down. In such conditions, a standard stove usually does not blow hot air, but only warm air.
By the way, the same thing happens when driving on the highway at high speed in the cold season, when oncoming air flows intensively cool the engine compartment, as well as the coolant in the cooling radiator, etc. In turn, the additional pump to the heater causes the coolant to circulate more actively and give off more heat.
Another advantage is ease of installation, which means minimal intervention and changes to the factory design. To put it simply, an additional pump is installed so that the coolant circulates in a small circle.
A simple connection of the pump to the vehicle's electrical network is also implemented. Usually, all the necessary fasteners, adapters, connectors, etc. are included with the pump.
How to choose an electric pump
It seems that we have sorted out what the additional pump gives us. Now let's find out how to choose it:
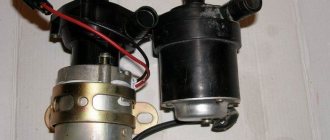
- The Gazelle electric pump is usually the most popular option. It will fit perfectly. This element is a conventional centrifugal pump. The disadvantage of this pump is that it cannot pump air due to the large gaps between the impeller and the housing.
VAZ 2109 electric pump from the old Gazelle
Note. Gazelle pumps are also different. Old and new pumps are known. As a rule, new electric pumps vibrate less and their use is more rational.
- “Advanced”, so to speak, motorists are advised to install, as a better option, an electric pump from Bosh.
- An option like a pump from Elara will also do. The manufacturer has recently significantly improved the element by introducing a new seal that does not leak. In addition, the cross-section of the fittings was increased, and this gave a double increase in productivity.
- A pump from Advers will also do.
Variant of the scheme for the VAZ-2114
We connect the motor through a fuse and a relay rated at 10 Amps. The relay will be turned on by a button attached to the device.
Scheme (simple version)
The “+” voltage was taken directly from the battery, but this can be done - a sealed holder “hangs” on the wire, where the fuse (5A) is located. Installing a button looks simple:
- Remove all the handles;
- Move the plastic panel towards you;
- We install a new button and connect the wires.
As a result, you can see what is shown in the photo.
Circulation button
What can be improved
- A diode is connected in parallel with the relay winding in the “back to front” direction, thereby extending the service life of the button;
- Connecting to the battery directly is bad. It’s better to find another point with a “plus”;
What we got
- The engine drive of the faucet is used on many cars, including the VAZ-2114, and it is this (the engine itself) that must turn on the additional pump. If anyone can implement something like this, it would be nice to leave your answer in the comments. By the way, a regular limit switch will not help here.
Installing an additional pump on a VAZ 2109
In this article we will learn how to install an additional pump on a car like a real auto electrician. The VAZ 2109 is a car that allows you to constantly modernize and improve something, however, like all models of this family. Let us present to the reader two algorithms on how to mount a pump from Gazelle and from Bosh.
Installing a Gazelle pump
As mentioned above, this is the most common option for installing an additional pump. Tools and materials:
- The Gazelle pump is standard. Costs about 1000 Russian rubles.
- Relay with normally open contacts. Standard relays from the starter or ignition will do, where you just need to bridge the necessary contacts.
- Some reinforced hose.
- 2 liters of coolant (regular antifreeze).
- Medium-sized clamps in the amount of 5 pieces.
- We wait until the coolant in the system cools down. The antifreeze is drained from the tank into some clean container if its reuse is intended. If you intend to use new antifreeze, then you can drain it for recycling.
- On top of the pump we see 4 screws. They will need to be unscrewed to get to the rubber seal of the impeller. We lubricate this gasket with a sealing compound.
- We assemble the pump, but instead of standard self-tapping screws we install long thin bolts, on the advice of an auto electrician. The VAZ 2109, by the way, is a car in which the Gazelle pump is quite successfully installed.
Advice. Some motorists who are installing an electric pump for the first time are wondering: where is it better to install the pump, in the gap in the heater supply pipe or in the outlet pipe? In fact, there is no difference in this, as long as the pump is installed downstream of the coolant flow.
- We attach the electric pump.
Auto electrics for VAZ 2109 – electric pump
Note. You can mount the additional pump on the VAZ 2109 directly to the stud of the washer reservoir or to the stud near the battery. In addition, some craftsmen advise installing it on the factory Shumka mount, which, as you know, is located on the engine shield. It is most rational to place it near the battery, which is what we will do.
- Unclench the iron clamp.
- We install the pump with a horizontal pipe towards the block.
Now you need to think about how to establish a connection. It is most practical to transfer the connection to the recirculation button. If not, then you can put it on the SAUO unit or on heated mirrors.
- Two wires are disconnected from the recirculation valve: with a white-blue stripe and a yellow-blue stripe.
Note. Let us remind you that the recirculation valve is located on the engine compartment panel, and two thin hoses go to it.
- We connect the blue-white wire to one terminal of the relay.
- Yellow-blue to the second relay terminal.
- We connect the third terminal of the relay to the wire of the electric pump.
Now it's time to check how the pump works. When you press the button, the pump should begin to hum and blow air. If this does not happen, then something was done wrong. We continue with the installation:
- Disconnect hose 1, which carries coolant to the heater from the outlet pipe.
- We connect it to the horizontal pipe of the pump (the length is enough, if anything).
- Now you need to connect hose 2 to the vertical pipe of the pump, which itself consists of 2 S-shaped pipes (it is located between the tap and the heater radiator). As a last resort, instead of this hose, you can use another one of a suitable size and type.
- The second end of this hose must be pulled to the block head, from where hose 1 was removed.
- Tighten the clamps.
- Be sure to tighten the drain plug in the block.
- Fill coolant to the maximum mark.
- We turn over the engine.
- Visually inspect the pumps for leaks.
- Then we turn on the ignition again and check for leaks, which we fix if found.
- We tighten the clamps.
- Let the engine run for about 30 minutes.
- Refill coolant to the required level.
Pump installation
First you need to prepare everything you need:
- Water pump.
- Relay (suitable for 2105, 2108 – starter, ignition relay). Take a jumper and bridge pins 30 and 86.
- Reinforced hose.
- Two liters of antifreeze.
- The norm is medium-sized clamps (5 pieces).
If the car has been driven, allow the system to cool completely. After this, drain the antifreeze into a previously prepared clean container (we will fill it back). If you are going to immediately change the antifreeze, then you can use any tank.
Unscrew the 4 pump bolts located on top in the impeller area. Treat the rubber gasket with sealant. When assembling the pump, install thin bolts and nuts instead of self-tapping screws. This experience came from the owners of Gazelles.
The location of the pump can be any. You can place the device in a gap in the supply or output hose. This is not important here, the main thing is that the flow of the main flow is respected.
The pump can be fixed in the following places:
- On the heels of the washer reservoir.
- Next to the battery (also on the studs).
- Attaching standard sound insulation to the engine shield.
In our example, we took the second option, which is recommended by the manufacturer itself. Place the pump with a horizontal hose towards the block. To do this, release the iron clamp.
You can connect an electric pump from a gazelle at your own discretion. For example, it is quite possible to connect it to the recirculation button, to the ACS unit when starting the heating system, to heated mirrors, and so on. In the example under consideration, we used the “recirculation” button to turn on the pump relay.
Disconnect the wiring from the recirculation valve: white-blue and yellow-blue. They are located on the front panel in the engine compartment (2 pipes fit to it).
- Connect blue and white to terminal 85 of the relay.
- Yellow-blue - connect to the thirtieth terminal.
- Connect terminal 87 to the electric pump wire.
To check operation, press the power button. The result should be a humming sound and air flow.
Pump installation sequence:
- Disconnect the fluid supply hose to the heater from the outlet pipe of the block head and connect it to the horizontal pipe of the electric pump. There is no need to increase the length.
- Connect a branch pipe (combined from two S-shaped hoses 2108) to the vertical hose of the additional pump. Their location is between the tap and the heater radiator. You can take another most suitable element. Connect the second end to the block head in the place where the standard pipe was previously located.
- Pull all the clamps through and screw the drain plug into the block.
- The final step is to fill the antifreeze to the maximum level.
- Start the engine and check for leaks.
- Turn on the pump and fix any leaks. Tighten the clamps where required.
- After 30 minutes of engine operation, bring the coolant level to normal.
To check that the additional pump is installed correctly, do the following:
- testing conditions (recommended frosty weather down to -10). Engine operating temperature up to +85;
- turn off the engine and turn the air on to first speed. Warm air will immediately come out;
- When the pump is turned on, hot air should be supplied. In this mode, the stove will work for about 15 minutes until the engine cools down to +45 degrees;
If everything looks like this, then the installation of the additional pump was done correctly.