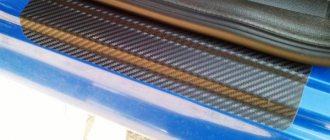
04/27/2021 5,810 Auxiliary systems
Author: Ivan Baranov
Currently, many different devices and installations can be used to diagnose vehicle systems. Moreover, each of them can be used for specific purposes. One such mechanism is a generator smoke device. How to make a smoke generator with your own hands and what is the principle of operation of the system - read about it below.
[Hide]
Smoke generator
Judging by the keen interest shown by forum visitors in the possibility of independently manufacturing this device, it was decided to issue the description in the form of a separate article.
To begin with, I suggest you watch the following video, which tells you why you need a smoke generator.
And now I offer my version of a smoke generator. The source of the smoke is Johnson's Baby Oil. The heating element is a torch candle 1102. 3740 from KAMAZ. This spark plug is designed for 18 V, current consumption is 6 A. I modified it. The fuel supply hole was plugged.
Generator operating principle:
In my version, the body was an old oil seal mandrel with some modifications. The lid of the smoke generator was the lid of a 20-liter aluminum canister, which we used to grind ourselves. Minimum turning work.
And finally, the final version of the device:
The mechanical timer for the smoke generator was taken from an old washing machine. Timers from microwave ovens are also suitable.
For normal operation of the device, the required pressure must be 0.8 - 1 atm., which can be obtained from any compressor.
Here are the drawings of my smoke generator (base). Structurally, it can be done differently.
I will immediately answer frequently asked questions.
Is it possible to use the hole in the spark plugs to supply air?
Yes, you can. But at the same time, the air supply tube must be above the oil level. And the candle must be placed in the sarcophagus, otherwise, with such an air supply, oil will get in along with the smoke.
Why are the air and smoke fittings at an angle?
Because the body was made from an existing workpiece, but this was also justified structurally. No hose kinks.
What should the oil level be?
The oil level should be just below the highest point of the spark plug. Oil is poured directly into the housing.
What can be used as a heating element?
Glow plugs from diesel engines can be used (the service life of the plugs greatly depends on how long they are turned on. A timer is required).
A simple do-it-yourself smoke generator for a car
To catch all the holes in the intake and crankcase ventilation, we’ll make a simple craft, namely a smoke generator, which will help find all these vulnerabilities.
We’ll make a smoke generator using the simplest available means based on one cigarette; as practice has shown, it’s enough to go above the roof to find all the holes. I'll show you how I did it, quickly and simply.
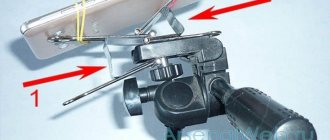
You only need two water pipes and some kind of long cigarette tube. Plumbing pipe with threads on both ends. We cut off the fitting from one liner and strip off much of the braiding, as in the photo.
To prevent it from pricking, we wrap the braid with blue electrical tape, where would we be without it?
Next, insert the lit cigarette into the liner with the filter. It fits very tightly and is comfortable.
There is another short piece of eyeliner on it. We will blow into it.
Now we move to the car. For my AUDI 1.8t, this is the entrance plug into the caterpillar that is needed. I came to a Zhiguli store and bought the cheapest fuel filter of a suitable diameter.
To better ventilate, I pierced it right through with a thin screwdriver. We connect the output of our smoke generator to one end and to its caterpillar with the other end.
In order to carry out the entire check slowly, it took 6 cigarettes. I found a loose clamp in the crankcase ventilation that was leaking a little. That's how simple it all turns out
How to make: design features
One bottle must be cut into two parts, the top one - 3 fingers longer than the bottom one. We also cut the second bottle into two parts, leaving only the bottom, in the center of which we drill a hole suitable for the diameter of the cigarette. In the bottom of the first bottle we also make a hole for the nipple from the camera. If necessary, you can use a winder so that both the nipple and the cigarette fit tightly into the hole. We insert a hose into the neck, winding it to the bottle so that the structure is airtight. Next, you need to light a cigarette and insert it into the hole in the first bottom of the bottle, and attach it to the second, upper part. For better results, you must first cut off the filter from one of the cigarettes and tape it with paper tape to the other cigarette. This way you will have more smoke, which means the test will be more effective.
|
|
It is important that the cigarette filter “looks” towards the hose. The second bottom, into which the nipple is inserted, is put on the structure of the bottle, hose and cigarette, completing this device.
Making a smoke generator for a car with your own hands
Currently, many different devices and installations can be used to diagnose vehicle systems. Moreover, each of them can be used for specific purposes. One such mechanism is a generator smoke device. How to make a smoke generator with your own hands and what is the principle of operation of the system - read about it below.
Characteristics of the smoke generator
What is the structure of the smoke generator, what is the principle of operation of the system? How to do the installation yourself, what drawings and diagrams can you use for this? First, let's look at the issue of purpose and functions.
Purpose and functions
A smoke generator is a device that is used for autodiagnostics, in particular, for checking leaks:
- intake systems;
- exhaust gases;
- exhaust tract of the power unit;
- cooling systems;
- to detect punctures in rubber;
- to diagnose the tightness of the headlights, if they begin to fog up, etc.
As for the principle of operation, the operation of a smoke generator for diagnostics is based on the use and formation of thick white smoke and its further supply to the systems being diagnosed. In order for the smoke to get into all the components being tested, it must be supplied under low pressure; this is a prerequisite, since this will allow the smoke to look for possible damage and leaks. Thanks to the pressure, the device will allow you to identify even small microcracks that cannot be visually identified.
Manufacturing instructions
If you strictly follow the instructions, the procedure for making a smoke generator for a car will not cause problems. In general, there are quite a lot of designs and circuits for such devices, but we suggest familiarizing yourself with the production of a generator set from a syringe and solid lubricant.
To do this you will need:
- the syringe itself;
- glow plug, these are used on diesel engines;
- wiring with terminals, required for connecting spark plugs;
- heat shrink paste;
- pipes with clamps, as well as rubberized sealing gaskets;
- copper tube, its diameter should be approximately 6 mm;
- drill and set of drills;
- air flow fitting;
- You will also need a metal mesh for washing dishes (the author of the video review of a simple homemade smoke generator is the ZP GARIK channel).
How can you make a smoke generator for a car from such materials:
- First of all, it is necessary to disassemble the syringe, remove the blower hose, as well as the pumping device. For further work, you will need a syringe housing; it is in it that the process of smoke formation will take place, which will subsequently be used for diagnostics. In addition, there is a special hole in the lid that is required for normal operation. It is necessary to install a piece of copper pipe into this hole; its length should be about 16 cm. For better fixation of the tube, it is better to treat the joint with epoxy resin.
- A copper hose will force a compressed air stream into the oil, usually transmission fluid is used for this. Oil is used to generate smoke and then push it out of the housing. The hose is installed all the way, this will block the air flow.
- Next, you will need to drill the copper pipe through the inlet hole. This will allow the air flow to be directed in a specific direction, in particular, into the housing of the generator unit.
- When these steps are completed, it will be necessary to install a fitting into the second hole through which air will escape. Securely secure this item to prevent possible future leakage.
- Now we move on to the next stage - the manufacture of the electrical component of the system. To do this, you will need to install a glow plug from a diesel engine in the bottom cover of the device, and use gaskets for better sealing. Also, the spark plug should be tightened as much as possible, otherwise transmission oil may leak. When the spark plug is installed and fixed, you need to connect a wire with quick-release alligator clips to it.
- Next, a special adapter for the smoke supply pipe should be installed in the hole through which the oil will flow. In this case, it is best to use transparent pipes; this will allow the car owner to control the air flow to the unit or system being diagnosed. You need to install a tip at the end of the nozzle; for this you can use the part that was built into the syringe, but before that you will need to remove the check valve ball from it. You also need to provide the ability to adjust the air flow, but here you need to rely on what kind of air source will be used. In addition, a check valve should also be installed in the supply line.
- Actually, at this point the device assembly procedure can be considered complete, the system is now ready for operation. Next, you will need to fill the working fluid, that is, oil, into the reservoir; its volume should be slightly higher than the glow plug. After a few minutes, you will be able to see the smoke formed in the outlet pipe. The pressure level of the incoming air can be about 0.5-1 bar, but this parameter should be selected more accurately by experimental method. If you have a compressor, then use it; if not, then in principle you can use other options, for example, a spare tire of a car or a pumping device for inflating water mattresses.
- When the manufacturing steps are completed, all you have to do is check the functionality of the system.
How to handle a smoke generator
Once all the elements have been collected, you can begin cold smoking meat and fish products. The commissioning process looks like this:
- Wood chips are loaded into the combustion chamber. How much of it is required for smoking is determined during the operation of the device, since this indicator depends on the fraction of the fuel, its humidity and operating power. The diameter of the installed pipes also affects the flow rate.
- The supercharger turns on at full power.
- The wood chips are set on fire through a special hole. It is convenient to use a gas burner.
- Adjust the compressor power by setting the necessary parameters.
- Wait the specified amount of time, adding wood chips if necessary.
- After every 3-4 smoking sessions, the device should be thoroughly cleaned.
If, as a result of the work, any inaccuracies in the operation are revealed, then it is better to bring the homemade generator to perfection so that the smoking result is satisfactory and the prepared products are tasty and safe.
DIY smoke generator. For car enthusiasts and auto repairmen
Hello everyone, pikabushniki and subscribers! This topic is for motorists who prefer to repair their cars with their own hands. This device allows you to look for air leaks in the air line of a car (check for integrity). Today I’ll tell you about a smoke generator ala “kolkhoz-samopal”.
Since it became necessary to have a smoke generator, I decided to assemble it myself, in view of the fact that I like to design (so that it works) and the abundance of information on the Internet on this topic. I did not invent the wheel and do not claim any laurels, but I am creating a post for fellow car enthusiasts who may someday need such a device. And so, we ended up with a construction budget of 1000 rubles. We need to achieve this result (diagram)
Please forgive me for the diagram, I tried to depict it in Photoshop.
To create we need
1. Syringe for solid lubricant for 100 g - 300 rubles.
2. Glow plug from a diesel engine (Peugeot is best) - 200 rubles.
3. Alligator wires, heat shrink and terminals - 180 RUR.
4. Hose clamps, nuts, copper washers, rubber washers, nipple with nipple for the wheel rim - 200 rubles.
5. Mesh for washing dishes - 20 rubles.
6. Drills of the required diameter and scraps of copper tube (6mm in diameter) 100 rubles.
And now step by step. First, we need a syringe for solid lubricant, I took this one:
Save to Album
All we need from it is a housing that fits perfectly under the container for the smoke generator. Next, we need to disassemble it completely (I didn’t photograph the process, as it was unnecessary, everything is already clear there), to this state
For further work, we need only the lid and the container itself, where the smoke generation process will take place.
Next, we prepare the cover for our smoke generator; for this, in the existing technological hole, I glued a piece of copper tube, 6 mm in diameter and 160 mm in length, onto the epoxy, it turned out like this:
Using a copper tube, it is necessary to set the direction of the air, in order for there to be effective smoke emission, we should immerse the copper tube in the oil (ATF), the air passing through the oil. it will be more efficient to squeeze smoke out (this process is shown in the diagram). The diagram also shows how to glue the copper tube, i.e. it needs to be inserted all the way into the existing technological hole in order to block and direct the air, moving exactly along the tube. Next, we need to not fully drill out the copper tube (marked with a red dotted line), and make a hole for the smoke to escape (marked with a blue dotted line):
This way we directed the air movement. In the inlet (air inlet), I screwed and glued a nipple with a nipple from a wheel rim (after cutting off all excess) like this:
The final photo will show its location. Now let's move on to preparing the electrical part, our smoke generator. I decided to make alligator wires to supply power to the glow plug from the battery. There are no problems with making the wiring, the process is simple - cut, strip, solder, heat shrink and shrink -), it turned out like this:
I purchased a transparent tube to see the smoke coming out, and also purchased a brass adapter from a thread to a “Christmas tree” for a clamp. Put together:
The tip I used was the one that came with the syringe in the kit (don’t let it go to waste).
We assemble the spark plug with wiring and put it in place:
The candle is inserted into the technological hole of the container located at the bottom. Don't forget to use washers and rubber gaskets to prevent oil from oozing out from below (I used this one):
We put everything together and get a smoke generator -)
Please forgive the clumsiness of the presentation, I will answer all questions. I also apologize for the quality of the photos, I had to shoot with a glow plug, holding it in my teeth 0_o. Thanks to all. I also apologize for the lack of a video report on the operation of this device. I'm not familiar with video blogging yet. I’ll mention it again and answer all questions.
DIY smoke machine based on H2O
Organizers of various performances, performances by artists and singers, as well as various themed parties (particularly for Halloween) use decorations to create the appropriate atmosphere and the “right mood” of those around them. An integral part of such events is artificial fog.
There are several ways to produce artificial fog:
- Dry ice is carbon dioxide with a temperature of -109.3°F or -78.5°C. Direct contact with it can cause instant cold burns (use insulated gloves). It can also pose a choking hazard because evaporating carbon dioxide gas displaces oxygen (symptoms: rapid breathing and coughing). Immediately leave the affected area as soon as you experience the above symptoms;
- Heated "aerosol sprayers" based on glycol or glycerin;
- Ultrasonic atomization or ultrasonic humidification (dividing the whole into indivisible elements). The piezoelectric disk is located under water (at shallow depths) and pulses vibrates at ultrasonic frequencies. The surface of the water breaks up into small droplets (fog).
The advantage of using such a humidifier:
- Large volume of fog;
- No consumables (only water and electricity);
- No carbon dioxide.
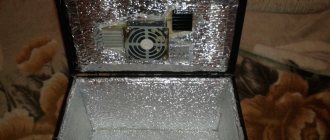
Step 1: Materials
- 5-liter bucket with lid;
- Corrugated pipe with a diameter of 10 cm;
- Cooler and power supply for it;
- Bolts and nuts;
- Empty 2 liter bottle;
- 2 mm steel wire (an untwisted wire hanger will do);
- Ultrasonic air humidifier and power supply for it;
- AC relay with remote control;
- Heat-shrink tubing or electrical tape;
- Solder;
- Water;
- Cold accumulator or ice.
Tools:
- Drill and drill bits;
- Knife or hacksaw;
- Wire strippers;
- Soldering iron;
- Hot glue gun.
Step 2: Cut holes in the lid
Take the lid from the bucket and mark the mounting locations for the cooler (main hole), air duct and connector for powering the atomizer.
We cut a hole for the air duct a quarter smaller than the one drawn so that the spirals on the corrugated pipe fit tightly to the hole.
Step 3. Prepare the cooler
Cut off the power supply plug and strip the wires. We connect the stripped wires to the cooler according to the polarities (+ to +, - to -). If the wires are not marked accordingly, you will need a voltmeter to determine the polarity or you can just go by trial and error (connect first in one order and then in the other).
Solder or simply twist the wires. To insulate the connections, we use heat shrink tubing or electrical tape.
Step 4: Install the cooler and air duct
Let's secure the fan to the bucket lid using bolts, nuts and washers. We simply screw the air duct into the hole.
Step 5. Install the sprayer in the bucket
Place the sprayer in the bucket, passing the power cable through the hole in the lid. Fill the hole with foam rubber or seal it with adhesive tape.
Let's pour water into a bucket. The level must correspond to the operating instructions for the sprayer (depending on the model).
Step 6. Autofill
In order for the fog machine to operate continuously, the bucket must be constantly filled with water. An inverted 2-liter bottle will help with this.
Let's make our own supporting frame from 2 mm wire. Let's make a U-shaped hook at the top of the wire. We choose a wire of such length that the neck of the bottle is at the water level that needs to be maintained.
Cut a slit in the lid and attach a U-shaped hook. Fill the bottle with water and hang it in the desired position.
Step 7: Launch
Turn on the sprayer. The fog does not overflow the bucket, it simply settles to the bottom. Turn on the fan. The mist will now come out of the duct.
If you wish, you can connect power to the atomizer and cooler to a remote control switch.
The atomizer consumes about 300 watts. Most of the energy goes out into the water in the form of heat. Therefore, to prevent overheating, it is necessary to either run the homemade product for short periods of time, or add cold accumulators (ice) to the water.
Smoke generator for car diagnostics
This device is needed to identify places where the tightness required for the normal functioning of a particular system is broken - the intake and exhaust tracts of a car, for example.
The smoke generator pumps out thick white smoke, which is clearly visible when it leaks from the path being diagnosed.
The principle of its use is simple, like everything ingenious - smoke is injected into the system or part that needs to be checked, which begins to come out in places where the tightness is broken. In a very similar way, tire shop workers check a wheel for air leaks by immersing it in a bath of water - the escaping air manifests itself in the form of floating bubbles. The smoke generator pumps out thick white smoke, which is clearly visible when it leaks; you just need to connect its output hose to the part being diagnosed, having first “plugged off” all other holes in it. The principle of operation of smoke generators manufactured by various auto equipment manufacturers is to heat liquid oil (like ATF), which, when evaporated, creates the required smoke. The smoke generator includes a compressor for pumping smoke.
What is a smoke generator
To impart a smoky aroma and taste to foods, you need to produce smoke and envelop the food in it. Lighting a fire and laying a path for smoke in the form of pipes is the simplest option, which has many nuances. The temperature of the supplied smoke with this method is high and strict control is necessary, as this affects the final smoking result. For cooling, the chimney is buried underground, which complicates the design. Smoke generators are considered an alternative.
How does a smoke generator work?
These devices are compact and easy to use.
The principle of operation of the device is to produce smoke as a result of smoldering sawdust, which is loaded into a special chamber.
The smoke temperature is low. It moves through the chimney into the chamber with the products thanks to the operation of the compressor, fills it and ensures the preparation of smoked meats. Using a smoke generator, hot or cold smoking is carried out. This affects the structure of the unit.
How to make a smoke generator for a car with your own hands
The cost of the cheapest smoke generator for a car is at least 6,000 rubles, so many car enthusiasts make homemade devices, showing remarkable ingenuity.
Homemade smoke generator for cars with an oil evaporator
Smoke generator diagram for a car
To make such a device you will need:
To manufacture a smoke generator, two necessary conditions are required - sources of compressed air and smoke.
- A container that will serve as the main module. This could be a grease gun, a metal can with a tight lid, or even an old fire extinguisher with a screw cap.
- Glow plug from a diesel engine.
- Time relay.
- Hoses, tubes for air supply.
- Source of compressed air.
In addition, you may need taps for cutting threads, compounds for sealing the joints of fittings, clamps - you will select all this in accordance with the source materials from which the main module of the automobile smoke generator that you will make yourself - the evaporator - will be made from. There is absolutely no need to make an exact drawing for making a smoke generator for a car with your own hands - after all, you will select the materials yourself, which means the sizes of the parts may be different (except for the glow plug).
A turn relay is used as a time relay, connecting a candle instead of light bulbs. This is necessary so that it does not burn out - the glow plug is not designed for long-term operation, and the relay will periodically turn it on and off. To connect the negative terminal of the battery to the spark plug, connect it with a wire to the body of the device. Please note that the oil level in the container is small - otherwise the candle will not warm it up enough and it will not evaporate. The air inlet tube should be immersed in oil - this will act as a kind of check valve for air at low pressure.
If you don’t have a compressor at hand, then an inflated car inner tube or spare tire is suitable as a source of compressed air.
If you do not have a compressor, then you can use your own spare tire as an air receiver (storage unit) - or use a car inner tube, having previously inflated it. As you can see, there is nothing complicated - such a simple smoke generator for a car will cost you much less than a purchased one. You can simply ask your friends at a car service center for a glow plug - craftsmen often leave such things “just in case”, and they lie idle in the workshop for years. The air supply can be adjusted by installing a suitable valve in the hose. To begin with - during testing - it is enough to pinch the hose by hand, bending it in half.
Do-it-yourself smoke generator for a car from a cigarette
Smoke generator made from a cigarette and a blowing gun
This simplest “smoke generator” for a car does not need unnecessary comments - you just need to make an adapter to connect a cigarette to a hose - that is, a banal mouthpiece.
As you can see, there is nothing particularly complicated behind the device’s initially frightening name. Especially if as a child you practiced making various “smoke products” - from casein, newspaper soaked in ammonium nitrate solution, etc.
We create a smoke generator with our own hands, details of how the main element of the smokehouse is made 95 photos
Simple and traditionally used in all culinary cultures of the world, cold smoking technology is designed to produce appetizing snacks from fish and various types of meat.
Having your own smokehouse at home or in the country will diversify the process of preparing delicacies, especially in cases where we are talking about avid fishermen and hunters.
This simple device, reminiscent of a simple stove, can be assembled from improvised means in various situations.
DIY dismountable smokehouse
You can build a temporary smokehouse right at the fishing spot, or make a permanent structure in the courtyard of the house, which will give scope to your culinary imagination and allow you to enjoy the unique smoked taste without harming your health.
The main principle of smoking is long-term fumigation of pre-salted products with smoke at a certain temperature.
Therefore, before you start studying various recipes for smoked fish or sausage, you need to acquire a smokehouse - a chamber in which smoke will be produced in the desired mode and with the required properties.
The main working device of the smokehouse is a smoke generator, which can be made from improvised means.
A food chamber can be built by giving a second life to a damaged refrigerator, gas stove, metal barrels and cylinders.
A portable and dismountable homemade smokehouse is most convenient to use. It can be disassembled and stored, and also taken out for picnics, hunting and fishing.
The prefabricated design allows for improvements and the replacement of parts and containers. To make such a smoking apparatus, you will need an old gas cylinder, two metal barrels, steel plates and rods, 5 half-meter sections of pipes with a diameter of 10 cm, and tools - a grinder, a drill and a welding machine.
A chimney is mounted from pipes, into which a homemade smoke generator is inserted - a device for producing and supplying smoke to chambers with food. The smoke temperature is regulated by the length of the removable pipe.
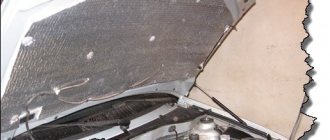
Operating principle and assembly of the smoke generator
Before you make a smoke generator with your own hands, you need to imagine the principle of operation of the smokehouse: in the firebox, due to constant heating, combustible material smolders, the smoke, passing through the pipe, is cooled to the desired temperature - from 20 to 40 degrees Celsius, depending on the product being processed.
This is where harmful impurities are removed and condensation settles, after which the smoke enters the smoking chamber to fulfill its purpose.
The body of the smoke generator for smoking can be any metal container, for example, a can or a deep pan, in the lid of which you need to drill a hole for the fitting - the part connecting to the chimney.
Sawdust intended for combustion is placed at the bottom of the container, on the side, at a height of approximately 3 cm from the bottom, it is necessary to provide a hole for ignition.
Then a connection is made in the housing for the aquarium compressor, and opposite the firebox there is a hole for the smoke exhaust, which is connected to the chamber with the products.
The photo shows what a homemade smokehouse with a smoke generator might look like.
Variety of smoke generator designs
The appearance and functionality of a homemade smoke generator depends on the situation. Temporary structures can be erected in 5 minutes, but with a more serious approach you can achieve factory quality and aesthetics.
The smoke generator compressor can be installed either at the bottom or at the top of the housing. Instead of an aquarium processor, you can use any other electric pump with a power of 4-5 watts.
The purpose of the compressor is to supply oxygen for combustion, so for this purpose craftsmen can adapt coolers and fans from various devices.
There are many options for selecting the housing; it can be made from a heat-resistant pipe, you can use various options for outlet pipes, supplement the design with a container for collecting condensate, or use an ordinary water tee as an ejector.
You can improve the ignition location by attaching a metal spiral to the bottom of the housing.