Handbrake cables VAZ 2110 | VAZ 2111 | VAZ 2112 - removal, installation, replacement
The need to replace hand brake cables arises if the cables, as a result of corrosion, have lost the ability to move in the sheath, have become very stretched, or have broken threads.
HELPFUL ADVICE When replacing one of the parking brake cables, the other cable must be replaced.
Removing the handbrake cable
1. We prepare the car for work to replace the parking brake cable (see paragraphs 2b and 4 Preparing the car for maintenance and repair). 2. Remove the rear brake drums (see Brake drum - removal and installation). 3. Remove the suspension shock absorbers from the additional muffler. 4. Loosen the tightening of the locknut of the parking brake lever travel adjusting nut (see paragraph 3 Checking and adjusting the handbrake).
WARNING The left rear handbrake cable passes through the right hole in the bracket, and the right hand brake cable passes through the left hole in the bracket.
5. Using a 13 mm deep socket wrench and universal joint, unscrew the locknut and adjusting nut and remove them from the handbrake rod.
11. Remove the handbrake cable from the bracket for attaching it to the body.
12. We take the handbrake cable out of the hole in the rear brake support plate and remove it from the car.
In the same way, remove the second parking brake cable.
Installing the handbrake cable
We install the handbrake cable and all the removed parts on the car in the reverse order of removal. After installing the brake drums, adjust the travel of the handbrake lever (see Checking and adjusting the handbrake).
useful tips for motorists
Replacing the handbrake cable
1. Make sure that the car is not on the handbrake. If so, lower it. To ensure your safety and prevent the car from rolling away, put it at speed and place anti-roll bars under the front wheels.
2. Next, we tear off the wheel bolts with a wheel wrench counterclockwise, “jack up” the car and remove any of the rear wheels.
3. We unscrew the two drum bolts and, by screwing them into special holes in the drum, remove it.
4. Using pliers, remove the upper and lower springs, thereby loosening the pads, gaining access to the internal springs, by moving them aside, we can easily remove the pads.
5. Pull the cable out of the brake shield.
6. Loosen the cable holder on the beam and pull the cable out of it.
7. Move the resonator (muffler) to the side by hand; if that doesn’t work, remove the muffler.
8. Loosen the handbrake tensioner nuts (1.8). Remove from the mount (4) and lever (3).
9. Pull the cable jacket out of the equalizer and pull the cable out of the rod.
We do the same with the other wheel.
We assemble in reverse order.
Hand (parking) brake system on VAZ 2110
In fact, the VAZ 2110 handbrake is quite simple. The principle of its operation is not based on anything complicated. The mechanical drive is a cable. When the parking brake handle is pulled, the driver also tightens the cable and creates uniform tension on the wheel pads.
If the handbrake malfunctions, it is recommended to perform an adjustment. And if it does not help, then repairs are carried out by replacing the faulty cable. On a car like the VAZ 2110, adjusting the cable is as simple as replacing it. If this malfunction is ignored, the car may move on its own, or you, on the contrary, will not be able to move.
You don’t have to go to a car service center to solve your problem. If you have some experience, understand the essence of the handbrake, and also apply the data from the repair and operation manual for the VAZ 2110, you can do everything yourself.
Is adjustment necessary?
First you need to determine whether the adjustment will really solve the problem of the handbrake malfunction.
To do this, a small test is carried out. Moreover, it is recommended to do a similar procedure after every 30 thousand kilometers, even if you are sure that the parking brake works well.
Drive your vehicle to an area where there is a slight slope. Place the car on it, turn on the handbrake and shift to neutral. If the car starts to roll down, everything is obvious - the handbrake needs repair.
How to properly tighten the handbrake on a LADA Priora
I would like to immediately note that to carry out this procedure very comfortably, it will be useful to introduce an inspection pit or a lift.
Adjusting the handbrake after tensioning
After adjusting the brakes, you need to check them again. To do this, the car should be placed on a road with a slope of at least 23%! The car should be in neutral gear in this area and with the handbrake pulled up. If the handbrake brakes hold the car in such a section, then the handbrake is adjusted correctly.
Pulling up the handbrake
It is likely that you just need to tighten the parking brake on the VAZ 2110 to fix the problem.
- Drive to the inspection hole, from where it is most convenient to make adjustments. Another option is a lift. You'll find something here. This way you can easily get to the necessary nodes.
- Make sure the brake lever is in its lowest position.
- Take two keys. You will loosen the lock nut first and tighten the adjusting nut second.
- Tighten the adjustment nut until the cable is properly tensioned.
- It is strongly recommended to hold the rod when tightening the adjustment nut with pliers.
- Now make sure that the lever makes full travel in 2-4 clicks, no more.
- If after checking everything turned out to be good and the working stroke is correct, tighten the equalizer locknut while holding the adjustment nut with a second wrench.
- Release the handbrake lever down and turn the rear wheels by hand. Rotation should occur evenly without any jamming.
- But if the adjustment did not allow the cable to be tensioned, then the element must be replaced.
Checking the effectiveness of the parking brake adjustment is also simple. You drive onto an area with a slope, put the car on the handbrake and watch the car’s reaction. If the car does not move in neutral, it means you have done a good job.
If the adjustment does not help
There are not many cases when adjusting the parking brake did not have any effect. However, this is no reason to despair.
It is possible that the handbrake cable has broken. This is a rare occurrence, but all options need to be considered. Especially if your VAZ 2110 is not new. By the way, on newer models the cable also breaks if the car is used very intensively. The braking system is simply not designed for such loads.
There are several situations in which it is necessary to replace the parking brake cable:
- The cable broke;
- The tips gave way;
- The cable threads have stretches, which over time can turn into a full-fledged rupture;
- The cable is difficult to move inside the sheath even after abundant lubrication.
The process is longer than adjustment, but not much more difficult. Therefore, you can cope with the task in your own garage with a lift or inspection hole.
There is one important condition - you will need an assistant. His task will be to pull the cable tightly, which will allow the equalizer to be installed correctly.
The sequence of work to replace the cable is as follows:
- Lower the handbrake lever as far as possible;
- Remove the brake disc from the wheel where the element is being replaced;
- Remove the muffler from the suspension cushions and the resonator from the rear suspension;
- Lower the exhaust system down;
- Remove the adjusting nut and locknut;
- Remove the equalizer;
- Now remove the cable ends from the equalizer;
- Remove the tip of the equalizer shell from the bracket, which is located on the car body;
- Bend back the brackets that secure the cable;
- Remove the rear brake pad and remove the cable end from the lever;
- Slightly loosen the nut that secures the cable holder to the rear axle;
- Remove the cable from the holder, then from the bracket, and then pull it out through the brake spike;
- Place a new cable in its new location and perform the assembly procedure, following the reverse order of the indicated processes;
- Make sure that the cables in the bracket are positioned crosswise;
- After completing the installation of the new element, adjust the handbrake.
Replacement
The process is longer than adjustment, but not much more difficult. Therefore, you can cope with the task in your own garage with a lift or inspection hole.
There is one important condition - you will need an assistant. His task will be to pull the cable tightly, which will allow the equalizer to be installed correctly.
The sequence of work to replace the cable is as follows:
- Lower the handbrake lever as far as possible;
- Remove the brake disc from the wheel where the element is being replaced;
- Remove the muffler from the suspension cushions and the resonator from the rear suspension;
- Lower the exhaust system down;
- Remove the adjusting nut and locknut;
- Remove the equalizer;
- Now remove the cable ends from the equalizer;
- Remove the tip of the equalizer shell from the bracket, which is located on the car body;
- Bend back the brackets that secure the cable;
- Remove the rear brake pad and remove the cable end from the lever;
- Slightly loosen the nut that secures the cable holder to the rear axle;
- Remove the cable from the holder, then from the bracket, and then pull it out through the brake spike;
- Place a new cable in its new location and perform the assembly procedure, following the reverse order of the indicated processes;
- Make sure that the cables in the bracket are positioned crosswise;
- After completing the installation of the new element, adjust the handbrake.
As you can see, the task does have certain nuances, but it is not difficult at all if you have some experience and rely on the VAZ 2110 operating manual. As a rule, everything is spelled out there.
It wouldn’t hurt to supplement your skills and knowledge with video tutorials or consultation with a friend from a service station. But if you are not confident in your own abilities, you should not risk replacing the handbrake cable yourself. It is better to spend more money, but entrust the work to specialists.
Didn't find the information you are looking for? on our forum.
Tensioning and replacing the handbrake on a VAZ-2112
During long-term operation, the parking brake cable of a VAZ-2112 car inevitably stretches, and the brake pads are subject to gradual wear. As a result, the handbrake does not cope effectively with the task assigned to it or stops functioning altogether. If, after stopping the car, you pull the lever, but the brake pads do not hold the wheels in a stationary position, then it is time for repairs. And we are not necessarily talking about replacement, since it is quite likely that the problem can be solved by simply tightening the cable. To do this, you don’t even need to contact a service station - you just need to know how to tighten or replace the handbrake on a VAZ-2112, and do everything yourself.
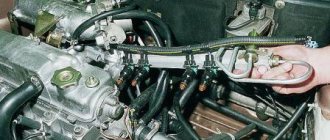
During operation, the handbrake cable of a VAZ-2112 car inevitably stretches
How does a car's handbrake work? This is perhaps one of the simplest systems, and it consists of such elements as:
- parking brake lever;
- lever lock button;
- handbrake cable with equalizer;
- manual brake system traction;
- adjusting nut and locknut.
There is also a protective cover in the design, and the cable itself passes under the bottom of the machine and is placed in a protective sheath. These are, in fact, all the main parts that make up the parking brake system, if you do not take into account its final element - the brake pads.
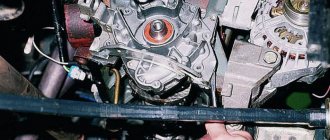
Handbrake VAZ disassembled
Adjusting the handbrake cable tension
Before you start adjusting the parking brake, prepare a simple set of tools in the form of two 13" wrenches and pliers. You will also need a jack to lift the car, although it is much more convenient to work if it is possible to use an overpass or a lift. So, if everything is ready, you can proceed, guided by the following instructions, which will tell you how to tighten the handbrake on a VAZ-2112 car:
- Raise the car off the ground using a jack, lift, or by driving onto an overpass.
- Set the brake lever to its extreme position (pull down).
- Using a wrench, loosen the cable equalizer locknut while holding the adjusting nut with a second wrench.
- Now you should tighten the adjusting nut and thus tighten it. To prevent the rod from turning, hold it with pliers. Tighten the nut until the cable is taut.
- Next, pull the handbrake lever towards you and make sure that its travel is 2-4 clicks of the ratchet mechanism.
- Once the check is complete, all that remains is to tighten the locknut.
To adjust the tension of the handbrake cable, the car must be raised
Before lowering the vehicle, check that the cable is not too tight. To do this, you need to lower the lever and spin the rear wheels by hand - with normal tension, they should spin freely. If so, you can start testing the parking brake to check its effectiveness. The essence of this test is to place the vehicle on an overpass or a section of road with a 23% slope and move the parking brake lever to its full operating position (tighten). The tension should be sufficient to hold the vehicle stationary. If the result is negative, re-adjustment is required. If the adjustment operations do not give the expected result, therefore, the handbrake cable is unsuitable for further use and must be replaced.
Replacing the parking brake cable
Sometimes any adjustment does not bring the expected result. In this case, replacing the VAZ-2112 handbrake becomes the only correct solution to the problem. For what reasons does a car owner have to change the handbrake cable? First of all, the first indicator for replacement is its breakage and critical stretching, when adjustment does not lead to anything. In addition, if during an external inspection you notice damage and other signs of wear, in this case you also cannot do without replacement. Another reason for removing the old cable and installing a new one is its difficult movement inside the protective shell, even to the point of jamming, which makes normal operation of the entire system impossible.
Reasons for replacing the parking brake cable: difficult movement, external damage, critical stretching.
We will talk further about how to replace the VAZ-2112 parking brake cable, but before you begin, remove the brake drums on the rear wheels to disconnect the ends of the cable from the brake pads. To do this, naturally, the rear of the car must be suspended using a jack or a stationary lift. Perform all further operations following the following instructions:
- As in the case when it was necessary to tighten the cable, you need to loosen the lock nut on the rod and unscrew it, after which the adjusting nut can be unscrewed. This will allow you to remove the bracket from the rod, from which you need to remove both ends of the cable.
- Next, using a screwdriver, remove the ends of the cable from the hooks of the levers that drive the brake pads.
- Then the tips of the protective shell must be removed from the brackets located on the left and right sides of the bottom of the machine. Each bracket has a nut, by unscrewing which you can remove additional brackets from the arms.
As you may have noticed, the parking brake includes two cables and both of them must be removed for replacement. Installation of new cables is carried out in the reverse order of removal. This is exactly how the VAZ-2112 parking brake cable is replaced, just don’t forget to adjust the parking brake after the installation is complete. You could learn how to do this from the instructions given in this article.
Replacing the handbrake cable on a VAZ 2110, VAZ 2111, VAZ 2112
Welcome! The handbrake cable - over time it stretches and becomes unusable, and sometimes it even happens that it breaks (In fact, everything depends on its quality, some cables sometimes don’t even stretch at all), all these problems associated with the cable cause a lot of inconvenience , it all starts with the fact that the car simply cannot be put on the handbrake, or it will hold the car, but very, very weakly, so to avoid such inconveniences, the cable must be replaced from time to time with a new one, this is not difficult to do and you can do it yourself You don’t even need to go to services.
Replacing the handbrake cable on a VAZ-2110, 2111, 2112
The handbrake, or scientifically the hand or parking brake, is an irreplaceable part of the car, the benefits of which many people underestimate.
The handbrake is a lever that, in an unexpected situation, will help to perform emergency braking of the car, and in a difficult situation, to move away on a hill, without damaging the cars behind. Yet the main task of the handbrake is to keep the car from accidentally moving.
The handbrake makes life much easier for motorists, and sometimes even helps out. Therefore, so that a force majeure situation does not occur and the handbrake does not fail at the necessary moment, you need to monitor the condition of the cable and its serviceability.
How to identify problems with the handbrake? We list the main problems and reasons for the handbrake malfunction.
Basic malfunctions of the hand brake:
It is difficult or completely impossible to put the car on the handbrake; the cable is difficult to move.
Reason: the threads burst in the middle and fluffed up;
The car rolls, even with the handbrake raised.
Reason: the cable is loose;
When I try to put the handbrake on, the car squats to one side.
Reason: one cable broke;
The handbrake lifts too easily and the car rolls.
Reason: the cable was worn out, the threads began to break.
If a malfunction is detected, the cable should be replaced. If there is no car service nearby, arm yourself with two “13” wrenches, one “10” wrench, a wheelbrace and pliers. Go!
How to replace the handbrake cable on a VAZ 2110-VAZ 2112?
Note! Immediately before starting work, remove both rear brake drums from the car, because the ends of the cable are attached to the brake pads, and without removing the drum you will not get to the pads (For information on how to remove it, read the article: “Replacing brake pads at ten")!
Removal: 1) First, crawl under the car and, using two keys, in the place indicated by the red arrow, loosen the lock nut (There are two nuts in that place, both of them are locked, the first nut, which is closer to the bracket, is an adjusting one, the second the same is the lock nut, thanks to them, by the way, you can adjust the cable, this is done here’s how: the lock nut is loosened and the adjusting one rotates in the desired direction, thereby the bracket begins to move and the cable is adjusted, finally the lock nut locks the adjusting nut again and thereby the cable is adjusted) and after which you can unscrew both of them, when the nuts are in your hands, move the bracket back and the main cable (It is also called a rod) will come out of the bracket (see small photo).
Note! After the operation has been completed, remove both ends of the cable from the bracket, one is shown with an arrow for clarity, and as soon as they are removed, put the bracket aside so that it does not interfere with further work on replacing the cable!
2) Now, using two screwdrivers or you can just stock up on one, remove the ends of the cable from the hooks of the levers, for more details in the photo below, see all the information, in a nutshell, the ends (One of the ends is indicated by a blue arrow) are connected to the hooks and these are needed and remove (one end for each wheel) to release the cable ends in some other places.
3) Well, finally, remove the shells of both cables from the second bracket, and also unscrew two nuts (One for each bracket), remove the additional brackets from the levers (see small photo below) and then completely remove both cables from car, but just keep in mind that they go criss-cross, so when reinstalling, don’t forget this and be sure to take it into account.
Installation: Installation of both cables is carried out in the reverse order; be sure to connect all removed brackets in their places so that the cables do not dangle or touch anything unnecessary.
Additional video: You can see the process of replacing the cable in more detail in the video located just below; in addition, it also explains the procedure for replacing the handle itself, you may need this too.
Replacing the handbrake cable on a VAZ-2112
Initially, you need to perform the following operations:
- Lower the lever all the way down.
We put the handbrake at the very bottom. Do not pay attention to the scuffs of the console; we conducted an experiment with non-standard armrests. The photo shows the editorial car - Remove the brake drum from the wheel that will be replaced.
Got to the brake drum - Remove the muffler from the cushions.
- Lower the exhaust system down.
- Unscrew the nuts on the handbrake rod.
- Remove the equalizers from the rod hinges.
We installed cables from a VAZ-2109, so the equalizers also had to be changed - Remove the end of the cable being replaced.
- Remove the cable from the casing, which is installed on the body.
- Bend back the brackets that secure the cable to the body.
- Remove the brake pad from the wheel and disconnect the cable from the mechanism.
- Remove the cable from the drum.
- Loosen the nut that tightens the cable on the rear beam.
- Remove the cable from the holder, bracket and spike.
After carrying out this work, everything is installed in place in the reverse order of disassembly. The cables should be arranged crosswise.
The new cable is inserted into the drum. All that remains is to put it on the block and put the wheel back together.
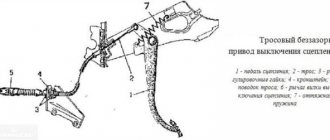
Handbrake diagram for VAZ-2112
For clarity, here is a diagram of a hand brake
1 - button that fixes the handbrake lever; 2 — hand brake lever; 3 — protective cover; 4 — handbrake rod; 5 — cable equalizer; 6 — adjusting nut; 7 - lock nut; 8 - cable; 9 — protective sheath of the cable.
In this circuit we need element number 6 . It is he, and only him!
What is required for adjustment?
In order to adjust the handbrake you need a platform or lift. If there are no such devices, then you can simply hang the rear wheels on the “goats”. They can be installed under the car using a jack. It’s also worth taking two “13” keys and pliers.
- The car is installed on an overpass or “goats”.
The lever position is set to the lowest possible position.
We put the handbrake at the very bottom. Do not pay attention to the scuffs of the console; we conducted an experiment with non-standard armrests. The iron fastenings of the armrest are visible. The photo shows the editorial car
Use a wrench to loosen the locknut.
- The second wrench holds the adjusting nut.
- The adjusting nut should be tightened until the cable is tensioned. It must be remembered that the rod should be held with pliers when tensioning the cable.
Tighten the adjusting nut
- After this, you should make sure that the full stroke of the handbrake lever is no more than 4 and no less than 2 clicks.
- When the stroke check is completed, the locknut is tightened. The adjustment is held with another key.
- If necessary, change the mechanism to a new one.
Everything is rusty, we changed the adjustment mechanism
If you cannot tighten the cable, then it should be replaced with a new one.
Adjusting the handbrake after tensioning
After adjusting the brakes, you need to check them again. To do this, the car should be placed on a road with a slope of at least 23%! The car should be in neutral gear in this area and with the handbrake pulled up. If the handbrake brakes hold the car in this area, then the handbrake is adjusted correctly.
How to change the handbrake on a VAZ 2112 - 2110
What to do when adjustment does not work
There are also cases when the above actions are not enough to adjust the handbrake. This can happen, for example, when the handbrake cable is broken. This happens on the VAZ-2112, albeit occasionally. In such situations, you need to replace the cable. The cable also needs to be changed when:
- The tips are loose.
- The cable itself begins to stretch, which will lead to its breakage during operation.
HAIKU! The old cable is very worn out! For comparison, old and new handbrake cables
Heavy wear on the handbrake cable
This replacement procedure does not require a call to 100. Although this will require some time and abilities from the driver, such work can be done without the help of others.
You should also keep in mind that when replacing the cable, certain conditions must be observed. To do this, the driver will need an assistant who will tension the cable.
What is required for adjustment?
In order to adjust the handbrake you need a platform or a lift. If there are no such devices, then you can simply hang the rear wheels on the “goats”. You can install them under the car using a jack. It’s also worth taking two “13” keys and pliers.
- The car is installed on an overpass or “goats”.
The lever position is set to the last bottom.
We put the handbrake at the very bottom. Do not pay attention to the abrasions of the console; we carried out the experiment with non-standard elbows. The steel fastenings of the elbowrest are visible. The photo shows the editorial car
Use a wrench to loosen the locknut.
- The second wrench holds the adjusting nut.
- The adjusting nut should be tightened until the cable is tensioned. You need to keep in mind that the rod should be held with pliers when tensioning the cable.
- Then you should make sure that the full stroke of the handbrake lever is less than 4 and more than 2 clicks.
- When the stroke check is completed, the locknut is tightened. The adjustment is held with another key.
- If necessary, the mechanism is changed to a new one.
- After releasing the adjusted lever down, you should spin the rear wheels. When the lever is in the last lower position, the wheels should spin freely.
Tighten the adjusting nut
Everything is rusty, we changed the adjustment mechanism
If the cable cannot be tensioned, then it should be replaced with a new one.
How to tighten the handbrake on a Priora - sequence of actions
Now you know how to tighten the handbrake on a Priora. We wish you success in completing these simple steps.
Progress
So, first you will need to prepare the necessary tool. Fortunately, tightening the cable does not require a huge amount of equipment; you can get by with 2 open-end wrenches for 13. Before work, you need to drive the car onto an overpass or pit, this will be even more convenient for you. It is important to know that according to regulatory documents, the handbrake must stop the car on a slope of up to 25%!
So, if you have installed the car, you will need to engage first gear and lower the lever to the down position. Further step-by-step annotation looks like this:
Remove the heat shield. It is secured with 4 fastening parts, which will need to be removed, then remove and set aside the cover.
READ Valve adjustment VAZ 2112 16 valves
When everything is ready, you can perform a control test. Return to the driver's seat, engage neutral and set the brake to park.
When fixing the lever, you need to count the number of clicks. With an average pressing force, their number will not exceed 5 times.
2nd test. Having lowered the handbrake to the last position, you need to check whether the rear wheels rotate well. If everything is fine, then they will spin simply, without any significant effort. If something interferes with them, then you will have to loosen the nut again and tighten it. Next, the devices are installed in reverse order. If any points remain unclear to you, you can watch the video on our website.
Why do you tighten the handbrake?
The cable acts here as a drive. If the driver pulls the handbrake lever, then he immediately uses the cable, which spreads the pads in the rear wheel.
If the handbrake is faulty, then you just need to tighten the cable or replace it with a new one. On a VAZ-2112 it’s quite easy to do this with your own hands.
What to do if there is no result
Sometimes motorists are faced with situations in which tightening the cable does not improve the quality of the handbrake. In this case, it is necessary to deal directly with the brakes. The main culprit is the brake pads. They can:
- wear out;
- “get stiff” and not respond to handbrake commands.
Installing new brake pads will help achieve normal results. Experts recommend dismantling the brake drums and checking the movement of the brake pads. If they don't move, it means they're stiff. If there is still movement, the problem must be looked for in other nodes. The primary culprit may be a stretched handbrake cable. If all else fails, it is best to turn to professionals.