Every day, dozens and even hundreds of new technologies appear in the world, complex and not so, useful and absolutely unclaimed. One such useful technology that has appeared relatively recently is the Light Assist system.
In this article I will talk about how this technology works, what it is, as well as its main advantages.
The Light Assist system is another assistant that controls the switching of the car’s high beam; by the way, it is often called “high beam assistant.” The function is designed to increase the safety of the driver, as well as other road users, mainly in oncoming traffic. In addition to automatic low/high switching, the system allows you to increase the lighting efficiency at night.
Relevant: Volkswagen boasted of achievements in the field of auto optics. Interactive matrix headlights from VW
How does headlight adjustment work?
If you are saving money and want to adjust the headlights yourself, then once you figure it out, you can do it.
Let’s roughly divide the process into two stages: Preparation
The first step is cleaning.
Be sure to clean up your vehicle. Each element should be cleaned, dust removed and the interior cleared of debris, then carefully wipe everything with a dry cloth. Carry out a visual check to see what the headlight reflectors and their lenses look like. They must be in proper condition so as not to create lighting problems.
Check the wheels and tires externally, and also measure the pressure. The car tank should be more than half full. Transport should not be overloaded; the general condition of the vehicle must be brought closer to what it is in everyday use. We are looking for a flat area for work. We install fixing stops to ensure that the machine is stable. Let's go to the screen. You will need a flat wall surface. You can try the process on a garage door or a large plywood board.
Adjustment
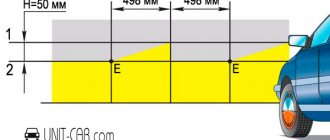
Park the car against the wall. It is necessary to determine the point that will become central for the machine. We also find a couple more points so that their position is located opposite the center of the headlights. We take the car away and place it approximately five or seven meters from the wall (we first study what the instructions for your model say). From the established points you need to draw vertical markings “A”, “O”, “B”, through these markings we draw horizontal line No. 1. Horizontal line No. 2 should be approximately 5-7.5 cm lower than the first (we also refer to the operating instructions). The point of intersection of “B” and “A” with the second horizontal line is called “E”. Next comes the actual adjustment. The hard part is over. You need to turn on the low beam. We cover one of the headlights with a cloth or something similar so that the low beam beams do not pass through.
Possible causes of malfunction
So, if the low beam in one of the headlights of a Lada Kalina does not light up, then the reason most likely lies in a burnt-out light bulb. Replacing it will not be difficult for every car owner.
However, unfortunately, there are a number of other reasons for this malfunction, the most common of which are the following:
How to improve headlights on a car
- The contacts in the plug block are oxidized or burnt;
- The fuse has blown;
- Open circuit;
- The relay has failed.
Below we will look at how to fix all these problems.
H7 standard bulb
Replacing the lamp
Replacing the low beam on Kalina is quite simple. Moreover, you will only have to spend a few minutes of your time on this.
The only thing is that before replacing old lamps, you need to purchase new ones of the H7 standard. It is advisable to install new bulbs on two headlights at once so that they provide the same glow.
Removing the plug
Replacement instructions are as follows:
- First of all, you need to remove the rubber plug located on the back of the headlight. To do this, you must first open the hood.
- Then you need to remove the positive and negative terminals from the contacts.
Releasing the latch from the landing
- Next, you need to press the spring bracket with your own hands and remove it from the seat.
- After this, you need to remove the old light bulb and put a new one in its place.
- Then you need to replace the bracket, put the terminals on the contacts and install the plug.
When replacing light bulbs, you need to pay attention to the quality of the contacts. If the contacts are oxidized or burnt, they must be cleaned
Fuse and relay block Lada Kalina
How does an oil filter work in a car?
Replacing the fuse
If, after replacing the lamps, the low beam headlights in the Lada Kalina still do not work, you should check the fuses. They are located in the mounting block under the steering wheel.
The lamps are protected by different fuses:
- Right lamp – F12
- Left lamp – F13
It must be said that it is not always possible to visually identify a blown fuse. Therefore, even if it has no external defects, you should check the voltage at the terminals with a test lamp or multimeter.
Lada exterior lighting diagram
Open circuit
If the fault cannot be eliminated, then you need to find an open circuit.
You can do this as follows:
- If there is no voltage at the fuse terminals, you need to ring the wire that goes from F13 to contact No. 56 of the lighting control unit, since you can turn on the low beam headlights on Kalina using switch No. 5.
- If the wire is intact, but 2 headlights do not light, then switch No. 56 must be replaced. However, you should first check whether voltage is supplied to the switch itself.
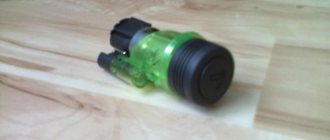
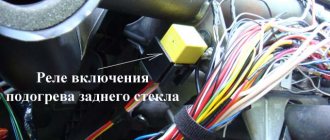
- If voltage is supplied to fuses F13 and F12, you should check whether there is voltage at the relay output. Let us remind you that the low beam relay in the Lada Kalina is located in the mounting block.
- If there is no voltage, you should check the area from F12 to contact No. 56 of switch No. 4, which is located on the steering wheel, as well as the area from terminal No. 56a to terminal 1 of relay K7. It is also quite possible that switch No. 4 or the relay itself is not working.
Replacing the latter is not difficult, since it is simply inserted with contacts into the socket.
In the photo - lighting relay Lada Kalina
In cases where there is voltage at the relay output, you should check the wiring of the machine from the mounting block to the headlights according to the diagram.
How to change spark plugs in a car
As we can see, finding an open circuit or a faulty part is not difficult. To do this, you only need a low beam circuit on Kalina and a multimeter or test light. These are, perhaps, all the main reasons for this malfunction on the Lada Kalina car.
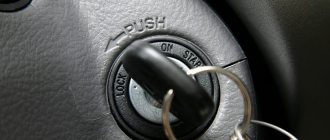
Automatic switching on of headlights upon ignition
In order to organize such operation of the lighting elements, it is necessary to connect them to the ignition power source, and as many know, some devices can be connected at any position of the ignition switch, while others begin to function only when the ignition is already on. Based on this, the most convenient place to connect the headlights is the heater switch button (the rightmost switch block).
For this scheme you will need:
- any standard five-pin relay;
- diode;
- wires.
This is interesting: Photo spies saw the successor to the Toyota Supra
Next, we need:
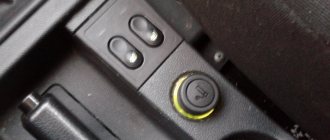
- Remove the size switch (switch block on the leftmost side).
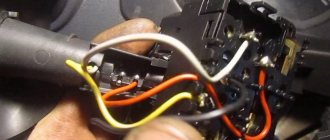
- Disconnect the positive wire from the key block responsible for the low beam operation (usually this is a green double wire) and connect it to the relay.
- You need to insert an additional wire into the positive wire that goes to the heater switch and also connect it to the relay.
- Connect the wire that powers the headlights to the relay.
- Throw the wiring to minus (to the body).
The connections can be soldered, but for full-fledged work, an ordinary insulated twist will suffice. As a result, automatic low beam headlights will work as soon as you turn on the ignition.
However, this method is considered not the most economical, since the headlights start working immediately, which is not very important in winter, when the engine needs to be warmed up or when repairing a car.
To avoid such inconveniences, you can complicate the circuit a little so that the low beam turns off while parked, regardless of whether the ignition is working or not.
About lamps
Often car owners do not know how to improve headlights. First of all, adjustment. Secondly, installing good lamps.
A few words about lamps. About the simplest and most common at the moment, the halogen ones. For example H4. What does good mean? The manufacturer and price will allow you to draw a conclusion about the quality without installing the lamp in the headlight. The price range for H4 lamps is from 150 rubles to 1500 rubles. My opinion: for 150 they are not needed, for 1500 too, but from 500 to 1000 rubles this is my product. The manufacturer is up to your taste. H4 lamps can also have a power of 100 watts. Do not install such lamps. There are at least three reasons.
- No well-known lamp manufacturer has such power. Such lamps are made by dubious “offices”.
- Such lamps emit a huge amount of heat, the reflector overheats and begins to melt. As a result, a clearly defined spherical surface is lost and the light flux is directed anywhere, the position of the lamp changes, which further diverts the light flux from the desired direction. The “glass” of the headlight deteriorates; in fact, modern headlights are made of plastic; it becomes cloudy, cracks, and becomes a light-blocking filter.
- As a result, you need to change the headlight.
The same applies to lamps H1, H7, etc. I don’t think we need to talk about Chinese xenon. There is a lot of light, it is bright, only they shine not on the road, but where they want and in the eyes of the oncoming driver first of all. It seems bright, but you can’t see anything at all. Of course, there are exceptions, but only exceptions. If you have installed Chinese xenon, turn on the low beam at night, move 80 - 100 meters away from the car, sit down so that your head is at the same level as when you are sitting behind the wheel of a car and evaluate whether the headlights of your car glare at you or not. Would it be comfortable for you to separate from such an oncoming person or not? And then decide whether you need such light or not. I'm not even talking about the attitude of the traffic police towards such a light, and possible problems with the inspector on the road, who has a real chance to “issue” a fine for you.
If this whole procedure with screens, lamps, and adjustments is too confusing for you, just evaluate how your headlights shine. If you suspect that it is not correct, contact the service, they will adjust it and you will see how much more comfortable it is to drive with good light.
Share your opinion, do headlights need to be adjusted? Do you often get blinded by the light of an oncoming car? How and where do you adjust the headlights? I will be grateful for criticism, advice, comments. Have a nice trip!
What's happened?
In mid-March 2021, the network was overwhelmed with news that supposedly another change would come into force on April 1: the obligation to turn on headlights during the day in Russia was abolished. There are no references either to the initiators of the bill or to the official documents amending the traffic rules. And the news was spread mainly through Telegram and WhatsApp messengers.
According to the innovation, in our country, from April 1, there is no obligation to turn on headlights during daylight hours - specifically low beam and even daytime running lights. That is, something happened to clause 19.5 of the traffic rules, which reads:
According to various sources, the new law has the following types:
- According to the change, it is allowed not to turn on low beam headlights during the day only in the summer or snowless seasons - from April 1 to September 30 of each year. The reasoning is simple: in summer the daylight hours are much longer than in winter, therefore there is simply no need to use lighting devices;
- You don’t have to turn on the low beams, but daytime running lights are definitely necessary - a strange statement, in fact, because today, even without changes to the traffic rules, this is prescribed;
- In Russia, headlights on have been completely abolished during the daytime - that is, in any season on any car you can not use external lighting devices (except for turn signals, of course) during the day.
Automatic headlight switching
As you know, low beams must be turned on when driving a vehicle, not only in the evening and at night, but also during the day. In a situation where the running lights do not work, the traffic police officer has the right to issue a fine to the driver. Of course, this is a small amount, but it creates a headache. In this regard, most motorists have encountered a number of inconveniences due to the fact that many simply forget to turn on the low beams when getting into the car, or do not turn off the lights when leaving the car, which is why they find the battery completely discharged in the morning.
In order to get rid of such problems, many decide to modify the process of turning on and off the headlights. Thanks to the simplest circuits, the headlights can turn on simultaneously with the ignition or when the engine starts. In this case, during the daytime the low beam headlights will light up, but not the headlights, and at night everything will work as usual. Let's consider both options.
When to regulate
Everyone should be able to adjust the direction of light, especially since in some cases it is impossible to do without it. Adjusting the headlights of a car with your own hands is a simple procedure, so you can save money if you know how to do it. Cases when this is necessary:
After replacing the light bulbs (it doesn’t matter if you have single or separate optics); After replacing (one or both does not matter), for example, you damaged one headlight and replaced or replaced both with more powerful or fashionable devices; The feeling of discomfort from driving with the existing lighting is also a sign of the need for adjustment; When oncoming cars flash their high beams at you, they communicate in such a way that you blind them; We connected the fog lights, they also need to be adjusted; If you replaced tires or wheels with a different diameter (size), you need to adjust the headlights; After work that changes the rigidity of the car’s suspension; When passing the next maintenance; Before a long journey (travel);
Pros and cons of the Light Assist system
The emergence of this technology, as expected, significantly simplified the lives of motorists; this innovation appealed to thousands of motorists around the world. The accuracy of calculations, perfection of design, and reliability are time-tested. The high beam turns on when it is needed and turns off immediately when there is a risk of blinding oncoming traffic. Even when overtaking on an unlit road, with automatic high beam switching, you will not dazzle the car you are overtaking. Among the disadvantages, we can only highlight the cost, complexity of the design, as well as incompatibility with many cars; unfortunately, not all cars can install such a system.
Well, that’s all for me, write what this option is for you, another unnecessary bells and whistles or a useful system that makes life easier for motorists and improves the quality of car lighting.
If you liked the article, share the link to it with your friends on social networks.
Traffic Laws:
19.1.
In the dark and in conditions of insufficient visibility, regardless of the road lighting, as well as in tunnels, the following lighting devices must be turned on on a moving vehicle:
- on all motor vehicles - high or low beam headlights, on bicycles - headlights or lanterns, on horse-drawn carts - lanterns (if equipped);
- on trailers and towed motor vehicles - side lights...
19.3.
When stopping and parking at night on unlit sections of roads, as well as in conditions of insufficient visibility, the side lights on the vehicle must be turned on. In conditions of poor visibility, low-beam headlights, fog lights and rear fog lights can be turned on in addition to the side lights.
19.4.
Fog lights can be used:
— in conditions of insufficient visibility with low or high beam headlights;
— in the dark on unlit sections of roads together with low or high beam headlights;
- instead of low beam headlights in accordance with paragraph 19.5 of the Rules.
19.5.
During daylight hours, all moving vehicles must have low-beam headlights or daytime running lights on to indicate them.
19.2.
High beam should be switched to low beam:
— in populated areas, if the road is illuminated;
- when passing oncoming traffic at a distance of at least 150 m from the vehicle, and also at a greater distance, if the driver of the oncoming vehicle periodically switching the headlights indicates the need for this;
- in any other cases to eliminate the possibility of blinding drivers of both oncoming and passing vehicles...
19.6.
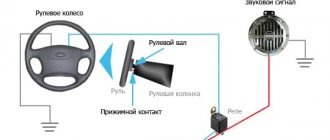
The spotlight and searchlight may only be used outside populated areas in the absence of oncoming vehicles. In populated areas, only drivers of vehicles equipped with... blue flashing lights and special sound signals can use such headlights when performing an urgent official task.
19.10.
Sound signals can only be used:
— to warn other drivers about the intention to overtake outside populated areas;
- in cases where it is necessary to prevent a traffic accident.
19.11.
To warn of overtaking, instead of a sound signal or together with it, a light signal may be given, which is a short-term switching of the headlights from low to high beam.
How does headlight adjustment work?
If you are saving money and want to adjust the headlights yourself, then once you figure it out, you can do it. Let's roughly divide the process into two stages:
Preparation
The first step is cleaning.
Be sure to clean up your vehicle. Each element should be cleaned, dust removed and the interior cleared of debris, then carefully wipe everything with a dry cloth. Carry out a visual check to see what the headlight reflectors and their lenses look like. They must be in proper condition so as not to create lighting problems.
Check the wheels and tires externally, and also measure the pressure. The car tank should be more than half full. Transport should not be overloaded; the general condition of the vehicle must be brought closer to what it is in everyday use. We are looking for a flat area for work. We install fixing stops to ensure that the machine is stable. Let's go to the screen. You will need a flat wall surface. You can try the process on a garage door or a large plywood board.
Adjustment
Park the car against the wall. It is necessary to determine the point that will become central for the machine. We also find a couple more points so that their position is located opposite the center of the headlights. We take the car away and place it approximately five or seven meters from the wall (we first study what the instructions for your model say). From the established points you need to draw vertical markings “A”, “O”, “B”, through these markings we draw horizontal line No. 1. Horizontal line No. 2 should be approximately 5-7.5 cm lower than the first (we also refer to the operating instructions). The point of intersection of “B” and “A” with the second horizontal line is called “E”. Next comes the actual adjustment. The hard part is over. You need to turn on the low beam. We cover one of the headlights with a cloth or something similar so that the low beam beams do not pass through.
How to turn off low beam
Post by rocket scientist » Jul 15, 2009, 11:04 pm
Messages: 3934 Registered: Dec 27, 2005, 00:00 From: Tyumen Experience: 2002 Car: Subaru legacy :
Awards: 1
| Rating: 5 384 |
| Reputation: +3 |
Thanked: 5 times Thanked: 23 times
Post by West2K » Jul 15, 2009, 11:05 pm
Messages: 612 Registered: Dec 05, 2006, 00:00 From: Tyumen Experience: 1999 Car: Mazda FSW :
Awards: 1
| Rating: 715 |
| Reputation: 0 |
Thanked: 6 times Thanked: 2 times
Post by SantaCluster » Jul 17, 2009, 6:16 pm
Hmm.. I was wondering. How can I TURN ON the constant low beam? I turn it on manually all the time. this makes the car more visible (and safer)
Are you saving on light bulbs?
Messages: 78 Registered: Sep 21, 2008, 00:00 Car: Mazda3
| Rating: 78 |
| Reputation: 0 |
Post by zoom_zoom » Jul 17, 2009, 9:37 pm
Messages: 54 Registered: Sep 12, 2006, 00:00 From: Tyumen Experience: 1995
| Rating: 54 |
| Reputation: 0 |
Post by shamsha » Sep 25, 2009, 01:30 pm
alexta2009, I made such a lotion for myself.. I can help for beer
Added after 49 minutes 6 seconds:
and for those who ask off-topic questions like “why?” I can say the following (everything further is my personal opinion and experience): fuck. For some reason, the Japanese made the low beam in such a way that when the ignition is turned on, it turns on and then when the starter is running, it does not turn off, so when the starter is running (even for 1 second), a “drawdown” occurs (or whatever you want to call it differently). as a result, ordinary light bulbs work for no more than a year (while on other cars it can last for 5 years), and after a couple of months they dim significantly (tested!), but I didn’t even want to think about xenon, because . such jumps are detrimental to both lamps and xenon units (both I and a relative have experience on exactly the same Mazda), and this effect will significantly accelerate the death of the battery in winter. these are all facts.
Well, plus the wishes that arise from many, many owners of this joke in the form of always-on low beams: you can’t stand in the dark in winter with the lights on (and sometimes you just want to), when starting from a signaling system with remote start, again, you don’t want the headlights to turn on (nafik should it be in the yard or in the parking lot?).
Well, in short, this system is incomprehensible.
Messages: 841 Registered: Oct 29, 2008, 00:00 From: Tyumen - Kurgan Car: MAZDA6
| Rating: 994 |
| Reputation: +1 |
Thanked: 1 time Thanked: 1 time
Post by MAZDAvod » 25 Sep 2009, 14:38
Automatic low beam is a breeze, if only it turns on after you start the car.
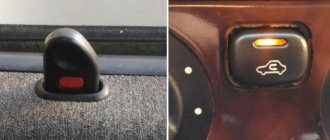
What to consider when connecting
When connecting, keep in mind that the new Gazelle instrument panels are equipped with a central switch, which has a separate position for the fog lights, so you don’t have to embed a separate button.
A number of points regulate where and how additional lighting fixtures should be installed:
- First of all, this is the height, which must be at least 25 centimeters from the surface of the roadway.
- Fog lights should be installed in such a way as to maintain symmetry with the axis of the vehicle itself.
- These and any other devices cannot protrude beyond the external dimensions of the machine by more than 40 cm.
- And in any case, the flow of light cannot be higher than the flow of the main low-beam headlights.
In some cases, traffic regulations allow the installation of fog lights on the roof of a vehicle. For example, if we are talking about an all-wheel drive vehicle with high cross-country ability. Or its operating conditions are so harsh that even making stickers for the headlights is not able to protect them from stones.
Read more: Cool congratulations from the driver
PTF before installation
Install on the front bumper
At the same time, in the first photo you can see that the manufacturer has already designated places for future foglight mounts in the bumper. You can choose another place, not forgetting the recommendations of the traffic police officers stated above.
Again, there is quite a variety of headlights on the market, based on shape and size. Most often, headlights of rectangular, square or oval shape are installed on Gazelle. But after the purchase you will have to decide where your lighting fixtures can be placed.
For example, a Gazelle Business fog light will require mounting holes, but the front bumper does not always provide this. Therefore, there are 3 main ways out of this situation:
- cut the required hole with your own hands;
- attach the fog lights to the top of the bumper;
- buy a bumper prepared for the installation of fog lights.
So, if we have established for ourselves the mounting location for the foglights, then it’s time to assemble the electrical circuit, and then introduce it into the standard one. Each kit, which is designed for additional lighting in bad weather conditions, includes not only headlights, but also electrical wiring to connect them, as well as an interrupt relay and a button to start the lighting.
The kit usually also contains instructions that help you correctly connect and route the wiring to the Gazelle - this will also be useful.
We fix the relay in the engine compartment
Basic sequence of actions
The work itself on connecting the fog lights to the Business Gazelle will be carried out as follows:
- Installed headlights must be connected with wires.
- The block with wires must be brought under the hood.
- We mark a place for installing the interrupting relay (this element must be included in the circuit, so if your kit does not have it, purchase it separately).
Connecting the PTF to the control unit in the cabin
- We connect the wiring between the relay and the headlights.
- The wiring from the relay will be routed into the interior through the process input.
- We designate a place for installing the power button.
- We mount the button and connect it to the standard electrical wiring.
Once we have the entire circuit assembled, we need to check its operation and the correct connection of the wiring to the relay.
Automatic switching on of headlights after engine start
To organize such a work scheme, you can go in two directions: connect to the oil pressure sensor or to the handbrake.
Method 1: Connecting to the oil pressure sensor
To make this connection you will need:
- relay;
- transistor (2 pieces);
- wires;
- microcircuit K561TP1.
All parts are placed in a small relay housing, after which the device must be connected to an oil pressure sensor. When the pressure in the engine lubrication system normalizes, that is, when the engine is turned on, the sensor will open, and the power from it will go to the capacitor. Ultimately, the voltage to the relay will be supplied through the transistors included in the headlight power supply. When the engine is turned off, power from the sensor is supplied to the desired lamp located on the dashboard. At this time, the capacitor that is included in the headlight control unit begins to discharge and the power supply to the relay stops.
This is interesting: Is it worth installing additional pads on the seat belt?
In this case, you can also control the headlights manually if you use a parallel connection. In order to set the time to turn off and turn on the headlights, just select the resistance on the board. The higher this parameter is, the longer it will take the headlights to turn on and off.
True, not everyone likes this method, since this scheme is much more complicated (you need to pull wires and make 3-4 connections).
Method 2: Connecting to the handbrake
This method is much simpler, since in this case it is enough to just slightly modify the headlight connection diagram for ignition, which we talked about at the very beginning. To do this, just add another relay and a short wire (about 25 cm) to the standard contact of the handbrake button.
Thanks to this method, the headlights will turn off as soon as you pull the handbrake, and light up when you release it.
Kind of light
There are the following types of car headlights:
- Dimensions. Installed in front and behind the car to visually determine the dimensions of the car.
- High and low beam optics. Often both lamps are located in the same housing or one lamp is used, which provides both a near-field, 40-50 meters, and a long-range, up to 120 meters, stream of light.
- PTF.
- Running lights.
The main technical characteristic of light is color temperature. It determines the spectrum of radiation that can be perceived by the human eye. For automobile lamps, color temperature remains the main parameter of choice, measured in Kelvin. Each light bulb is marked with a cap or base.
Type of light depending on color temperature:
- 2400 Kelvin – rich yellow light.
- 3200 K – weak yellow light, used in the factory configuration for automotive headlight optics.
- 4300 K – warm white light, good road illumination at night.
- 5000 K – light 95% close to daylight.
- 6000 K - light blue light of a cold spectrum; in bad weather it does not provide sufficient visibility of the road.
- 8000 K and above - blue cold light, used in automotive optics as a decorative element; its use for headlights is prohibited.
Halogen
70% of automotive optics use a halogen lamp, which consists of a bulb, an incandescent filament, and a base. Instead of vacuum, there is a halogen gas (a volatile compound of bromine, chlorine, fluorine, etc.), which gives the tungsten filament a lower degree of evaporation and a higher degree of incandescence. The light of a halogen lamp, in comparison with a conventional incandescent light bulb, has greater brightness with an increased length of the luminous flux. Advantages:
- resistance to mechanical stress and vibration due to the use of a quartz flask;
- average service life 2000 hours;
- ease of self-installation, quick dismantling.
Xenon
High-intensity discharge lamps, better known as xenon lamps, are a relatively new technology based on the principle of halogen design. The flask is filled with inert gases (xenon from 70%). The lamp does not have a standard filament; there are two electrodes that ensure the occurrence of an electric arc. Xenon, heating up, begins to shine with bright white light, as close as possible to daylight.
To operate effectively, it is necessary to generate a voltage pulse necessary to initiate an arc. Cars with xenon optics have a special ignition unit, or “ballast”. Advantages:
- increased light flow;
- high efficiency (45% higher than halogen analogues);
- service life up to 10,000 hours;
- small load on the car generator;
- good visibility when driving at night.
Xenon lamps are characterized by a color value of 4300 K. These are the best temperature indicators at which good visibility is ensured at night and during bad weather. Lamps labeled 5,000 K produce light that is 98% similar to daylight.
Diode
Diode optics, or LED headlights, are a new word in automotive lighting. Until recently, diodes were used one at a time for interior lighting, daytime running lights, and backlighting. The LEDs are equipped with an ice block and installed in lensed optics. Advantages of installing LEDs:
- minimal energy consumption;
- service life more than 10,000 hours;
- at a color temperature of 5000 K, LED lamps provide white light and increased brightness;
- It is permissible to use LEDs in a regular lensed headlight.
The disadvantages of ice lighting include the cost of the diode unit, which, if one element breaks, must be completely replaced.
Laser
As an innovation, a new element is included in the optics of the car - laser headlights. The high cost of manufacturing a laser unit is so far the only limitation to the widespread use of the new technology.
For the first time, it was the Chinese who decided to install a laser beam on conventional LEDs. At the same time, the luminous flux of the ice element increased by 70%. Laser headlights are equipped with a certain number of diodes and a laser module; the light beam has clear boundaries and does not blind oncoming drivers.
The color temperature does not exceed 5500 K, which provides good illumination of the road at night, in fog, during heavy snow and rain. The built-in infrared camera also contributes to better illumination (only in luxury cars, for example Audi Sport 2018).
Main reasons
When wondering why the high beams are not on, be prepared for the fact that there may be many reasons:
If flashing occurs (signaling for oncoming cars), but everything else does not, the problem is definitely not in the lamp. You need to start checking according to the scheme from the very beginning of the chain:
- Fuse - if visually it is intact and voltage is applied to it, the problem is not with it. Just in case, it’s worth checking all electrical switching devices going to each headlight;
- Headlight relay - it is responsible for turning on the headlights. To check the coil and moving contacts, you need to remove it. Apply 12 V voltage from the battery. If everything is OK, the relay will work. We check the presence of contact with an ohmmeter.
- Let's see if the voltage in the fuse box goes to the contacts in the connectors under the relay. If it is not there, you will have to get to the headlight switch and carefully check whether there is a missing contact somewhere. This is possible in the case of twists.
Car owners often encounter the problem of a fuse burning out after replacement. Finding the source of the short circuit is not easy
If this happens, you should pay attention to the following points:
- As a result of a break in the insulation of a hot wire, it comes into contact with metal.
- the wire cuts the insulation, creating a ground, as it is clamped on both sides.
- the disconnected wire dangles, touching the ground.
Automatic switching on of headlights via relay.
The second way to implement automatic headlight switching is to connect the electromagnet of the headlight switch relay or an additional relay to the generator excitation circuit, or rather the charging signal lamp circuit. This method is suitable for almost all modern cars.
To implement it, you need to add a five-pin relay of type 90.3747. Connect the wire from the ignition switch to pins 85 and 30. Connect pin 86 to the generator terminal to which the wire from the charge control lamp is connected. Connect pin 88 to the headlight relay or directly to the fuses protecting the headlight circuit.
In this case, when the ignition is turned on, the power from the ignition switch, the relay electromagnet coil, goes to negative through the generator winding, and the relay is activated and opens contacts 30 and 88. After the engine starts and the generator starts operating, a plus appears at the output of the generator warning lamp. The relay turns off and closes contacts 30 and 88, turning on the headlights.
To prevent a harmful circuit in this case, it is advisable to use a diode connected in series with the relay coil directed towards the generator. In this case, the headlights will light only when there is a charging current, subject to the integrity of the circuit, which can be monitored by the battery charge lamp.
Method one
It will be useful for him
- Strong thread of sufficient length
- Building level
- Marker or felt-tip pen
- Magnets or buttons (depending on what surface will be used to adjust the light beam)
- Laser flashlight to accurately find the center of the car
- Roulette 5-10 meters.
We transfer the dimensions of the car and the location of the headlights onto the projected surface
Make a loop at one end of a strong thread. We hook it to the tread pattern of the rear wheel.
We unwind it to the wall and fasten its opposite end to it. If it is metal, for example a gate or a metal fence, then we use a magnet to attach it. If the tree is buttons.
We stretch the thread so that it touches the top of the rear and front wheel disk. Thus, we found the ideal horizon and transferred it to the wall. We perform the same operation on the other side of the machine.
Now we have the exact height of the wheels relative to the floor. We mark the places where the thread is attached to the fence with a marker.
We touch the thread with a building level and measure the distance from its upper part to the center of the headlight or low beam lens. It is usually marked with a dot on the headlight glass. If it is not there, then “by eye” we determine its center. We transfer this distance to the reflected surface. From the point of contact of the thread with the fence, measure the resulting distance. For accuracy, we use a level so that the resulting point does not go left or right. We do the same on the other side of the car.
We are looking for the center of the car on the projected surface. We use a laser flashlight. We use the interior rear view mirror as a guide. It is mounted in the cabin exactly in the center of the car. We stand in the back center of the car and shine a flashlight into the center of this mirror. In the rear, you can use the additional brake light as a reference point; it is also located clearly in the middle of the car. Slowly lower it down until the beam appears on the wall. The assistant places a mark on the laser dot. We found the exact center of the car.
We stretch the thread from the far left to the far right point on the wall. We get an even horizon from one edge of the car to the other. Measure the distance from the center of the left headlight to the center of the right headlight. We use a tape measure. We divide the resulting distance by two and mark the result obtained from the center of the machine on the horizontal line of the thread. Now we know the exact location of the center of the headlight or lens on the reflected surface.
We measure the distance from the beginning of the lens or the tip of the halogen light bulb to the wall. If this does not work, then we measure from the headlight glass, in the case of the VAZ 2107 and similar cars, where the optics have a flat surface.
Open the hood and look for the designation of the angle of refraction of the light release. It is indicated as a percentage. Let's say it is 1.0%. This means that you need to multiply the distance from the headlight to the reflected plane by the specified value.
For example. The distance is 5 meters. The refractive value is 1.0%. Let's multiply, we get 0.05 meters or 5 cm. This means that on the wall you need to move the center of the headlights down by 5 cm. This way we get the calculated location where exactly the light beam from lenses or lamps should shine.
We turn on the low beam and adjust the angle of inclination using the screws on the headlights so that the break point where the “tick” is obtained coincides with the resulting point on the wall. The headlights can be adjusted up and down, and left and right.
This is where the adjustment method ends. Let's move on to the second, simpler, but less accurate.
High beam on a car
In the dark, low or high beams are required.
Without this, a fine cannot be avoided. We turn on the high beams at night, when there is insufficient visibility and in tunnels. At the same time, the Rules allow the use of low beams in these cases. We switch far to near in the following cases:
— when passing oncoming traffic (150 meters before the oncoming car);
— when passing oncoming traffic at a greater distance, if the driver of the oncoming car “blinked” his headlights at you;
- in all cases when your distant driver can blind oncoming drivers;
- in populated areas, if the road is illuminated.
You can use your high beams when overtaking. Paragraph 19.11 of the traffic rules allows the driver to “blink” his headlights to warn of overtaking.