How to polish a scratch on a car
Every car owner has encountered such a nuisance as scratches on the car. Such damage can occur as a result of an accident, careless handling (the car can be scratched by keys, nails, metal elements of clothing), and scratches can also form due to small pebbles flying out from under the wheels of the car driving in front. There are two ways to deal with this problem:
- contact a car service center for help;
- do the polishing yourself.
The first option is good because all operations will be carried out by professionals and the result will most likely be excellent. But on the other hand, you will lose a significant amount of money, as well as a large amount of time. Self-polishing will cost several times less, however, the result may not meet your expectations. In this article we will talk about how to repair a scratch on a car with your own hands and discuss what is required for this.
Removing scratches on a car body using polishing
Removing scratches on a car body with paint
Above we looked at the types of scratches that may appear on the body of your car. Based on the type of damage on the car, you can determine whether the part needs painting or not. However, there are other situations that also need to be addressed.
For example, a year or even two ago you scratched your car on the way to work. If you were in a hurry, then most likely you decided not to think about it because of some scratch that can be easily polished out. But the scratch remained, because after work you were very tired, on the weekend at the dacha, and then you simply forgot. Common situation?
If a scratch was made on your car a long time ago, but you still haven’t decided to take care of it, then the time has come to do it. However, most likely, the scratch has already been covered with a coating of rust, and now polishing alone will not do. In your case, you will need a rust converter. After washing the car, apply the product to the damaged area. The converter will corrode the rust layer and replace it with a protective zinc layer. Only then can the part be sent for painting.
Preliminary stage
Before starting work to eliminate a scratch, you need to determine the extent of damage to the paintwork on the car. First you need to thoroughly wash the car and visually assess its condition:
- If the scratch is a paint mark from another car, you can simply use white spirit.
- If there really is damage, then you need to determine its depth. To do this, you need to run your fingernail perpendicular to the scratch. If the nail clings to the edges, the damage is quite deep; if not, then you are lucky and you can repair such a scratch quite quickly. You can also simply wet the car; if the scratches are not visible on the wet surface, then they are shallow.
Determining the depth of scratches
Scratch removal methods
There are different ways to remove defects from a car body. They all have their own characteristics and are selected depending on the size and severity of the defect.
Painting
If the scratch is in an inconspicuous area of the body, it can be eliminated by spraying with aerosol paint. Such materials are sold in automotive stores and are intended specifically for removing scratches. The operating procedure will be as follows:
- wipe the damaged area with solvent;
- take a sheet of paper, cut a hole in the center approximately corresponding to the size and shape of the scratch;
- carefully glue the paper to the body with masking tape;
- spray paint through the hole in the sheet, holding the can at a distance of 15-20 cm and applying a thin layer of coating;
- let the paint dry a little, then level the scratch area to the same level as the undamaged base using a rubber sanding sponge;
- if necessary, repeat the process again, but only 24 hours after the first stage;
- polish the body area with a special polish.
Painting over damaged paintwork from a spray can
Polishing
This method is ideal for removing small scratches that only affect the varnish layer and are superficial. They regularly occur on any machine during its operation and can be easily eliminated with your own hands. Polishing against scratches is done using special pastes, aerosols, and liquids. The most convenient to use and economical are creamy, thick pastes that reliably seal defects on the body. Once the paste is applied, protection against chips and scratches will last for several weeks or months (depending on the frequency of pressure washing).
Surface scratches can be removed by polishing
Car polish can be made based on silicone, acrylic or other polymer materials. It is advisable to choose products from trusted brands, since cheap polishes have a lower concentration of the main substance, so the beautiful shine of the car will disappear in a couple of weeks. If the scratch is slightly deeper, you can first use special restorative abrasive polishes, which are applied with vigorous circular movements or with a polishing machine. After this stage is completed, wax or protective polish is applied to the defect area.
Anti-Risk is considered an effective polishing agent. It quickly repairs minor scratches, brings the body into proper shape, gives the coating a shine, and also fights stains that arise from:
- road salts;
- ultraviolet;
- reagents.
Paint polishing products
An inexpensive but high-quality polishing compound is “Anti-scratch”. Many car enthusiasts always have it in stock to easily get rid of minor body defects. Apply the polish to a damp cloth, wipe the damaged area, wait a couple of minutes until it dries completely and polish the body until it shines. After applying the paste, you can additionally apply liquid protective wax.
Painting works
Deep scratches, as well as older defects that have become rusty, must be removed using professional methods. If corrosion is present, the process will be even more complex and expensive, involving careful grinding and application of anti-corrosion compounds (primers). If you neglect such actions, the rusting of the metal under the paint will continue.
The order of painting work is as follows:
- Preparation. Dirt and rust are removed, dents are repaired with automotive putty, and the entire surface of the part is degreased.
- Padding. Apply primer with a brush or spray.
- Coloring. Paint in 2 layers with a break of half an hour.
- Varnishing. The finishing layer is varnish, which is sprayed in 2-3 layers.
Polishes based on liquid glass
Such products are sold in liquid form and are available at any auto store. The effect of using polishes will be the same as when using non-abrasive wax pastes, but they are more durable. Small scratches are filled with polish, and a protective film is created on the body that can withstand up to 5 pressure washes.
Car polish H-7 based on liquid glass
Pencils and markers
These products are widely advertised, are inexpensive, accessible, and easy to use. There are two types of markers and pencils:
- Wax. Their properties resemble polishes, but they contain pigments that match the color of the car body. Based on artificial and natural waxes.
- Gel. They contain silicone or polymers, are squeezed out of a tube for application, and have the consistency of gels.
Fix it Pro Scratch
Pen Gel markers remove even the smallest scratches. Wax repairs are more effective and help protect the surface of the part from future damage. After treating the scratch, you need to remove excess product with a soft cloth and polish the problem area well. It is important to apply the pencil only to a grease-free base, or to an area treated with anti-silicone.
Removing shallow scratches
If your car has minor scratches, you can get by with a light abrasive polish. In a car service, they use a special tool for this, but buying it for one time is impractical. So, we will need:
- abrasive paste (it is better to use a fine abrasive);
- cloth napkin;
- wax polish.
The seller may offer you a paste with a pigment that will help polish out deeper scratches on the car. Here you don’t have to worry too much about the color of the pigment matching the car’s paint. In any case, the pigment will wash out after several washes.
How to remove minor scratches:
- First, you need to thoroughly wash the car body, let it dry and make sure that there is no dirt, sand or dust left on the car. Polishing must be done in a garage or outdoors, but only in calm weather.
- Now you need to apply a small amount of abrasive paste to a napkin and treat the damaged area in a circular motion with light pressure. Do not rub one place for too long - this can remove all the varnish in that area.
- The abrasive paste must be thoroughly rinsed off after finishing polishing.
- Then you need to apply wax polish to the damp surface, let the car dry a little, and then wipe the polished area dry with a clean soft cloth.
Aerosol can of paint
You've probably seen “palette” racks in stores with small cans of paint resembling samples. These are not paint samples, but just means of assistance in cases where you need to tint something a little in a small area. On the plus side, it is possible to select colors from a catalogue, but again the problem mentioned in point 4 may arise.
In this case, the task will become more complicated and you will have to use a computer color selection, and for a high-quality coating, find a spray gun with a compressor. If you manage to perfectly implement your plans, then you can safely consider that you are halfway to mastering the auto painting business. But everything is possible, you just need to carefully follow all the manufacturer’s recommendations and the necessary requirements of the technological process.
The main requirement for a successful result is the presence of a clean and warm (at least 15 degrees) room or a quiet, windless and dust-free corner of the street in the summer sun. If you are going to carry out the procedure indoors, you should definitely stock up on personal protective equipment such as a respirator, safety glasses and gloves, although they will also not be superfluous outdoors.
Step 2. Clean the surface from dust and degrease with a special agent (anti-silicone) using a lint-free cloth. Let it dry for a few minutes.
Step 3. If the indentation is significant, you will need to figure out how to repair the scratch on the car with a special automotive putty, with which the surface will be leveled. It is applied with a spatula in a thin layer in several stages. We wait until it dries (for time, see the instructions for the putty, but at least 30 minutes), rub it with fine abrasive sandpaper (first No. 1500, then No. 2000). Reapplication and grouting may be required. In general, remove to a perfectly flat surface.
Step 4. Apply a thin layer of primer, being careful not to get it on the old paint. We wait about half an hour for it to dry.
Step 5. Degrease again. Wait until it dries (2-3 minutes)
Step 6. With a firm, smooth movement of the hand with a spray can, apply the first layer of paint. Make sure that it lays down thinly, evenly, without smudges. We wait according to the instructions on the can (usually 5-10 minutes).
Step 7. Apply a second layer, similar to the first, and let it dry again. Step 8. If the car has a pearlescent or metallic tint, then the next step is to apply a thin layer of varnish, let it dry for at least 30 minutes, and preferably several hours. Step 9. Polish again painted area with a special paste, preferably using a polishing machine.
But it’s better at this stage to go to the nearest car wash, where they will complete your masterpiece for a small monetary reward. Summarizing all of the above, we note that there are quite a lot of options for how to cover up a scratch on a car. Some of them are simple but not durable, while others require considerable technical training and certain skills to implement. But everything is in your hands. In conclusion, we would like to wish that the question of how to paint over a scratch on your car bothers you as little as possible!
Removing deep scratches
If the paintwork on the car has received significant damage, it will not be possible to get by with polish alone. The easiest way to remove such scratches on a car is to use markers. All you need to do is paint over the damaged area with a marker, and then polish it in the same way as with shallow scratches. This method is quite cheap and simple, but its effect is not long-term, so this operation will have to be repeated regularly.
The second method is do-it-yourself repair tinting. To carry out this operation you will need:
- base paint;
- varnish;
- primer;
- alcohol;
- thin brush with soft bristles;
- kit for removing shallow scratches.
Most modern cars are sold with a repair kit that includes base paint and clearcoat. If your machine did not come with a kit, then you need to select consumables.
How to remove deep scratches:
- The first step is to thoroughly wash the car and let it dry. The damaged area on the car should be treated with alcohol to completely degrease it. All work must be carried out in a dust-free environment.
- Then you should apply primer to the scratch and wait a little.
- Now you can start painting. You need to apply paint to the damaged area with a thin brush, being careful not to go beyond its boundaries. After this, you should let the paint dry. Drying time is indicated by the manufacturer on the packaging.
- The next step is to apply varnish. This process is carried out similarly to the previous one. Only the varnish must be applied beyond the boundaries of the damage and with a small margin, which will be erased during subsequent polishing. Now you just need to wait until the varnish dries, after which you can use the vehicle for its intended purpose.
- No earlier than a month after touch-up, it is necessary to polish the treated area on the car. To do this, use a paste with a fine abrasive and a wax polish. The process is no different from polishing shallow scratches.
After completing all of the above procedures, removing the scratch on your car can be considered complete. In some cases, it’s easy to do without a primer (if the scratches are not very deep), but it’s better to play it safe to avoid the paint shrinking during drying.
How to determine whether a scratch should be painted or polished?
From my experience, I note that you can polish a scratch precisely if you have two layers of paint on your car or the scratch is not very deep.
The fact is that if the scratch is deep and reaches the primer or putty, then polishing becomes pointless without subsequent painting or using a special pencil.
And here straightening may be required.
But if the scratch is fresh and shallow, and especially since you have two layers of paint on your car, then you can safely polish it.
This is how it is shown in the picture.
But first you have to buy it.
Of course, it is more convenient to use a special grinding machine.
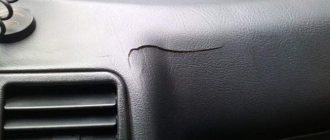
Nowadays it is very easy to get a scratch on your car. Cars are parked closely in courtyards and parking lots; some drivers park them so close that they can easily be hit when leaving or parking. Fences, garage doors, etc. are also often hit.
I’m a newbie behind the wheel; I started driving on my own for nine months, so I can’t boast of careful driving. My unfortunate black Chevrolet Lanos has a lot of scratches, both small and large, of varying depths.
But it never even occurs to me to eliminate them on my own. Only a specialist can correctly assess the depth of the damage and choose the right way to eliminate it. Therefore, I would not advise doing anything on your own. If you don’t have the means to do this, then you should at least go to a service center for a consultation and, if necessary, in case of a deep scratch, preserve it in order to fix it later.
If the scratch is very small and you want to remove it yourself, then try to do it using the video below.
WHAT SCRATCHES CAN BE POLISHED?
In principle, anything can be polished - the only question is the cost of what you want. If we evaluate from the point of view of common sense, then relatively shallow defects - those that have not reached the decorative coating of the body - can obviously be eliminated by polishing. The depth determines how much effort will have to be made. The fine detail is removed with the first touch of the polishing machine, deeper defects will have to be treated with different circles and pastes, and the deepest ones will first be sanded with fine sandpaper.
To quickly clarify the situation, there are a couple of simple ways to check: with a fingernail or with water. If you run your fingernail across the scratch (only without force!) and catch it, even slightly, it means that the defect is already too deep and polishing alone will hardly be able to eliminate it. The good thing about the water option is that it immediately shows the expected result – what the area will look like after polishing. The damaged area of the body is moistened generously and checked to see if the scratch is visible above the layer of water: if so, then you will have to do more than just polish.
Classification of scratches
It is customary to divide all encountered defects of this type into several varieties. There are scratches to the base, to the paint and to the varnish, and the latter are divided into ordinary and deep. And then there are also slippages. The last option is the most dangerous: there may be various defects to any degree. Rubbing in occurs when the body touches other cars, trees, branches, fences, etc.
Polishing is guaranteed to remove shallow defects from rubbing in, and at the same time restores the color. And more serious damage after it will be less noticeable. But this will not help the furrows down to the very base.
Scratches to base
By default it is metal, but in recent years, plastic has increasingly become the basis. In both cases, polishing will not help. Such furrows can be seen from afar, from any angle and even in low light. And in color, they differ from the body, the above-mentioned checks do not pass.
It must be said that scratches to the very base do not appear after washing or from a brush, even the hardest. Most often this is the result of vandalism: when someone deliberately damages the body with a nail or any other hard, sharp object. Also, deep grooves often appear during an accident, along with dents.
If you still try to polish, the defect will decrease slightly, but the result will be too weak for a meticulous inspection of the car owner. You'll have to go to the workshop and repaint the car.
Scratches to paint
They are also visible under water and can be caught with your fingernail. From scratches to the base, such defects differ only in color: they are less noticeable precisely because they do not differ in color from the body. The reason for the appearance is also often vandalism or an accident, careless parking. These defects are deep enough that a good master will not undertake to polish them in the first place. You can grease or mask it temporarily until the car is repainted.
Scratches on varnish
The majority are like this and I really want to polish them. Moreover, in both tests, ordinary scratches on varnish pass immediately: you can’t catch them with your fingernail, no matter how hard you try, and you won’t be able to see them under water either. This is where polishing really helps.
Unfortunately, there are many opportunities to again cause defects in this category to the body: rub the dirt with a sponge, wipe off the dust with a dirty rag, press hard on the napkin - and here they are. It gets ridiculous: passers-by in the parking lot touch the body with a bag or zipper - again, scratches.
Deep scratches in the varnish deserve special mention. This is approximately at the border of the paint and varnish layer. If you polish, you can remove the remaining varnish - and then you will have to repaint. Compounding the problem is the difficulty of assessing the depth of a scratch in a particular case. It feels like it barely clings to your fingernail, and is almost invisible under water, especially in low light. The price of a mistake is removed varnish, etc.
In practice, any scratches on the varnish are polished, provided that it is done professionally. For example, deep ones can be removed by sequentially using different sandpapers: from 1500 to 3000. By the way, keep in mind: sandpaper larger than 1500 is generally not suitable for polishing a body; it is a tool for carpentry work.
How to remove scratches on plastic
The interior of the car suffers no less from scratches. The sills, door cards and other plastic parts of the interior are covered with abrasions.
Plastic restorers
You can make the cladding tidy again with the help of plastic restorers.
Such products are sold in the form of aerosols, sprays and milk. They have good penetrating ability and are designed to fill scratches. In addition, the restorers contain a polish that returns the surface to its former freshness.
Instructions for use are on the packaging of the product. As a rule, restorative compounds are applied to dry and cleaned parts and left for a few minutes to dry. After this, using a clean microfiber cloth, the surface is well polished by hand.
Hairdryer or lighter
A simpler and cheaper way to deal with scratches on plastic is to heat it with a hair dryer or, in extreme cases, with a lighter. Under the influence of temperature, damage is literally healed. This life hack will help completely remove small scratches and make deep ones less noticeable.
To remove scratches in this way, you need to very carefully heat the damaged surface, without staying in one place for a long time. If there are a lot of scratches, take breaks so as not to melt the part and burn the upholstery parts adjacent to the plastic.
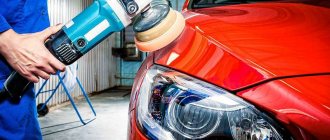
Secrets of proper polishing of a car body
Polishing scratches on a car body is a necessary measure when restoring the paintwork from numerous small defects. It allows you to return the car to its original appearance without completely repainting it. The causes of damage are small stones flying out from under the wheels of other cars, tree branches, ice, hail, and careless driving. Defects spoil the appearance of the car and cause corrosion. If you have special equipment, you can polish your car yourself.
How to fix a deep scratch on a body without completely repainting it
Receive one of the most read articles by email once a day. Join us on Facebook and VKontakte.
The appearance of scratches on a car body is an inevitable process, practically independent of the driver. No matter how carefully you drive your car, stones, sand and other debris flying from under the wheels leave marks on the paintwork. All these defects must be eliminated to avoid corrosion in the future. Small and shallow damage can be easily removed by polishing. Another thing is deeper chips and scratches that affect the base, soil, or even reach the metal. Constant removal of defects at service stations is a significant expense. But if you have the desire and patience, you can try to fix the problem yourself and without global painting.
Preliminary preparation
Before eliminating minor scratches, the damage is diagnosed and the surface of the car body is prepared. Preparation for recovery is carried out according to the following algorithm:
- Prepare the work area. Polishing car body scratches should not be done outdoors, as getting in the way of dirt or dust will only worsen the problem. Restore the paintwork in a garage with good lighting - otherwise, the work will be ineffective, since in low light only large and deep scratches can be seen. Before polishing, the room must be cleaned, as dust and dirt will affect the quality of the work performed.
- The area of the car body that is to be restored must be thoroughly washed, dried and degreased. Do not use gasoline or other solvents as a degreaser, as they can damage the paint layer. Use masking tape to seal the undamaged areas of the car body.
- Depending on the depth of the scratches, the necessary tools and consumables are selected.
After the restoration is completed, in order not to scratch the vehicle body again, it is treated with special compounds (“liquid glass”) or protective materials (vinyl or polymer films) are used.
Scratches on the surface of your car
If your paintwork has surface scratches, you can take the following steps:
Preparation
The first and most important part of fixing slightly scratched paint is to clean and prepare the paint. Rinse thoroughly and dry the affected surface. Next, it's time to use iron remover to remove any car wax or invisible contaminants from the paint. Then apply the clay to the paint surface. Next, wipe down the car paint with rubbing alcohol or isopropyl alcohol. Finally, use masking tape to mask off the areas you don't want to fix. It is especially important to use masking tape, since the adhesive leaves virtually no residue when removed.
cutting
The first step in the process, commonly called polishing, is cutting. Here you will use a polisher with the most aggressive, softest pad and most abrasive compound. It is always better to test the combination on a small area of the machine. Remember that you should let the polisher, pad and paste do their job. Do not press too hard and clean the pillow using an air compressor, water and a microfiber cloth. If a combination of products does little to improve the paint, move on to another combination rather than trying to force the products to work. Also remember that different manufacturers use different types of paints with different hardeners, so just because a combination works on one machine doesn't mean it will work on another.
Polishing
This may seem like the last part of the process, but you're far from done. After the “hollow” of the scratch has been removed during the cutting process, it is necessary to level the paint surface. Polishing and buffing the paint with a less aggressive pad and compound will now reveal the fresh paint underneath the surface you just cut away. Now you can start buffing the paint until it is clear. This part of the process also helps with swirls and imperfections that were not eliminated during the cutting step or that were caused by the cutting process itself. Don't worry if you still see swirls—the next step is to improve your paint.
Cleaning
Refining is also considered by many to be a type of polishing, but here you will use the hardest pad and the best compound to remove tiny curls and scratches that are not visible under normal lighting. Once you've achieved a mirror-like, streak-free finish, your paint is nearly perfect and now needs protection.
Coating
This step is performed after you have removed polish residue and other potential barriers that could interfere with the adhesion of the coating. It's time to apply wax or another coating (such as ceramic). Depending on the composition and chemical/natural composition of the coating, you may need to leave the coating for a while before polishing it. The application process for ceramic coatings is very different from waxes, synthetic or natural. Therefore, the application process will vary by product. Whatever you choose, follow the manufacturer's recommendations. Don't skip this step, as leaving the paint exposed without any obstruction between it and the elements/road debris will mean you'll end up with bigger scratches in larger numbers more often. Black cars are especially susceptible to obvious paint defects.
Tool
Do-it-yourself car polishing is most effective when using a sanding machine and discs. After applying the abrasive, use a machine operating at medium speed to polish the damaged area until shiny.
In this case, it is necessary to select the correct polishing wheels. Polishing discs come in the following varieties:
With their help, cracks, scratches and chips are removed from the surface of the car. Made of soft rubberized plastic. Abrasive wheels are equipped with the smallest particles of diamond chips.
Designed to add a glossy shine to a vehicle's paintwork. Circles are made of soft, non-fibrous fabric or felt.
- Soft with a textured surface. Designed for polishing car windows and headlights. Consumables are made of foam rubber.
When using circles, you need to remember that the temperature of the surface being treated should not reach 40 degrees Celsius. Otherwise, the paintwork will change its color and texture.
Instead of a grinding machine, you can use a grinder or a drill with a special soft wheel, but on these devices you need to adjust the rotation speed of the disk. If this possibility is not provided for by the design of the tool, then it is recommended to use fine-grained sandpaper and soft, non-fibrous fabrics. The polishing process in this case will be performed manually.
Features of removing marks at home
Depending on the type of surface being treated, care products will differ. A prerequisite for safe and gentle cleaning is compliance with the instructions .
From linoleum
To remove scratches from linoleum, use mastic. It is sold in hardware stores. You need to select a color for mixing that matches the color of the floor covering.
Mode of application:
- linoleum is cleaned of dirt and dust, degreased with an alcohol-containing liquid;
- mastic and color are mixed, sometimes several pigments are used at once to obtain the optimal color;
- Apply the composition to the damaged area with a spatula, carefully remove excess;
- When the composition dries, polish the surface with a soft cloth.
Instead of mastic, you can use clear nail polish. If the scratches are small, use wax.
From a gold or silver ring
To polish a gold or silver ring at home, use GOI paste. In addition to this, you only need felt to apply the composition.
Procedure:
- The ring is cleaned of dirt.
- GOI paste is applied to the felt.
- Polish the surface until completely smooth.
If GOI paste is not at hand, then use toothpaste and even lipstick. Napkins for jewelry, which are sold in specialized stores and online markets, have a good effect. They cost about 100 rubles.
From a metal object
Small scratches on metal surfaces are repaired with silicone grease. It covers the damage and prevents the metal from rusting. However, this method is short-lived. With frequent contact with water, the silicone will wash off.
Therefore, a more thorough approach is recommended:
- remove all contaminants from the metal surface, degrease it;
- if rust has already appeared, it is removed with acid;
- Using a mastic of a suitable color, seal the scratch;
- when the material dries, it is carefully sanded with fine-grained sandpaper.
If the damage is deep, then it will have to be puttied, painted and varnished.
From the tabletop
A scratch from a countertop can be removed using furniture wax. It copes well even with deep damage, making it almost invisible. You need to select a product that will not stand out from the overall color.
Use wax as follows:
- Clean surfaces from dirt and degrease them. It is important to remove all dust from deep within the scratch.
- Rub the wax into the damage so that it completely fills it.
- Excess product is removed with a soft cloth.
- Rub the surface until shiny.
This universal composition is suitable for processing countertops made of any material, but from time to time the procedure will have to be repeated.
With chrome surface
Chrome parts can be polished using GOI paste. For processing use composition No. 2.
Procedure:
- clean the product from contamination;
- apply the paste to a drill with a felt wheel attachment;
- process the part;
- the procedure is continued until the surface becomes smooth.
If you don't have a drill, you can polish by hand, but the process will take twice as long.
Chrome-plated products are sensitive to various substances and abrasive compounds, so if there are deep scratches, it is better to contact a specialist.
With silicone case
You can remove scratches on the silicone case using CD polish. Procedure:
- Degrease silicone with alcohol.
- Spray polish.
- Using a felt cloth, rub it.
- Remove excess product with a napkin.
If the scratch is deep, you can fill it with clear nail polish. The easiest way to apply it is with a toothpick.
On the sink
To remove scratches on the sink, you will have to make some effort. Since the surface is always in contact with water, only moisture-resistant materials are used.
Algorithm of actions:
- clean the damaged area;
- rub the scratch with fine-grained sandpaper;
- fill the hole with putty - you need to work quickly and accurately, since the material hardens in air;
- cover the layer of putty with varnish.
Do not use the sink for 2 days so that all layers have time to fully set.
On shoes
There are several ways to get rid of scratches on shoes. Three effective recipes:
- Marker. It is matched to the color of the shoe and the scratch is painted over. This method allows you to mask a defect if it is small.
- Glue Moment . It is applied to the damaged area using a toothpick, after which the surface is compressed so that the scratch comes together. The main thing is not to put pressure on the place where the glue was applied.
- Nail polish . It is applied in the same way as glue. If the scratch is small, then it is better to use a transparent varnish, since matching it to the color of the shoes will be problematic.
For leather shoes, it is better to purchase a product called “liquid leather”.
On ceramic tiles
You can get rid of scratches of varying depths using grout. The main difficulty is purchasing a product that perfectly matches the tone of the material.
Procedure:
- remove dirt from the tiles;
- apply grout to the surface;
- wait for the material to harden;
- Polish the tiles with a felt cloth.
This method will allow you to get rid of the defect for a long time, since the grout is resistant to moisture.
With stainless steel
You can remove minor damage from stainless steel using toothpaste. Use it as follows:
- Clean and dry the surface.
- Apply the paste to the scratch.
- Rub it over the metal surface with a soft cloth until the defect disappears.
- Soak a cloth in water, wring it out and wipe the treated area.
If the scratch is still visible, repeat the procedure. For more serious damage, use GOI paste No. 3.
On a wooden floor
To remove a scratch from a wooden floor, you can use a repair marker to remove it. The main thing is to match it to the tone of the surface.
Mode of application:
- clean the wood from dust and dirt, let it dry completely;
- open the marker and move it over the scratch several times, the damage should be completely filled with dye;
- remove excess with a dry cloth and polish the floor.
Using a marker will make the scratch less noticeable for a while, but for a better repair it will have to be sanded, painted and varnished.
From the watch glass
You can remove scratches from watch glass using GOI paste. For processing use composition No. 2 or No. 3.
The paste is applied to a soft cloth, which is used to polish the surface . This method is suitable for processing organic or mineral glass.
If it is sapphire and the scratches are deep, then folk remedies will not be able to cope. The use of professional restorative polishes will be required. For plastic glasses, it is preferable to use toothpaste. This publication will tell you in more detail.
From glasses
Glasses should not be cleaned with abrasive products . If they are glass, then the choice is made in favor of toothpaste or wax polish. This treatment does not affect the intact protective layer, so the lens does not become cloudy.
Scratches can be removed from plastic glasses with wax, clear varnish, and even CD spray. The main thing is to ensure that liquid does not get inside the mechanism. You can learn how to remove scratches from eyeglasses here, and how to remove scratches from sunglasses here.
From laminate
You can remove scratches from laminate flooring using:
- wax candle,
- acrylic varnish,
- baking soda,
- even beeswax.
The main thing is to fill the scratch and then polish the flooring until it shines.
There are also many special products on sale for removing scratches from laminate flooring. They are available in the form of pencils, gels and putties. When choosing a suitable composition, you need to correctly determine the color so that the dye does not stand out from the overall tone.
Details are in this material.
With glossy details
The glossy surface is difficult to process, since all abrasive compounds are prohibited for use. It is unacceptable to use even soda solution.
Scratches are polished with wax and masked using car pencils . If these remedies do not give the desired result, specialized formulations are purchased.
Powders for processing are not purchased. It is possible to use a furniture pencil, a special retouch or a restoration marker. You can polish the gloss only with a soft felt or suede cloth. How to remove scratches from a glossy kitchen surface, read here.
From the skin
You can remove scratches from leather by treating them with rubber glue or paraffin . When choosing glue, you need to make sure that it does not contain acetone.
You need to work with it accurately so as not to hit an undamaged area. After eliminating the defect, the skin is lubricated with cream of the desired shade.
In the store you can buy a special product called “liquid skin”. It seals damage well, which after treatment becomes almost invisible. Read more here.
From the refrigerator
To remove scratches from your refrigerator, you can polish its surface with cleaning products. With minor defects, baby oil or toothpaste will help .
If the scratch is deep, it is painted over. Use a marker or acrylic paint to choose from. When none of the proposed methods helps, the only way out is to mask the defect or replace the door.
Read about how to remove scratches from a refrigerator here.
From furniture
Scratches from furniture can be removed using improvised and special compounds. Dark wood furniture is rubbed with walnut . The oil it contains masks defects well.
To permanently repair damage, use sandpaper to rub the problem area. Then you need to apply wax paste to it and sand it to a shine.
From store-bought products they use:
- oil polish,
- wax pencils,
- touch and stain.
To make the defect less noticeable, you need to select a dye to match the color of the furniture. This article will tell you in more detail.
From plastic
Minor damage to plastic can be removed with wax . It is applied to a dry cloth and the surface is polished. As an alternative, you can use GOI paste.
If the scratches are deep, use a hair dryer. They heat the surface, resulting in it being leveled. However, this method is only applicable on dark plastic. White surfaces may become stained.
Plastic polishes also have a good effect, but you need to choose a product taking into account the type of material. This article will tell you more about removing scratches from plastic.
From the mirrors
Scratches on the mirror can be removed using improvised means. To do this, it is polished with a mixture of vinegar and mustard and treated with toothpaste. You can fill the defect with clear nail polish or silicone sealant.
If the mirror is damaged on the back side, you can repair the defect with regular foil. You can hide the scratch using cerium oxide. This chemical is known as jeweler's blush. Before polishing it must be dissolved with water.
Details are in this material.
With car
The choice of car scratch remover depends on where exactly the damage is located. If it is a body, then it is sanded and a new coat of paint is applied.
When a scratch is located on the plastic, it can be removed by heat treatment using a hair dryer.
Headlights and mirrors are polished with toothpaste. There are also coloring products on sale (pencils, mastics, pastes) that allow you to mask the defect for a long time. You can find out how to remove scratches from your car here.
Polishing materials
As for polishing products, the motorist can use abrasive and protective compounds. They are used depending on the degree of damage to the vehicle body surface.
To eliminate defects, it is necessary to use polishes; they are divided into two types:
- Abrasive polishing paste. It contains tiny crystals. Using this product, the surface of the vehicle body is completely polished, effectively removing small and medium scratches. However, the substance should be used carefully - there is a high probability of damaging the vehicle's paintwork. In this case, you cannot do without painting the area to be restored.
- Wax-based protective compounds. The substances are suitable for removing the smallest chips, scratches and getting rid of “cobwebs”. They are used for surface treatment. The advantages of such pastes include a gentle effect on the surface of the car body, but the disadvantage is the low durability of the coating. After several months of driving the car, the polishing procedure using wax compounds will have to be repeated.
When choosing polishes, you should pay attention to products from famous brands. Buying a cheap product can be detrimental: instead of a shiny and smooth restored surface, the motorist will receive a worn-out body area that requires more serious repairs.
How to choose a polish, its types
To make your car shine like new, you need to choose the right polish, and for this you need to decide on the size and depth of the existing scratches on the body.
As you already understand, before starting any work, you should decide on its scale. Inspect your vehicle and assess how deep the scratches and other damage are.
Scratches can appear not only on the surface of the body, but also on the glass. Then it’s worth studying the technique of working with glass polishing; it is used in this case too, one might say it’s an almost universal tool.
It is recommended to inspect the vehicle for defects in good lighting. It is good if you carry out the inspection in daylight and with an additional lamp or flashlight.
A magnifying glass may be needed to determine the depth of the scratches. An inspection will help you decide what materials will be needed, whether you can get by with a regular polishing pencil or whether you will need a paste, or maybe even serious painting of the surface.
If the damage is more serious - uneven paint, stains and scratches, then you should choose a polish with an abrasive.
It is necessary to add a paste with synthetic ingredients to such a substance, because in its pure form, polish with abrasive can have a negative effect on the coating, and in this way all scratches will be reliably masked.
The abrasives will smooth out any rough edges, and the remaining components will fill in the scratches. To ensure complete stability of the polishing, it is coated with varnish of a certain shade; ordinary polishing with wax hides defects until subsequent washing of the surface.
In addition, the material is presented in different forms and the choice also depends on this factor.
In liquid form, you can find polish packaged in a box or in aerosols. In this form, the material disappears quite quickly, so it is not an economical option at all.
It spreads over the surface of the body, so a lot of substance is wasted. You won't be able to apply a thick layer of polish the first time. Therefore, you have to spend a lot of material.
The problem can be solved by purchasing a silicone compound, but it also costs money. The main advantage of the liquid state is that such material is applied much faster than others.
Hard polish creates a dense layer that can mask scratches for a long time, so this option is more reliable and convenient.
However, you will have to spend time treating the surface. It will take both time and physical strength. The paste is applied without much effort, has an optimal cost and produces the desired effect, so this is the best option offered.
As a rule, polishing materials have approximately the same composition - silicone, wax and other pigments. But all of them can be divided into groups, because one element always predominates in the composition.
1. Compositions with a wax element are very popular, because they are not expensive and do not require the use of special technologies. They give an amazing effect, but do not last forever; after the third wash of the car, they must be applied again;
2. Abrasive polishes are suitable for removing serious scratches. You should not use it for minor injuries, because in this case the harm from such a composition is greater than the benefit.
With its help, you can easily remove the applied varnish, so the next stage of work will be to protect the surface from corrosion.
Experts recommend using them not often. This substance is ideal if it is necessary to change the entire coating of the car;
3. Synthetic polishes can be divided into groups:
- silicone comes in a more comfortable form than wax, but has the same properties;
- the cleaner performs two functions - it removes defects and creates a polishing effect; to secure the result, it is worth applying a protective polish;
- Polymer drugs from the entire class produce the best effect, but their cost is prohibitive. The surface of the car body receives protection from abrasion, reagents on the road and other natural disasters. The only thing is that such material will have to be applied efficiently, which means it will take a long time.
Polishes used for protection come in three types: Teflon, wax, and epoxy. They are not abrasive, but have a sufficient period of protection, especially epoxy-based substances.
When deciding on a polishing coating, it is worth assessing the finish of the body and how seriously damaged the coating is. Some polishes contain Teflon, which protects from mechanical stress, as well as from ultraviolet rays.
How to polish small scratches on a car
To polish a car body from scratches with your own hands, you will need to apply an abrasive substance to the damaged area, then use a grinding machine and an appropriate wheel to polish. This technology allows you to effectively get rid of minor scratches.
Elimination of small defects is carried out using wax-based pastes.
Car polishing products
In order to determine which polish for the body and interior of a car is better, we will consider three popular products that have been repeatedly tested by car owners and received the highest ratings.
Wurth Profi
This German program will allow you to repair scratches on your car using a polishing machine. It’s worth noting right away that this paste is of an abrasive type, so it is not recommended to carry out work without equipment.
To polish with this composition, it is best to purchase three types of paste:
- rough (item 893153);
- average(893154);
- small (893155).
You will also need three polishing wheels for the job. The manufacturer has thought of a system that makes it very easy to select a disc for a specific polishing paste.
- black (fur) is used for aggressive treatment with appropriate paste;
- yellow (foam rubber) is also suitable for coarse polish, but it is not so hard, so a medium paste is applied to it;
- blue (foam rubber) for medium and fine polish.
According to the instructions, removing scratches on a car using Wurth Profi begins with rough processing. Gradually, the circles change and the surface is “grouted” until all small scratches disappear from the body.
Thanks to this restoration, the surface will be resistant to reagents and sunlight.
If you want to polish without touch-up paint and there are no deep scratches on the car, then you can eliminate the treatment with a coarse abrasive compound.
ZM
The best product among domestically produced polishes is considered to be the “brainchild” of the ZM company, developed using modern American technologies. The main advantage of these compounds is the ability to polish a car with your own hands, either with or without a polishing machine.
Among the range of pastes for removing scratches from the car body, it is worth highlighting the following bases:
- Coarse paste (abrasive type) for removing deep scratches from the car body (item 09374).
- Medium-hard abrasive compound to remove scratches that do not reach the metal (09375).
- Car polish (applied by hand without a machine) without abrasive particles (09376).
- Protective paste, to add shine (09377).
ZM also offers a line of polishing wheels for each composition:
- Article 01927 – for rough processing with paste article 09374.
- 09550 – for pastes 09374 and 09375.
- 09378 – for polish 09376.
- 05729 is used when processing with 09377.
Body Compound
Body Compound scratch remover is another effective paste that quickly “reanimates” paintwork. Compared to professional counterparts, no equipment is required to use this polish. In addition, manual polishing of the body does not require the selection of several components, costing from 500 rubles each. The product contains soft abrasives, so after sealing cracks, you don’t have to worry about the paint material.
Pastes of this brand are suitable for any coating, so they are also used for car interiors, plastic elements of the dashboard and much more.
The only downside to Body Compound is that this gentle abrasive is only suitable for minor damage. In terms of durability, it is not inferior to its analogues.
You can also purchase Bravo, RM, Sonax, SIA and Meguiars to polish the car body. These pastes have also proven themselves well among car owners.
Before you remove scratches on your car with your own hands, regardless of the paste or spray you choose, carefully read the instructions and take into account some general recommendations.
Polishing deep scratches
To polish deep scratches that have damaged the ground layer or reached the metal, you will need to treat the damage with an anti-corrosive agent to prevent corrosion, prime it, and tint it in body color. Next, rough grinding is carried out with abrasive wheels or high-grit sandpaper. Afterwards polishing is carried out with medium-grained and fine-grained discs.
Before applying a new layer of primer and paint, the old damaged coating is disposed of.
Sandpaper
A selection of sandpaper types with varying grits are ideal for wet sanding or for removing the deepest scratches and scratches. 1000, 2000 and 3000 grits are the most common and you'll use them most often, but even finer grits are needed to eliminate hazing. Again, using such abrasives can cause more damage if used incorrectly, so make sure you have professional advice before attempting this at home.
Nuances
Polishing car scratches has a number of nuances that need to be taken into account:
- The work surface must be constantly cooled. Restoration is best done with a grinding machine with a cooling option. If polishing by hand, the sandpaper should be constantly moistened with water.
- When choosing polishing wheels and products, take into account the degree of damage to the car's paintwork. Using unsuitable consumables will result in deterioration of the paintwork.
- After the paint has completely dried on the damaged area, a special protective layer of varnish is applied and polished with a soft disc using a protective compound.
Restoring a car's paintwork from chips and scratches is done with your own hands, with certain experience and tools. If you are not confident in your abilities, it is recommended to contact a service center.
Polisher and pads
A dual action polisher is best recommended, but with patience and practice, a rotary polisher can be just as effective at removing surface scratches on a car and even better on deeper scratches. Either will take practice and time to master, and if used incorrectly can damage the paint, so maintain even pressure and make sure the pad stays flush with the paint and doesn't move around.
Preparation for polishing
To successfully polish a car body from scratches with your own hands, you should take care to create optimal conditions for the work.
- the surface of the machine must be absolutely clean and dry;
- Polishing should be carried out in a closed, clean room with good ventilation and no dust;
- It makes sense to take care of high-quality artificial lighting. To achieve the best result, you should clearly see the surface of the car from all angles.
Before carrying out the procedure, you will need to remove all dents, and apply special tape to significant scratches and chips. If deep polishing of scratches is planned, the damage is processed separately.
Important! You should not polish in direct sunlight, as the polish dries out instantly, and this leads to stains and stains.
Only by following the above rules can you polish your iron horse no worse than in car dealerships, and at the same time win significantly financially.
When is it necessary to polish a car?
It is not always the owner of the car who is to blame for the appearance of scratches. Even if you have been driving for quite a long time, this will not protect you from other road users who have insufficient driving skills. Damage can occur from branches, pea gravel, and more. Regardless of the reasons for the appearance of chips, restorative polishing of the car body is recommended in the following situations:
- New car. If you purchased a new car, then you should not rely on the factory coating; it is better to periodically polish the car. In addition, protective polishing of the car body will protect the vehicle from adhering dirt.
- Used car. The paintwork of a used car needs careful treatment. However, unlike new cars, used models need to be coated not only with restorers, but also purchase a product such as a protective car polish.
- Uneven color change. If stains begin to appear on the paintwork, and the tone of the body becomes uneven, this indicates that low-quality paint was used when painting the car. You also need to get rid of stains and scuffs in a timely manner using car polish.
- Lack of shine. “Older” vehicles and cars that have “survived” handicraft painting often lose their shine. Almost all car polishing kits include universal products that return a “fresh” look to the car, so they will help you quickly deal with dull paint.
If we talk about polishing a car body with your own hands, then to perform it you will not need to master complex operating technologies or purchase expensive equipment. The main thing is to choose a good restorative or protective agent.
Choosing a polish for a car body
Before purchasing specialized compounds, you need to assess the general condition of the car’s surface and the degree of damage. If there are no visually visible defects, but the color has faded and the shine has been lost, a simple protective polish will solve the problem.
If there is a network of small scratches on the body, clearly visible on a clean car on a fine day, it is recommended to purchase two types of polish - with abrasive particles and a composition with a low content of abrasive elements. Products of the first composition are able to clean the varnish layer from the depths of scratches. The severity of the damage should be taken into account. For deep cracks, you need to buy highly abrasive pastes.
Please note that products with hard particles intensively remove the varnish layer and make the surface more vulnerable. Therefore, after using them, you cannot do without applying a protective composition.
In addition to the composition, polishes can be classified according to parameters such as cost, scope and consistency:
- paste polishes - have a dense consistency and are suitable for polishing scratches on any area of the car body. The price of such products is quite high, but the pastes are enriched with elements responsible for color saturation;
- liquid polishes - they are used mainly for treating the hood, roof and trunk of a car, since they spread over vertical surfaces. However, they can polish the car thoroughly and for a long time without fear of erasing the paintwork down to the ground;
- Aerosol passwords are easy to apply and easy to use. But the components in the cylinder for effective spraying contain a very small amount of polishing materials.
Polishing scratches on a car body is carried out using selected products and can be done either manually or using a polishing machine or drill. It depends on the severity of the imperfections on the surface of the car.
How much does it cost to fix scratches on a car?
So, what price can you expect to pay to repair a scratch? It depends on the severity of the damage, the type of paint (pearl and metallic are more expensive and harder to apply correctly), and the quality of the tools and supplies you'll use. For detailing and light scratch removal, a basic kit with everything you need will cost a couple hundred dollars, while professional polishers alone can cost thousands. The same goes for car shampoos, waxes, paints, primers, paint sprayers, hardeners, thinners and polishing pads. The more you pay, the better quality you can expect.
That being said, buying the most expensive items does not guarantee a perfect result, so we always recommend visiting a professional if an actual painting job needs to be done. You'll spend more up front, but you'll likely save yourself the hassle of redoing it over and over again and learning through trial and error. So, the cost of polishing scratches on a car can be extremely high, but there are also things like a scratch removal kit for your car that contain both waxes and polishes. These versatile products are generally useless on large jobs, but can save you a lot if the damage is small, so shop around and you'll find a solution you can easily afford.
Stages of simple polishing of a car body
Simple polishing of the surface of the machine can also be called preventative. Car enthusiasts who care about their iron horse will perform it once every 3-4 months. This procedure eliminates minor damage to the car and gives it a flawless shine. The process itself is absolutely not complicated and does not take much time and effort.
The required amount of polish should be applied to a soft, lint-free cloth and distributed evenly. (If an aerosol is used, it must be applied directly to the surface of the car.) The composition on the fabric should dry to a white coating - then it can be used for effective polishing. Next, the body is treated with smooth circular movements until an intense shine appears.
To obtain optimal results, it is recommended to strictly follow the manufacturer’s instructions regarding the drying time of the composition, as well as its quantity and consumption.
Stages of deep polishing of a car body
In order to get rid of significant scratches on the car body, the deep polishing method is used. It is necessary to have certain skills and be armed with knowledge about the procedure in order to get a truly high-quality result. In addition, the process takes a long time, but changing the appearance of the car for the better is worth it.
First you need to prepare tools for deep (abrasive) polishing:
- Pastes of various types - abrasive, non-abrasive and with a medium content of abrasive particles.
- Polishing machine.
- Polishing wheels.
- Sandpaper P2000 and P2500.
- Soft rubber scraper.
- Any soft, lint-free cloth.
- Water in a spray bottle.
Abrasive polishing of a car surface should be carried out in stages:
- cut the sandpaper into small pieces and soak in water to soften it;
- rub the scratched areas with sandpaper, while using a scraper and water to remove the cleaned particles from the surface;
- Sprinkle the area to be treated with water and apply a polishing machine with the hardest wheel (white) to it. Before turning on the equipment, apply and evenly distribute a highly abrasive compound on the wheel;
- After polishing all areas, wash the car with car shampoo.
The grinding machine must be selected taking into account the ability to easily regulate the speed. Polishing a car should begin at the lowest speed of the machine - 900 per minute, then the speed should be increased to 2000 rpm.
Then the same area of the body is polished again, but using a non-abrasive compound and a softer wheel on a polishing machine.
Important! During the polishing process, you should never put too much pressure on the machine - this can lead to damage to the paintwork.
The work process should proceed smoothly and calmly, without unnecessary fuss and haste. Particular care must be taken when processing edges and corners of the body. After polishing an area, you need to thoroughly wipe it with a damp cloth, evaluate the result of the work, and only then proceed to other areas. In this way, the entire body is gradually polished.
The polishing machine moves completely effortlessly across the surface of the car as long as there is a sufficient amount of paste and water on the disc. In case of overheating, it is necessary to turn off the equipment, let it cool down and only then apply water and continue working.
After washing the car with car shampoo, let it dry and then apply a protective polishing compound that does not contain abrasive particles. But wax will also work. It can simply be dripped onto the body and distributed with light movements without rubbing. After drying, you need to remove excess wax with a soft napkin or rag.
Properly carried out deep polishing of scratches on a car body with your own hands guarantees the return of the car to a practically new appearance and gives a second, if not a third life to the paintwork on the surface.
We remove chips and deep scratches on the body in a garage
Many drivers sooner or later encountered damage to the body of their car. And when these are just scratches, not everyone will bother removing them. In most cases, only the varnish is damaged, since car varnish is very hard in structure and takes all the pressure from outside.
But if the base or even the soil is damaged, then things are different!
In this article I want to tell you how you can remove a deep chip or scratch on a car body without local or complete painting of the element.
In order to make it more convenient to show the whole process, I removed the door from the car that had two deep damages. Having pre-treated the entire required surface with a degreaser, I take 2000 sandpaper and remove the sharp edges of the varnish from the scratch itself. And it is important to remember that at this stage you cannot use plain water, since the scratch can reach the metal, and water can subsequently cause oxidation.
Next we need paint
You can buy it in cans or on tap without picking. The paint color code is printed on the vehicle's identification plate.
Unlike professional selection, paint from a store may differ in tone.
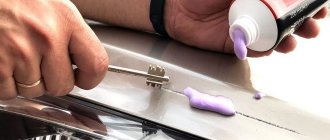
Now take a simple medical syringe
Cut the tip of the syringe at an angle of 45 degrees. (This is necessary for ease of paint application).
You only need to add a little paint. Approximately one milliliter per 10 cm scratch.
Next, carefully and slowly fill the scratch with paint so that there are no gaps left. But one layer of paint will not be enough, since the soil, after the paint subsides, will show through. Therefore, you need to apply a second coat of paint.
After drying, it is necessary to remove excess paint, which looks like a terrible matte stripe. To do this, we take the same sandpaper No. 2000 and a small block. (The block must be hard and even).
If you don’t have such a block at hand, you can make it from a foam construction float. This is a lightweight and fairly hard material. But all the same, any homemade block must be sanded on a perfectly flat surface in order for the result of its work to be perfect!
Let's go back to the door
Carefully sand off the excess paint from the scratch ( it will give in very easily, so you don’t need to put too much pressure on the block).
At first I sanded with a degreaser, but it was much more difficult than with water, then I realized that I had already blocked all access to the base and metal with paint, and therefore there would be no corrosion over time, and I started sanding with plain water - it’s more convenient.
Next we take the varnish
You can use simple acrylic from a spray can, but I prefer two-component varnishes.
Again, take a new syringe and cut off its nose at an angle of 45 degrees. Fill it with varnish and carefully apply one layer to the scratch.
Just don’t try to cover the scratch with tape at this stage! Because after applying the varnish, sharp edges will remain. Which will be impossible to polish.
After applying the varnish, check that the varnish fills the entire scratch. There should be no gaps or bends in the varnish. If necessary, add varnish carefully.
Leave to dry
The hardening time of the varnish is indicated on the manufacturer's packaging.
Further
Cover the scratch with tape so as not to rub off the varnish during the polishing process.
First, we take sandpaper No. 1000 and the same block of hard foam to reduce the height of the applied varnish.
After that, we re-glue the tape a little further and sand the remaining varnish with No. 2000.
Then we remove the tape and sand it with sandpaper No. 3000.
At the next step, carefully inspect the treated surface (there should be no flaws, cracks or gaps on it).
Polishing
For initial polishing
I use paste No. 74 and a medium-hard circle. (If you only have a drill or grinder at hand, then you need to control the speed, since the varnish can be burned out very easily).
If there are plastic parts in the polishing area, it is better to cover them with tape so as not to damage them. There is also no need to linger on the edges of the part, since they can be easily wiped down to the base.
For final polishing
You can use #75 and a soft circle.
And it is better to apply this polishing on the part already put on the car with the transition to neighboring parts. This is done so that no obvious differences are visible on the elements. 0 0 vote
Article rating