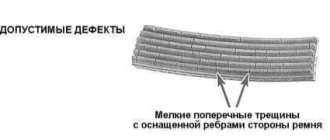
As you know, the Lada Kalina generator belt (belt of attached units) gradually wears out, stretches, etc. during the operation of the car. For this reason, you should constantly check the tension of the generator belt, and also assess the condition of this element for delamination, cracks and other defects.
The fact is that if the alternator belt is worn out or loose, the alternator itself may work worse, which leads to problems with charging the battery. You can also note the appearance of extraneous noise (for example, the alternator belt whistles or makes noise). In such a situation, a worn belt needs to be changed or, at a minimum, tightened if possible. At the same time, the condition of the generator belt rollers should be checked.
It often happens that the belt itself is in good condition, without obvious defects. However, it cannot be tensioned due to the fact that the Kalina belt tensioner has failed. Next, we will look at how to replace the alternator belt on Kalina with your own hands, as well as how to change the Kalina tension roller.
Lada Kalina: alternator belt tensioner, check and replacement
As you know, the Lada Kalina generator belt (belt of attached units) gradually wears out, stretches, etc. during the operation of the car.
For this reason, you should constantly check the tension of the generator belt, and also assess the condition of this element for delamination, cracks and other defects. It often happens that the belt itself is in good condition, without obvious defects. However, it cannot be tensioned due to the fact that the Kalina belt tensioner has failed. Next, we will look at how to replace the alternator belt on Kalina with your own hands, as well as how to change the Kalina tension roller.
Adjustment methods
Currently, there are three main methods of tensioning the alternator belt in cars:
- Using a special arc-shaped strip. In this case, the generator has two mounting points. One of them is an axis around which it can move within small limits. The other is the nut on the adjustment bar. If you release it, you can move the pulley to the required distance. This method is now considered obsolete. It is mainly used on VAZ classics.
- The generator is moved by rotating the adjusting bolt. This system has become widespread in cars of the tenth family.
- Using a tensioner. This is a special movable roller that rests on the belt between the generator and crankshaft pulleys. It is equipped with a screw mechanism. By rotating it, you can adjust the pressing force. This is exactly the kind of alternator belt tensioner for the Lada Kalina.
Lada Kalina: alternator belt, tensioner and features
Let us immediately note that not all modifications of the Lada Kalina have an alternator belt tensioner. For example, there are versions with an 8-valve internal combustion engine, where there is no such tensioner initially (Kalina generator belt without a tensioner). In turn, there are also 8-valve versions with a tensioner and 16-valve engines with a tensioner.
Taking into account such features, it is necessary to pay attention to certain nuances when replacing a belt on a particular type of internal combustion engine, as well as when selecting rollers, the belt itself, etc. Let's figure it out.
Moreover, it should be remembered that the belt may become unusable even before the specified period, which indicates the need for regular inspection (usually every 10 thousand km).
The basic rule is that if there is noise or whistling, or problems with battery charging are noticeable, you need to check the alternator belt. During visual inspection, the presence of cracks on the working surface (track), as well as delaminations and defects on the outer part of the belt, is not allowed. If damage is visible, the element must be replaced.
At the same time, it is important to make the right choice of alternator belt for Kalina, since depending on the modification, different types of belts can be used on Lada Kalina:
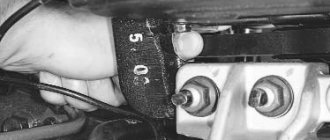
- on an engine without air conditioning and tensioner, the belt length is 823 mm.
- the version with a belt tensioner without air conditioning has a belt of 882-884 mm.
- for an engine with air conditioning and tensioner, the length is 1018 mm.
- on a 16-valve engine with air conditioning and tensioner, a 995 mm belt is used.
As for the tensioner, in this case the Kalina belt tensioner may also sometimes require replacement. At the same time, the task of selecting a part is simplified, since the tensioner for all types of internal combustion engines where it is installed is the same (item number for the Lada Kalina tensioner is 2123–1041056).
When to change?
VAZ Lada Kalina vehicles use a belt drive for auxiliary units. On cars with air conditioning, the service life of such a belt is no more than 30 thousand km. On simple versions of cars, the strap can last longer, but most owners try to change it after the same 30 thousand kilometers traveled. For various reasons, the belt may fail earlier, so it must be checked periodically during vehicle operation. There should be no cracks on the working track, and delamination on the outer part of the belt is unacceptable. If such defects are present, we immediately change the strap. Another signal to replace this element is a whistle or other noise when the unit is operating.
The process of replacing the belt on a Kalina with air conditioning (sixteen valves) is presented in a video from the user Alexander.
Replacing the alternator belt on Lada Kalina
Let us immediately note that it is easiest to replace the belt on engines that do not have a tensioner. At the same time, replacement on other types of internal combustion engines (with a tensioner) is also not particularly difficult and can easily be done independently.
- Let's start with the first option. On an 8-valve engine without a tensioner, replacing the belt will require a 13mm wrench, as well as a small flat-head screwdriver. Please note that on this type of internal combustion engine the belt is very tense.
It is recommended to use only a suitable belt (eg POLY-V six-ribbed belt). It is not advisable to use other belts, as they are rigid and can reduce the life of the generator bearings.
Now all that remains is to remove the old belt, then install a new one. If the belt is difficult to tension on the pulleys, you need to know how to tension the alternator belt. You can usually tighten it with a screwdriver. The process is completed by raising the generator, which will allow the belt to be fully tensioned. The top bolt is inserted back, the nut is tightened. Then the bottom bolt is tightened.
- On an 8-valve engine with a tensioner, the process for replacing the belt is somewhat different. We also note that if the Kalina generator belt tensioner fails, replacement can also be performed within the framework of strictly removing and installing a new belt.
First of all, you need to prepare keys for 13, 17 and 19 (socket or regular). You also need a head 8 with a ratchet, open-end or simple wrench. At the same time, you should prepare a flathead screwdriver, a needle, cleaner, rags, a cleaning brush and a clean container. Let's add that you will also need to have lubricant for CV joints.
So, to adjust the degree of belt tension on Kalina, a mechanical tensioner is used. Please note that the Kalina generator roller, or rather the Kalina generator belt roller, often requires replacement or maintenance every time the belt itself is changed. As a rule, prevention, which includes applying lubricant, is sufficient.
- So, to replace the belt and service the tensioner or replace the belt tensioner, you must first loosen the reverse threaded pulley bolt. Next, remove the plastic plug on the roller using a flat screwdriver;
- Afterwards, the locking nut located on the belt tensioner rod must be unscrewed a few turns. Then you need to reduce the belt tension by rotating the rod nut clockwise. You need to rotate until the rod begins to rotate in its installation location.
- Next, unscrew the bolt on the side, designed to secure the end of the rod near the tension roller;
- The tensioner can now be removed. If it needs to be replaced, you need to install a new tensioner assembly or replace/serve only the roller (will be discussed below).
How to replace the alternator belt on a Kalina with a 16-valve engine
The main difference from the process discussed above on an 8-valve internal combustion engine is the need to remove the front engine mount. To do this, prepare a head for hexagonal sprockets 11 or Torx E14, a pair of jacks, as well as a key or head 17, a head with a ratchet 8.
As part of the replacement, the car is jacked up, the right wheel and the wheel arch liner are removed. At the same time, the support boot is dismantled. A support is placed under the bottom and the engine protection is removed.
Next, you need to use a second jack to slightly raise the engine, placing a wooden spacer between the jack and the engine crankcase. Then you need to unscrew the TORX E14 bolts that secure the engine support to the bracket.
If the bolts are difficult to unscrew, use the lower jack to slightly change the position of the engine to make unscrewing easier. You also need to unscrew the 3 TORX E14 bolts that secure the support to the side members.
Having installed the belt, it should be tightened by turning nut 8 counterclockwise. The degree of tension is checked by hand by pushing the belt. Having received the desired tension, it is fixed with a nut 19.
Afterwards, reassembly is performed and the engine is test run. In order for the check to be carried out correctly, the belt must be loaded by turning on powerful energy consumers, as well as the air conditioner.
If the alternator belt whistles, it needs to be tightened. To do this, do not turn off the engine, since it is enough to loosen the lock and slightly tighten the tensioner rod. The tightening is carried out until the whistling disappears. When the whistle has disappeared, all that remains is to tighten the lock nut. Finally, we note that if initially there was no whistling of the alternator belt, but it appeared later, the tightening process needs to be repeated.
Lada Kalina: alternator belt tensioner, check and replacement
As you know, the Lada Kalina generator belt (belt of attached units) gradually wears out, stretches, etc. during the operation of the car. For this reason, you should constantly check the tension of the generator belt, and also assess the condition of this element for delamination, cracks and other defects.
It often happens that the belt itself is in good condition, without obvious defects. However, it cannot be tensioned due to the fact that the Kalina belt tensioner has failed. Next, we will look at how to replace the alternator belt on Kalina with your own hands, as well as how to change the Kalina tension roller.
Advantages of a tensioner
Why weren't designers happy with the previous adjustment methods? Why did they add an extra video? It's not just about convenience. The tensioner significantly increases the service life of the generator. Without a roller, the entire load falls on its bearings. If the belt is tensioned normally, then there is nothing to worry about. In this case, the generator will last many thousands of kilometers. However, very often car owners overtighten the belt, and this is bad.
The load on the bearings increases many times over, so they quickly fail. In itself, this is not so scary and expensive, although repairing a generator is quite labor-intensive. But the car owner does not always recognize the breakdown in time. The bearings gradually “break”, the rotor moves and begins to cling to the stator winding. The result is the need to purchase a new generator. Of course, the Kalina generator belt tensioner pulley can also fail, which happens quite regularly, but that’s only 400 rubles, not twelve thousand.
Lada Kalina: alternator belt, tensioner and features
Let us immediately note that not all modifications of the Lada Kalina have an alternator belt tensioner. For example, there are versions with an 8-valve internal combustion engine, where there is no such tensioner initially (Kalina generator belt without a tensioner). In turn, there are also 8-valve versions with a tensioner and 16-valve engines with a tensioner.
Taking into account such features, it is necessary to pay attention to certain nuances when replacing a belt on a particular type of internal combustion engine, as well as when selecting rollers, the belt itself, etc. Let's figure it out.
Moreover, it should be remembered that the belt may become unusable even before the specified period, which indicates the need for regular inspection (usually every 10 thousand km).
The basic rule is that if there is noise or whistling, or problems with battery charging are noticeable, you need to check the alternator belt. During visual inspection, the presence of cracks on the working surface (track), as well as delaminations and defects on the outer part of the belt, is not allowed. If damage is visible, the element must be replaced.
At the same time, it is important to make the right choice of alternator belt for Kalina, since depending on the modification, different types of belts can be used on Lada Kalina:
- on an engine without air conditioning and tensioner, the belt length is 823 mm.
- the version with a belt tensioner without air conditioning has a belt of 882-884 mm.
- for an engine with air conditioning and tensioner, the length is 1018 mm.
- on a 16-valve engine with air conditioning and tensioner, a 995 mm belt is used.
As for the tensioner, in this case the Kalina belt tensioner may also sometimes require replacement. At the same time, the task of selecting a part is simplified, since the tensioner for all types of internal combustion engines where it is installed is the same (item number for the Lada Kalina tensioner is 2123–1041056).
Replacement cost
The cost of changing a belt on a Lada Kalina car depends on the type of engine, range of units and is:
- for a motor without a tensioner - from 300 rubles;
- engines with a tensioner without air conditioning - from 150 to 350 rubles;
- motors with tensioner and air conditioning - from 220 to 400 rubles;
- for unit 21127 - about 600 rubles.
Replacing the roller will require an additional 250 rubles. The total amount required by the car owner to purchase spare parts, in the maximum version, will not exceed 850 rubles.
Replacing the alternator belt on Lada Kalina
Let us immediately note that it is easiest to replace the belt on engines that do not have a tensioner. At the same time, replacement on other types of internal combustion engines (with a tensioner) is also not particularly difficult and can easily be done independently.
- Let's start with the first option. On an 8-valve engine without a tensioner, replacing the belt will require a 13mm wrench, as well as a small flat-head screwdriver. Please note that on this type of internal combustion engine the belt is very tense.
It is recommended to use only a suitable belt (eg POLY-V six-ribbed belt). It is not advisable to use other belts, as they are rigid and can reduce the life of the generator bearings.
Now all that remains is to remove the old belt, then install a new one. If the belt is difficult to tension on the pulleys, you need to know how to tension the alternator belt. You can usually tighten it with a screwdriver. The process is completed by raising the generator, which will allow the belt to be fully tensioned. The top bolt is inserted back, the nut is tightened. Then the bottom bolt is tightened.
- On an 8-valve engine with a tensioner, the process for replacing the belt is somewhat different. We also note that if the Kalina generator belt tensioner fails, replacement can also be performed within the framework of strictly removing and installing a new belt.
First of all, you need to prepare keys for 13, 17 and 19 (socket or regular). You also need a head 8 with a ratchet, open-end or simple wrench. At the same time, you should prepare a flathead screwdriver, a needle, cleaner, rags, a cleaning brush and a clean container. Let's add that you will also need to have lubricant for CV joints.
So, to adjust the degree of belt tension on Kalina, a mechanical tensioner is used. Please note that the Kalina generator roller, or rather the Kalina generator belt roller, often requires replacement or maintenance every time the belt itself is changed. As a rule, prevention, which includes applying lubricant, is sufficient.
- So, to replace the belt and service the tensioner or replace the belt tensioner, you must first loosen the reverse threaded pulley bolt. Next, remove the plastic plug on the roller using a flat screwdriver;
- Afterwards, the locking nut located on the belt tensioner rod must be unscrewed a few turns. Then you need to reduce the belt tension by rotating the rod nut clockwise. You need to rotate until the rod begins to rotate in its installation location.
- Next, unscrew the bolt on the side, designed to secure the end of the rod near the tension roller;
- The tensioner can now be removed. If it needs to be replaced, you need to install a new tensioner assembly or replace/serve only the roller (will be discussed below).
How to replace the alternator belt on a Kalina with a 16-valve engine
The main difference from the process discussed above on an 8-valve internal combustion engine is the need to remove the front engine mount. To do this, prepare a head for hexagonal sprockets 11 or Torx E14, a pair of jacks, as well as a key or head 17, a head with a ratchet 8.
As part of the replacement, the car is jacked up, the right wheel and the wheel arch liner are removed. At the same time, the support boot is dismantled. A support is placed under the bottom and the engine protection is removed.
Next, you need to use a second jack to slightly raise the engine, placing a wooden spacer between the jack and the engine crankcase. Then you need to unscrew the TORX E14 bolts that secure the engine support to the bracket.
If the bolts are difficult to unscrew, use the lower jack to slightly change the position of the engine to make unscrewing easier. You also need to unscrew the 3 TORX E14 bolts that secure the support to the side members.
Having installed the belt, it should be tightened by turning nut 8 counterclockwise. The degree of tension is checked by hand by pushing the belt. Having received the desired tension, it is fixed with a nut 19.
Afterwards, reassembly is performed and the engine is test run. In order for the check to be carried out correctly, the belt must be loaded by turning on powerful energy consumers, as well as the air conditioner.
If the alternator belt whistles, it needs to be tightened. To do this, do not turn off the engine, since it is enough to loosen the lock and slightly tighten the tensioner rod. The tightening is carried out until the whistling disappears. When the whistle has disappeared, all that remains is to tighten the lock nut. Finally, we note that if initially there was no whistling of the alternator belt, but it appeared later, the tightening process needs to be repeated.
Repair of the generator and replacement of its belt according to the size on Kalina 8 valves
Regardless of the vehicle, the generator unit is considered one of the main components of the electrical network. Since it is this that allows you to power energy consumers when moving, as well as renew the battery charge. Domestic cars are no exception, in particular, we will talk about Lada Kalinas. How to change the belt of a Kalina 8 cl generator, what size should the belt be, how can it be adjusted? Find answers to these questions below.
Design
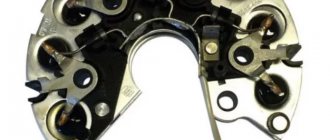
The main element of the tensioner is the pressure roller. It is made of plastic, and a sealed bearing is pressed inside. The roller is mounted on its own bracket, which, with the help of a threaded rod, can move in a vertical plane. This ensures the required moment of pressure on the belt. To prevent the bracket from moving spontaneously when the car is moving due to engine vibration, the pin is tightened on top with a locknut. The entire structure is placed on the generator bracket. There are two holes in it for attaching the Kalina generator belt tensioner.
Functions of the alternator belt in a car
In what cases is the tensioner roller replaced, how to replace the brushes, how to tension and adjust the belt in a car with and without air conditioning? First of all, we recommend that you familiarize yourself with the purpose of the belt. Every modern car has a generator, and if it breaks down, full operation of the vehicle will be impossible. The purpose of the belt is to transmit rotation from the crankshaft to the generator unit itself.
After the rotation is transmitted to the device, electricity is generated in the on-board network, which allows you to power all devices and equipment. That is why the performance of the strap is very important, since if it breaks, the generator device will not be able to function.
Recommendations for choosing a belt drive
Gates
drive as standard.
.
As a replacement on the first models, you can use Dayco 825
.
Here you need to take into account that elastic specimens are marked with the “ Poly-V
” symbol; if it is absent, the product has a rigid structure.
Alternative drives for VAZ 1118 with air conditioning
:
- Roulunds Rubber 6PK1015;
- Dayco 6PK1005;
- Bosch 6PK1015;
- Gates 6PK1019.
Alternative drives for VAZ 1118 without air conditioning
:
- Bautler 6PK883;
- Dayko 6PK888;
- Finwhale BP6 883;
- Luzar LB 0118 1118-3701720 6РК 884;
- Roulunds Rubber 6PK884;
- BRT 882 mm (Balakovo plant).
Drive system repair
In what cases does the strap need to be replaced?
In accordance with official data, the manufacturer does not provide for the repair and replacement of the strap in a Lada Kalina car with 8 or 16 valves. However, this does not mean that the strap can work forever - like any other consumable, it wears out over time and must be replaced. Moreover, a broken belt for potassium ducts is a fairly common problem that many people face.
To determine the need to replace a strap with number 21100370172000 or any other, you need to take into account the signs of wear on the part, more about them:
- There is a whistling noise while driving. As practice shows, the appearance of a whistle is often associated with the switching on of many energy consumers, that is, if there is a high load on the on-board network. For example, you started the engine of your Kalina, and when you step on the gas, a loud whistle starts to be heard from under the hood. In most cases, this is due to the fact that the belt is loose - then it will need to be tightened using a tension roller, or changed if its condition requires it.
- The device itself began to show signs of cracks and other damage or deformation. By opening the hood and looking at the strap, you may find signs of damage on the structure of the strap, this indicates wear. In this case, the problem will not be solved by tightening or adjusting the tensioners; the problem of wear can be solved exclusively by replacement.
- When the power unit was operating, noise began to appear. In the event that the service life of the belt is coming to an end, this can be recognized by uncharacteristic noise from under the hood, which was not there before. For example, many car enthusiasts also note that in addition to noise, there is also a loud knock, as well as knocks when the car engine is running (the author of the video is Ilgiz Magafurov).
If the car has a special generator device sensor that allows you to determine whether it is operating correctly, then it will be much easier to determine the problem. For example, if a whistle appeared from the engine compartment and a light began to light on the sensor, this indicates that the belt needs diagnostics. Such a strap should be tightened, since the whistle, as mentioned above, indicates a weak tension, and such a problem may also indicate the need for replacement.
DIY replacement instructions
How to change and how to tighten the alternator belt on a Lada Kalina car? If you have already completed a similar task before, then completing it will not take much time and effort. But if you are encountering such a problem for the first time, then, of course, it would be better to entrust this procedure to specialists at a service station. Be careful when performing this task as mistakes can have serious consequences.
Tools and materials
To perform all steps correctly, prepare all the tools and materials that may be required.
In particular, we are talking about:
- a set of wrenches, you will need wrenches 8 and 13;
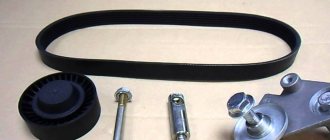
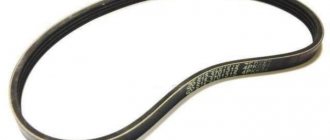
- new strap for installation;
- open-end wrench 19 (video author - Kalinin channel).
Stages
After all the tools and materials have been prepared, you can begin replacing the belt:
- To begin, turn off the engine and ignition and open the hood of your car.
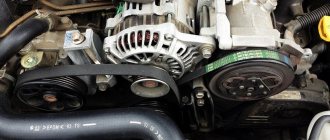
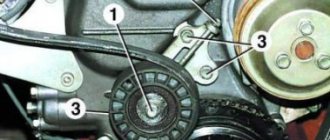
- The strap itself is located on the left side of the engine compartment. If you cannot find it, then start the engine and look in the engine compartment. The belt itself will rotate on special rollers, you will be able to see it, just do not confuse it with the timing belt.
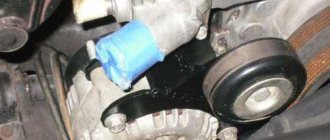
- Once the installation location has been found, you need to use a wrench to loosen the bolt that secures the adjustment rod to the bracket. Having done this, touch the RG itself to make sure how tightly it is stretched. This is necessary so that you can objectively assess how to install the tensioner after replacing the RG.
- When you loosen the nut, you will need an 8-mm spanner; use it to unscrew the adjusting rod, this will reduce the tension. The rod itself must be unscrewed almost to the very end. These actions will allow you to loosen the tensioner tensioner as much as possible. When this happens, you can start dismantling the lower mount; to complete this task you will need a 13 key.
- After these steps are completed, you will need to move the adjusting rod as high as possible, this will allow you to dismantle the belt. But before you do this, you will need to remove it from the generator assembly shaft. Once you manage to remove the RG part from the pulley, you will be able to completely remove it from the crankshaft.
- Next, when the belt is dismantled, it should be carefully checked visually. If there are signs of damage on its surface, then, of course, the part must be replaced. The replacement procedure is performed in reverse order.
Photo gallery “Do-It-Yourself Replacement”
How to tension and adjust the belt on Kalina?
To adjust the strap tension, follow these steps:
- First of all, you should loosen the locknut on the tensioner rod; to do this, unscrew it counterclockwise with a wrench.
- Next, the rod itself should be unscrewed, this will allow you to tighten the strap. Use your hand to press directly on the body while unscrewing the tensioner.
- When the RG is tightened, it is necessary to tighten the locknut, then start the engine and make sure that there is no whistling during its operation. As mentioned above, a whistle most often appears when a large number of energy consumers are activated, so after starting the engine, also activate the heater, headlights, rear window heating system, radio, etc. If the whistling stops after these actions have been completed, this indicates that everything was done correctly.
Replacing the alternator belt tensioner pulley
Problems with the generator can lead to more serious problems. If electric current is not generated by the car, if it runs on one battery, then battery failure is also inevitable. If there is insufficient production of on-board current, as indicated by the corresponding light on the instrument panel, first of all, it is necessary to check the tension of the alternator belt.
In addition, in many cars, the belt drive we are talking about, which, by the way, is driven by a timing pulley, often connects other critical components. These units are also called attachments. In particular, the belt can drive a pump that pumps antifreeze. So loosening the belt can lead to more than just power problems!
It is regulated by a special roller, which is located on the tensioner bracket. If this wheel rotates noisily, sticks, or releases grease from the cuff, the defective alternator belt tensioner roller needs to be replaced. Why does this small critical element fail and how to change it? Let's first consider the example of Kalina. The reasons for part failures are simple.
- Wear due to end of life.
- Violation of the integrity of the cuff.
- Manufacturing defects.
To replace the belt tensioner roller of the Kalinovsky generator, we will need the following tools:
In principle, the procedure for replacing the tensioner belt roller of the Kalina generator is easy to learn from a video on the Internet. But we will also provide fairly clear instructions.
- Find the hexagon of the adjusting pin above the pulleys and place a 8mm wrench on it.
- Having loosened the locknut with a 19mm wrench, we rotate the pin clockwise, so our treasured part will move away from the belt.
- Use a screwdriver to remove the roller cover.
- Unscrew the roller mounting bolt with a size 17 wrench.
- We remove the roller assembly with bolt, bushing and washer.
- With the new part, we assemble everything in the reverse order.
From these instructions it is easy to understand that replacing the generator belt tensioner pulley in Kalina is a fairly simple process.
Most common faults
During operation, the surface of the roller is constantly in contact with the generator belt. In addition, it is in continuous rotation, which places additional demands on the reliability of its bearings. The tensioner bracket is also subject to heavy load. Hence the main problems:
- Bearing wear. It simply runs out of service life or becomes unusable due to dust and dirt getting on it.
- Damage to the work surface. As already mentioned, the roller itself is made of plastic. Despite its high wear resistance, it often cannot withstand loads. This manifests itself in the form of scratches and chips, which quickly render the alternator belt unusable.
- Misalignment. This means that the belt and tensioner are at a certain angle to each other. Alignment can be disrupted in both the horizontal and vertical planes (due to the curvature of the bracket). This always causes rapid wear of the belt and the roller itself.
Often the cause of the malfunction is the driver himself. When trying to make adjustments, he forgets or does not loosen the locknut enough. As a result, the hexagon of the stud breaks off, and the Kalina generator belt tensioner fails.
Other VAZ models
However, for other modern VAZ cars with front-wheel drive, the procedure follows a similar scenario. For example, the technology for replacing the generator belt tensioner roller on a Priora is almost no different from that described. But the Priora does not have an adjustment pin. In principle, the roller can be unscrewed immediately. However, if it turns out that the belt is leaky, you will have to suffer.
Also find out why hydraulic lifters knock when hot and why valves knock when the engine is cold. To replace the belt together with our part from the Priora, you need to hang the engine and unscrew the engine support cushion, as it interferes with removing the leaky V-belt drive.
As for the other AVTOVAZ model, the Lada Granta, initially it did not have a mechanism for tensioning the generator belt; due to the strong constriction of the belt drive, the electric motor bearing suffered. But the car was in the lead on the hot list of the cheapest cars in the world. Therefore, the owners were offered to independently replace the generator bracket with the same one from Kalina with minor modifications.
Consequently, replacing the generator tensioner belt roller for the Lada Granta is identical to a similar operation on the Kalina, provided that the Granta engine is equipped with a V-belt drive tensioning mechanism.
Nuances of the procedure on foreign cars
Well, with VAZs everything is clear, their maintainability is often pleasing, but in some popular foreign cars you need to disassemble half the car to get to any component. The situation is similar, for example, with a Chevrolet family car. To replace the generator belt tensioner roller on a Chevrolet Lacetti you will have to work hard. Although the reasons for the part failure are the same.
First, let's indicate what is required from the tool:
There are many stages to go through, we will list them.
- Remove the interfering air filter housing.
- Remove the exhaust manifold thermal shield.
- We disconnect the power steering pump from the mounts and move it to the side on the hoses.
- Using a 15mm wrench, we install our broken part into the mounting position.
- We unscrew it.
- We install the new one in the reverse order.
Here you can put an end to the repair. Another popular foreign car, unfortunately, also causes difficulties in carrying out the described operation. More specifically, let's look at the procedure for replacing the alternator belt tensioner pulley in a Renault Logan car.
To implement the technology we will need:
Repairs must be made from below the car, for example, from the inspection hole. Let's describe the process step by step.
- Remove the mudguard of the engine compartment on the right.
- We throw a 13mm wrench onto the bolt of our broken wheel, but don’t flatter yourself – we won’t unscrew it just yet. Turning the key clockwise, move the tensioner bracket until the two holes align - in the body and on the bracket. This will lock the roller and relax the belt.
- Now we unscrew the bolt of the broken part we need.
- We install a new spare part and assemble the mechanism in reverse.
If the tested Logan has an air conditioner, then its tube will interfere with the work, you will have to unscrew its fastening and very carefully bend the tube to avoid its breakage and freon leakage. So there is enough trouble here too. Then, maybe, with an inexpensive all-wheel drive car, a brother of the VAZ, things are simpler? Let's see how the generator belt tensioner roller is replaced on a Chevrolet Niva.
On this car, in order to remove the treasured part, you need to loosen the belt, and to do this you need to move the electric motor itself.
- set of wrenches;
- mounting blade.
It is better to carry out work in a garage equipped with an inspection pit for repairs. Now let’s put everything into pieces.
- Remove the sump protection and engine splash guard.
- Next, loosen the two nuts that secure the generator to the tension bar and to the lower socket.
- To loosen the belt, use a mounting blade to move the electric motor housing towards the cylinder block.
- We unscrew the nut securing our part, take out the spring washer and take out the part.
- We assemble with a new spare part by performing the operations in reverse.
It turns out that on the Chevrolet Niva the procedure we are interested in will also bring some difficulties. If all this seems too much for someone, then it is better to contact a car service.
How much or where is it cheaper?
The price of this repair, in theory, should pleasantly surprise you. In order to understand how things really stand, let’s summarize the collected data on the average cost for cities in the Russian Federation into a kind of table, which is presented below.
| City | Price |
| Moscow | 800 – 1500 rub. |
| St. Petersburg | 1000 rub. |
| Ekaterinburg | 800 – 1000 rub. |
| Samara | 500 rub. |
| Kazan | 600 rub. |
| Tyumen | 500 rub. |
| Vladivostok | 650 rub. |
It turns out that the price for replacing the generator belt tensioner pulley in different cities differs markedly. However, the magnitude of the highest cost in modern times should not be scary.
The result is this: we looked at how the part we are interested in is updated using the example of different car models, and noted the nuances of repair that you may encounter. In conclusion, we add that if a strange noise is detected from the side of the roller, you should not delay replacing it.
Source: daciaclubmd.ru