Self-replacement of low beam lamp for Ford Focus 2 restal and dorestyl
If your low beam headlight bulb on a Ford Focus 2 has burned out, it’s time to replace it. It is not at all necessary to go straight to the service center, where you will have to spend several hundred rubles; the lamp can be replaced yourself. Thanks to our detailed instructions, you can replace the lamp yourself without any problems and without the help of service specialists.
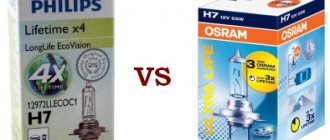
Which lamp is better to install on a Ford Focus 2 for low beam?
Standard lamps installed from the factory are usually Philips Long Live or Osram Ulra Live. That is, these are lamps with an extended service life.
- PHILIPS H7-12-55 LONGLIFE ECO VISION P-12972LLECOC1
- OSRAM H7-12-55 Ultra Life O-64210ULT
You can install brighter lamps than standard ones, for example +30% light or even brighter +100% or +130% light. The disadvantage of these lamps is that their service life is shorter than conventional ones.
- PHILIPS H7-12-55 +30% Vision
- OSRAM H7-12-55 +30% Super O-64210SUP
- OSRAM H7-12-55 +110% NIGHT BREAKER UNLIMITED
- Philips H7-12-55 +130% X-tremeVision
These lamps will illuminate the road better than standard ones, and lamps +130% and +110% are leaders among halogen lamps, but when buying them you need to be prepared for the fact that they will have to be changed more often.
Replacing lamps on the pre-restyling version of Ford Focus 2
Using a screwdriver, unscrew the upper headlight mounting bolt.
The red arrows indicate the lower latches on which the headlight is held; they must be carefully pressed out
Next, slightly pull the headlight towards you and remove the plug going to the headlight and pull out the headlight
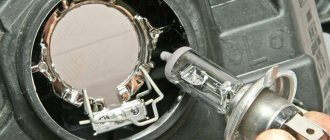
Now all that remains is to remove the plastic boot of the headlight, which is held on by 4 latches
We see a lamp in front of us. We remove the socket from the lamp, snap off the metal whiskers holding the lamp and replace it
Reassemble in reverse order
Replacing a lamp on a restyled version of Ford Focus 2
The procedure for removing the headlight is identical to that on the pre-Restayl.
Unscrew the upper headlight mounting bolt
We unclip the two latches and carefully pull out the headlight, disconnect the block with a wire.
Unlike the pre-restyle, the updated version of Focus 2 has a rubber boot, which is easier to remove.
But the lamp latch is different, more complicated.
The arrow in the photo shows the place on the motor; you need to lightly press and pull out the lamp along with the block.
Insert a new lamp into the socket and install the lamp in place until it clicks. We assemble the headlight and install it in place.
Is it possible to install xenon in low beam on a Ford Focus 2?
In the maximum configuration, Focus 2 was equipped with xenon (D2S or D1S lamps). However, if you have halogen headlights, installing xenon in them is prohibited by law. The penalty for installing xenon in such headlights is up to 6 months of deprivation of driving privileges.
If you nevertheless decide to install xenon, on the restyled version of the model you will need special adapters so as not to break the standard block.
How to disassemble a Ford Focus 2 Dorestyle headlight
Let's look at the spotlight on Ford Focus 2.4 restyling
A repeat of the Ford Focus 5 came out in our speech in 2008 and was made shortly before the appearance of the third generation cars in 2011. The first thing that clearly distinguished the redesigned focus of the Second generation dorestyle were the headlights. In fact, the interior of the headlights remains the same, only the shape and architecture have changed. Now let's see how to remove and disassemble the headlight of a converted Ford Focus 4.
Removing the headlight on a Ford Focus 2
Removing the headlight on a converted second focus is not much different from removing the headlight on used cars. What remains for our client - what remains for our client is less than 15 minutes, including replacing all the lamps.
It won't work any other way; if we succeed, we will not enjoy the work. So we take a long, narrow flathead Torx T-30 screwdriver, put on some cotton gloves, and roll up our sleeves:
- Bat Torks T-30 Remove the main screw that secures the headlights. It is located approximately in the center of the headlight housing and is twisted across the engine compartment.
Loosen the mounting screw.
Click on the mountain.
Replacing the lamp
Once the headlight is in the palm of our hand, you can change the bulbs. Factory installed luminaires have the following characteristics and indicators:
Replacing headlight bulbs
Much more often it is necessary to change the lamps installed in headlight devices. Powerful halogen lighting devices have a short service life compared to other elements. This happens because the filaments in them operate under conditions of high temperature and vibration.
Some car owners change lamps because they are not happy with the light of the old ones. Usually you are not satisfied with the shade, brightness, or irregular shape of the light spot.
What you will need
To replace high and low beam lamps in a Ford Focus 2, the following is required:
- flat blade screwdriver;
- TORX-30 key;
- clean cotton gloves.
How to remove the headlight ff2 restyling
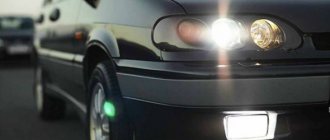
The working condition of the headlights on your Ford Focus 2 is necessary not only in order to feel confident on the highway, but also in order to comply with the requirements of traffic regulations, which require turning on the lighting at certain times of the day and when driving on roads of the established type. In addition, high-quality headlights are necessary to ensure the safety of your car at night and in poor visibility conditions. When installing light bulbs in the headlight unit of a second generation Ford Focus model, you must be guided not only by personal desires, but also by the required technical characteristics. as well as existing rules for the operation of vehicle lighting devices.
You can also dismantle the headlight unit on a second generation Ford Focus if you wish to carry out light restyling or tuning of your car. You may want to consider replacing both your low and high beam bulbs with more efficient or brighter ones.
The operation of removing the headlight unit on the second generation Ford Focus model is quite simple and can be performed even by an untrained driver with low technological skills. To carry it out you will need practically no more than ten minutes. However, after its implementation, you will be able to fully enjoy the high-quality lighting of the road surface and will not miss a single pothole on the highway.
Possible problems and ways to solve them
Among the malfunctions in the lighting of Ford Focus 2 cars, the most common problem is that the low beam does not light up. This happens because it lights up more often and not only at night. The requirement to drive during the day with low beams or daytime running lights on leads to the fact that the lamps work in an overloaded mode and quickly burn out. The malfunction is eliminated by replacing the burnt out elements.
Do not replace only a burnt-out device. The second lamp works the same amount of time, therefore, it will become unusable in the near future. In addition, during operation the spectral composition of the radiation changes, so even light sources of the same brand will shine differently.
It often happens that after replacing the headlight still does not work. The cause must be looked for in the fuse block. When the filament filament burns out, current surges may occur that can blow the fuse. If both lamps do not light, the reason lies in the common fuse, and if only one, then the fuse in the circuit of the faulty device must be checked.
When installing new elements, it is prohibited to use homemade inserts or devices of a higher rating. This may cause electrical wiring to melt and catch fire. If the installed fuse burns out again, you need to look for the cause, and not reduce the sensitivity of the current protection.
Instructions - removing the headlight on a Ford Focus
So, you can install a headlight unit on the second version of Ford Ficus in the following way.
Turn off the power to the car and remove the negative terminal from the battery.
Prepare in advance a Torx wrench with a dimension of “25” and a flat-tip screwdriver. It is possible that the appearance of your headlight may differ slightly from those shown in the figure, but even in this case, the procedure for dismantling the headlight unit will be absolutely identical.
Press the locking latch and unplug the plug connecting the headlight circuit. and pull out the headlight housing completely.
After carrying out the necessary repair or restyling work, reassemble the structure in the reverse order.
I am making a manual for disassembling and reassembling headlights without using a hair dryer and oven. Many people write on forums that the headlight can only be disassembled by heating it with a hair dryer or oven. Here is my disassembly method for those for whom these options do not suit:
I'll tell you how I did it when it was cold. I took off the headlight, armed myself with a couple of pencils, a utility knife and a regular knife, just in case. How I took it apart: 1 Using a utility knife, I cut the sealant around the circumference of the headlight, lifted the latches and trimmed the sealant there. 2 Then, approximately in the middle of the headlight, I used a small utility knife to pry the black plastic into the headlight away from the latch and began to cut the sealant with another knife. Why this was done: when cutting the sealant, the plastic relaxes a little, a small utility knife (back wall) bends this plastic more and, as a result, a gap appears between the headlight housing and the plastic glass. Let's move on 3 We insert a small ordinary knife into this gap and cut the sealant in any direction convenient for you. Accordingly, when moving to the side, you need to move a small stationery knife. Gradually you need to stick pencils in so that later you don’t have to worry about using a knife again. The first headlight took an hour to disassemble. second - 30 minutes
Disassembly and replacement of headlights
Disassembly and repair of a car headlight is required if it is necessary to clean the internal surface, replace the glass or reflector, as well as if you intend to alter the optics, for example, to install lensed elements.
Removing the headlight correctly
How to remove a Ford Focus 2 headlight was stated above. Fastening is carried out with one bolt to the cross member of the engine compartment and two plastic latches. In this it is no different from the headlights of the pre-restyling model.
No assistants are needed to dismantle the optics; all work is easy to do alone.
We disassemble the headlight
Before disassembling a dismantled headlight, you need to find an assistant in advance, since this is very difficult to do without outside help. You can damage the case or glass; this procedure will take a lot of time.
To disassemble the headlight, you will need the following tools:
- installation hair dryer with temperature control;
- scalpel or sharp knife;
- flat screwdrivers with a thin blade.
The glass is attached to the body in a U-shaped groove. The groove is completely filled with sealant. To soften the adhesive element, you need to set the temperature on a hairdryer to 250-350 degrees. An assistant should hold the heater over the joint at a distance of several centimeters. After heating the seam, use a scalpel to trim the sealant, while simultaneously moving the hair dryer to the next area. After trimming, continuing to heat, insert a screwdriver into the gap between the glass and the body and carefully push them apart.
After dismantling, traces of glue are carefully removed from the glass and from the groove cavity.
Gluing is done using high-temperature sealant. The curing time is indicated by the material manufacturer. All this time, the glass and body must be secured against shifting.
Ford Focus headlight wiring
If the power connector or lamp sockets are damaged (broken wires, melting), they must be replaced. The blocks are available for sale either empty, without terminals, or with built-in terminals and wire sections. The procedure for installing new items varies.
In the first case, the wires from the old block are cut off. Then the terminals are attached with a special crimp and secured in the connector. In order not to get confused in the position and order of the wires, it is better to rewire one at a time, installing it from the old connector to the new one in a similar place.
To install a new block with wires instead of the old one, you need to clear the ends of the insulation and connect them by twisting. It is advisable to solder it to increase reliability. The junction is insulated with tape. It is more practical, instead of electrical tape, to use pieces of heat-shrinkable tubing, which is placed on the wires before connecting them. After heating with a hot air jet using a hair dryer, the joint will be reliably insulated.
Just as in the first case, it is better to change the wires one by one.
Fuses and relays
In the Ford Focus 2, the relay and fuse box is located in the passenger compartment under the glove compartment (glove box). To remove it, you need to turn one or two retaining clips.
Removing the headlight on a Ford Focus 2
Removing the front headlight of a restyled second focus is not much different from removing the headlight on old cars. It will take us no more than 15 minutes to do everything, including replacing all the lamps.
We won’t be able to replace the lamps any other way, and even if we do, we won’t get any pleasure from the work. Therefore, we take a long thin screwdriver with a flat slot, a Torx T-30 bit, put on cleaner cotton gloves and roll up our sleeves:
- Use a T-30 Torx bit to unscrew the main headlight mounting screw. It is located approximately in the center of the headlight housing and is screwed into the cross member of the engine compartment.
Unscrew the fastening screw.
We press out the fastening clamps.
Replacing lamps
When we have the headlight in our hands, we can start replacing the lamps. Standard lamps that are installed from the factory have the following parameters and indices:
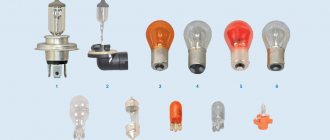
- yellow turn signal bulb PY21W, its power is 21 W;
- the low beam lamp with H7 socket has a power of 55 W;
- H1 and power 55 W are the parameters of the high beam lamp;
- A 5-watt W5W lamp shines in the side lights.
The turn signal lamp is changed after dismantling the plug, which we turn counterclockwise and remove. The lamp is removed along with the socket, after which the lamp is rotated and removed. We begin replacing the low beam lamps by removing the rubber cover on the headlight housing, then pressing the locking tab and removing the contact block. Hold the lamp by the contacts and remove it from the headlight housing. The high beam lamp is also removed. The socket with the size lamp is removed if you turn it counterclockwise.
We disassemble the headlight in a restyling body
That's how she understands it.
Removing the lamp shade and separating it from the body and reflector is an extreme measure, but sometimes this is also necessary. For example, to clean the reflector from dirt or dull sediment, to clean the headlight shade, to modernize the headlight architecture (installing lensed optics). To disassemble the headlight, you can go in two ways - either heat the sealant on which the lampshade is mounted, or cut the sealant around the perimeter with a cutter from an engraver.
It is better and safer to heat the headlight with a hair dryer at an air flow temperature of 250 to 350 degrees.
It’s easier to work with two people - one warms up the seam, the second uses a scalpel or a sharp knife to trim the warm sealant around the perimeter, pulling the shade away from the body. After working with the headlight, it should be thoroughly blown out of chips and sealant residues, the joint area should be cleaned of old sealant, the joint between the lampshade and the body should be degreased, and the headlight should be glued together using any high-temperature sealant.
Removing the Ford C-max headlight
All other fastening elements are exclusively plastic and do not require unscrewing; you just need to snap them off.
How to change the radiator on a Ford Focus 2? All Ford car owners sooner or later face such a problem as damage to the radiator of the cooling system. How to remove an “error check” in a car in the field using. If you can't do it manually, you can use a screwdriver to help yourself.
Removing a headlight on a Ford C Max 2006.
Replacing light bulbs in a Ford Focus headlight 1. When the headlight is removed, let's proceed to replacing the light bulb. How to remove trim from Renault Megane, step-by-step instructions. How to remove the front door trim of a Ford Focus 2.
How to remove the headlight on a Peugeot video Auto Disconnect the headlight power supply. Removing a headlight on a Ford C Max You can see how to change the low beam bulbs on a Ford Focus 3 in this video.
Removing the front headlight Ford C-max 2010-2014
Let's start with the theory. Here's the headlight itself.
Still, the fate of a tuner without ready-made solutions is difficult: And so what we have: The decision was absolutely correct, as a result, the original kit did not fit completely, the ring was too big for the high beam reflector! I had to take 90 and they fit.
And having put everything together, it’s decided! First, let's remove the headlight itself, there's nothing complicated here, one screw, two clamps and you're done.
How to Remove a Ford S Max Headlight
Next, turn off the block. I forgot to take a photo.
Duratorq TDCi turbodiesels with working volumes of 1.5 and 1.6 liters develop power of 75 and 95 hp. The most powerful Duratec Ti-VCT is equipped with a six-speed automatic transmission PowerShift, all others have five-speed manual transmissions.
Front bumper Vehicle equipment level is determined separately for each market.
Already in the basic configuration, the Ford B-Max is equipped with a Torque Vectoring Control torque distribution system to the drive wheels, which helps in taking the tightest turns.
Another useful option is the Active City Stop system, which automatically stops the car if it detects a stationary obstacle in front of it.
The list of additional options available for installation includes a panoramic roof, a camera with maximum visibility, leather seat trim and a navigation system with a five-inch screen. The SYNC infotainment system allows you to control your music and other functions using your phone via Bluetooth using voice commands. Removing a headlight on a Ford C Max However, the most important feature of the system is the function of calling an ambulance and the police automatically in the event of an accident.
This is determined by many parameters, including the deployment of airbags. In this case, the electronics calculates the coordinates of the accident site via GPS, determines the language of this area and calls the necessary services to the accident site.
Self-installation of lenses in Ford Focus headlights - step-by-step photo report
Hello everyone, dear friends and guests of the FaraInfo website. Today I want to present to your attention another wonderful, in my opinion, photo report on how to install bi-xenon lenses on a Ford Focus. This is not the first and, I hope, not the last article on this topic; not so long ago I already published an article on how to install lenses in Lancer headlights. Today you will learn how to do the same on a Ford Focus.
Headlight retrofit, which I already talked about, is a great opportunity to give the old headlights of your favorite car a second life. Installing bi-xenon allows you to improve the quality of light, as well as increase traffic safety, so in addition to visual pleasure, you also get a lot of advantages, which largely relate to traffic safety.
Installing lenses in headlights yourself is a responsible and difficult procedure, the outcome of which largely depends on your abilities. Such work should be approached with full responsibility, or you should not take it on at all.
Before installing bi-xenon lenses, prepare:
- A drill or a sharp knife (you can also use a hair dryer to unstick the headlight unit);
- “Poxipol” glue and sealant for final assembly (gluing glass and headlight housing);
- Bi-xenon modules (in this case Valeo 2);
- Ignition units (in this case 6G);
- Lamps (for example, Osram D1S);
- And also “hoods” for Range Rover 3 lenses.
Replacing headlight glasses in a Ford Focus II
New glasses for headlights of Ford Focus II
To remove the headlights, we did not need to remove the bumper, and when we removed them, we discovered a lot of dirt that had formed due to the constant presence of moisture.
Installation of headlights with new glasses and bi-lenses.
Next, it was necessary to clean the headlights themselves, check the functionality of the wiring and install Hella 3R 3.0 bi-xenon lenses , which are a modernized copy of the standard lenses installed at the car manufacturer’s factory.
Lenses to replace the standard ones, perfectly match the mounting holes.
Installation occurs using bolts or adapter frames.
Installing bi-xenon headlights in Focus - step-by-step instructions
- The first step is to dismantle the headlights; to do this, lift the hood cover, unscrew several bolts securing the headlight, and also turn off its power.
- Next we proceed to disassembly. There are two disassembly options: the first is by cutting, the second is by heating and separating the two parts of the headlight unit. In this case, the first option was chosen. You can saw with a drill using a special circle, or you can try to do it with a knife or something else.
- The next step was painting the masks. Everything is simple here, take a suitable paint, apply it in several layers and wait until everything dries. What to paint and what not is a personal matter for each of you.
- Now you need to cut holes in the reflector for the module. We do this in a way convenient for you, you can use the same drill or something alternative.
- To adjust the modules in the reflector, these podiums were hastily constructed and secured behind the ears with ordinary self-tapping screws. We install the podium on the table, insert simple lamps (halogens) into the reflector, then connect and mark the light boundary on the wall. This will help you adjust the bi-xenon after installing it.
- Installation of bi-xenon lenses. We attach the lenses themselves to M4 bolts with nuts that are self-locking. To be safe, so that nothing would come loose, I sealed the bolt heads with cold welding.
- Considering that the selected ignition units do not have a moisture-proof connector, and at the same time have short wires, it was decided to place them inside the headlamp itself. For greater reliability, it was decided to solder the wiring itself.
- We adjust the lens hoods by carefully trimming them. We glue them with durable glue (I used “Poxipol”, this one will hold).
- Now you can glue the glass. However, before that, I would still recommend checking how everything works. To do this, we take the headlights and “figure out” how everything works in place. If everything is in order, we proceed to install the glass.
- We remove the remnants of the old sealant, if any, then apply a new sealant (Dinitrol), and then glue the two parts together. Everything should work out right the first time, so be careful and careful. We clean off the excess with a rag, then squeeze everything tightly and secure it with tape. We leave it in this state for a day, depending on what kind of sealant it is and how long it needs to dry completely.
Installing angel eyes in FF2 headlights
focus 2 dorestyle
We have two focus lights and a set of angel eyes!
1. OPENING THE OPTICS
To install angel eyes in the focus headlight, you need to remove the polycarbonate glass. It is removed by cutting with a milling cutter along the contour (seam), where the white (glass) is connected to the black (headlight housing). It is absolutely IMPOSSIBLE to heat the original headlights on Focus 2 Dorestyle and Restyle in the oven or with a hairdryer! You will simply ruin them, the glass will turn yellow (cloudy) and bubble, the headlight housing will float, and the place where they are connected will remain unopened, because the focus headlights are connected with a high-temperature rubber sealant, the housing is a groove, and there is a spike on the glass. The tenon fits into a groove into which this very durable rubber is already poured, the connection is based on the principle of a wooden board - lining
We buy a cutter in a store with power tools or at a construction market; a cutter from a CNC (computer numerical control) machine is best suited; we attach it to a bolt, and put the bolt on a regular drill. We begin to saw along the seam, slowly, gradually going deeper and moving along the entire length of the headlight. The depth of the cut can be adjusted by the diameter of the washer securing the cutter, don’t be too afraid of the recess, there are a lot of voids in the headlight, wiring, etc. The insides of the headlight are very difficult to damage, unless of course you cut with a grinder
On the way, you will come across cutters, brackets, clamps, we also mercilessly cut off their guides, because when assembled back they do not carry their fastening properties. You can check the degree of cut by inserting a thin slotted screwdriver.
They sawed it, lifted the glass along with the mask (edging) of the headlights and saw this! Remains of sealant, polycarbonate, crumbs, burrs and other dirt.
We put the cutter in the groove (where the tenon from the glass remained in the groove) and begin to clean as much as possible, you shouldn’t get too carried away because Uneven surfaces, debris and sealant can also be cleaned out with a knife. The remaining tenon in the groove itself should not be removed; the frame and overall load-bearing capacity of the headlight will be impaired! Crumbs and other debris can be blown off with compressed air, a hairdryer with a soft watercolor brush, or vice versa, sucked in with a vacuum cleaner. Wipe chrome amolgam reflectors only with soft flannel, soft paper towels and other very gentle rags so as not to scratch
Something like this
2. DISASSEMBLY, PAINTING
Unscrew the headlight mask from the glass using a TORX 10 wrench (two self-tapping screws) and unclip the turn signal with a yellow stripe from the mask (two latches). We wash the glass with a powerful stream of water and wipe it dry!
If the task is to paint the headlight reflectors, then do the following: cover the high beam reflector along the contour with masking tape (paper), do the same with the lens housing on the low beam, and cover their backs with the holes for the lamps. To paint, it is not necessary to remove the reflectors from the mounts, you just need to properly cover all areas from paint that will not be painted. This way the headlights don’t have to be adjusted later and put back into their seats; some screws are hidden in the insides of the focus optics and are difficult to get out...
If the task is to paint (remove) the yellow stripe from the turn signal, cover the excess with the same masking tape!
If we paint with varnish for tinting, then we don’t need to strip the chrome; it will just turn out tinted; we can adjust the final lightness and darkness by the number of layers applied. If we paint with paint, we sand the chrome with fine sandpaper or a dishwashing sponge with a fine abrasive (Scotch Brite) or solvent remover. Prime at will (it is highly recommended to prime the lens hood), the temperature inside the optics is not high and there is a well-thought-out heat dissipation and there is no external influence as on the car body, therefore, we remove garbage, degrease, smoke Apply 2-3 layers of any paint, either from a spray can or from a pistol intermediate drying between layers. Let the whole thing dry completely according to the recommendations in the instructions for the paint and remove the paper and tape.
To paint the headlight mask a different color, you need to remove the chrome coating from the plastic of the mask, do the same as in the case of the lens edging, sand it, degrease it, paint it. Without fanaticism - we saw white (gray) plastic under the chrome - move on, paying special attention to the corners, ribs and visible parts of the mask (there is no need to sand the back). We paint in several layers, starting with spraying from the back into the decorative cracks of the mask and roundness under the reflectors, then we move on to the face.
3. INSTALLING RINGS
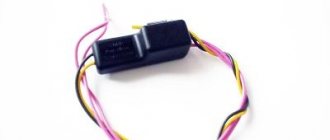
CCFL eyes are glass tubes with a diameter of 2 mm, bent in the form of rings, filled with gas. Each glass tube is enclosed in a transparent plastic tube with a diameter of 8 mm and suspended in it by silicone rings. Thus, the glass tube is reliably protected from shaking and shock. To make the tube glow, you need power that differs from the usual 12 volts DC. Small inverter blocks are used to power the peephole. One inverter unit is required for each headlight (2 rings). The inverter units are designed in such a way that the car’s computer does not give errors regarding dimensions!
Under no circumstances should you attach the rings to the reflectors using the adhesive tape included, it is unreliable and it is better to buy normal double-sided 3M. It is also not recommended to attach the rings to the sealant because when the rings heat up, it can release an oil film on the glass from the inside and takes much longer to dry than tape! To speed up the setting, the whole thing can be heated before, during and after installation!
The rings can be placed in the optics with gaps both down and up, and even to the side, as you like - the wide eyelashes on the headlights cover the gaps and visible wiring from the rings at the top, if the eyelashes are not planned, then we put them with the gaps down.
Reflectors and lenses stained with fingers, debris, etc., are removed out of sight with a soft rag and a brush. Debris that gets inside the lens is cleaned with a cleaning rod made of knitting wire and a bandage. Before assembly, we check the operation of the rings with ordinary batteries.
4. ASSEMBLY OF THE HEADLIGHT, CONNECTING THE RINGS
After all the debris has been removed, the mask is screwed back onto the glass along with the turn signal, the wires from the rings are inserted and the headlights are brought out to the rear, we begin assembly.
We take the sealant and, like a toothbrush, apply a THICK layer, do not spare the sealant, the excess inside will be hidden under the mask and body elements, and the excess outside will be cut off with a stationery knife, part of the sealant will fall into the standard groove, which was cleaned above with a milling cutter and a knife. We compress the corners and along the contour with clamps (mini vices), electrical tape, masking tape, staples, carefully vise through spacers, etc. We make sure that the headlight does not move, that the sealant is applied evenly, at the same time, we scratch the glass as little as possible and do not scratch it with a tool. We put it on the battery and smoke for 24 hours until the sealant is completely hardened! Next, take a sharp knife and cut off the excess that comes out.
You don’t have to do this step... To be completely sure of the tightness of the headlight and prevent moisture from getting inside, cut a thin strip of any oracal vinyl film and glue our new seam with it, treat the corners and protrusions with 2-3 layers, pull with a hairdryer or a simple lighter! The film will also help to hide the clearance from the headlights through uneven joints (gaps) of the hood and headlights and eyelashes if the car is broken or the elements are not aligned correctly, it will also be more convenient to wash the engine compartment and the layer of dust and dirt on it will show the frequency of such washing of the engine compartment
2 wires from one ring and 2 from the other ring are connected to the ignition unit (inverter) which fits comfortably behind both the high and low reflector, from the ignition unit there are 2 wires red + and black -, which are connected to the + and - of the standard marker cartridge. The blocks need to be placed inside the headlight, they are much smaller than xenon ones and they will be fine there
Result!!!