05/10/2021 4,391 Sensors
Author: Ivan Baranov
Parktronic is a device that facilitates the process of parking a car. Thanks to its presence, the driver knows the distance remaining to an object located in front or behind the car. The need to check the parking sensor may arise if the device malfunctions.
[Hide]
The design of parking sensors and the principle of its operation
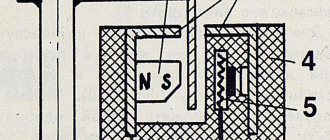
The main structural elements of an ultrasonic car parking sensor:
- Control microprocessor module. Used to receive and process pulse signals that come from ultrasonic controllers. The element is the “brain” and the central core of the parking system. The main purpose of the microprocessor device is to promptly warn the driver about the presence of malfunctions.
- Controllers, their number differs depending on the model and class of the device. Sensors are used to detect objects and obstacles in a timely manner. The controllers transmit information to the microprocessor module. Installation of elements is carried out both at the rear of the car and at the front. The action of the controllers is based on the use of ultrasonic pulses.
- Bipper. The sound device is mounted inside the car. It is located in the middle of the center console, under the rearview mirror or on the left next to the side mirror. When the sensors detect an obstacle, the beeper plays a warning tone. The element can be equipped with a display that displays the distance in meters or centimeters to the obstacle.
Operating principle of the device:
- When operating, the controller installed on the rear bumper of the car emits an ultrasonic pulse without interruption. If the sent signal identifies an object in the form of an obstacle, then the pulse is returned back like a mirror. The exact time for the ultrasonic pulse to be reflected determines the distance to the object.
- On average, the controller detects obstacles up to two meters from the vehicle. If an object is more than two meters away, it can be seen in the rearview mirror.
- The parking radar is activated after the driver engages reverse gear. But the machine can be equipped with a sensor that operates in non-automatic mode. The use of such devices is advisable in cities with heavy traffic or in traffic jams. Automatic parking radars emit warning pulses continuously. Both sound and light components can be used to warn the car owner.
Video “Guide for installing a parking radar on a car”
The “CarEra Auto is Easy” channel presented visual instructions for installing a parking device from scratch and connecting it to the car’s electrical network.
Parktronic is a transceiver device. The purpose of this device is to detect unexpected obstacles in front or behind the vehicle and warn the driver about it.
Parking sensors work on the principle of radar. That is, the device sends a sound signal in all directions, usually ultrasonic frequencies are used.
The signal, encountering an obstacle, is reflected from it and returns to the parking sensor receiving device. In the parking sensor control unit, the signal is processed and the driver is given a warning about an obstacle that has arisen.
Structurally, the parking sensors are made in three versions:
- In the first case, it consists of a control unit, sensors, and connecting wires.
- In the second case, there are no wires.
- In the third, metallized tape is used instead of sensors. It is believed that such tape parking sensors are devoid of dead zones. It is installed on the inside of the bumper.
You can learn about installing parking sensors with your own hands in a practical guide: how to install sensors, equipment and conduct testing.
The main signs and causes of malfunctions of the parking sensor and its components
If the device begins to work incorrectly, this may cause unpleasant consequences for the car owner. The test can be performed if the user is aware of the causes and symptoms of the malfunction.
Why might the parking sensor not work?
Reasons indicating the need to diagnose and repair the device:
- Problems with wiring, electrical circuits are pinched or damaged. Depending on the type, the parking radar can be wired or wireless. If the device is wired, then there is a possibility of a break or pinching of the power lines, which will lead to problems in the functioning of the system. There will be interruptions in signal transmission.
- Errors made when fixing the device. If you did the installation yourself, the controller or touch strip may not be properly fixed. One of the mistakes that car owners make is to attach the sensor incorrectly, as a result of which it is directed not at potential obstacles, but upwards. When installing, the device must be properly fixed to prevent it from vibrating during driving, which will lead to distorted results.
- Factory defect, not a single electronic device is protected from this. The parking system includes several components, so a breakdown of one of them will lead to malfunctions of the entire device. If an electronic unit breaks down, the car owner is usually warned about this, while the breakdown of controllers is more difficult to diagnose.
- Negative effects of moisture and dirt on the controllers or control unit. When water gets on the sensors, the sensor elements begin to function intermittently. Therefore, when choosing a place to install the devices, you need to think about it so that they cannot get hit by a stone from under the wheel of a car coming from behind. And in humid weather, water should not settle on the devices. The electronic module must be placed in the passenger compartment so that it is not exposed to moisture or dust.
- Short circuit of the microprocessor module of the parking system. If a short circuit occurs on the microprocessor unit board, the device fails or functions intermittently. The cause of the short circuit may be contamination of the board or exposure to high temperatures.
Main signs of device malfunction
A damaged parking radar must be repaired after the first signs of damage appear. If the system was installed regularly during car production, then there should be a corresponding indicator on the control panel. The appearance of this symbol on the device may indicate a device malfunction.
If you installed the parking sensors yourself, you can determine the problem by monitoring its operation. When approaching an obstacle, the parking sensors will continuously signal the presence of an object or not react to it at all.
Sergei Lavrov showed what malfunctions can be encountered when purchasing cheap Chinese-made parking sensors.
Tactile check
First, inspect the outside of the sensor. You will need an assistant who will be in the driver's seat during the test and change gears. First, put the car in reverse gear and move closer to the rear sensor. Do the same with the front instrument, just change the speed.
When the car approaches any object, the parking sensor begins to make characteristic sounds (squeaking, beeping, and others). This means that the device is operational and signals approaching danger. In this case, you zoom in and out of your hand. Also, when your hand touches the sensor, it should vibrate. If the system does not respond, it means it is faulty.
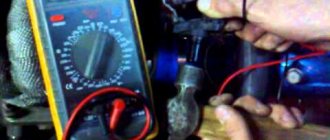
How to check the parking sensor? Carrying out diagnostics
Before checking the parking sensor, you need to decide on the diagnostic method. There are several options for checking the device, one of them is implemented using a multimeter. You can come close to the touch controller mounted on the bumper. If the device is working, then when an obstacle approaches, it will make a click. You may not hear it, but if you record it on a voice recorder, the click will be clearly audible.
Before diagnosing the parking sensor, you must release the parking brake lever of the car, turn on the ignition and move the gearshift knob to the reverse position.
Some devices allow you to implement the following type of diagnostics:
- The ignition is turned on and the transmission lever is moved to the neutral position.
- The parking brake lever is released.
- The power unit is starting.
- The car owner runs his fingers over the controllers located in the front or rear bumper. When the devices are operational, they may vibrate. But we must remember that not all types of devices respond to such touches.
If instead of traditional controllers a metallized tape is installed on the bumper, then its condition can be assessed visually. Malfunctions may occur as a result of physical damage to the device. Visual diagnostics of the tape is performed to determine the presence of defects. Cracks and deep scratches on the element can cause malfunctions. If the tape is intact, the problem should be looked for in other system components.
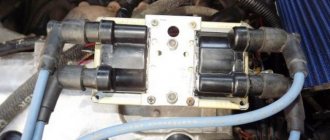
Visually, you can determine problems in the functioning of the microprocessor device. The unit board is subject to diagnostics for the presence of burnt-out components. The device is disassembled, the cover is removed from it, then a visual check of all the constituent elements of the circuit is performed. It is necessary to pay attention to the diagnosis of capacitor devices; with prolonged use they can swell. The reason may be the negative impact of dust and dirt on the elements, so it is recommended to clean and dry the board.
The Corvus Gold channel showed clearly effective ways to diagnose parking radars for cars.
Checking the parking sensor with a tester
Diagnostics with a multimeter will take longer, but the results will be more accurate:
- Before performing the test, you must disconnect all ultrasonic controllers from the vehicle's electrical circuit.
- After disconnecting the wiring, the sensors are dismantled.
- Taking the controller in your hands, you can see the contact components on the element. A multimeter probe is connected to one of the contacts.
- The diagnostic device is set to resistance measurement mode, and a threshold of 2 thousand ohms must be set. Then the tester probe is connected to the contact elements of the controller.
- The readings are read and displayed on the display of the diagnostic device. The controller operates without interruption if the resulting resistance does not correspond to zero or does not tend to infinity. In other cases, repair or replacement of devices is required.
The diagnostic method using a tester allows you to identify problems in the functioning of the controllers and the electrical circuit to which they are connected. To do this, the conductors through which the sensor is connected to the microprocessor module are checked. The integrity of electrical circuits is diagnosed. Damaged wires must be replaced or re-soldered; it is recommended to wrap the soldering area with electrical tape or install heat-shrinkable tubing.
The STO Garazhok channel talked about the features of diagnosing parking systems using multimeters.
What to do
When buying parking sensors for your car, you need to make sure that it is in working order. The new part must respond to any obstacles placed in front or behind the machine. If there is no signal about an obstacle, it is better to refuse to purchase this model and look for another option.
If problems arise in the operation of the old device, you should clean its surface from dirt and dust that accumulates as the system is used. In frequent cases, such simple manipulations restore the functionality of parts.
When cleaning, it is important to pay special attention to the places where the sensors are attached. They must not be contaminated, otherwise the sensor will not be able to properly receive the signal and transmit it to the electronic unit. You should also inspect the reliability of fastening the working elements
You should also inspect the reliability of fastening of the working elements.
How to identify a faulty sensor
It is not difficult to identify a faulty parking sensor. The check is carried out by touching the sensor while the power plant is idling. If there are no malfunctions, the sensor should vibrate slightly and make a cracking sound when in contact with a finger. If such signs are not noticed, then he was not taken out of action.
If you need to diagnose the control unit, you will need to contact a car repair shop. It is impossible to check such a complex system with your own hands. But it is possible to conclude that the inoperability of the parking sensors is related to the unit only after a thorough diagnosis of other parts of the device.
To check the parking radar for a short circuit, just use an ohmmeter and connect the ends of the probe to the terminals of the unit. If a short circuit occurs or there is a break, the instrument needle will remain at zero. To eliminate the defect, you need to contact a specialist.
But at home it is not difficult to diagnose a printed circuit board. To do this, remove the cover, under which dirt or dust may accumulate. Often there are traces of scale inside the block structure. In this case, you will need to replace the radio components, including the capacitor.
Repair
If the parking sensors are damaged, you can try to restore them yourself. The first solution is to dry out the radars. If the device malfunctions after rain, snow or a visit to the car wash, there may be liquid on it. In this case, the system will return to its previous operating mode immediately after drying. If this does not happen, you will need to dismantle and open the device to check the membrane for damage. A failed part needs to be replaced. But you shouldn’t do this on your own. It is better to entrust it to a car mechanic.
If the parking sensors do not work, but the sensors are cleaned of dirt and water, the metallized tape may be damaged. It is not difficult to identify the problem - any defect will be noticed visually.
If there is no signal from the strip parking sensors, diagnostics and repairs will be carried out according to the same principles as in the case of the sensor system.
The first step is to assess the external condition of the working units and get rid of contaminants.
Next you should check the reliability of the connection and fixation of the wires.
Fixing a malfunction in the rear or front parking sensors with your own hands is problematic. It is better to entrust such a task to a specialist from a service center or service station.
How to prevent breakdowns
In order not to encounter malfunctions in the operation of parking sensors, it is necessary to service them in a timely manner, protecting them from negative factors. First of all, you should protect the system from water and dirt, so after each ride in rainy or snowy weather, visiting a car wash and driving off-road, you need to clean the sensors. If minor problems occur in the form of infrequent false alarms, it is not necessary to contact the service center.
But if the problem is a complete failure or display of inaccurate results, you cannot do without the intervention of a professional technician.
In what cases can you repair parking sensors yourself?
It will not be possible to repair the parking radar only if the problem lies in the operation of the microprocessor module. Detailed diagnostics of a printed circuit board and its repair involves resoldering the component elements. And to perform this task, special equipment and tools are required.
Sequence of actions when repairing a device
The parking system repair procedure is performed as follows:
- The first stage involves thorough cleaning of all touch sensors installed on the bumpers. For cleaning, use a clean, lint-free rag. Lint may remain on the sensor element and cause it to not work properly.
- Visual diagnostics or continuity testing of electrical circuits is carried out. It is necessary to check the integrity of the wires coming from the electronic module on the connector. If damaged wires are found during diagnostics, they must be replaced. To do this, the plastic cladding under which the power lines are laid is dismantled, the conductors are changed and the upholstery is put in place.
- The electronic module is visually checked. You need to make sure the integrity of its body and the connector to which the wiring is connected. There should be no oxidation or signs of damage to the contacts on the plug. If the contact elements are bent, they are leveled, and traces of acidification are removed using fine-grained sandpaper.
- Then it is recommended to disassemble the unit to assess the condition of the board. Traces of dirt and dust, if present, are removed from the housing. If the board has been exposed to moisture causing the device to not work, it should be dried. It’s not a fact that this will help, but in some cases it can solve the problem. Drying is done with a hair dryer or the board is placed in a warm place, but exposure to high temperatures is not allowed.
- The quality of the connection of wires to the sensor contacts is checked. To do this, you need to dismantle the rear or front bumper or crawl under it and visually assess the condition of the contacts. If the wire on one of the sensor elements is missing, it must be soldered again. Acidification on the contacts is removed, all wet components of the system are dried.
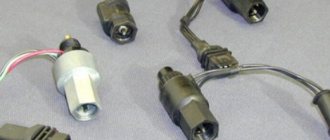
- If diagnostics show that only one of several controllers is faulty, then the device must be removed and replaced. The controllers themselves are usually made in small cylindrical cases filled with hermetic glue. To dismantle and disassemble the sensor element, you must carefully remove the back cover of the plastic case from the clamps and remove the working part of the device from it. If the sensor is equipped with a rubber gasket, it is removed. Damage and wear of the seal often causes the sensor to fail, so this element must be replaced.
- All remaining sealant is then carefully removed. You need to get to the cork gasket on which the metal circuit is installed. One conductor is usually connected to it. If it is missing, a new cable is soldered.
- Depending on the type of parking sensors, after disassembling the housing, you can see a felt gasket with a slot; a second conductor is installed into it. The seal is removed, under it you can see a sensor element made in the form of a small metal disk. If a cable is not soldered to this component, then the conductor is soldered. Further assembly is done in reverse order. When performing this task, the device must be filled with sealant to prevent moisture from getting inside.
The Arsis44 channel presented a detailed guide on how to perform repair steps to restore the functionality of the parking radar.
Removing and replacing a non-functioning parking sensor
The procedure for replacing a parking system device consists of three stages:
- Disabling controllers and dismantling them.
- Installation of new sensors.
- Connecting devices to the machine's electrical network.
When replacing one sensor with another, it must be taken into account that the devices must be interchangeable in size and parameters.
How to remove the sensor?
If the parking systems being replaced fully comply with the operating parameters and dimensions, then the replacement procedure will not take much time. There is no need to touch the wiring to connect the device, which simplifies the process.
The dismantling procedure may differ depending on the device model and vehicle, so below are universal removal instructions:
- The ignition is turned off and the car is set to the parking brake.
- The wiring connector is disconnected from the control unit. Depending on the type of device, the fastening method is different. Usually, to disconnect it is enough to disconnect the block; some connectors are secured using special clamps. It is important that the connectors on the devices being replaced match each other, otherwise you will have to re-wire the wiring.
- After disconnecting the block with wires, the control module is removed from the seat. Usually it is fixed with bolts that need to be unscrewed with a screwdriver.
- Then the beeper, which is sometimes equipped with a display, is disconnected from the power supply. After disconnecting, the device is removed from the landing site.
- The ultrasonic sensor elements are removed from the bumper or bumpers. Depending on the type of mounting, the contacts with the wiring must be disconnected from the device. It may be necessary to completely dismantle the bumper if the design features of the car require it. To avoid this, you can try to disable the devices by gaining access to them from under the bottom of the car.
- After disconnecting the contacts, the sensors are removed. They are usually fixed to the bumpers using sealant or glue. If further operation of the controllers is not planned, they are dismantled using a knife. If the sensors are to be used in the future, traces of sealant must be carefully removed and the sensors carefully removed.
- If the parking systems being replaced do not match each other in terms of connectors and number of sensors, new wires will be required. To do this, it is necessary to clarify how the electrical circuits going from the beeper to the controllers and the control module are laid out. Then the interior trim is dismantled and the old wires are completely removed. The removed parking sensors are removed.
Instructions for self-installation of parking sensors
General diagram of installation of parking system elements.
Install a new parking radar in the reverse order:
- First, the site for installing the device is prepared. The microprocessor unit is mounted in the same place where the old module was installed, or in the luggage compartment. To ensure secrecy, the module is mounted under the decorative upholstery of the trunk or in the space behind the wing. When choosing a mounting location, it is necessary to take into account that the device should not be exposed to moisture and high temperatures.
- Touch sensors are installed in the bumper. If the number of controllers is greater than on the old parking radar, then the bumper must be prepared for the installation of new devices. The outer two sensor elements are installed on the side parts of the bumper. To accurately calculate the distance you need to use a ruler.
- Holes for installing sensors are marked using a marker. After completion of the work, it will need to be removed with alcohol so as not to spoil the color of the body. When marking, be sure to use the instructions to take into account all the operating parameters of the parking system. It is recommended to place sensor elements at a distance of at least half a meter from the ground.
- If necessary, additional holes are made in the bumper using a milling cutter into which touch sensors are installed. For better fixation of devices, controllers should be attached using glue or sealant. You must be careful not to leave traces of the product on the working surface of the sensors, otherwise the devices will not work correctly.
- The beeper is being installed in the car interior. The device is installed on the center console, in the middle or on the left, near the driver’s seat.
- If the sensors are not interchangeable, then wiring for their connection is laid under the decorative trim of the interior. Cables must be laid from the control unit to the beeper, as well as from the beeper to all controllers.
- To disguise the sensor elements on the bumper, they can be painted in the color of the car body.
Installing a beeper with a display on the center console in the cabin
Making markings on the bumper for installing controllers
Installing the controller in the rear bumper of a car
Connecting the device
If the devices are interchangeable, then there will be no problems connecting. You just need to connect all the connectors and test the operation of the parking system. When the sensors are different, the connection procedure is performed according to the diagram that is included with the system. The electronic module, beeper and all sensor elements must be connected to each other. The device is also connected to the battery and reverse speed sensor so that when it is activated, it turns on.
Parking sensor connection diagram
How to avoid damage to the parking sensor?
To prevent quick failure of the parking system, sensors require periodic diagnostics and maintenance. If there are traces of dirt on the sensors, these elements must be cleaned. The presence of moisture on the control module will lead to its breakdown, so wet marks must be removed. One of the features of metallized tape, which is used instead of sensors, is the possibility of moisture accumulation under it. Therefore, the tape must be periodically removed and dirt removed not only from it, but also from the surface of the bumper.
When cleaning the microprocessor unit, you must be careful not to damage the device. Correct operation of the system depends on the correct installation of the component elements and their connection. In addition to the connection, you need to configure the operation of the device. This will allow it to react to obstacles from a distance, necessary for the driver. When setting up and connecting the system, study the service manual; it may indicate the nuances of use and connection.
Loading …