Date of publication: January 22, 2021. Category: Automotive equipment.
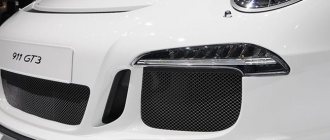
Protection of the main components and assemblies of the car is an integral (and for our roads, necessary) part of tuning. After all, no one has any questions when installing engine crankcase protection or automatic transmission. The radiator, which is responsible for cooling the engine, often also needs additional protection. An additional mesh for a car radiator, installed in front of or behind the standard grilles, significantly extends the “life” of the radiator and ensures uninterrupted operation of the cooling system.
Is it possible to do it yourself?
YES of course you can.
And it will be many times cheaper than buying from a dealer. To do this, we need to buy either a metal mesh at the nearest store (as I wrote above, the best is aluminum, because it is easy to work with). Or take a plastic one, preferably made of fiberglass, but which bends easily. Then we simply remove the radiator grille (or two, upper and lower, if any), cut the protective mesh to size and fasten it with screws and ties. I would like to note that on many cars the grille needs to be removed along with the bumpers, because there is no way to get through.
For those who do not want to mount it rigidly, but want to make it removable, you need to make a frame onto which we stretch the mesh fabric (a rigid wire is suitable for this, or you can use a PVC pipe). And then insert it between the bumper and the cooling element. I repeat once again - THE MAIN THING IS NOT TO RUB ANYWHERE.
The cost of both elements will be about 300 - 500 rubles, plus your time.
Now we are watching the video version
I’ll finish this, I think it was useful. Sincerely yours, AUTOBLOGGER
Replacement methods
The lower grille can also be removed without removing the bumper. Installing the grille in this case is easier. To do this you will need:
- Remove the 4 radiator grille mounting bolts located on top (note that the chrome plating of the part is quite fragile, so you need to work carefully).
- After this, the mesh can be pulled out and a new one of the same size installed in its place.
- In order to secure it, you will need to adjust the parameters.
- Assembly requires putting the mesh in place and screwing the grille fasteners back.
The main thing when choosing a grille is to maintain its size; if you prefer a mesh for windows, it can be attached to the car with clamps, but the appearance will be unaesthetic.
Unscrew the indicated 4 bolts
Raise the edge of the grille fastening and lower it towards you
Unscrew the mounting bolts
Carefully remove the radiator grille from the Renault Duster
This is what it looks like in front of Duster without a radiator grille
The second method is to remove the front bumper along with the grille. Below we will show how easy it is to remove the Duster bumper and install a protective mesh in the second step.
Advantages and disadvantages.
How to make and install a protective insect net on the radiator grille?
The main advantages of the radiator mesh:
- protects against stones, dirt, and insects getting inside the power plant;
- the appearance of the car becomes more attractive;
- the mesh is easier to clean than the grate.
Negative points:
- sometimes it can be difficult to find a suitable product for a specific brand of car;
- a heavily contaminated mesh blocks the access of air flow to the motor, which can lead to unpredictable consequences (including engine failure);
- Installation difficulties may arise;
- If installed improperly, there may be backlash and, as a result, noise and rattling at high speed.
Mesh screen installation technology
Do-it-yourself aluminum radiator repair in a car
If your plans include installing a protective and decorative mesh on the radiator grille, you should decide on its location. This can be an external or internal arrangement of the mesh screen, with each method characterized by its own set of advantages and disadvantages.
In particular, the external installation method allows for additional tuning of the car’s exterior. If the mesh screen is located internally, it will practically not be visible behind the radiator grille, and in some cases this will require removing the bumper, and for many foreign car models this is a problem.
For the mesh to perform protective functions, the cell size must be within 2.5-5.0 millimeters - this is a reliable barrier to small stones, debris and insects, and at the same time, air will penetrate to the radiator fins with virtually no interference.
Let's look at the main differences between internal and external methods of installing a mesh screen.
Mounting on top of the radiator grille
If previously a car had only one monolithic grille, recently it has often been practiced to install protective elements consisting of two parts: one located in a regular place, the other behind or under the bumper.
Most car brands practice placing a nameplate in the middle of the grille, which will have to be removed during external installation.
The procedure for externally installing a mesh to protect the radiator in the bumper consists of the following steps:
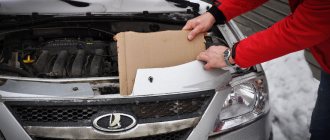
- determination of the geometric dimensions of the mesh screen. The best and most accurate way is to use an overlay sheet of thick paper or cardboard and transfer the outline of the hole with a pencil;
- using the resulting template, a mesh of the required size and shape is cut out of the rolled material using metal scissors;
- if the edges of the mold are too sharp, it is necessary to select a cable whose inner diameter of the insulation coincides with the outer diameter of the mesh wire. Using a utility knife, we cut the insulation and place the resulting hollow PVC tube on the edges of the mesh along its entire perimeter;
- the resulting structure is attached to the radiator grille in any convenient way.
If you plan to install parking cameras in the area of the mesh screen, a hole of the appropriate diameter should be cut in the places provided for this.
Installation of the mesh from the inside
In this case, the first two or three stages are completely identical, but there are some nuances. In particular, only in every fourth foreign car the radiator grille is removed from the outside. In other cases, to install additional radiator protection, you will have to dismantle the bumper, which significantly complicates the procedure.
If you succeed, take a close look at the bumper: most likely, on its inside there are standard fasteners and other structural elements to which our mesh can and should be attached.
For vehicles with an easily removable standard radiator grille
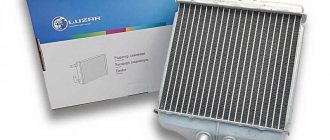
We replace the VAZ 2114 heater radiator with our own hands: instructions and nuances
For some cars, such as the Jeep Wrangler, removing the standard radiator grill can be done quite easily and quickly. For owners of such cars, the most optimal option for installing an additional protective mesh would be to attach it to the inner surface of the standard grille.
Required materials and tools:
- plastic mesh of the required size (easy to purchase at any garden supply store for 200–300 rubles);
- platforms for laying and fastening electrical wiring (size 20X20 mm, packing 100 pieces costs only 150÷170 rubles);
- plastic zip ties (size 2.5x100 mm, pack of 100 pieces costs 40÷50 rubles);
- universal instant adhesive gel (110÷130 rubles);
- household scissors;
- ruler or tape measure.
The manufacturing process is simple, does not require technical skills and does not take much time:
- disconnect the wire connectors from lighting fixtures, sometimes mounted on the radiator grille (turn signals, fog lights, etc.);
- carefully remove the upper protective grille;
- along the edges of the large ventilation holes on the inside of the grille, using instant adhesive gel, we fix areas for subsequent fastening of the mesh;
- let the glue dry so that the fixation points acquire the necessary strength;
- Using scissors, we cut out blanks of the required size from a plastic mesh (so that they completely cover the ventilation holes);
- we secure the pieces of mesh with plastic clamps (it is necessary to ensure that the tension is strong enough and there is no sagging);
- cut off the excess mesh and the “tails” of the clamps;
- we install the modernized grille in place.
On a note! Depending on personal design preferences, the mesh can be chosen in red, blue, green, orange or black.
Radiator grille tuning
There are many ready-made kits on sale for tuning grilles of specific car models. The advantage of their use is standard sizes and fasteners. You just need to remove the old part, install a new one - the result is achieved.
Branded radiator grille tuning kits can be quite expensive. A budget-friendly way to improve the appearance of your car is to do the tuning yourself. Let's look at the main options for tuning radiator grilles.
Installation of a decorative radiator grille
Perhaps one of the most common tuning methods is decorative mesh. This is a metal mesh that is sewn onto the inner surface of the radiator grille. You can do this kind of grille tuning yourself.
To mount a decorative radiator grille yourself, you need to:
- Remove the radiator grille, clean it of dirt and dust;
- Cut the “mesh-grid” according to the dimensions of the radiator;
- Secure the decorative grille. For this, self-tapping screws with a wide head are usually used; with a careful approach, ordinary construction ties are also suitable;
- Install the radiator grille.
Covering the radiator grille with film
Tuning the appearance of the grille can be done by covering it with decorative film. This is a relatively cheap way to restore the appearance or tuning. The market offers a wide selection of films to suit every taste and budget. The film can be decorative or transparent (transparent protects against damage).
It's easy to apply the film. To do this, you need to degrease the surface of the grate, and, heating the film with a hairdryer, “stick” it, and then expel the air. Covering complex surfaces with film will require skill, so it is better to turn to specialists.
Immersion printing on radiator grilles
A good way to protect the grille surface and give it a unique texture is by immersion printing (hydroprinting). The technology for applying such a coating is as follows. A special film with a pattern is placed on the surface of the water. Then a solvent is sprayed on top, the film loses its integrity and turns into a liquid, viscous state, without losing its texture. The prepared part is dipped into a container and the coloring film envelops its surface. Next, the part is washed and dried. Coatings applied in this way perfectly protect the grille from corrosion and physical damage.
Painting radiator grilles
Radiator grilles can be restored by painting. To apply the coating, careful preparation of the surfaces to be painted will be required. After cleaning and degreasing the grille, it is necessary to apply a primer. The soil is selected depending on the type of material from which the part is made. The paint is then applied to the grille using pressure spraying. To obtain a high-quality coating, several layers of paint and varnish are applied. For such work, you will need a room with controlled humidity and temperature.
Chrome plating of radiator grilles
The first method is galvanic application of chromium. The part is immersed in a bath with a special solution - an electrolyte, which contains chromium elements. A direct current is passed through the part, which provides conditions for galvanic deposition of metals, and chrome plating occurs.
Less expensive and complex is the method of chemical metallization. The part is primed, then the chemical components of the coating are applied step by step by spraying. Chemical metallization increases the strength of parts. In some cases, this method makes it possible to process plastic parts.
The radiator grille is the most important part that defines the appearance of the front end of the car, so car manufacturers carefully develop its design. However, if you want to stand out from the crowd or simply improve the appearance of the car, the grille can be repainted, chromed, or covered with film.
Protection of the main components and assemblies of the car is an integral (and for our roads, necessary) part of tuning. After all, no one has any questions when installing engine crankcase protection or automatic transmission. The radiator, which is responsible for cooling the engine, often also needs additional protection. An additional mesh for a car radiator, installed in front of or behind the standard grilles, significantly extends the “life” of the radiator and ensures uninterrupted operation of the cooling system.
How to install the product
Before you begin installing the mesh, you will need to remove the grille. On some cars this can only be done together with the bumper. As a rule, to dismantle you need to unscrew the retaining bolts that are hidden under the hood, and then bend the clamps at the bottom of the grille. After this, it can be carefully removed from its place. For other models, the fastening is so simple that you don’t even have to lift the hood lid: just pry the edges of the grille with a flat screwdriver and remove it from the grooves. You can find more detailed instructions in your vehicle's owner's manual.
Required Tools
To install the protection on the grille, prepare the following set of tools:
- ready-made protective mesh
- flathead screwdriver;
- a set of hex keys for dismantling the grille;
You will need these tools regardless of your preferred mounting method. But besides them, you will need the fasteners themselves. Depending on how you connect the mesh to the grating, you will need one of the following tools:
- standard holders
- cable ties about 18–20 cm long
- screws and industrial hair dryer
- welding machine.
Mounting options
You can secure the mesh in four different ways:
- using standard holders;
- using cable ties;
- using self-tapping screws;
- fusing the stacks into the lattice.
Each of these methods has its own pros and cons. For example, the best option is to install it on standard clamps. Another option is to install the mesh on self-tapping screws. True, before this you will need to heat the screws and thereby prevent further cracking.
Rare motorists resort to the fusion method. Firstly, you need to have special equipment. Secondly, if the grate is made of plastic, it can easily be melted. Well, in the end, you can’t redo a crookedly fused grille, and the entire part will need to be replaced.
For these reasons, drivers who decide to modernize the radiator grill on their own most often use plastic construction clamps. They are low cost and available at any hardware store. To make the ties invisible, purchase them in the color of the future grille and mesh.
Installation instructions
When the mesh itself is ready and the installation method has been selected, you can begin the installation process.
- Carefully remove the radiator grille. Be careful not to damage the cells.
- Wash the parts and remove any debris that has accumulated during use.
- Apply the mesh to the outside or inside of the radiator depending on the final location.
- If you are installing the mesh outside, fold in the seam allowance at the edges.
- Secure the mesh to the grill with clamps. It is best to use a symmetrical circuit. The ties arranged in a checkerboard pattern look beautiful and hold tightly.
- Cut off the long tails of the zip ties. Make sure that the fastening is not broken and the clamp does not fly off.
- Place the grille back into the car.
Connect the mesh and radiator grille strictly along the contours
Do-it-yourself manufacturing and installation
Despite the large number of products that can be purchased at auto parts stores, some drivers construct the mesh for the body kit themselves. Among the reasons are the unusual shape of the bumper air ducts, as well as the desire to stand out and create a unique part.
To make a bumper mesh with your own hands, you will need the following tools and materials:
- Scissors for paper and for cutting metal.
- Net.
- Screwdrivers and keys.
- Self-tapping screws.
- Marker, cardboard and pencil.
- Soldering iron power 100W.
Mesh construction is divided into several stages:
- Removing the vehicle bumper. To make the operation easier, the car is driven onto an overpass, inspection hole, or a jack is used.
- Creation of patterns. To do this, cardboard is applied to the holes in the air duct, and the resulting figure is traced to the required dimensions. Next, cut out with scissors.
- Creating a part. The resulting template is applied to the mesh, and the required part is cut out with metal scissors.
- Fit. The resulting part is applied to the opening of the air duct; in case of some discrepancy in size, the edges of the cut mesh are folded and applied again.
- After the adjustment is completed, the part is fixed to the vehicle body kit.
Important! When cutting a part from a mesh, it is recommended to make a slightly larger part compared to the template. This step will subsequently make it easier to install the mesh on the car bumper.
The protective element is mounted either on the inside or outside of the bumper.
From the inside
When installing the mesh on the bumper yourself, use a soldering iron. With its help, the element is attached to the edges of the air duct openings. The edges of the mesh are heated with a tool and soldered into the bumper. After this procedure, the body kit is sanded on both sides, coated with primer and varnish.
An alternative fastening method can also be used. The mesh is installed on the body kit using self-tapping screws. They are carefully screwed into the thickened parts of the bumper.
Outside installation
You can also install the mesh on the outside of the bumper yourself. This method of fastening has its own nuances. The element is attached with self-tapping screws instead of the standard radiator grille. The method is not feasible if the car has a complex-shaped radiator grille.
The installed mesh will need to be cleaned from time to time. This process is performed using compressed air and a pressurized water jet.
Radiator grille mesh: to install or not
If radiator protection is needed, mesh is virtually the only solution available. However, taking into account a number of disadvantages, the installation of such protection must be approached with maximum responsibility.
It is important to consider the following features:
- Is there an urgent need to install such protection? When driving around the city at low speeds, stones and rubble do not pose a threat to the radiator. Usually the radiator receives mechanical damage when driving on the highway. It turns out that if the car is constantly used within the city, an additional stack is not needed.
- How the mesh will affect the cooling system. The fact is that the mesh under certain conditions can become a serious barrier to air, which will lead to overheating of the engine. In this case, overheating is much more serious than damage to the radiator from stones.
- How will the mesh be attached? It is necessary to take into account all the features of the implementation of fasteners in advance, since there is a risk of damaging the radiator itself. Also, in the event of an accident, non-standard fasteners can cause additional damage to the car with unpredictable consequences.
For these reasons, it is necessary to take into account the individual characteristics and operating conditions of a particular vehicle. In practice, it is usually advisable to install radiator protection on cars that are usually used for highway driving, and are also used in regions where summer temperatures are not the highest. However, in this case there are nuances.
As a rule, if the car does not have a complex and technologically advanced engine with high output with a small displacement, when installing a mesh, the risks of overheating are not so high.
The main thing is to keep the radiator protective mesh clean and regularly wash the cells with a high-pressure washer. If the motor is forced and the motor is quite heavily thermally loaded, it is better to refuse to install any protection in this case.
Active radiator grille
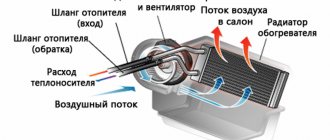
Typically, through an opening in the front of the body, cold air enters the engine compartment and cools the radiators. High-end cars use active radiator grilles. Structurally, this is a series of controlled movable blinds that are controlled by the engine control unit - they increase or limit the oncoming flow. The advantages of such a node are obvious. At the first start, for faster warm-up and fuel economy, the grille closes, reducing heat transfer. As the temperature rises, the blinds open to a larger angle, providing sufficient cooling. Some models of active grilles improve the aerodynamics of the car.
Types of protective nets
The wide variety of mesh screens designed for additional protection of the radiator is due to the use of various manufacturing technologies for these auto accessories, as well as a wide range of modern materials used in their manufacture. It is not surprising that today it is possible to choose this decorative element that ideally matches the color scheme, shape and size of your car. Let's take a closer look at all of the above factors.
Preparation method
Both factory meshes and those manufactured by large and very tiny tuning companies use a number of different technologies:
- the welding method is characterized by a mesh pattern that has a clearly visible volume even from a distance;
- woven mesh is produced using a technology similar to textile production, but here, instead of threads, the object of weaving is metal wire of small diameter;
- the twisted method requires the use of special machines that make a lattice in the form of a honeycomb - with ideal hexagons;
- casting technology is used to produce meshes from polymer materials;
- The expanded metal method is a technology for cutting slots in sheet metal using a powerful press. If necessary, the mesh can be stretched to form a diamond pattern instead of a square one;
- The chain-link technology involves weaving individual wires in a certain way.
All of these methods, except the last one, make it possible to obtain the output mesh with a rigid spatial structure, which is characterized by a constant geometry. The chain-link is characterized by the presence of transversely located rows of wire, which can move within certain limits, so their fastening requires a certain skill.
As a rule, the decorative mesh, as a result of separation (cutting) from the roll, has sharp edges, which should be processed before installation so as not to damage the body elements or bumper. Sometimes, for these purposes, the edges are wrapped with insulation of suitable diameter, removed from the cable.
Material of manufacture
There are three large groups of materials from which protective and decorative elements for the radiator grille are made:
- polymers (the most worthy representatives of the class are polypropylene, polyethylene, nylon);
- steel (regular with chrome plating or stainless);
- non-ferrous metals (copper, various aluminum alloys, brass).
If we consider the mesh from the point of view of ease of installation, then preference should be given to polymer products:
- they are easily cut with a hacksaw or scissors;
- usually the edge of the protective grille does not require additional processing;
- the material retains its original spatial shape under any conditions;
- modern plastic products are absolutely resistant to ultraviolet rays, temperature changes and moisture.
Among the main disadvantages are the relatively low strength - when exposed to a large stone crashing at high speed, defects may occur and the mesh may be damaged.
Aluminum mesh for radiator protection is considered more versatile, especially if it is made using perforated technology. Among its advantages are the possibility of painting and using chrome plating technology, ease of bending to give the desired shape. Aluminum is more resistant to mechanical stress and aggressive environments. If dents occur, they can be corrected without removing the protective screen.
Brass and copper products are more expensive, but their decorative properties are much higher. Over time, such additional grilles acquire an indescribable touch of antiquity. If desired, they can be easily cleaned with metal brushes; they are not afraid of corrosion.
When choosing a mesh material, make sure that the product is compatible with the standard radiator grille and other nearby body elements. If you are unable to determine whether the mesh is discordant with the exterior of the car, seek help from specialists.
Color solution
Most tuning studios prefer chrome parts. It is not surprising that such grids are the most common. However, a universal black product will look no less attractive. Brass screens or copper meshes will not match any color.
Many car owners prefer to paint the grille in the main color of the car body, but there are also fans of contrasting solutions. In a word, the color of the decorative mesh on the car radiator grill can be any, depending on your preferences and tastes.
MYTHS
Also, opponents may say that such grids are not only not useful, but they also contribute to overheating of the engine. Allegedly, if you take the thinnest cell, then it is:
Firstly, it will be poorly blown with air, poorly dissipating heat
Secondly, it will clog very quickly, completely clogging this mesh
Thirdly, the engine will overheat in traffic jams
But friends, this is not so, the radiator itself is made of aluminum, even without blowing it dissipates heat very well, because it is specially made ribbed (so that each rib) dissipates as much as possible.
Again, even the thinnest cell will pass the incoming air quite well (there will be an obstacle, but it is not significant). When it comes to engine overheating in traffic jams, the grille and the mesh have almost no meaning; here a large load falls on the fan, which turns on when the critical temperature is reached.
I will say even more, there are cars (standard, not tuning) whose front part was completely covered for the sake of beauty. And nothing overheating happened, just the standard fan turned on more often and cooled the car.
Negative points
Such nets are not always needed for a car; standard grilles are made in such a way that they protect against various debris and insects (for example, this is on top of my KIA OPTIMA). They redirect air flow and effectively protect the radiator. Therefore, placing it at the dealer is just an additional waste of money.
Why protect something that is already well protected? Actually, this is most likely one of the main disadvantages of this improvement.
The mesh that is pulled out is usually not firmly attached between the radiator and its grille; it can “play and rattle”, which can really irritate you. And also if it is not installed correctly, it can wipe part of the surface, fasteners or even pipes
Types of radiator grids.
There are many different types of meshes for radiator grilles. Products vary in quality and cost. According to the manufacturing method, the mesh can be divided into:
- industrial, factory-made for specific car brands;
- homemade, made with your own hands for yourself or to order.
Both the first and second differ in the method of fastening:
- with a rigid fastening - this design does not shake or rattle while moving on an uneven surface, but it is quite difficult to dismantle if necessary;
- removable radiator mesh - they are quite easy to remove and clean, but if the fastening is not rigid enough, it can cause extraneous sounds when driving.
Both homemade and industrial radiator meshes can be made from various materials:
- plastic - cheap, well processed, very light, but not strong enough;
- aluminum - have a small mass, are quite reliable and not too expensive, but over time they become dull, losing their aesthetic appeal;
- Stainless steel mesh is the most durable, looks great after a long period of use, but is expensive and difficult to install.
Radiator meshes vary in size and shape of the cells, and can be external or internal. The first ones are installed in front of the radiator grille and have the following advantages:
- easy to install and remove;
- external mesh can be cleaned directly on the machine;
- aesthetic appeal - design solutions give the car a unique appearance.
The only disadvantage of an external protective mesh is the price. Original branded products cost from 2-3 thousand rubles.
Internal protection elements are cheaper, and they also have the following advantages:
- the component is installed on simple plastic clamps (there is no need for a complex fastening system);
- high-precision processing of the material is not required, which significantly reduces the cost of the product.
A significant disadvantage of this type of protective component is its problematic installation and dismantling with the mandatory removal of the bumper and the resulting difficulty in maintenance. For this reason, an external radiator mesh is recommended for self-production.
Advantages and disadvantages of a protective mesh for the radiator
Modern cars are equipped with radiators whose dimensions are quite large - so much so that their lower part goes far down. The radiator grille is usually installed between the headlights, covering only the upper part of the radiator, and then only from large objects. The lower part, located at the level of the bumper, often turns out to be frankly poorly protected, and not only a mosquito, but also a rather large stone that jumped out from under the wheels of the vehicle in front could easily fly in through large gaps. This results in microscopic defects that increase the natural loss of coolant. And if you add honeycombs clogged with midges flying into the headlights, you get a completely bleak picture, reflected in the overheating of the power unit.
So the influence of the radiator mesh on the cooling system from this point of view can be called very positive. It is worth noting other positive points:
- unlike the standard plastic radiator grille, the mesh is made of metal, which is not afraid of stone impacts - the wear of this element is much less than the grille;
- using a Karcher to clean the mesh from debris is much easier than the grate;
- the protective mesh has virtually no effect on the vehicle's throughput - air will flow to the radiator at the same speed;
- many models of grids have a built-in curtain, which makes it easier to start and warm up a cold engine in winter;
- Finally, such a car accessory can also perform a decorative function, allowing you to make the exterior of the vehicle somewhat exclusive.
There are few negative points. The most common problem is difficulties in selecting a mesh for a specific car model. The second negative point is the difficulty with installation: not all car owners are fluent in plumbing tools, and if the mesh is installed poorly, backlash may occur, especially at high speed, which will manifest itself as rattling and other unpleasant sounds.
Types of meshes
Protective devices for the air duct are divided into:
Universal.
The accessory is a standard design that is suitable for installation on most cars.
Model.
Protective devices of this type are designed for installation on a specific vehicle model. They differ in the type of attachment to the car body kit.
Protective accessories are also divided by type of material:
Plastic.
The advantages include an attractive appearance, immunity to corrosion, and the ability to be painted in various colors. The main function is protection against large objects. Disadvantages include low maintainability and susceptibility to severe mechanical damage.
Metal.
The advantages include high strength and the ability to more effectively protect the vehicle’s air duct from foreign objects. Well, the disadvantage of metal is its high susceptibility to corrosion and severe mechanical damage.
Protective devices can be:
Large ones.
For the most part, they are made of plastic. They may look like a lattice. Installed on many popular models of European cars. Capable of protecting the air duct from large foreign objects.
Small ones.
Made of metal. Protects cars from small stones, construction debris and insects. When hit by a large object, they transform and tear.
How to make a protective mesh for a grill with your own hands
Ready-made protective nets can be made from materials such as:
- aluminum;
- steel;
- carbon;
- plastic.
Aluminum is a lightweight but durable metal that does an excellent job of protecting the cooling system. Steel meshes are no less effective. Carbon meshes are commonly used to protect the radiators of sports and racing cars, but they are expensive.
The most popular material for making your own mesh is ordinary plastic. It is easy to work with, and its cost allows for some mistakes.
Materials and tools for tuning
To work, you will first need the mesh itself, which can be purchased at almost any hardware store. Chain-link mesh is perfect for these purposes, although other options are also acceptable. The material, be it plastic, aluminum, steel or even carbon, is at your discretion.
Chainlink mesh is well suited as a base
So, to work on the mesh you will need:
- the mesh itself;
- paper;
- ordinary scissors and metal tools;
- metal cutters;
- pencil and marker.
DIY creation
All your further actions depend on the shape of the radiator grille. If it is fairly even, with relatively right angles and clear lines, you just need to measure the length and width of the lattice, and then cut the mesh in accordance with these parameters. However, manufacturing becomes significantly more complicated if the part has a complex shape with a large number of bends or sharp corners.
In order to make a pattern, you will need to do the following:
- Attach a sheet of paper (or glued sheets) to the radiator grille. Press firmly so that you can clearly see its shape, and then trace along the outline.
- Cut out the resulting shape from paper.
- Attach the pattern to the mesh and cut it out. If you are going to install the mesh on the outside of the grate, be sure to leave allowances of about 0.5 cm on all sides.
- Use pliers to remove all excess.
The process of making a protective mesh in the photo
Cut out a pattern from paper that matches the shape and size of the radiator grill Cut the mesh according to the pattern Cut off all excess and your mesh is ready
If the mesh is too fine-mesh and soft, you can use a second mesh with larger cells as a frame. Cut out the desired shape using the same principle, and then connect both parts.
Your mesh is ready. Now all that remains is to paint it and install it on the grill.
How to install a protective mesh on a radiator with your own hands
The radiator grille increases the service life of the engine. Provides protection of the cooling system from mechanical damage. In addition, this element is a visual expression of the character of the car and its owner, being part of the car’s design.
The grille traps large objects, but due to its design features it allows small debris to pass through. To prevent small debris and insects from entering the vehicle systems, an additional filter element is installed.
Find out the cost of installing a protective mesh on a radiator online in 3 minutes
Don't waste your time - use the Uremont search and get offers from nearby services with specific prices!
How to install an insect screen on a radiator grille
Such spare parts are made from chrome or stainless steel, polymers (for example, polypropylene) and non-ferrous metals (brass, copper, etc.) Various technologies are used to manufacture products:
- welded (volumetric effect);
- woven (wire woven like threads in fabric);
- twisted (the shape of a honeycomb - special equipment is required for production);
- cast (used for the manufacture of spare parts from polymer);
- expanded metal (slots are cut out on a sheet of metal using a press);
- “chain-link” (pieces of wire are intertwined using a certain method).
When installing the mesh on the radiator, pre-treatment of the edges is necessary. Otherwise, there is a risk of damaging the bumper and body elements. For additional cable insulation is glued to the perimeter protection.
Installing a mesh on the radiator grille - choosing color and material
Aluminum is a universal option if it is made with “perforation”. It can be chrome plated, painted and bent to give the desired shape. This metal withstands mechanical and chemical influences well, and if dents appear, it will allow you to return to its original shape without removing the protective screen.
Non-ferrous metals are higher in cost, but they also look “more expensive”. With use, it acquires a pleasant “aging” effect. If this is not desired, these materials can be refinished with wire brushing. One of the pleasant properties is that they are resistant to rust.
If you decide to install the radiator mesh yourself, the ideal choice is polymer products. The advantages of this choice are described below:
- lends itself well to cutting with scissors or a hacksaw;
- the edge does not need to be further processed;
- the material holds its shape stably;
- polyurethane tolerates UV rays, temperature changes and water well.
The disadvantages include low strength (a stone when driving at speed can pierce the part).
Chrome parts are popular in tuning centers. Black specimens also look impressive. Brass and copper options are suitable as a solution only for some body colors. You can paint the part in the main shade of the car or choose a contrasting solution - the choice is up to the car owner.
Installing a radiator protective mesh - technology
When choosing a mesh, give preference to mesh sizes in the range of 0.25 and 0.5 cm. Such parameters will allow air to penetrate inside the car, but will serve as an effective barrier for debris, insects and small stones.
External installation allows you to “pump up” the exterior of the car. When placing the element from the inside, you may need to remove the bumper (for some car models this is a labor-intensive manipulation). If you cannot remove the bumper, look on the inside for fasteners (or alternative elements) for mounting the mesh.
Installing a protective mesh on the radiator grille
If there is a manufacturer's nameplate in the middle of the grille, it must be removed. Recently, not monolithic options, but composite ones have become more common. One part is attached to the place provided for this, the second - in the bumper area.
You can install the mesh on the radiator grill using the following algorithm:
- determine the required screen geometry (to create a template, thick paper is often used, which is applied to the car to draw the outline with a pencil);
- think through holes for parking cameras (if necessary);
- using metal scissors, cut a piece of the desired shape from the roll;
- the sharp edges of the “cut” are covered with a PVC tube from the insulating wires (the internal diameter of the future casing must coincide with the same external parameter of the wire);
- fasten the resulting spare part.
Install a radiator protective mesh - mounting methods
There are several options that can withstand wind loads well. The most popular of them are self-tapping screws. To increase the contact area, large washers are used. The screws are heated before installation (for example, with a household hair dryer). Fixing with clamps is a good alternative to self-tapping screws (a simple method - does not require special tools). When installing, it is important to select the elements exactly in the color of the mesh, and pull them out only along the inside. Fishing line is used only in a desperate situation (when other methods are not available). Other mounting options for installing a radiator protection mesh:
- fusing (the metal at the edges is heated very much and, until it cools down, is pressed into the plastic);
- gluing (using a gun to evenly cover the perimeter of the product with adhesive);
- “fitting” onto the holders (if there are standard fasteners, just snap the holders into the seat).
Positive points
There is a healthy grain in such improvement of the car, especially if in the summer you often move along the highway, from one city to another. The thing is that modern cars have large radiators (which can extend far down) and double grilles that are supposed to protect them. One is mounted between the headlights, but many manufacturers now build the second into the lower part of the bumper.
Grilles are supposed to protect - but they don’t! And why? This is because now they often carry purely design solutions; there is a large cell where not just a fly, but a really large stone from under the wheels of the car in front will fly.
All this can really cause damage to the surface of the radiator; it’s certainly difficult to break through, but it’s easy to get clogged with flies or fluff. And here the decision to fix the protective mesh is very justified, because all the insect fluff and other delights of our roads will settle on it. And you can easily wash it all off at the nearest sink.
What is the mesh for? Is it possible to install it yourself?
If you do the work yourself, the costs are always lower, since you don’t have to pay for what you do with your own hands. The mesh can be selected with small or large cells, depending on what you want to achieve:
- If it is made of hard material, it will protect well from stones and branches.
- With a small cell, it will be difficult for air to get to the radiator, which will not be very good, since the system requires not only oxygen for proper operation, but also additional cooling in the form of air flow.
- A fine mesh is more relevant if you need to protect your car from insects, but then it is better to use a soft material, for example, a regular mesh that is placed on windows. It is short-lived, breaks quickly enough, fades in the sun, becomes fragile, but is inexpensive and does not interfere with the passage of air to the necessary parts.
The photo shows a stuck insect (bumblebee)
There are even more stuck insects at the bottom of the radiator grille
Additional mesh for the radiator: pros and cons
Advantages of installing additional grids on the radiator:
They reliably protect the metal elements of the radiator from stones and other solid objects (which can freely penetrate through the rather large holes of the standard grilles) flying out from under the wheels of vehicles moving in front of your car.
The entry of dust, fluff, insects, sand, small leaves, grass and other debris into the intercellular space of the radiator significantly impairs the efficiency of the engine cooling system. Installing additional protective elements relieves the motorist from the listed troubles. And cleaning and rinsing the mesh is much easier than cleaning the radiator itself.
These decorative accessories improve the appearance of the car, giving it individuality and exclusivity.
Opponents of installing an additional protective mesh on the radiator grille talk about the following negative (albeit very ambiguous) points that arise after its installation:
- About reducing the aerodynamics of radiator airflow. Allegedly, the factory specialists thought through everything when designing the car, and a decrease in air flow can only lead to a deterioration in the car’s performance. However, rarely does anyone install additional meshes with a cell size of less than 5X5 mm (and this is unlikely to significantly affect the natural airflow of the radiator when the car is moving). It’s not for nothing that such protective devices are produced by studios that specialize in tuning expensive Porsche, Maybach or Bentley models (and they won’t “hang” additional “things” on a car without preliminary testing).
- About turning on the fan more often when parked for a long time in a traffic jam (especially in hot weather). However, when the car is not moving, natural cooling of the radiator does not occur at all. And the mesh certainly cannot interfere with the operation of the fan (drawing air through small cells).
Grid in tuning
The mesh plays an important role in tuning a car bumper. In addition to protection, it gives the vehicle a stylish and unusual look. The most popular use is aluminum mesh. It is not susceptible to corrosion and will decorate the car. Also, an alternative option may be to use a brass accessory. Such a mesh will reliably protect the radiator and decorate the car.
A protective mesh in the bumper of a vehicle is a necessary accessory that protects the car radiator from foreign objects and large amounts of dust. In addition, the part has high aesthetic qualities, which allows it to be used as a vehicle tuning element. The mesh can be purchased ready-made, or you can make it yourself. The second method is more universal, since everything is limited only by the motorist’s imagination.
Why do you need a mesh in the bumper?
A bumper mesh for a car protects the radiator and engine from debris. Ensuring protection of the cooling system is relevant for Russia. European roads are in good condition and it is difficult to find rocks, rubble or construction debris on them. In Russia, these components are found everywhere. In addition, dust also negatively affects the operation of the cooling system of a car engine. Therefore, to protect against insects and debris that can subsequently damage the vehicle, a protective mesh is used.
Important! During the cold season, it is recommended to use winter bumper grille caps. They are made in the form of a monolithic plastic structure that follows the shape of the ventilation hole
This device will allow the engine to warm up faster and cool down more slowly during short stops.