Replacing broken tail lights doesn't always mean you need to rush to the auto repair shop. It's actually a pretty simple job that you can do with some basic tools and some patience in just 3 steps.
Finding a replacement tail light is relatively easy. Most auto parts companies sell inexpensive original equipment parts. Likewise, many auto dealers have easy-to-navigate websites that sell parts at discounted prices. If you're not afraid to buy a part not made by your car's manufacturer, make sure the seller lists it as a contract (or certified) part. A certified part is guaranteed to fit and perform the same as the original, but usually costs an order of magnitude less.
How to remove a taillight with your own hands
Depending on your vehicle model, removing the taillight may be difficult.
To carry out the replacement, you need to remove the bumper or simply lift the hood. In this article we will talk in detail about how to remove a taillight with your own hands. I want to say right away, so as not to be corrected by all the smart readers, I know perfectly well what a flashlight is and what a headlight is, due to the fact that we have a very rich Russian language and not everyone knows how to speak it fully, many when they try to repair a car with your own hands, in the Yandex search they type exactly “How to remove a taillight with your own hands”, or more correctly, of course, “How to remove a taillight with your own hands”, and my article was written just for that small percentage of people who want to remove the rear one in their car "headlight"
How to change rear lamps on a Jetta 6
Removing the rear light
You should open the trunk and go to the corner in which the flashlight with the burnt out lamp is located. Remove the panel and unscrew the plastic screw securing the lamp. Then carefully remove the flashlight from its seat and disconnect the power connector.
Then turn the light over, find the two plastic latches and squeeze them. Pull the bracket with lamps out of the housing.
Replacing the brake/marker lamp for Jetta 6
The brake/parking light bulb is located in the bracket next to the “P21W/5W” label. You can change the lamp by pressing and turning it a quarter turn counterclockwise. Then install a new lamp and turn it clockwise.
Replacing a Jetta 6 turn signal lamp
Turn signal lamp o. You need to turn the lamp counterclockwise, remove the old lamp, and install the new one in the reverse order.
Installation of Jetta 6 flashlight
Install the bracket with the lamps into the lamp body until it clicks. Connect the power connector, install the light in the seat and press the headlight. Tighten the fastening screw in the corner of the trunk and return the panel covering the screw to its place.
Removing the additional Jetta 6 headlamp unit
The Jetta 6 light consists of two parts, one of which is located on the trunk lid. It is necessary to remove the light unit on the cover to replace it, or to change the reverse lamps and parking lights.
To do this, open the trunk lid and remove the trim by prying it off with a screwdriver. Then unscrew a couple of nuts under the trim using a 10mm socket or a screwdriver. Remove the flashlight from its seat and disconnect the power connector.
Causes of taillight failure
Failure of one or both rear lights is a common problem that occurs on Peugeot cars. The reasons can be very different, ranging from mechanical damage resulting from a collision with another car, from a stone hitting the headlight at high speed.
There are also more complex reasons. Starting with wiring problems and banal wear of parts. As a rule, in Peugeot 308 and 408 the negative wire in the taillight connector very often oxidizes; in this case, the connector and the taillight board should be replaced.
The headlight also needs to be removed to simply replace the light bulb.
A car enthusiast can independently fix this problem by replacing the taillight with his own hands. Minor repairs do not require a lift or special equipment, so the motorist can easily save on visiting a service center and make the replacement himself.
Typical malfunctions of rear lights
Faulty rear lights can cause an accident, as road users driving behind do not know what maneuver the driver of the front car will make. Therefore, they should be eliminated immediately.
Lighting devices have similar faults:
- the light bulb burned out;
- fuse is blown;
- lack of food;
- contacts are oxidized or burnt;
- broken wiring;
- lack of mass.
If you have problems with lighting, you should check every element included in the network, starting with light bulbs and fuses.
Step-by-step instructions for removing a taillight with your own hands
The procedure for removing a car's taillight is not very complicated. It can be produced without specialized equipment. We recommend sequentially performing the following steps:
- Lift the trunk lid. After this, find under the cover on the side two wings or two 10 nuts. You need to unscrew them, and then remove the taillight.
- When removing the headlight, pull it carefully towards you; the edges of the headlight are usually fastened with latches.
- Next, you need to unfasten the electrical connector.
- To replace the light bulb you will need to remove the board.
- Place the parts in a special container so they won’t get dirty or get lost.
Interesting: This kind of work must be done very carefully. If the mechanical impact is too strong, the headlight will simply break. Then you will need to replace the headlight completely or have it repaired in a workshop.
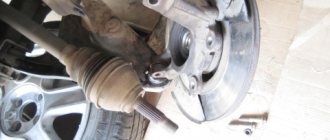
On some Peugeot models, removal of the rear bumper is required to remove the taillight.
- Once the bumper is removed, you will have access to the headlights from both the top and bottom. Now you can start replacing it. First, take a wrench of the appropriate size and unscrew all the bolts. Then grab the headlight, making sure that all the bolts holding it are removed, and smoothly pull the part towards you. It is important to pull it carefully, without jerking movements, so as not to damage anything. When you remove it from the car body, disconnect all electrical connectors connecting it to the car wiring.
Helpful advice: If you are afraid that after disconnecting you will not be able to remember how to connect the headlight, then sketch it or take a photo with your phone before disconnecting. Then the assembly process will go quickly and will not cause any hassle.
- Depending on the model, the headlight may also have a connector responsible for the turn signal. Then you need to pick up the metal bracket with a screwdriver and simply pull it up. Only after this can you completely remove the non-working or broken headlight and replace it with a new one.
- To replace it, you need to perform all the same steps in reverse order. Connect the wiring, insert the headlight and use the bolts to put the bumper in place.
If you have no experience in carrying out repair work, such a replacement may take several hours, but an experienced car enthusiast can do it in half an hour or less. It is important to disassemble carefully and not lose important bolts and screws.
In what cases is it necessary to change the brake light bulb?
Replacing the brake light bulb is usually necessary if it has burned out.
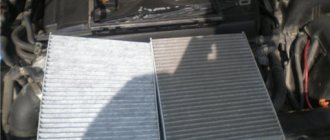
Old and new light bulbs
Like any breakdown, it happens at the most crucial moment. It is possible that the light bulb works, but not entirely correctly. For example, it is designed to serve as side lights and a brake light. Sometimes situations arise when the lamp copes with the first function completely, but it does not work as a brake light. Sometimes the light bulbs do not light up as they should, but only blink. This indicates poor contact.
Before you start replacing the lamp, you should make sure that this is the reason why the rear brake light does not light up.
The rear lights may not light up for the following reasons:
- The brake light fuse is faulty: the contacts have oxidized or it has burned out;
- the lamp burned out;
- malfunctions in the rear stop switch mechanism;
- the contacts in the socket where the light bulb is screwed in have oxidized;
- electrical wiring is damaged.
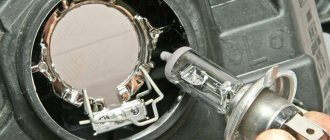
Replacing a standard element with an LED one
We are considering the option when a light bulb burns out. To decide to replace the light bulb, you need to make sure that this is the cause. To do this, you can use working lights from repeaters or other car devices. If, having screwed them in instead of the burnt ones, the signals come on when you press the brake pedal, then you need to change the bulbs. If the brake light does not light up, then the cause needs to be looked for elsewhere.
In some car models, if one brake light bulb fails, the other one does not automatically light up. This should be taken into account when testing lamps.
There are situations when even working lighting elements are changed. This happens when a car is being tuned. At the factory, a simple incandescent lamp is installed as a brake light bulb. If a driver wants to modernize his car, he replaces the standard products with two-pin LED bulbs.
Regular and LED lamps
This is done because of the benefits that the driver receives as a result of the replacement:
- LED lights last longer, their operating time is 100 thousand hours (for a conventional one - 2 thousand hours);
- have improved light output;
- flare up instantly, in 70 nanoseconds, which increases the reaction time for the driver of a car moving behind;
- Thanks to the design, it has the best performance qualities.
If you decide to replace the rear brake light bulb, then this operation can be performed at home (video author: Dmitry Busse).
Consequences of driving with a damaged taillight
The rules of the road clearly describe what awaits a driver who drives on the roads with a broken taillight. According to the standards, without receiving a fine, the driver can move in this form only when going to a car service center to repair the breakdown. It is also permissible to drive vehicles that have recently been involved in an accident and have not yet had time to replace a part.
Unauthorized driving on roads with non-working or physically broken rear lights can result in a fine for the motorist. Its value is 100 rubles. Therefore, it is not recommended to drive around the city with broken or non-functioning taillights, especially at night. The driver should fix the breakdown himself or contact a car service. We hope that the tips in this article will help you fix the problem yourself and get your car back on the road.
Operations for removing the rear light (headlight) of the Lada Granta
1. Disconnect the wire from the negative terminal of the battery.2. Fold back the trunk trim behind the taillight. (kept on with Velcro)
3. Squeeze the pad retainer...
4. ...and disconnect the wiring harness block from the rear light.
5. Unscrew the three nuts securing the rear light (headlight)
This is how the nuts for securing the rear light of the Lada Grant are located.
6. Pull back and, sliding the guide from the holder on the body, remove the rear light (headlight). Install the rear light in the reverse order of removal.
When installing the rear light of a Lada Granta, it is better to use sealant to seal the holes through which the mounting studs of the light (headlight) pass.
Removing the rear lights on a Lada Granta car is done to replace them in case of mechanical damage or when the presence of the lights will interfere with various repair and restoration work. To perform dismantling work, you will need an eight socket socket. Do the following sequence of actions:
- De-energize the vehicle by disconnecting the negative terminal from the battery.
- Bend over the decorative trim behind the rear light and press out the plastic connector retainer with the wires.
- Disconnect the connector with wires from the flashlight.
- Next, use a socket to unscrew the three nuts securing the housing to the car body.
- By pulling the light towards you and sliding the guide from the holder on the body, remove it.
- Make any necessary repairs or replacements, then perform installation in reverse order.
At this point, the repair work to remove the rear light on the Lada Granta (VAZ 2190) has been completed.
Car : Lada Granta. Asks : Lisa.
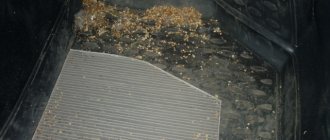
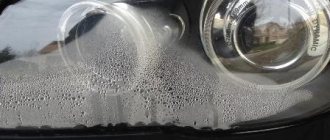
I bought myself a Lada Granta car. Overall completely satisfied with it. I haven't had to deal with any problems yet. But lately I have encountered a problem with the rear lights fogging up.
Step by step guide to disassembly and replacement
Disassembly of the optics may be necessary if the bulbs in the rear lights need to be replaced.
To do this, perform the following steps:
- two fastening nuts are unscrewed;
- then remove the headlight from the socket;
- by pressing the latches, remove the board and replace the old light bulbs with new ones;
- We perform assembly in reverse order.
If the damage is minor, the rear light glass can be repaired.
Photo gallery “Replacing light bulbs”
Eliminating the causes of water appearance
Removing fogging of taillights or headlights:
- The cables are disconnected and the corrector hose is disconnected.
- Remove the headlight, thoroughly clean the surfaces, check the technical holes and breathers.
- Be sure to check the O-rings that are located in the connectors and sockets of the lamps - any rings that are even slightly damaged must be replaced immediately.
- Carefully examine the surface for the formation of cracks. Small ones can be sealed with sealant.
- Check the seam for tightness. It is necessary to replace the seal, it is advisable to go around the sealant in a circle.
- If a lot of water collects in the housing or the headlight on the Granta Liftback constantly sweats heavily, some car owners drill a small hole in the glass at the bottom. This often helps, but it is not the best solution to the problem.
Only special sealants can withstand such operational loads, have good adhesion, and glue reliably. The compositions are very durable and elastic, do not allow water to pass through, can withstand high and low temperatures, the negative influence of petroleum products, and vibration.
At the same time, polyurethane sealants cannot be used for gluing joints and dismountable elements, and anaerobic sealants are intended for treating relatively flat surfaces. Can be used to seal shallow cracks.
Expert answer
I don’t quite understand what you meant with the phrase “condensation inside the pair.”
Increased condensation (I emphasize the word increased) in the rear dimensions could only appear as a result of their leakage. The seal could be broken if you lightly “bumped” something with the rear bumper. You might not have noticed this, for example, when the car is very dirty and you hit an obstacle while driving in reverse, then there might not be any marks left on the bumper.
Also, as a result of natural wear and tear, microcracks could appear in the glass or connecting seams.
Also, the appearance of condensation in the rear dimensions is a disease of the Lada Granta. Only for some it is expressed more strongly, and for others less.
There is no exact recommendation here. I've seen many repairs ranging from disassembling and reassembling the rear marker with new sealant, and someone drilling additional holes in the marker.
Also check for condensation in the trunk niche; if there is condensation there, then your ventilation valves are clogged. In this case, the air inside the trunk does not circulate, and this causes the dimensions to fog up more.
How to replace brake light, tail light and turn signal bulbs
Renault Sandero uses exactly the same lamps as Renault Logan, and the process of replacing lamps in the rear lights is just as simple as in Logan. In order to replace the taillight and brake light bulbs, you will need to remove the headlight. It can be removed very easily, and even a novice car owner can cope with replacing lamps.
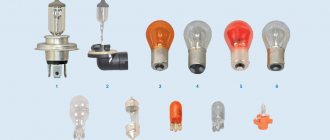
What lamps are installed
The rear light of Renault Sandero uses only 3 lamps - brake light, turn signal and reverse lamp. These lamps can be bought at any store, so there should be no problems finding and replacing them.
Brake light bulb P21/5W 12v
- PHILIPS 12V P21/5W (P-12499) price from 45 rub.
- PHILIPS 12V P21/5W LONGLIFE ECO VISION (3x resource) (P-12499LLECOCP) price from 60 rub.
- BOSCH 12V P21/5W Day Time Long Live (1987302282) price from 60 rubles increased service life
- BOSCH 12V P21/5W Pure Light (1987302202) price from 45 RUR
- KOITO 12V P21/5W (4524) price from 50 rub.
- NARVA 12V P21/5W (N-17916) price from 30 rub.
- OSRAM 12V P21/5W (O-7528) price from 45 rub.
- GE 12V P21/5W (1077) price from 45 rub.
- MTF LED. 12V P21/5W (MP215WW) color white, price from 850 rubles per piece (1 year warranty)
- MTF LED. 12V P21/5W (MP215WR) color red, price from 850 RUR Warranty also 1 year
- PHILIPS LED. 12V 21/5 - 8 diodes red (12836REDB1) price from 650 rubles per piece (1 year warranty)
Brake light bulb P21W 12v
- PHILIPS 12V P21W P-12498 price from 40 rub.
- KOITO 12V P21W (BA15s) 4514 price from 50 rub.
- BOSCH 12V P21W Pure Light 1987301017 price from 35 rub.
- NARVA 12V P21W 78165 price from 25 rub.
- Osram 12V 21W 7506 price from 35 rub.
- MTF LED. 12V P21W lens 360 color white price from 850 RUR
- MTF LED. 12V P21W white MP21WW price from 850 RUR pcs
Turn signal lamp PY21W 12v
- PHILIPS 12V PY21W 12496NACP price from 65 rub.
- BOSCH 12V PY21W amber Pure Light 1987302213 price from 50 RUR
- OSRAM 12V PY21W amber O-7507 price from 60 RUR
LED lamps should be installed in the turn indicators either all at once, or by replacing the turn relay with a special one for LEDs. Otherwise, if you install only the rear LED turn signal lamps, they will blink frequently, as if the lamp has burned out.
Replacing lamps in the rear lights of Sandero
Open the trunk lid and unscrew the plastic headlight clamp on the leg, as shown in the figure.
We remove the headlight from the car body by pressing the latch and disconnecting the wire block from the headlight
Next, remove the lamp gasket
Press the 3 latches of the board and pull it out of the lantern
Now all that remains is to replace the lamps: by pressing the lamp, turn it counterclockwise and pull it out of the socket. We insert new lamps and reassemble in the reverse order.
When installing LED brake or reverse lamps, after installing the lamps, connect the block and check the functionality of the lamps.
Recommendations for replacing lamps
In reverse, you can install either regular LED lamps or Chinese analogues with a lens. The light from such lamps will be much brighter. This is especially true for those who have poor vision and the lighting of standard rear lamps is not enough.
If, during removal, you find that, for example, the brake light or reverse lamp is on, but has already turned black, it is better to replace such a lamp, as it will soon fail.
That's all, we hope that our instructions for replacing lamps in the rear light of Renault Sandero helped you, if you have any questions, you can ask them in the comments below.
How to remove a headlight on a VAZ 2110, 2111, 2112; dismantling and installing a headlight unit
If there is a need to remove the headlight . for example to replace headlight glass. then this article is for you.
The main difficulty here is to remove the decorative trim - the “eyelash” - in order to get to the lower nut of the headlight assembly. On VAZ models of the tenth family, the front headlight unit can be simply removed by slightly loosening the bumper fastening. This process is not as complicated as it seems at first glance. It is worth remembering that plastic is very fragile in the cold, so this procedure must be carried out in a warm room.
Feet
Dismantling
The main difference in the design of the crossover stops is the need to dismantle them when replacing lamps.
To do this, first open the fifth door, after which 2 self-tapping screws are unscrewed, which fix the element on the side in the door opening. Then, in the trunk, on the back side of the lamp, the decorative trim is removed, which blocks access to it.
This will allow you to unscrew the nut securing the stop. In this case, a wrench is not required, since it is a wing nut. It is made of plastic and screws onto a special threaded rod.
Next, according to the instructions, you just need to slide the flashlight back and remove it. However, in reality everything is a little more complicated. The attachment points are designed in such a way that they are at an angle of 90° to each other. Therefore, it is necessary to grasp the far edge of the flashlight and press slightly on it, disengaging the latch, then slide the element back and remove it.
How to disassemble a VAZ 2110 headlight
The design of dozens of headlights can vary greatly depending on the manufacturer (see types of headlights). Disassembly of the headlight will be shown on the two most popular models: Kirzhach (Avtosvet Plant) and Bosch.
Headlights VAZ 2110 Kirzhach
To remove the headlight glass, carefully insert a flat screwdriver into the corner of the glass, and then insert a utility knife into the resulting gap and cut off the sealant step by step, helping with the screwdriver.
If the sealant does not yield, then it needs to be heated using a hairdryer; this is described in more detail in the video:
After the headlight glass is removed, remove the headlight reflector by unscrewing three bolts:
To remove the board with the reflector and module from the headlight, remove the pressure spring through the hole in the hydraulic corrector. Then we tighten the adjustment as much as possible and slip in the screwdriver handle, after which we begin to unscrew first one adjustment screw, then the other. We remove the board from the headlight.
How to properly remove a headlight from a VAZ-2110 car
If the car owner needs to replace a burnt-out light bulb in the headlights of the car, there is no need to disassemble the unit itself. But if you need to upgrade the lighting fixtures yourself or remove the rear windows, then you cannot do without disassembling the headlights. In addition, the dismantling procedure is sometimes required if it is necessary to replace the hydraulic corrector - a convenient device that allows you to use a lever to adjust the level of light flux directly from the inside of your own car.
Knowing the simple rules that will tell you how to remove the headlight on a VAZ-2110 step by step, you will not have to go to a service station. You can handle the work yourself.
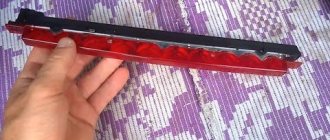
Installing an additional rear brake light on a car
First, you need to decide on the location of the future brake light, as well as purchase all the necessary components. The most common places for attaching a brake light are the car's spoiler and rear window. It is immediately worth considering that the signal should not be blocked by any objects and should be visible at any height of the car moving behind.
The most difficult installation method is to attach the brake light to the spoiler. The fact is that many spoilers are made hollow, which means that it is impossible to stretch all the necessary wires inside them. Another thing is to install the signal under the rear window, where the wires can easily be hidden under the rear parcel shelf of the car. However, we did not mention one more location of the brake light - the rear bumper. The disadvantage of this location is that the bumper can get dirty very quickly, making the signal inaudible.
Typical signs of a lighting system malfunction
The above signs indicate damage, deformation, or a break in the electrical circuit of the lighting system. To troubleshoot problems, you will need comprehensive diagnostics, identification of the breakdown, and subsequent replacement of elements. You can do this either independently or by contacting a service center for help from specialists.
how to replace the additional brake light bulb in Renault Logan
Replacing light bulbs, types of lamps Do not touch the glass part of the lamp, as skin oil will significantly shorten the life of the lamp. If you accidentally touch the glass surface of the lamp, you should carefully wipe it with a cloth soaked in methyl alcohol and then dry it before installing it. Warning! Allow the lamp to cool completely before proceeding with the removal procedure if the headlights have just been turned on. Always use a paper towel or dry, clean rag when installing a new lamp to avoid injury if the lamp is damaged and to increase lamp life. Remove cover A. Disconnect light bulb connector 1.
Disconnect the spring clip 4 and remove the light bulb. Bulb type: H4. Turn socket 2 a quarter turn to remove the bulb. Bulb type: W5W. Turn socket 3 a quarter turn to remove the bulb. Bulb type: pear-shaped lamp with bayonet base 21W. Bulb type: PY21W. The headlights are equipped with polycarbonate glass. Use a soft cloth or cotton wool for cleaning. If stains cannot be cleaned dry, lightly dampen a soft cloth (or cotton wool) in soapy water and wipe the dirty areas, then wipe again with a soft, damp cloth or cotton wool. Finish cleaning by wiping gently with a soft, dry cloth.
How to replace bulbs in the rear lights of Renault Logan
The use of detergents containing alcohol is prohibited. Unscrew screws 1 and remove the rear light unit. Remove the foam 2. Disconnect the socket by pressing the lock 3. 4 Parking light and brake light. Pear-shaped light bulb with bayonet base and two filaments P 21/5 W. 5 Direction indicator. The bulb is orange, pear-shaped with a bayonet socket P 21 W. 6 Reversing light. Pear-shaped light bulb with bayonet base P 21W. Fog lamp. Pear-shaped light bulb with bayonet base P 21W. The third brake light 7 is accessible through the luggage compartment. Turn socket 8 a quarter turn to remove the bulb.
Bulb type: P 21W. Release chuck 9 using a tool such as a flathead screwdriver. Remove the reflector to access bulb 10. Bulb type: W5W. How to replace lamps in additional brake signal Renault Sandero and Sandero Stepway An additional brake signal on Renault Sandero and Sandero Stepway is located on the rear trunk lid. In order to replace the lamp, you will need no more than 10 minutes of free time and only one flat-head screwdriver. It is worth noting that the lamps in the add. The brake light burns out extremely rarely; in my 3 years of using the car it burned out only once. The additional brake light located on the trunk lid of Renault Sandero has a 12v W16W lamp installed. This lamp is used on many Korean cars as reverse lamps or tail lights.
Also, in addition to the conventional incandescent lamps mentioned above, you can install brighter LED lamps. Both lamps with a W16W base and lamps with a W5W base are suitable. These lamps have the same base, but different power. What will LED lamps do? Brighter light, visibility of the brake light will improve. The service life of LED lamps is longer than that of incandescent lamps (if you purchase high-quality diodes). LED lamps consume less power, unlike incandescent lamps, and they also heat up less.
Instructions for replacing lamps in the add. brake light Open the trunk lid and see an additional lamp. Next, press the socket lock, turn the socket clockwise and pull it out of the grooves. We take out the old lamp from the socket, install a new one and reassemble it in the reverse order. When installing LED lamps, you need to guess the polarity, so after inserting the lamp, ask an assistant or press the brake pedal yourself and see if the installed LED lamp lights up. If not, turn it over and install it again, now it will definitely shine. Next, all that remains is to remove the brake light. Assembly is carried out in reverse order.