How to connect a rear view camera to a navigator yourself
Due to the fact that every year the flow of cars on the streets is becoming more crowded, and parking is becoming more and more difficult (especially for women), it is very important to clearly see the space around the car. Sometimes there are situations when some details simply cannot be seen using mirrors. This can result in damage to the car and unnecessary material costs for its repair. The rear view camera is designed to provide maximum visibility. In budget cars it is most often not provided in the basic configurations, but it can easily be found in any hardware store.
Motorists will dig and install it themselves, often connecting it to a navigator for greater convenience. The advantages of such a connection are obvious. This means saving money on the purchase of an additional monitor, ergonomics and ease of use. Connecting a rear view camera to a navigator requires basic electrical installation skills and experience in disassembling some interior elements.
Typical mistakes when connecting a rear view camera
The cigarette lighter itself gets its brown negative wire from the same bolt on the body.
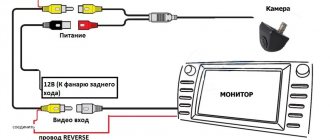
Diagram of connecting the camera to the car radio display Connecting to the radio In order for the image to be displayed on the car radio monitor when turned on, you need to lay the yellow wire through the interior and secure it with electrical tape. The camera has also proven itself in traffic jams and in heavy traffic as a means of additionally preventing collisions due to an incorrectly chosen distance by a vehicle coming from behind.
There are a great variety of rear view camera models. Wired video cameras are universal, they can be connected to all types of monitors.
The camera is indispensable in conditions of limited visibility or when there is little space for maneuvers. On average, the cost of KZV on the market is as follows: 1.
Lamp fault monitoring system
Therefore, a simple delay is set to turn off the camera's power. Installation methods: in the standard license plate light. After assembling the entire system, carefully insulate the power wires, check that you have not mixed up anything in the connection system, and check the functionality of the devices.
The disadvantage of this method is possible interference that will not allow the image from the camera to be clearly displayed. If you still bought a camera with a different signal standard, use a converter. Rear view camera pinout for 3 wires Rear view camera pinout for 4 wires Rear view camera pinout for 5 wires Rear view camera pinout for 6 wires Here is the same kitchen as for 3, 4, 5 wires, the masses are simply displayed separately on each line. Signal transmission method.
Post navigation
Even few standard systems are equipped with such a useful function as camera washing. Connecting a rear view camera with your own hands requires basic electrical installation skills and experience in disassembling several interior and body elements. For example, our range for this purpose includes voltage converters of 5, 6 and 7.5 V, respectively. We install the camera in the backlight socket and connect the camera power to the reversing light. Now you know everything about properly connecting a rear view camera.
The standard length of a meter for a video cable and a meter for a power cable may not be enough to connect the camera to your car model. When the rear camera is turned off, the relay is switched off and sent to the button through contact 87a plus. Stick to these rules and you will have a very useful and stable assistant. How to Install REVERSE VIEW CAMERA Detailed Instructions
Installation
There is an opinion among a large number of motorists that installing this device is a very expensive and complicated procedure. After all, you need to arrange a place to install the monitor and spend money on the necessary devices. Installation becomes definitely easier if, instead of an additional monitor, you use a regular navigator, which is installed as standard in almost all modern cars, or one that you can buy and install yourself.
The camera turns on when you start moving backwards, allowing you to clearly see everything that is happening in the blind spot behind the car. Main advantages:
- even in the dark, the driver will be able to see the obstacle in time, thanks to this, driving safety increases;
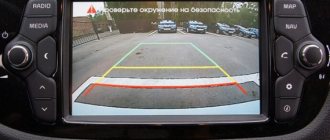
- the cameras are equipped with markings that allow parking a few centimeters from the obstacle;
- A high-resolution color image is transmitted to the monitor;
- complete absence of dead zones;
- The minimum viewing angle is 120 degrees, so the driver can confidently navigate the space.
Installing a rear view camera using wires
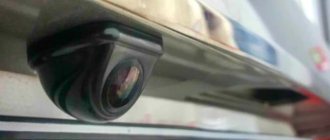
You can independently connect a rear view camera to the navigator only if it has an AVI input socket. Also, in order to connect this equipment together, you will need an adapter from the incoming jack to an RCA connector (usually included in the kit). The camera is mainly installed in the license plate frame.
In order to screw it on, you can use self-tapping screws and plastic clips. After installation, all removed elements of the body and interior are installed in their places.
It is also recommended to read the article on how to choose a DVR.
After installing the device in the selected location, through the holes that are intended for the license plate light bulbs, the cable is laid into the car interior. To ensure that the camera only works when reverse gear is engaged, the wires are connected to the reverse light. After this, a cable is pulled through the cabin to the navigator. When connecting the video camera to the navigator, you must be very careful, since incorrect actions can lead to equipment or vehicle damage.
Connecting a wireless camera
This method of camera installation is distinguished by its ease, since there is no need to lay a cable to transmit the signal to the navigator. All information is received via a wireless channel.
The camera is mounted in a standard location and connected to the transmitter. The transmitter is connected using two wires. The black one is connected to the car body, and the red one is connected to the rear light power wire. The receiver from the camera is installed in the navigator body. One wire from the receiver goes to the USB connector, and the other to the AV input.
There is also another possible way to connect the camera to the navigator, namely via Bluetooth. This method has several disadvantages, including the high price of the equipment and the presence of interference if the car is located near towers or other transmission devices operating at a similar frequency.
Read how to file a traffic accident yourself here.
A rear view video camera, properly connected to the navigator, will be able to provide full visibility, the absence of blind spots when parking, and will not disturb the interior of the car. Installation and connection do not require much effort; anyone who has at least a little knowledge of technology will be able to complete the installation quickly and efficiently.
Connecting the camera to the navigator
Most often, such a car navigator should have a video input, or AV-in.
This will allow the device to receive an external video signal from a video player, DVR, rear view camera, TV tuner, and even an echo sounder. This will be especially convenient if the navigator has a large screen. In most cases, such navigators include a special AV cable, and all the cables and connecting wiring needed for connection are supplied with the external video camera when you purchase it in the store. There are video cameras for certain models of navigators, and there is universal equipment that is suitable for any device that has an AV input. Unlike car navigators, which have a built-in camera, for example, Garmin Nuvi or xDevice BlackBox 7 (they can act as video recorders - filming the car from the front), there are models where it is possible to connect a rear view camera, which is mounted in the license plate or bumper , which makes parking much easier when moving backwards.
Currently, models with wireless video cameras, consisting of a camera itself, a transmitter and a receiver, are very popular. With this connection, no cabling is required. Some models have a special cutter, which is used to make a hole into which the camera is then inserted.
Connecting the camera to the navigator is quite simple and does not require special skills. It is connected to a wireless transmitter, which, in turn, is connected with two wires: one (black or brown) to the car body, and the second (red) to the rear light power wire. Then the receiver from the video camera is inserted into the car navigator, from which two wires come out: to the USB connector and to the AV input.
You can also connect the video camera to the navigator using Bluetooth. The camera is connected to the on-board network and mounted in the rear of the car. And by connecting the camera to the reversing light, you will see a picture on the navigator as soon as you engage reverse gear.
Why is it necessary to combine a navigator with a camera?
Any driver knows how difficult it is to maneuver a car when moving in reverse. To make this task easier, automatic parking systems equipped with rear view cameras have been created. They have many advantages:
- They convey a clear color picture of everything that is happening behind the car.
- If there is a camera, the driver will not run into a dangerous obstacle: a pole, a stone, a wall, a high curb, and will not damage the car.
- Driving becomes safer, as the possibility of hitting small children or pets is eliminated.
- The driver will move in reverse much faster and more confidently.
This is not a complete list of situations when a rear view camera will be useful. But many car enthusiasts believe that installing this device is too complicated. After all, you will have to look for a place in the cabin for a rear view display, then look for a way to transmit a signal from the camera, spend money on the necessary components, etc.
But most of the technical difficulties disappear by themselves if, instead of a rear view display, a conventional car navigator with a video input (aka AV-IN) is used.
Such a device is found in almost every modern car today. And the signal can be transmitted to the navigator from a wireless rear view camera.
The advantages of this solution are obvious:
- Saving money (almost everyone has a navigator, and it is located in the most convenient place, in front of the driver’s eyes).
- Space saving (no need to install any additional displays on the dashboard).
- Convenience (the car navigator turns into a single media center of the car, the driver’s attention is not distracted by other devices, and therefore driving safety increases).
We will talk about ways to implement this scheme below.
Connecting the tablet
There is an original mounting idea for using a tablet as a monitor for a reverse camera. A nest is made for it on the back side of the sun visor (similar to the principle of a mirror near the passenger seat). This way the tablet does not block your view. Of course, the idea is only suitable for relatively small devices.
The idea of using an existing tablet is tempting, but difficult to implement and not with all devices. Particularly difficult with Android
" Let's first consider an easier option: you have a tablet with Windows installed. You can go in 3 ways.
- A webcam has been installed. It is connected via the USB connector. Of course, you will have to pull the cord across the entire cabin, but almost any model will be accepted. If the camera is already installed, but the drivers for it are not saved, the software can be easily found on the Internet;
- It costs a regular camera. In addition to the cable, you will need a TV tuner (such as a flash drive) with support for video input. Installation of the system due to its purchase will increase in cost by approximately 2 thousand rubles;
- Camera with WiFi
. On the one hand, it’s convenient: you don’t need to pull the network. On the other hand, it will initially be more expensive than other options. And the most important thing is the obligatory signal delay. Even if it’s literally for a split second, but it can’t be avoided. So you need to get used to parking slowly and carefully. In addition, if the parking lot is located near powerful sources (radio stations, high-voltage lines, etc.), the signal will be jammed. And finally, you will need to download and install the “RFK WIFI” program on the tablet.
Read more: Replacing the Priora handbrake without removing the seats
If you have Android, then you will need more different kinds of squats.
- The tablet must have a USB port;
- The video camera must cooperate voluntarily with Android devices. That is, you need to buy it personally for your tablet. Get ready to look: a rather scarce item;
- You will have to use a video server, install software that only works with GPS or a gyroscope (the G-sensor will not work).
Enthusiasts overcome all these problems. But more often people give up on such a difficult idea to implement and connect the camera, for example, to a car radio. Before you connect a rear view camera to a navigator or tablet, really evaluate your abilities in laying and setting up networks. If you are not confident in your abilities, it is better to turn to specialists: such a service costs about 1.5 thousand rubles, but everything will definitely work. And if your tablet is not compatible with the camera, they will tell you about it right away.
Some car owners practice combining different electronic devices. For example, they often connect a rear view camera to the navigator. Thus, car owners increase the safety and comfort of using their vehicles. To perform the installation yourself, you need to know about some of the nuances of the procedure and its purpose.
Installation options
Wired connection using the example of Digma DM500B
How to connect a wireless rear view camera
The sequence of actions is similar, except that you do not need to pull the camera wire to the navigator.
- The camera is installed above the room and connected to a wireless transmitter.
- The camera transmitter is mounted in any suitable place, for example, in the trunk of a car. It is connected using two wires. The black wire (ground) is connected to the car body, the red wire is connected to the rear light power wire. The diagram is given below.
The wireless transmitter will save you from the hassle of pulling a cable around the cabin
Video: How a connected system works
What you really need
The following configuration is also possible: a navigator with a wireless camera. However, we cannot recommend such a device to you. Of course it seems convenient - no wires and the ability to move the navigator freely. However, think about the fact that the video camera also requires a certain amount of electricity to operate. Very quickly you will get tired of replacing the batteries in it, and besides, they cost, albeit not so much, but noticeable money.
In general, navigators with a rear view camera have found their buyer and a market niche. They are very useful, especially for beginners who are not yet very confident in parking backwards. And besides, such a device can have a number of other functions - for example, there are already navigators in the form of a mirror, which are equipped with two built-in cameras and a radar detector that can warn you of danger and the threat of a fine.
Call us at +7 (495) 648-67-59 and +7 (800) 333-48-59 , and we will do everything to solve your problems and answer all questions regarding our products and the store. With us you will know for sure that you are making a profitable purchase, because we will offer you exactly what you need at the lowest price! Navigator-shop sells only certified equipment with free delivery!
Important point
If you decide to connect the device using a wired method, a problem may arise: after starting the engine, strong noise appears on the navigator screen, making it difficult to see. To eliminate them, you need to add a relay to the connection diagram. A relay from a VAZ car is suitable, for example, a relay from wipers or a fan. The connection diagram is given below.
The presence of a relay in this circuit will eliminate interference that interferes with the view
As you can see, there is nothing complicated in connecting a video camera to a navigator, and even a novice car enthusiast can cope with this task. The main thing you should pay attention to is the reliability of the contacts and insulation, since the above interference can also arise due to careless insulation of the power and ground wires.
Copywriter with five years of experience. (2 votes, average: 5 out of 5)
Why do you need to combine two devices?
Maneuvering in reverse can be difficult even for experienced drivers. For beginners, a navigator with a connected rear view camera (RVC) can be an extremely useful device. It has the following advantages:
- the driver will be able to perform maneuvers more freely and confidently when driving the car in reverse;
- when installing this combination, traffic safety increases because it allows you to avoid accidental collisions with pedestrians and animals;
- with KVZ, the risk of damage to motor vehicles as a result of a collision with lamp posts, fences, benches and other objects is reduced;
- The driver whose car has a camera + navigator system has the clearest possible image of the space behind.
Which navigators can you connect to?
The camcorder can be connected to navigation devices that are equipped with an AV-IN connector (video input) or have support for wireless connection of external image sources.
In the first case, the negative wire of the video camera is connected to the car body. The video output of the device requires an RCA connector at the end of the cable or an adapter that must be connected directly to the navigator or to a wireless radio transmitter. In the second case, the KVZ is connected to the navigator using a special radio transmitter.
In addition, there are now cameras on sale that are designed specifically for connecting to navigators.
To avoid mistakes, it is better to give preference to universal devices that can connect to any navigator with an AV connector.
How you connect the view camera to your navigation device depends on the type of connection.
Installation options
You can connect a video camera to the navigator in 2 ways - wired and wireless.
Wired connection
This technique will require the following parts:
- fasteners;
- RCA adapter, which will be installed at the input of the navigation device;
- cables with output connectors;
- KZV.
The wired connection type involves the following stages:
- The rearview camera is firmly fixed above the license plates using self-tapping screws, near the lighting elements.
- A wire is passed through the backlight hole into the interior.
- The power cable is connected to the wire that supplies power to the rear brake lights.
- The ground cable is connected to the car body anywhere.
- After this, you need to check the reliability of the connected electrical wiring and fastening.
At the final stage, you need to connect the video camera wire to the navigator, and connect the other wire of the device to the car cigarette lighter.
In this case, the KVZ will turn on only when the car is driving backwards, and the image from it will be displayed on the display of the navigation equipment.
Wireless connection
Motorists note that the wireless connection method is the simplest.
To do this, we attach the KVZ above the license plate, after which we connect the device to a wireless radio transmitter.
There are 2 cables on the transmitter. The first (ground) is attached to the car body, the second (power) is connected to the power cables of the brake lights.
Navigators with a rear view camera - double functionality for the price of one device!
Is it possible to connect a rear view camera to the navigator? What are the advantages and disadvantages of such a solution? What should be the connection diagram for the rear view camera to the navigator? We will answer these and other questions in this article about navigators with a rear view camera .
Many drivers have encountered problems maneuvering their car when reversing. To facilitate such maneuvers, car parking systems are used. Parking systems with a rear view camera are the most reliable and comfortable for the driver to perceive!
The rear view camera will become your indispensable assistant when driving:
- will provide a clear and unambiguous color picture of the situation behind the car - as if you were looking with your own eyes;
- will protect your car from hitting dangerous obstacles: stones, curbs, poles, benches, trees and bushes;
- will eliminate the possibility of hitting small children and animals;
- will make reversing quick and comfortable.
Many people are intimidated by the apparent complexity of the installation: they need to mount the rear view camera somewhere, find a place in the cabin for the monitor, somehow transmit the signal from the rear view camera to it, and buy other necessary components.
But in reality, everything is not so difficult if:
- instead of a monitor, you can use a car navigator with a video input (AV-IN) , which is found in the interior of almost every modern car,
- To transmit a video signal, use a wireless rear view camera.
You can learn about the features of choosing and installing a rear view camera on a car from our article: “ How to choose a rear view camera ”
How to choose the right rear view camera?
When choosing a rear view camera, you need to consider the following factors:
- Sudden temperature changes. The camera installed on the car must function stably in the temperature range from -65 to +65 degrees Celsius.
- The vehicle will be operated in conditions of increased moisture, dust or dirt. The camera must be protected from these negative environmental factors. In order for the selected device to function in extreme conditions, it must be protected from dust and moisture. Thus, it is recommended to install cameras with a protection index of IP 66, IP67, and IP In the index, the first number shows the level of protection from dust, the second – from moisture. Cameras with IP68 protection level can operate underwater.
- The viewing angle of the selected camera should range from 120 to 170 degrees.
- It is advisable to opt for purchasing a parking camera capable of transmitting a color image. In addition, it should overlay parking lines on the image.
- The camera should function well in the dark; as a rule, the lighting that comes from the license plate lights or from the fog lights is enough to transmit a clear image to the monitor.
In black and white, it is difficult to perceive information from the image that comes from the camera. The absence of parking lines makes it impossible to estimate the real distance to the obstacle. In this case, the parking camera essentially becomes a useless accessory.
Considering the factors described above, you can purchase a truly high-quality camera that will last for quite a long time and will be an effective assistant. However, when purchasing, it is important to pay attention to the design of the camera, viewing angles, and type of mounting of the technical device.
Viewing angles that are too wide will result in severe image distortion and a fisheye effect.
There are standard cameras that are made for a particular car model, mortise cameras (the camera cuts into the rear bumper), universal cameras, and cameras located in the license plate frame.
When choosing a camera, you need to consider how it will look on the vehicle, whether you will have to drill holes in the body or bumper, and whether the camera will be visible to strangers (if you attach the device in such a way that it will be visible, then there is a high probability of theft of this expensive equipment) .
Benefits of connecting a rear view camera to a GPS navigator
One of the simple and popular solutions for displaying images from a rear view camera is a car navigator with a built-in video input function (AV-IN).
The advantages of connecting a rear view camera to a car navigator are obvious:
- saving money - almost every motorist has a navigator and it is installed in exactly the most convenient place in terms of visibility for the driver. Those. There is no need to buy an additional monitor!
- saving space in the cabin - no need to clutter the windshield with additional “devices”;
Connecting a rear view camera to a tablet and mobile electronic gadgets
Of all types of electronic wearable devices (laptops, smartphones), a tablet is most convenient for connecting a rear video camera. The monitor screen size and resolution quality are suitable for work. The flat body of the tablet allows you to choose several options for convenient installation.
Often, owners of cars with a primitive radio, without a navigator, have no choice but to connect a rear view camera to a tablet. To connect a wired video camera, you will need to purchase a TV tuner (looks like a flash drive) with a video input plug.
On the Internet it is easy to find designs for homemade tripods for tablets, which allow you to easily install and remove a mobile device on the dashboard or center console. For small tablets, you can install a special slot on the back of the sun visor.
For tablets with the Android operating system, the video camera model must be adapted to the operating system; the tablet must be equipped with a USB port. In some cases, you will need to install additional software.
The principle of operation of a car navigator with a signal at the video input
As long as there is no electrical signal at the video input, the navigation program window is displayed on the navigator screen.
As soon as the navigator detects a video signal, the navigator screen automatically
switches hardware to display the image from the video input, and after it disappears, it returns to the navigation program.
The operation of the navigation program is not interrupted while switching images; the screen simply switches in hardware to one video source (navigation block) and then to another (video input). To implement the described operating logic of the navigator, power is not supplied to the rear view camera continuously, but only while reverse gear is engaged. This is achieved simply by connecting the power cable of the video camera to the positive wire of the reversing light. That is, they turned on reverse gear, the navigator shows the image from the camera, turned off the gear - the navigator works in normal mode, displaying the navigation program.
Thanks to the touch screen, the navigator with video input provides the user with some options for setting up and adjusting the displayed image. With simple taps on the screen, the navigator can:
- make the image mirror - this option is used if the camera does not support mirror mode. Mirroring makes it easier to perceive information; it creates the effect that you are looking into a regular rear-view mirror.
- Rotate the camera image 180 degrees, which is necessary if you need to mount the camera upside down.
Playing ahead
Fortunately, manufacturers are not slow either, and a navigator with a DVR and camera has already become a reality. There are models of various configurations, both with one or two cameras already built-in, and with the ability to connect them.
Connecting the camera to the navigator does not require any special skills; the gadget itself will recognize the new device and display the image from the camera on the monitor. You just need to select the plug you need and connect it to a special video input on the navigator body.
The camera can be used not only to record what is happening - it will also be extremely useful when parking and other difficult maneuvers.
Rear View Camera
There are no special requirements other than standard for the rear view camera connected to the navigator. All the nuances of choosing a rear view camera and installing it on a car are described in the article “ How to choose a rear view camera .”
The video input of navigators, as a rule, is omnivorous; it supports both modern TV signal standards - PAL and NTSC, which allows you to connect any car rear view camera to it.
We also remind you that there are two types of rear view cameras:
- wired cameras - the video signal from the camera is transmitted via a video cable;
- wireless cameras - the video signal is transmitted using radio waves.
Each method of video signal transmission has its own pros and cons:
Connecting power to the rear view camera
Power to the rear view camera is supplied from the reversing lamp; for this, the positive wire of the camera is connected to the positive wire of the reversing lamp using a special clip.
The negative wire of the camera is connected to the “car body” in any nearest accessible location. Structurally, the rear view camera video output, as a rule, has a standard design in the form of a “tulip” type RCA connector and is connected:
- or to the video cable running through the cabin to the navigator;
- or to a wireless radio signal transmitter, the transmitter is also powered from the reversing lamp.
Selecting a rear view camera
Miniature rear view cameras should not be confused with optical sensors.
Installing the camera becomes the first installation step, regardless of the choice of projection device. When choosing a camera, there are several important points to consider:
- Viewing angle. A viewing angle of 110 – 120 degrees is considered normal. Drivers who choose cameras with a wide viewing angle (up to 180 degrees) can better assess the road situation, but must take into account the panoramic effect, which distorts the actual size of the image.
- Resolution and sensitivity. The standard resolution of 628 x 582 pixels suits most ordinary drivers; increasing the image quality for the rear packing video camera does not make sense. When choosing a color sensor (CCD or CMOS), you need to take into account that CCD transmits a higher quality image, balances colors, but is much more expensive. CMOS sensors perform worse in low light, but provide acceptable color quality in daylight.
- Availability of infrared illumination. Additional illumination with sufficient light provides better color image quality. In low light, the infrared source allows you to see the road behind in black and white at a distance of up to five meters.
- Video format. When choosing from the three formats that a camera can be equipped with (SECAM, NTSC, PAL), you need to consider what type of monitor the video image will be displayed on. The discrepancy between formats will make purchasing and installing a camera pointless.
- Signal transmission method. The division of cameras into wired and wireless affects the cost and connectivity. Wired video cameras are universal, they can be connected to all types of monitors. Cameras equipped with transmitting and receiving modules can often transmit images only to the navigator.
- Complete with cables. It is preferable that the camera be equipped with a three-wire video cable with an additional excitation wire; the power wire can be two-wire. The length of the cables also matters. The standard length (2-3 meters for a video cable, a meter for a power cable) may not be enough to connect the camera to your car model.
- Case material. Experienced car enthusiasts choose cameras in a metal case, considering it more durable and durable than a plastic one.
- Variability of installation location. There are cameras mounted in the license plate frame, and devices in a separate housing. A separate video camera requires a choice of several installation locations that are convenient for the driver.
The remaining standards of video cameras (presence of parking lines, power voltage, protection from dirt) are the same for most models.
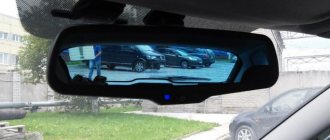
Many car enthusiasts find rear view cameras equipped with a monitor mounted in the rear view mirror the most convenient.
It is difficult to deny the convenience of such a device. The monitor turns on when the reverse movement begins, allowing you to see the road situation in good resolution. The main disadvantage of such gadgets is the high price, which is unaffordable for many categories of car enthusiasts.
Less convenient is the rear view camera, equipped with a folding miniature display that can be placed on the dashboard
The main disadvantage of such devices is that the view is cluttered, especially if the car already has a DVR, navigator, or a separate radar detector installed. Car enthusiasts find it more practical to use the display of one of the existing devices. Having purchased a rear view camera of any type (with or without a monitor), you need to install it in the rear of the car.
Features of connecting a rear view camera to the video input of the navigator
To be able to connect a rear view camera to a GPS navigator, the navigator must have a video input (AV-IN). The video input of navigators has a standard design in the form of a plug connector; rear view cameras with an output video format of PAL or NTSC (most video cameras) can be connected to it.
To connect to the navigator, use an adapter “tulip - micro-jack plug 2.5 mm with 4 contacts” (usually included with the rear view camera). Below is a diagram of the contacts and their purpose: