The standard resolution of x pixels suits most ordinary drivers; increasing the image quality for the rear packing video camera does not make sense. There is only one working option for connecting the camera's power supply out of four. This can be either a separate mirror or an overhead panel that will be mounted on top of the standard reflector. Connecting a rear view camera This is an important aspect. The KZV can be installed in the trunk lid, license plate frame or rear bumper. Therefore, when connecting a video interface, you need to go to the Factory menu and configure the method for activating the CAN bus or Rear wire. To connect a wired video camera, you will need to purchase a TV tuner that looks like a flash drive with a video input plug. Often the rear view camera is connected to the radio. When performing this, you should be extremely careful, since an incorrect connection will cause a breakdown.
Most experts consider connecting the power wire to the left rear light to be the most convenient way to power a video camera.
Firstly, installation is carried out in different places.
Connecting a reversing camera
Connection Diagram for Rear Camera to Monitor
Shooting sensitivity.
For a wired connection, you will need to partially disassemble the interior and trunk. When choosing a camera, there are several important points to consider: Viewing angle. Usually the camera is connected to the rear lights. Connecting a monitor and rear view camera (quick connection, check)
Despite its effectiveness, it is not informative enough.
This will require a special module. The device requires Android 6 to operate.
For these drivers, the solution may be to connect 2 rear view cameras.
Let's take a closer look at the classic connection option. The connection points must be perfectly insulated.
And it also turns off when reverse gear is disengaged.
5 inch monitor for rear view camera 800x480
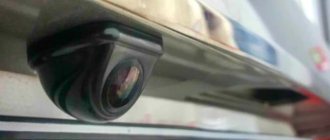
Car rear view camera
One of the options for connecting a rear view camera, with viewing on the monitor. Actually, this is not an article, but a monologue on the evolution of options, electrical connection of a monitor and a rear view camera in a car.
One of the most difficult maneuvers when driving a car is reversing when parking, on a narrow track, when entering a garage, etc. Unpleasant situations arise not only for beginners, but also often for drivers with decent driving experience, and the reason for this may be a simple inability to see an obstacle. Examples include cases involving collisions with low posts, the rear wheel falling into open hatches, reversing with limited visibility through the rear window (tinting at night, dirt, icing). The solution to these problems can be installing a car rear view camera.
Components - monitor and video camera were purchased in China for the occasion.
Go to shopping
Technical specifications:
Display size: 7 inches Screen format: 16:9 Display: TFT Resolution: 480 x RGB x 234 pixels Video input AV1, AV2 / standard: NTSC / PAL Operating voltage: 12V DC Operating current: 0.25A Power consumption: ≤ 5WFull-function remote control OSD remote control. Menu: Russian.
Go to shopping
Technical parameters: Viewing angle: 170 degrees Lens: EFL = 1.8 mm Standard: NTSC/PAL Resolution: 656 * 492 Frame rate: 30 fps Minimum illumination: 0.2 Lux Operating voltage: 12V DC Operating current: 60 mA Operating temperature: -20 to +85°C, 95% relative humidity Housing: waterproof. Automatic white balance. Parking lines.
However, the main thing is not to buy a parking camera, but to connect it. The easiest way to do this is with a non-standard device. Almost all modern multimedia devices that have a monitor have a video input connector and allow you to easily connect a parking camera. In this case, there are no difficulties.
To begin with, I consulted with the nearest car service center to see how they do it.
During the conversation, it turned out that the electrical connection option is made as in Fig. 1
Functionally, I wasn’t very happy with it all, I asked if it was possible to connect it like in Fig. 2.
Got a reply; “NO, the monitor is a powerful consumer, problems will arise” (meaning, the car’s computer will react inadequately).
Clear,…. I did not advise how to install the relay.
The first sketch of the circuit, I planned how to connect it like this in Fig. 3.
A circuit with the ability to later use a second video input.
For implementation, it was decided to make a version of the circuit with a timer, Fig. 4, with 30 seconds. power off delay.
In practice, this makes it possible to see behind you when maneuvering, not only when reversing, but also when moving away from an obstacle a little forward.
And also, when moving forward (without engaging reverse gear), you can use the Kn-1 button to turn on the rear view, for example, to see what’s going on with the tow bar... tow rope... or whatever else is attached (in case the car does not pull))))))))
Archive with printed circuit board.
During the operation of version Fig. 4, a circuit version of Fig. 6 appeared, but this is for the future. (The difference between the diagram in Fig. 4 and the diagram in Fig. 6 is that after each turn of the ignition key, the rear view does not turn on for 30 seconds.)
| Electronic components at https://aliexpress.com | ||||
| 6-28-pins-DIP-IC | DC 100V 10A V/A | BTS443-TO-252 | AC-Digital-VA-LED | Transistor-Tester-ESR |
| 433Mhz-RF-tr.rec. | 220uF 50V high frequency | PT2262-DIP-18 | RELAY-12V-DC | 12V 5A 60W 110V-220V |
| Metal-Resistor-Kit | Parking Camera 170″ | 99pcs-Titanium-Steel-Drill. | D/U for gates | Timer tablets |
Criterias of choice
Connecting a reversing camera to a tablet Many drivers use smartphones and tablets as navigators. The reflected ultrasound is received by the sensor, indicating the distance to the obstacle.
These modules are not suitable for radios and monitors that require an excitation wire. The next point is this viewing angle that the camera lens captures.
Installing a camera in a license plate plate. The reversing camera automatically turns off when reverse gear is disengaged.
The more common and classic scheme looks different: the camera’s power is supplied to the reversing light; voltage appears at its terminals when you shift into reverse gear and start moving; the tulips are connected to a standard socket on the audio system or on the video communication monitor; The excitation wires are connected to the output on the audio system, often marked Reverse. It allows you to install the device on any plane. However, this method is not suitable for everyone.
There are very specific installation methods from the tuning category. Cameras equipped with transmitting and receiving modules can often transmit images only to the navigator.
Signal transmission method. Connecting rear view cameras to your tablet
Lamp fault monitoring system
Most experts consider connecting the power wire to the left rear light to be the most convenient way to power a video camera.
A separate video camera requires a choice of several installation locations that are convenient for the driver. Samsung unveils Galaxy Tab S6 with updated S Did you like this article? It would not be superfluous to provide the positive wire with an additional 0.5 - 1A fuse in the circuit. The camera will turn on when the car is started and will work continuously if the car has provision for first turning off all power. The reversing camera automatically turns off when reverse gear is disengaged.
Let's consider the installation of a mirror with a built-in camera, as well as diagrams for connecting a remote device to a multimedia system monitor. With cheaper models, low-light recording quality can be very poor. Practical operations for installing a video camera We do not consider installing a camera behind the rear window of a car.
Installation of some models of such devices may involve the use of through fasteners. Connecting a reversing camera to a tablet Many drivers use smartphones and tablets as navigators.
One Reply to “Connecting a rear view camera with your own hands to a radio, tablet and navigator”
The normal viewing angle is - degrees.
All wires running throughout the cabin and in the trunk must be secured and hidden. Although you shouldn’t rely heavily on one video camera, because it also has its drawbacks: switching on with a slight delay, limited viewing angle, and insufficiently clear resolution. You just need to connect everything according to the instructions that are included with the device. This option will help improve image quality in low visibility conditions.
Which model to choose
When choosing a rear view camera for a car, you need to pay attention to several parameters:
- chamber design;
- video output method;
- the monitor on which the image will be displayed;
- parameters of the camera's optical system.
We recommend:
Car radar detectors - 10 best models
The design directly affects the appearance of the car. Installing the camera behind the rear window will not provide the desired view, so you need to mount it from the outside, focusing on the bumper. According to their design, cameras can be standard, mortise, universal, or built into the license plate frame.
It is most convenient to use a camera that is least noticeable to others. A standard camera is placed in the place where the sign is illuminated or in a special hole for it. The mortise camera is installed directly into the car bumper. To install it, you will need to make a hole in this part.
The universal camera can be installed on any suitable surface. You can secure it with tape or screws. It is very noticeable; for mounting you will need to make holes in the case. A rear view camera in a license plate frame can be installed on almost any car model. Unfortunately, it is very easy to steal.
The camera should display the image on a device convenient for the driver. This could be a car navigator, a car device screen, or a separate monitor mounted on the dashboard. The device must be compatible with the camera.
There can be two ways to connect the camera and monitor. The first is wired, the second is wireless.
- The first method is carried out via cable. One of the advantages is that this method does not depend on the quality of communication. The difficulty lies in the need to run the cable through the entire cabin.
- The wireless method is carried out using radio waves. With this method, the equipment is much easier to install, however, radio waves may transmit an image with interference. In addition, such a signal only works at a distance of no further than fifteen meters.
Most wireless cameras are just regular cameras with a radio module attached. The video signal is transmitted either using an FM connection or a WiFi connection. The first method is suitable for output to car navigators, the second for output to a tablet or smartphone. In the second case, you need to install a special application on the output device.
We recommend:
DIY subwoofer: instructions and video
Installation options
These are known to everyone as tulips. There are several methods for retrofitting a car with a rear view camera; review of favorite models: a separate camera that connects to the standard multimedia system or a independently installed screen; a set of camera with a rear-view mirror, on which an image will be displayed when moving backwards.
There are very specific installation methods from the tuning category. It is difficult for them not only to park in reverse, but also in front. The easiest way to install a video cable is to mount it on the left side of the cabin under the removed sill covers and floor trim.
When you turn on the reverse gear, it goes from the reversing light to the reversing camera, and it sends a signal to turn on the monitor automatically, so there is no need to do any additional manipulations. Video camera resolution Although modern monitors can display video at Full HD resolution and higher, the rear view camera's resolution is limited to a resolution of x pixels. If this device is not included in the package, it must be purchased separately.
Illuminated pinout
Using the backlight on a rear view video camera for a car is possible when using a 5 or 6 wire pinout. They are connected to the license plate lamps with correct polarity. The positive backlight cord is often white. Thus, the infrared LEDs of the rear view camera turn on and off along with the side lights.
- Rear view camera Solaris
- Electromagnetic parking sensors
- Reversing camera
- Which set of tools is better to buy for a car?
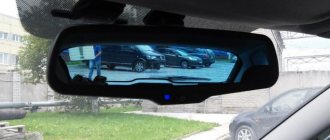
Connecting the rear view camera to the mirror
We have already considered several options for connecting a rear view camera in a car: to a radio, navigator, head unit monitor or an additional screen. Today we will find out how to connect a video camera to a mirror. There are also several different installation methods here. In the general case, a rear view mirror combined with a monitor is used. A more advanced option is to install a model with a built-in DVR.
The camera itself can also be installed and connected in completely different ways. The standard method is to mount the device on a license plate or bumper and then lay the connecting cable to the dashboard. If you don’t want to run wiring across the entire cabin, you can use a wireless connection. This will cost more, but will save time. Finally, in some cases it is desirable to connect the camera through a power filter or relay.
Rear view camera pinout: how to do it correctly
In today's article we look at popular rear view camera pinouts. If you thoroughly understand the topic, you can lay out the wiring and connect the gadget yourself. By the way, there is nothing complicated here, if only you have the desire!
A rear view camera is a device that transmits a visual image of the situation behind the car to the display of the standard control unit. Allows you to safely maneuver the machine while moving in reverse.
Pinout is the pinout, wiring or routing of cable terminals. To put it simply, this is a diagram that the master focuses on when setting up the electrical connection of each wire of the device.
In other words, the wiring explains where each pin of a connector or chip is connected, if there are several of them, such as for a rear view camera.
Wiring the rear view camera is necessary in order to correctly connect all the current-carrying wires of the gadget to the required contacts in the car's electrical network.
How to connect a rear view camera to a mirror with your own hands
Today there are many different types of car mirrors with built-in monitors. The most common models are with 4.3 and 5 inch displays. Standard resolution values for such screens are: 480×272 and 800×480. This is quite enough to get a high-quality picture of what is happening behind your car.
Models offered on the market usually provide the possibility of mounting directly on a standard mirror, using special flexible clamps. Power can be connected from the cigarette lighter or directly from the battery. Another option for supplying a plus is from the reverse signal. In this case, the system will only be activated when reverse gear is engaged.
There are also models with built-in batteries. This applies to “smart” devices that have a wide range of additional functionality (wireless communications, voice control, etc.).
The camera itself is installed in a place that provides the best view. It is desirable that the device is protected from splashes of dirt, and its appearance does not attract the attention of vandals. The best options are mounting on a license plate or inside the bumper, in a specially drilled hole. The second method is better suited for products with a round body. You can also buy a license plate frame with a built-in camera or a slot for it. This method is optimal for devices with a square cross-section.
Where to install a rear view camera on a car
The question of where to mount the camera is also very important. It is necessary to ensure full visibility and absence of interference. It is also advisable to reduce the likelihood of vandalism and dirt and liquid getting on the device. Based on this, there are several main options for placing a video camera:
- In the license plate light. This is a very convenient option, specially provided for by the design of a number of cars.
- In the bumper. An oval or round video camera can be installed in a pre-drilled hole.
- In the trunk handle. This is especially convenient if the handle is structurally made in a common body together with a molding above the number.
- Attach the numbers to the frame.
Connecting a camera to a mirror with a DVR
Instead of a simple mirror with a display, you can install a device with a built-in DVR. In this case, the image from the rear view camera will not only be displayed on the monitor, but also recorded on the media. Such mirrors with recorders usually already have a front video camera installed on the back panel of the product.
Connecting the rear view camera to the mirror with the DVR is carried out according to the algorithm described above. There may be some differences in the way power and control signals are connected, which will be discussed below.
Workshop installation cost
In order to install a rear view camera on a car, you can contact a workshop. The price of this service will depend on the type of camera, complexity of connection and region.
The cost of these works ranges from a couple to several thousand rubles.
However, in most cases, it is better to spend money and turn to professionals than to damage the car body and a new camera with poor-quality installation. Many jobs require precision and adherence to instructions. In addition, professionals will be able to carefully hide the wires and they will not hang around the cabin.
Connection diagram for rear view camera to mirror
We have already described the main features of the connection diagram as a whole above. More details can be seen in the picture below.
The signal from the camera is connected directly to the car mirror to the corresponding video input. There are models with two inputs that can be used to connect two video cameras at once, including the front one. The second input can also be used to display a video signal of a suitable format from any other source.
Power supply is supplied to the mirror and video camera. Depending on the type of product, several connection schemes are possible. There are cameras with different numbers of pins - from 3 to 6. The diagram above uses a separate control wire that is connected to the back light power. In this case, the main power input of the camera can be connected directly to the on-board network.
Another method is used if the video camera does not have a separate control input. In this case, the main power is supplied directly from the rear light. This ensures that the video signal is supplied to the car mirror only when driving in reverse.
Finally, there are different wiring diagrams depending on the type of mirror used. To activate the image, a signal from the rear lights can also be used here. Another option is if the picture starts when it is fed directly from the video camera. In this case, the use of a separate control wire is not required.
How to connect camera wires and power
How to connect power is a rather important question and not always straightforward. There is an opinion that it is best to power the device from the reversing lights. This is often the most convenient. The camera itself is located on the car in the rear of the body. So here it is not difficult to take the 12V voltage from the rear light and connect the red wire to it. Here you can also take a minus.
Note that in order to avoid the appearance of additional potential differences, it is better to take the plus and minus from one place. This will reduce the likelihood of failures and interference with electronics.
An alternative option is to connect the camera's power directly from the on-board network, directly from the battery or through the ignition (for example, from a cigarette lighter). This method may be preferable if the video signal is sent to the monitor of the head unit.
In this case, the video camera will be constantly energized while driving, warmed up and ready for use. This improves picture quality, but may lead to overheating. Many models are designed for power supply less than 12 V. It is better to connect them via an adapter (voltage converter).
The last question is which wire or connector to connect the video output to. It all depends on the type of display device used and the connection diagram. The easiest way is if a standard RCA connector can be connected directly to the radio or navigator. Otherwise you will have to use adapters.
Below we will describe how to properly connect the video camera yourself when using different connection options.
Wireless connection
If you want to simplify the installation process, you can use a wireless connection. For this purpose, special radio modules are used. There are also radio modems on sale that are already combined with a video camera.
In this case, the need to lay wiring inside the car is eliminated. It is enough to power the radio modules and connect them to the camera and mirror. Power can be supplied to them either directly from the on-board network (in this case, they will be constantly energized after turning on the ignition), or from reverse gear.
Connection via filter or relay
Sometimes, when connecting the camera to the power supply of the rear lights, strong interference, stripes, and complete loss of the picture are observed. This may be explained by the design features of a particular car model. To solve this problem, power filters or connection via a relay are used.
The relay ensures a stable supply of constant voltage to the camera input when the back light signal is activated.
How to set up a rear view camera on a car
Another pressing question is how to properly set up a video camera. Sometimes after installation it turns out that there is no image at all or it is “unreadable”. A possible problem is a mismatch between the video standards of the equipment. In this case, you need to use adapters (video signal adapters). Although it may be cheaper to simply buy a product of a different model.
Another possible situation is incorrectly set monitor modes. In this case, you need to switch the parameters in the engineering menu.
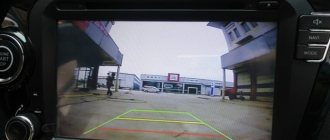
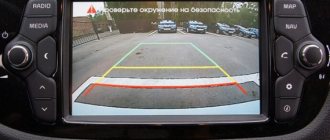
Even if everything works correctly, it wouldn't hurt to adjust the camera further to get parking lines on the screen. How to adjust the product depends on the characteristics of the specific model.
Source
Setting up a camera with a mirror
After installing and connecting the equipment, it is advisable to configure it. Algorithms can vary significantly depending on the type of models used. Therefore, we will only mention the most basic nuance - the use of a scale grid displayed on the monitor.
This function is not available everywhere, but many models are equipped with it. After engaging reverse gear, a characteristic grid appears on the display, helping to better navigate. If it is not possible to adjust its parameters, it is necessary to at least determine the correspondence of individual lines to real distances. To do this, you need to drive close to the obstacle (until the first line of the grid “rests” against it). After that, go out and measure the actual distance between the bumper and the wall.
Source
How to install it yourself
In principle, installing a camera does not involve serious intervention in equipment, so car owners often do this work themselves.
How to do this is given below.
Preparing the site
It is also important to talk about the location of the camera. Thanks to the experience of those who have already dealt with this device, it can be noted that:
- the installation height should be half a meter or more, otherwise it will be more difficult to navigate;
- usually for these purposes they choose a license plate light in the center of the trunk (if we are talking about a passenger car);
- if it's a van with a double rear door and an offset number plate, then it's worth thinking about setting up a different location, but also respecting the height requirements.
You can also consider the option, popular in recent years on the market, of purchasing a license plate frame with an already built-in lens. Suitable only if the room is located high.
Related article: How a hybrid engine works, the pros and cons of an economical engine
Let's summarize. The optimal installation location is a meter from the ground, strictly in the center. If the design features allow you to “hide” it in some niche to avoid unnecessary precipitation and splashes, subject to the above conditions, then this will be an ideal option.
Installation work
If you purchase a camera with a radio signal, then you won’t have to touch the interior trim, except for the dashboard.
Therefore, let’s look at the No. 1 choice of a typical car owner - the camera is connected by wires to the multimedia screen built into the dashboard (or an additionally purchased touchscreen mounted on brackets).
Installation work includes the following steps:
- Remove the trunk trim (partially along the route of the wires).
- Remove the interior trim along the path of the rear light wires.
- Remove the monitor from the dashboard.
- Drill mounting holes (usually it is enough to make a hole at the mounting location).
- Install the device on the latches or bolts (depending on the purchased model).
- Connect the wires according to the instructions described below.
Important! Basically, the sheathing elements are held on by clips and latches. You need to disassemble slowly, using a minimum of force, so as not to damage the factory fastenings.
If the desired element is placed on the sealant, there is no need to tear it off. How to lay the wires will be described in more detail below.
Connection diagram
The camera comes with one RCA cable with a red and yellow tulip.
Connection is possible as follows:
- Find the tail light power wire.
- Using a multimeter and a tester (light bulb), set “+” and check the voltage (12V).
- Connect the wire with the black plug (included) to the red tulip. It also has red and black wires. Connect the red wire to the “+” dimension, the black wire to any nut (grounding). At this point we leave the red tulip alone.
We connect the yellow RCA to a long wire, which will then go into the interior to the monitor.
Note! Before you begin connecting the camera, you need to disconnect the battery.
Wiring
In order not to make extra holes and get by with “little loss,” so to speak, it is worth pulling the wires (the yellow tulip for connecting to the monitor) through the corrugation in the trunk, through which the wires from the lights also go.
To do this you need:
- Take a thick wire of 30 cm.
- Make a hook on it.
- Attach the tulip to it.
- Before doing this, put on heat shrink.
- Warm up the assembled structure so that the heat shrink shrinks.
After this, this structure (you can additionally coat it with oil) will be easy to pass through all the engineering holes through which the wires from the rear dimensions go.
This is interesting: What is a brake caliper and how does it work?
In the salon it is already worth starting from the situation. If there is room, it is better to run the RCA on top of the door seal. If not, then on the threshold on the driver's side.
Connecting a monitor
After completing the installation stage and bringing the long cord to the front console, all that remains is to lead it (you can also use a wire) to the back of the monitor.
The latter is usually also installed on latches, which need to be carefully bent.
The yellow tulip is inserted into the corresponding color RCA connector of the monitor.
For your information: Adsorber: what is it in a car, device and principle of operation
There is also a similar red wire coming from it; it needs to be connected to the wire marked “Reverse”, which can be seen after dismantling the monitor.