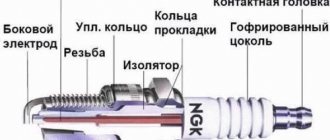
The tightening force of the spark plugs depends not only on the thread diameter and the size of the key, but also on the length of the screwed-in threaded part and the design of the seat: soft crushable ring, hard ring, cone. The same spark plug is tightened on different cars with the same torque.
General recommendations for replacing spark plugs
Work must be carried out on a cooled engine. Before unscrewing the spark plug, the surfaces adjacent to it should be cleaned of dirt to prevent dirt from getting into the cylinders. The thread must be clean. There is no need to lubricate the threads with any lubricants, oils, sealants or other technical fluids.
How to properly tighten a spark plug according to one of the leaders in the production of automotive ignition systems, Bosch.
German "Meriva"
Each car has a spark plug tightening torque indicated in its passport data. Opel Meriva uses a spark from a gap of 1.1 mm. Replacement is made with a 16 mm wrench. To gain access, remove the plastic cover, remove the connectors and unscrew the 2 bolts.
The first step is to remove the coil block along with the spark plugs. Carry out an external inspection for the presence of soot and chips. To tighten it, it is better to use a spark plug wrench with a rubber insert. You will also need sprockets for dismantling decorative elements in the engine compartment. For installation, reverse manipulations are carried out, the tightening torque is 25 Nm.
The spark plugs must be crimped with a certain force to the gasket thickness specified by the manufacturer. Ideally, it should be equal to 1.7 mm. But inexperienced repairmen manually turn it up to 1.2 mm, when the risk of damaging the ceramic inserts increases.
Conical spark plugs are more fragile and require torques with a low error of ±2 Nm. Therefore, it is better to buy an original torque wrench. Cheap tools are usually disposable. Good spark plugs also cost a lot compared to the cost of a key.
Cause of spark plug overheating
The correct way to tighten the spark plug is of great importance because there is heat generation in the well. So, even the gasket provided at the bottom of the thread, where the top of the cylinder and the seat meet, is responsible for normal heat transfer. Otherwise, if you do not follow the tightening torque instructions (for example, if the spark plug is not tightened enough), overheating will occur. The candle itself will operate with low efficiency.
It turns out to be a whole theory. And in fact, this information is not news, but many have simply forgotten about it.
Unfortunately, there are quite a few kits that do not have specific information on this matter. It happens that just a wrench is shown, but the tightening torque is not indicated.
External signs of malfunction
How to calculate tightening force without a torque wrench
Something else useful for you:
- How and where to choose NGK spark plugs for your car
- What does the potassium number of spark plugs mean, table
- How the ignition coil in a car works and how it works
A clear replacement of the spark plug will be required in the following cases:
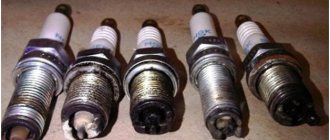
- Erosion of contacts - they have visible irregularities, the gap between the contacts is increased.
- The characteristic red soot is a consequence of the use of ferrocene additives.
- Melting of the electrodes: long-term operation on a lean mixture under load, use of spark plugs with an inappropriate heat rating.
- Durable black carbon, dry or oily: of course, spark plugs can be burned out or sandblasted, but for the average motorist, replacement is easier and faster. This also directly indicates in the first case a malfunction of the power system (constant over-enrichment of the mixture), in the second - oil penetration into the combustion chamber.
- A strong brown deposit on the spark plug insulator at the junction with the skirt (hexagon for tightening) indicates a leak in the spark plug: gases from the cylinder leak between the insulator and the skirt, and the spark plug loses its seal.
- Cracks on the insulator.
Removing dirt from wells
During vehicle operation, dirt accumulates inside the recesses where the spark plugs are located, which turns into carbon deposits under the influence of high temperatures. Dust and moisture often get on the oily layer.
When unscrewing the spark plugs, these foreign particles can penetrate inside the engine cylinders, causing mechanical damage to the rubbing surfaces of the power unit. If liquid gets into the motor, it can cause water hammer.
For these reasons, before removing the spark plug, it is important to clean the spark plug well by blowing with compressed air. If this is not possible, then you need to at least wipe the area around the candle with a damp cloth.
Main threaded connections in the engine
Decoding the ngk spark plug markings
List of main engine threaded connections and features of their tightening:
Cylinder head (cylinder head) A very important unit, therefore, when attaching it to the block, it is important to observe not only the tightening torque, but also the order in which the bolts are tightened. As a rule, the cylinder head is tightened with a fairly large torque, starting from the center of the block to the edges in several passes. Be sure to check this information in the vehicle’s operating manual (for each engine model, the numbers and order may be different)! Valve lid
Due to the small diameter of the valve cover studs, extreme care should be taken when tightening them and not exceeding the required torque. Also check the tightening order and torque in the manual. Spark plugs and glow plugs
They are tightened in any order, but very carefully, since if the threads in the engine are damaged, expensive repairs will be required. When tightening the injectors, also be careful: due to their small diameter, it is easy to damage the threads. The engine mounts should be tightened after the engine is fully installed, when it is already resting on them with its weight. If you tighten the cushions before the engine is completely resting on them and the jack is removed, the cushions will quickly tear during operation.
This cylinder head tightening procedure is most often used for inline four-cylinder engines.
So, now you know the basic rules when working with threaded connections. If you don't have a torque wrench but need to tighten something in the engine, it's best to purchase or borrow one from someone. As a last resort, use a homemade one, but do not tighten the nuts “by eye”, this will most likely harm both the engine and your wallet; repairing internal combustion engines in used cars is not a cheap pleasure.
Self-replacement
Selection of Denso iridium spark plugs by car
Please note that when replacing, it is advisable to immediately replace all spark plugs with new ones, regardless of their visual condition. Glow plugs are selected according to their suitability for installation on a particular type of diesel engine
Removing protection
Glow plugs are often located at the top of the cylinder head (usually near the diesel injectors). They may not be visible if the motor is covered on top with a plastic cover or protective casing. This protection must be removed to provide access.
Disconnecting the battery terminals
Since glow plugs are an electric heating element, you will need to disconnect the negative terminal from the battery. Then the small nuts are unscrewed, which secure the tips of the high-voltage wires to the contact rods of the glow plugs. The wire connects to the top of the spark plug. This nut must be unscrewed with a wrench, and the wire itself can be moved slightly so that it does not interfere with further removal of the glow plugs.
Unscrewing glow plugs
The next step is to unscrew the spark plugs using a ratchet wrench. It is necessary to unscrew it very carefully so as not to damage the threads in the cylinder head. There is also a risk of breaking the spark plug itself, which may result in additional difficulties with subsequent drilling of the rod and restoration of the thread.
Cleaning contacts
Next, it is necessary to clean the contacts on each high-voltage wire of the glow plug from contamination. This is necessary for the new spark plugs to be fully operational after they are installed on a diesel engine. If the contact is “stuck”, then it can be removed without much difficulty using a flat-head screwdriver.
After dismantling, a visual inspection of the removed glow plugs is carried out. If even only one of them shows extensions of the rod, the rod is swollen or deformed, melted, cracks or other defects are noticeable, then all spark plugs are replaced with new ones. Also a reason for replacement is the presence of abundant carbon deposits in the place where the tip is connected to the spark plug body, or any noticeable damage to the tip.
Removing dirt from spark plug holes
Separately, it is worth noting the procedure for cleaning the holes for installing candles from carbon deposits. To do this, you will need a special reamer, the length of which will allow you to effectively clean the spark plug wells. Before screwing in, the reamer must be lubricated. The specified reamer must be screwed into each hole. For the procedure, it is better to use a standard scan rather than a universal one. If this is possible, it is additionally necessary to remove deposits from the channels using compressed air.
Installing new glow plugs
After cleaning, new and/or pre-tested glow plugs are installed on the diesel engine. It is necessary to tighten the spark plugs until slight resistance appears. The tightening torque is adjusted with a torque wrench and is 15 Nm. Over-tightening may lead to the fact that during the next replacement there will be a risk of the spark plug breaking in the well when attempting to dismantle it.
When the installation of new elements on all cylinders is completed, the cleaned tips of the spark plug wires are put back into place and secured with a nut and wrench. It is necessary to make sure that the wire tips are tightly secured, and that the spark plug contacts are completely closed.
Then you can connect the negative terminal to the battery. The next step is to check the installed spark plugs. You should check it in the normal manner: turn the ignition key, start the diesel engine, and then evaluate the operation of the internal combustion engine in warm-up mode. If the engine starts confidently, runs smoothly and without failures, then the glow plugs are fully operational. Otherwise, it is necessary to re-diagnosis the diesel internal combustion engine to find a potential malfunction.
Determining the tightening torque
Signs of faulty spark plugs
Let's consider the procedure for determining the tightening torque using a torque wrench. The torque wrench can be divided into several types.
Arrow key
The easiest type of key to use. The principle of its operation is based on the deflection of a lever with a scale relative to a fixed pointer. The torsion bar handle is used to transfer force to the fastener. The arrow pointer on one side is attached to the head of the key, and on the other side it is free and serves as an indicator that shows the torque value at a certain point in time.
The advantages include:
- low cost of the product;
- The scale works in both directions. It allows you to tighten fasteners with both right-hand and left-hand threads.
The disadvantages include:
- low accuracy (measurement error ranges from 4 to 10%);
- these keys cannot be adjusted and, therefore, they wear out over time and lose measurement accuracy, which makes them unsuitable for use;
- it is extremely difficult to work in hard-to-reach places, because you must always monitor the tightening according to the arrow indicator;
- there is no ratcheting mechanism, like a ratchet wrench, so the wrench always has to be rearranged;
Limit key (protein)
The design of this torque wrench is shown in the picture. This wrench has a special mechanism that allows you to set the required torque on it and transfer it to the element being tightened. This wrench also has a ratcheting mechanism, like a regular ratchet. The required tightening torque can be set using the scales located on the body of the product. As soon as the required tightening torque is reached during tightening, a click will sound and the lock will operate, which will not allow the set torque to be exceeded. The limit wrench is very convenient to use, since when using it you just need to tighten the connection until it clicks. These wrenches have a large torque range (from 5 to 3000 Nm). Connection drive sizes range from 1/4" to 1".
The advantages include:
- the error of this key is no more than 4%;
- quite easy to use, as there is a ratcheting mechanism;
- you can set the required torque in advance, upon reaching which the key will make a characteristic click;
- easy to use in hard to reach places;
- Can work with fasteners with both right-hand and left-hand threads.
The disadvantages include:
- the need to calibrate this key;
- Over time, the ratchet mechanism may fail, but you can purchase a repair kit separately for some key models.
Digital
Compared to previous wrench models, this torque wrench has many features. A special key sensor generates a signal that is converted into the required torque and displayed on the electronic key screen. This key has minimal measurement error due to electronic components. The required tightening torque is set on the display, upon reaching which the key emits a sound signal. During operation, the screen displays the torque value in real time.
The advantages include:
- displaying torque values in different force values;
- has light and sound indication;
- high measurement accuracy (low error);
- can work with fasteners with both right-hand and left-hand threads;
- does not require adjustment due to electronic filling;
- ease of operation due to the ratchet mechanism;
- saves measured values to the device memory.
The disadvantages include:
high cost compared to other types of keys.
This tool must be selected in such a way that the tightening torque of the fastener is 20-30% less than the maximum torque on the wrench used. If you try to exceed the limit, the key will quickly fail. The tightening torque and steel type are indicated on each bolt.
Main reasons to follow the recommendations
It turns out that all these drawings on packages of spark plugs are far from comics, and not diagrams for nerds. You can’t ignore them, otherwise don’t be surprised if the part starts to act up! You probably noticed that there is a washer on the threaded part, but have you ever thought about its purpose? According to manufacturers, this metal ring plays a vital role in the process of removing heat from the part. And if the tightening is weak, the candle will not work stably!
And this is just the beginning! More than 90% of breakdowns occur precisely due to improper installation. A low tightening torque leads not only to overheating of the spark plug, but also to loss of compression of the power unit. As a result, vibration appears, which can damage the central electrode or insulator.
However, you should also never overdo it; pharmacy precision is needed here! Otherwise, it is likely that the annular gap between the glow tube and the steel body will narrow, the spark plug will overheat and fail forever, and may even fire. A deformed body and cracked ceramics also indicate that the spark plugs were not installed professionally! And you don’t even have to ask how to calcinate the spark plugs, in this situation it’s pointless!
Spark plug manufacturers and sets
When purchasing spark plugs, please read the quick installation guide. Different manufacturers have different instructions
It is also worth paying attention to the table of recommended parameters. The kit box also often contains useful information.
The main brands of spark plugs in the Russian car market are Bosch, Denso and NGK. When purchasing a Bosch kit, you should be prepared for the fact that you will not find any useful installation information in the package.
The Denso kit contains a complete installation diagram, but disappointingly does not include a specific spark plug specific torque value. The meaning can be found in the online catalogue. NGK, together with the kit, provides information on the tightening torque of the spark plugs and the number of their revolutions. The disadvantage is some inconsistencies in the number of revolutions.
Before purchasing a kit with new spark plugs, you need to make sure that the old ones are not working. This can be done using a spark plug tester (ask in specialized stores). It often happens that after calcination, candles remain functional for some time. Good luck and easy travels!
Checking the threaded tip
This element should not be unscrewed or loose. Otherwise, a spark will jump through the internal thread, which will lead to ignition interruptions. So I usually take a pair of pliers and tighten them up.
Life hack - adjusting Lada Granta valves without replacing washers
It seems that the matter is simple and trivial, but it can lead to a major overhaul of the engine. Be attentive to your car and service it on time.
How to clean and restore spark plugs - 5 ways
General rules for using the tool
The tool itself is a rod with a handle at one end and an indicator mechanism at the other. At the working end of the handle, a socket head or a connecting socket for a horn attachment (wrench or union attachment) is installed.
The keys are equipped with indicator and adjustment mechanisms, both with and without overtightening protection.
Next, we will consider the types of torque wrenches that are most often used in work.
Click type
Often motorists purchase just such a key because of the high measurement accuracy, durability and the presence of a convenient scale with adjustment. It is impossible to tighten the thread with such a wrench, since a fuse is provided.
The main thing is to know how to properly work with a product of this type. The bottom line is that it is necessary to set the required value of the maximum force (tightening torque) in advance.
Next, the connection (bolt or nut) is tightened as usual until a clearly audible click appears. This sound signals that the required parameter has been reached. It is noteworthy that the device will then go into the “slip” mode and it will not be possible to tighten the connection.
Video: “How to use a click key”
How to use the scale:
Torsion bar type with pointer arrow
Such keys have a characteristic feature - large overall dimensions. Directly at the handle itself there is a scale on which the necessary measurements are made. It is not possible to pre-set this wrench; the tightening result is achieved after the fact.
Recommended for use only in machines and mechanisms where an average level of tightening accuracy is provided.
When using a pointer tool, the handle moves relative to the scale in the direction of application of force. The arrow remains motionless.
To make measurements as accurately as possible, you must perform the following steps step by step:
- Find in advance the place on the scale that the shooter should reach at the moment of applying maximum effort;
- Tighten smoothly and consistently, reaching the specified position on the scale;
- If additional force is necessary, the tool is removed, tightened with a regular wrench and checked again.
Video: “How to use an arrow key”
Torque electronic device
The use of this tool is justified when assembling equipment that requires high tightening accuracy. Information is displayed on the LCD display (tightening torque in Nm). The advantage of the models is the ability to save settings during operation.
Data installation is carried out according to the instructions using special buttons. It’s convenient and quite simple, and the time savings are huge. It is beneficial to use such devices on an assembly line when it is necessary to perform a repetitive operation many times.
Signals when the specified tightening torque has been reached with high accuracy. There are also special electronic adapters that are installed on the ratchet wrench.
Video: “How to use an electronic key”
With horn attachments
These keys have a similar operating principle to the arrow type, but a different appearance. The difference is achieving more accurate results. The tightening torque is fixed by a rotating mechanism with a spiral spring.
A dial indicator with a measuring scale in Nm is attached to this mechanism. Rotation of the lever occurs according to a principle similar to working with a nut. The mechanic creates the required amount of force, which is displayed on the scale due to the deflection of the dial indicator.
On a cold or hot engine
The spark plug is designed to ignite the air-fuel mixture inside the engine cylinders.
The diesel analogue is a metal heating element that prepares the fuel, the surface of the engine block for easier starting of the car by heating.
It is not recommended to replace the ignition elements on a hot gasoline engine, since you can not only get burned, but also damage the spark plug threads.
The opposite situation arises in the case of diesel power units, since during their operation the metal spark plug housing “sticks” to the base of the engine. To “rip” this part out of place, it is better to preheat the engine.
Every car enthusiast can cope with the task of replacing ignition or filament elements. This does not require special skills or special abilities. The main thing is to use the tool correctly, follow simple instructions, and avoid common mistakes.
High-quality fuel and engine oil will extend the life of these parts, and they will have to be changed much less frequently.
Source
Standard tightening torques for cylinder head bolts
To know for sure how much torque to tighten a particular threaded connection, you can use the following data.
Table: tightening torques for connections depending on thread diameter
| Nominal thread diameter | Turnkey size of head, bolt (nut), mm | Thread pitch, mm | Strength classes according to GOST 1759–70 | ||||
| Bolt | |||||||
| 5.8 | 6.8 | 8.8 | 10.9 | 12.9 | |||
| screw | |||||||
| 4;5;6 | 5;6 | 6;8 | 8;10 | 10;12 | |||
| 6 | 10 | 1 | 0,5 | 0,8 | 1,0 | 1,25 | 1,6 |
| 8 | 12 — 14 | 1,25 | 1,6 | 1,8 | 2,5 | 3,6 | 4,0 |
| 10 | 14 — 17 | 1,25 | 3,2 | 3,6 | 5,6 | 7,0 | 9,0 |
| 12 | 17 — 19 | 1,25 | 5,6 | 6,2 | 10,0 | 12,5 | 16,0 |
| 14 | 19 — 22 | 1.5 | 8,0 | 10,0 | 16,0 | 20,0 | 25,0 |
| 16 | 22 — 24 | 1,5 | 11,0 | 14,0 | 22,0 | 32,0 | 36,0 |
| 18 | 24 — 27 | 1,5 | 16,0 | 20,0 | 32,0 | 44,0 | 50,0 |
| 20 | 27 — 30 | 1,5 | 22,0 | 28,0 | 50,0 | 62,0 | 70,0 |
| 22 | 30 — 32 | 1,5 | 28,0 | 36,0 | 62,0 | 80,0 | 90,0 |
| 24 | 32 — 36 | 1,5 | 36,0 | 44,0 | 80,0 | 100,0 | — |
Glow plugs description, operating principle, diagnostics
Glow plugs - description, operating principle, diagnostics
Definitions of the concept - glow plugs
A glow plug (another name for glow plugs) is one of the parts in a diesel engine that acts as a preheating engine for better starting at low temperatures. Glow plugs should not be confused with spark plugs because... A glow plug does not produce a spark, but is a regular electric heating element.
Purpose
The purpose of the spark plugs is banal heating before starting the engine after a long period of inactivity or in conditions of low air temperatures; low temperatures for a diesel engine begin at +5°C and below. At this temperature, diesel fuel begins to evaporate worse; this causes a lean mixture with air to form, which makes it difficult to start a diesel engine.
Principle of operation
To better understand what a glow plug is, imagine an ordinary small electric heater that is inserted into the fuel combustion chamber of a diesel engine. Activation of the glow plugs begins immediately after turning the ignition key to position II. For informational purposes, a special indicator lamp in the form of a spiral lights up on the dashboard. At this moment, the candles begin to heat up to such a temperature that the working element of the glow plug glows hot and turns red, thereby raising the temperature in the combustion chamber. However, 5 seconds of hot heat are not able to heat the massive cold cylinder block and the constantly changing cold air when the starter is cranked. This is where the main task of the glow plugs comes up - to heat the incoming fuel into the cylinder, to a temperature at which the fuel begins to evaporate and thereby form a normal air mixture for easy starting of the engine. After the spark plug has reached its operating temperature (about 2 - 5 seconds), the indicator on the dashboard goes out. (In practice, it is noticeable that the lower the air temperature, the longer the spark plug needs to warm up) After this, you should try to start the engine. When the glow plug indicator goes out, this does not mean that voltage has stopped flowing to the spark plugs. In modern engines, voltage may be supplied to the spark plugs for some time after the engine has started. And all in order to reduce the level of harmful emissions when the engine is still cold, as well as for the stability of the combustion process. Sometimes the voltage is not removed completely for this, but is gradually reduced from 12 volts to 7 volts to maintain the operating temperature of the spark plugs. As soon as the engine starts, the glow plugs begin to perform another auxiliary function; they become system assistants for better fuel atomization, since the tip of the spark plug is in the combustion chamber, and this tip plays the main role. The flow of freshly incoming fuel constantly breaks against it, which creates turbulence in the air mixture in the cylinder, which ignites much better during compression.
Symptoms, problems at work.
Symptoms of non-working glow plugs in most cases become apparent when the temperature drops, when heating of the fuel is already required. The fact is that in warm weather, if one or two glow plugs fail, it is not always noticeable when starting the engine. In cold weather, two failed spark plugs make starting the engine very difficult. Failure of more than three spark plugs at once is excluded, so if the engine does not start, look at the glow plug relay or wiring. Typically, faulty spark plugs can be first observed on the instrument panel, with a constantly flashing indicator in the form of a spiral.
Causes of problems.
The glow plug basically stops working.
1. The service life of the spark plug has been exhausted (depending on the manufacturer, the average life is 50 – 80 thousand kilometers)
2. Malfunction of the fuel system and engine equipment.
3. Faulty glow plug relay
If at least one faulty spark plug is detected, it is recommended to replace them all. Because If one is not working in the chain, all the others fail.
A simple check of the glow plugs.
Here we will describe the diagnosis of spark plugs, the simplest method for us is to check for electrical conductivity. The spark plug spiral must conduct electric current, and the resistance of the spiral in the initial (not heated) state must be in the range of 0.6 - 4.0 Ohm. If you are not within these limits, then it is recommended to replace the glow plug.
Category: Latest news, Expert advice
Designation of NGK spark plugs: marking
As mentioned above, decoding NGK candles helps to avoid errors and inaccuracies in the selection process. It is well known that the manufacturer sells products in branded packaging. As for markings, special codes can be found on the body of each spark plug.
Such designations on NGK spark plugs greatly simplify the entire selection process. Knowledge of the labeling allows you to accurately determine which option from the NGK product range will be the most suitable in terms of the main parameters. Marking codes are displayed in the NGK catalog, after which selection is carried out using printed tables, online services, etc. So, it is best to consider the issue of marking spark plugs using ready-made examples.
As can be seen from the examples, the most important parameters can be considered the type of spark plug itself and the physical dimensions, the features of the thread/spark plug, the heat index (the so-called “hot” and “cold” plugs) and the size of the gap between the electrodes. Also, one should not forget about the fact that additional symbols can be added to the basic marking, which indicates the individual characteristics of a particular type of candle.
From this variety, you need to choose a gasoline engine or a motor that runs on gas. Then you will need to enter the make and model of the car, after which a table will be displayed indicating all modifications and technical characteristics of the internal combustion engine. Based on the table, further accurate selection of candles is carried out.
Glow plugs Auto-guts that are inside cars
Motul oil for diesel engines and gasoline engines
To uncover…
Glow plugs operate on the principle of a conventional electric heating element. During normal operation of a diesel engine, the fuel in the cylinders is ignited by self-ignition at the moment it is injected by injectors into air pre-compressed by the piston, heated to 700-900°C, so conventional spark plugs are not needed in a diesel engine. Glow plugs in such engines are part of the pre-starting device and are needed only to improve the conditions for the formation of the working mixture after a long period of inactivity (“cold”), especially at low air temperatures (below +5 degrees, when diesel fuel evaporates reluctantly and does not form the necessary fuel for operation). engine mixture with air).
The main task of a glow plug is to reach operating temperature as quickly as possible in order to heat the air in the combustion chamber. The plugs heat up to 850–1300 degrees within 2–30 seconds and consume an average of 8–16 amps each. The duration of the current supply to the spark plug and the voltage level are controlled by a relay or a special electronic unit. Having “turned off” the light on the dashboard, which prohibits the driver from turning on the starter, the relay continues to heat the spark plugs for some time - up to 3 minutes - with the engine running. Often, for this purpose, the voltage is reduced in steps (for example, + 12V or + 24V during initial heating, and +7V further to maintain the temperature of the spark plugs). However, some modern spark plugs are disconnected from the network immediately after the starter is turned off, since they remain hot for the time required to warm up the engine. In the most advanced designs, the electronics monitor the engine temperature, and if it recognizes it as warm enough, it does not turn on the spark plugs at all.
During steady-state operation of the engine, the spark plugs begin to play a different, auxiliary role - they become an element of the fuel atomization system, improving the preparation of the working mixture (the fuel flow is constantly “broken” at the tip of the spark plug, which contributes to the creation of turbulence in the combustion chamber). Also, being a solid body with good thermal conductivity, glow plugs continue to heat the injected fuel, being already heated by combustion processes inside the engine.
Some diesel engines with direct fuel injection into the combustion chamber (without pre-chambers) do not have glow plugs at all, mainly these are relatively large and low-speed tractor engines or engines driving industrial equipment. Some diesel engines, instead of glow plugs, use a pre-heater in the form of a heating grid built into the intake manifold, such as the 5.9-liter Cummins diesel of the Dodge Ram.
Some tractors have only one glow plug, located in the intake manifold and working in tandem with an additional nozzle. When starting, this nozzle continuously injects diesel fuel in a small amount, thereby supplying hot air with diesel combustion products into the combustion chambers. This device is called an electric torch heater.
Model internal combustion engines use glow plugs and at the same time catalytic spark plugs. The fuel mixture of such engines contains highly flammable components. At the moment of startup, these components are ignited by the hot wire of the spark plug. Subsequently, the filament heat is maintained by the catalytic oxidation of alcohol vapor included in the mixture. This article does not discuss such engines in detail.
TalisWoMan › Blog › Tightening without using a torque wrench
A method of tightening without using a torque wrench (taken from the Internet, with a small editorial edit by me) I wondered: “How to tighten a bolted joint to the required torque without a torque wrench if you don’t have a key on your property?” This can be done, I tested it personally yesterday. You will need: 1 ) open-end or double-sided socket wrench, in my case it was a bendable screwdriver for bits with a cavity in the handle into which a meter-long piece of pipe was inserted;
2) spring canter (scales) with a limit of up to 20 kg. I took the electronic ones, bought on Ali. Now we remember our school knowledge. The tightening torque is a certain force applied to a lever 1 meter long. For example, we need to tighten the nut with a torque of 2 kgf*m. To do this, we need to measure the length of the spanner in meters. For example, the length of the key was 0.25 meters. Divide 1 by 0.25. We get the number 4. We multiply four by the required tightening force (2 kgf*m) and we get the figure 8 kg. Since I am a philologist, not a mathematician, I simplified my calculations and the efforts made with a meter-long piece of pipe: it’s easier for a girl to count and twist) Next, we install the screwdriver/wrench on the bolt or nut, attach the hook of the spring scale to the other end of the key and pull the scale ring until the required kg is reached. Thus, in a simple way without the presence of a torque wrench, the bolted connection is tightened to the required torque. Yes, it looks unprofessional when you insert a pipe into a screwdriver, hook a scale to the end of the pipe and pull, looking at the dial (I would even say stupidly), but the price tag of at least 2500 rubles for a torque wrench justifies the moment of shame V=).
Many spare parts for bicycles and not only often indicate the tightening torque of screws/bolts/nuts and other things, so as not to damage the threads and spoil the spare part. The article will be useful for those who want to tighten the nuts according to the manual without spending money on torque wrenches, because they cost not budget-friendly. In principle, if you have extensive experience in torsioning nuts and the ability to translate Newton-meters in your mind into “arm force,” you can do without a wrench, although it is clear that the error will be a couple of Newton-meters, but now let’s talk about how still tighten with the smallest error. So we are talking about installing the rear derailleur. The derailleur nut is screwed to the bicycle hanger with a force of 10 Nm. Divide by 10 and we get 1 kg*m (kilogram force per meter). This means that the maximum recommended force when tightening the nut should be equal to the force exerted by a 1 kg load suspended from a 1 meter long wrench, and the force of the load must act perpendicular to the key! It is clear that looking for a meter key is an extremely thankless task, but there is a way out! General formula: M = 0.1 * F * L where L is the arm length (in cm), M is the moment of force, F is the impact force (weight in kg) That is
we need a 10mm wrench (open-end wrench is most convenient), scales (electronic or mechanical, it doesn’t matter)
So: 1. We measure the length of the key with a ruler, according to Figure.2. Using the formula, we calculated F (in our case = weight in kg.) F=M/(0.1*L). Example: I had an open-end spanner and its length according to the figure turned out to be 12 cm. Substituting into the formula I got: F = 10 /(0.1*12)=8.33 H, i.e. 8.3 kg.3. We hang the scales on the side where we have the cap key (the hook of the scale will not slip, which is why this key is a little more convenient than the open-end key on both sides). We pull the cord/ear of the scale and look at the scale so as not to exceed our xx kg, calculated earlier according to the formula. PS Before all these manipulations, do not forget to weigh a 1 liter plastic bottle of water on the scales and make sure that the scales show exactly 1 kg (with an error of +-30 grams). Possible errors: 1) pull perfectly at an angle of 90 degrees, 2 ) accuracy of measurement of length L3) error of the scales. And yes, it’s better to under-tighten it a little, that is, so that the error is on the smaller side, because breaking the threads on a threaded connection is an unpleasant thing (I already broke it in a fork, and have been tightening it with the scales ever since