Car owners often face the problem of how to disable demo mode on a Pioneer radio. After purchasing and first connecting a device from this company to the on-board network and making the necessary initial settings, the display will not be able to be turned off. The screen will remain on and display a list of the radio's capabilities. However, the device will not provide the user with any hints on how to deactivate this mode. The radio can be used in this condition, but it will cause inconvenience to the driver.
Step-by-step instruction
To find out how to disable demo mode, follow these steps:
- press the Mute button and hold it for several seconds;
- if the demo program does not turn off, it is recommended to turn off the player, open the service menu and hold down the SRC key for a few seconds;
- turn the volume control wheel until the cursor selects Demo;
- turn off demo mode by selecting Off instead of On;
- close the settings menu by pressing the Band button.
Please note that if the red AAC cable from the player is not connected to the terminal that turns on the ignition, the car's battery may be discharged.
How to disable demo mode on a pioneer car radio
To watch online, click on the video ⤵
Removing the demo mode on the radio Read more
How to disable demo mode on a Pioneer radio Read more
Menu of “deep” settings + disabling DEMO mode + disabling time on Pioneer radios More details
How to disable demo mode (constantly lit screen) on a pioneer radio More details
remove DEMO mode on the Pioneer radio More details
How to turn off the radio without removing the Pioneer panel without removing the battery terminal Read more
Disabling demo mode on the Pioneer radio Read more
Pioneer 6400 BT settings More details
How to turn off the pioneer car radio Read more
How to disable Pioneer? More details
Pioneer AVH-1400DVD review Read more
Setting the time, date and language on the Pioneer car radio. More details
Video review of the Pioneer DEH-1500UBG car radio Read more
Pioneer DEH-X3500UI settings overview More details
Pioneer hidden system menu. Initial setup of the radio More details
How to turn off the Pioneer radio Read more
turning off the PIONEER tape recorder Read more
Disabling Pioneer DEMO mode More details
pioneer deh-p5950ib demo mode off More details
Possible problems and their solutions
Modern car players developed by Pioneer are multimedia centers with advanced capabilities and a large number of settings, which will take time to learn. Demo mode is always enabled by default on Pioneer devices. It is intended to demonstrate the capabilities of the radio when selling it.
If you ask the company employees for help, they will answer that the solution to this problem can be found in the instructions.
The user manual contains step-by-step instructions on how to properly set up the radio, but sometimes it happens that the instructions are lost or are not at hand.
Some users experience that the demo mode is activated again after turning the ignition off and on. This is due to the fact that the player's power passes through the ignition circuit.
When installing a player, a service station employee always asks how best to connect it - directly to the on-board network, or so that it turns off when the engine stops. If you choose the first option, the device will constantly receive energy from the battery, regardless of engine operation. In this case, all settings will be saved in memory. If you are not satisfied with the power option that you chose the first time, you need to contact the service station staff again so that they can change the connection type of the player.
If the player is not directly connected to the on-board network, then problems arise with other functions. For example, the date and time settings on the player, as well as the radio station presets, will be constantly lost. But the direct connection also has a disadvantage, since the player will drain the battery when the engine is idle.
Everything for the client, everything for the user. We installed the radio on the car, made the first settings, turned it off, but information messages continue to run on the display, the backlight is shining, and the radio is in a hurry to brag about all its abilities, except the ability to disable this Demo mode. Let's take an example of how to turn off a Pioneer radio yourself.
A modern Pioneer car radio is often a full-fledged multimedia center with a large number of options and various features, for a complete study of which you can create a separate course of lectures for teaching at a driving school. But sometimes half an hour is not enough to study the instruction manual. What to do if the leadership is completely lost? Or if you disabled the Demo mode on your Pioneer or JVC radio, but it starts up again.
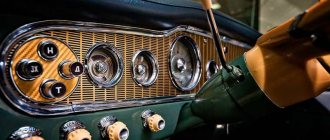
Pioneer car radio
How to disable demo mode on a Pioneer radio
- What is demo mode?
- How to turn it on
- How to turn off
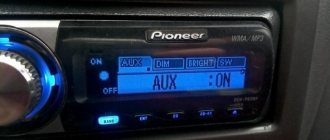
If the car radio continues to light up after connecting, it means it is in demo mode. It may work in this form, but it will be inconvenient to use the device. To disable the demo mode on the Pioneer radio, you need to perform simple manipulations in the settings.
What is demo mode?
Demo mode is designed to get acquainted with the car radio.
It starts automatically after the first connection.
This format does not provide for turning off the radio display. It will remain on even after all initial settings have been made. This is necessary so that it constantly displays all the capabilities of the radio on display. The only thing that the radio does not report while working in demo mode is how to disable this state of the device.
How to turn it on
The user manual describes in detail how to turn off the demo mode on the Pioneer radio, but there is not a word about how to turn it on again. The demo state is activated automatically when connected to the on-board system. If there is a need to enable demo mode after it has been disabled, you can do this as follows:
- activate the boot (engineering) menu by holding the SCR button for 3-4 seconds;
- press and hold the SCR button again until Set up appears on the radio screen;
- turn the volume control to go to demo settings;
- click on the volume control to activate the Demo on state (in some models, to perform this action you need to click on one of the arrows on the sides of the volume control);
- Click on the Band button with an arrow located at the bottom left of the panel to leave the settings.
Are you a car driver?! Then you can take this simple test and find out. Go to test »
Once all steps have been completed, the display will remain on continuously. A list of all available functions will be constantly displayed on the screen. It is not recommended to leave the device in this format for a long time, because... it can lead to a complete discharge of the car battery.
How to turn off
To turn off the demo format of the Pioneer car radio, you need to hold down the Mute button for a few seconds. If this does not help, you need to take a more complicated route and sequentially carry out all the steps described above to enable demo mode. Pressing the volume control will activate the Demo off state.
After turning off the demo mode, you can start the required format of the radio by pressing the SCR button once. Through the engineering menu, you can disable the demo state for other car radios - this is a universal method. Disablement options can be found using a simple search of settings.
After turning off the demo mode, the backlight and ticker will no longer be activated and distract the driver and passengers. It must be remembered that the battery will not discharge after stopping the engine only if the red ACC wire is connected to the contact responsible for turning on the ignition.
The demo mode will turn on again and again if, during installation, the device is connected through the ignition circuit and not through the on-board network. In this case, it does not receive power from the battery after the engine is stopped. In such a system, none of the settings set during the previous startup will be saved.
The advantage of connecting via the ignition circuit is that the radio screen goes out after stopping the engine, but the disadvantage is that the date, time, and preset radio stations will need to be configured again each time. Therefore, it is recommended to still connect the radio directly, disabling the demo mode from the device menu, so that it does not drain the battery while the engine is stopped.
You can change the connection type of the car radio at a service station using the services of a master electrician.
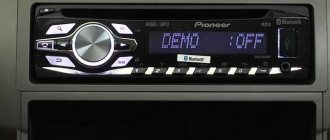
How to complete the demo
When supplied by the Pioneer manufacturer, the device is set to DEMO ON. Immediately after purchasing and connecting the car radio, it is important to understand and disable the demonstration, designed to advertise the device when selling. It is possible to use the Pioneer car radio in this state, but it does not seem comfortable, since when the device is turned off, the backlight does not go out and the creeping line does not disappear from the display.
Disabling Demo on the Pioneer radio is very simple:
- If long pressing on mute does not help, then you need to turn off the Pioneer radio, go to the engineering menu and long press the SRC (Source) key.
- In the settings, turn the wheel to reach the DEMO line.
- Switch from ON to OFF indication.
- Close the settings by pressing BAND.
Pioneer car radio engineering menu
Important: if the red wire (ACC) of the Pioneer radio is not connected to the contact that turns the ignition on/off, the car’s battery will be discharged.
Thus, after purchasing a modern Pioneer car radio, setting up the device is quite accessible for independent actions.
Demo mode disabled
Page 11
To prevent the display from shining too brightly at night, its illumination is automatically dimmed when the car's headlights are turned on. You can turn the display brightness control on or off.
Press the ENTER
to turn the display brightness control on or off.
Turn LEVER
to adjust the contrast level.
As the level increases or decreases, values from to 15.
This unit's rear output (rear speaker output and rear RCA output) can be used to connect a full-range speaker system ( Rear SP:F.Range
Demonstration on JVC car radio
The Japanese from JVC have a demo that turns on automatically if there is no sound playback for several minutes. But disabling the Demo is simple:
- Press the SEL (select) key and hold it until one of the setting items is displayed on the monitor.
- By going through the menu items, select the DEMO OFF item. On some models, select the DEMO ON item and press the button to switch to DEMO OFF.
JVC car radio
Please note: do not open the device case. There is a risk of exposure to laser radiation or damage to the player. There is nothing inside the case intended for user manipulation; servicing must be performed by a qualified technician.
Demonstration on a Sony car radio
To disable the Demo, which starts after turning off the Sony radio, you must follow the following sequence:
- Press and hold the Select key. The Setup Monitor appears.
- Turn the tuning dial until “DEMO” appears, then press the tuning dial.
- Turn the dial to select “DEMO-OFF” and press the dial again. The setup is complete.
- Press the (BACK) key. The monitor will return to normal music/video playback status.
It is important to know: if there is no ACC position in the ignition switch of the car, you need to make sure that the Auto Off mode is selected. When the car radio is turned off, its power supply will be automatically canceled after a while, which will protect the battery charge. If automatic cancellation (Auto Off) is not selected, then whenever the ignition is turned off, you must press and hold the (SOURCE/OFF) key until the monitor turns off.
By the way, many car enthusiasts complain about independently switching the player to another radio wave. The AF (alternative frequency) function is responsible for this. It is responsible for switching to a more powerful radio signal if the selected frequency, in the opinion of the device, is not strong enough.
Manual
The kit includes instructions for using the Pioneer MOSFET 50Wx4 radio. The guide contains 5 main points:
- Before starting operation.
- Device management.
- Adjusting audio parameters.
- Initial settings.
- Other functions.
Each item describes in detail the purpose of the device controls, setting sound quality, working with the tuner and external devices.
Settings
When setting up the Pioneer radio, all actions are performed using a special MULTI-CONTROL joystick. The manual contains detailed instructions for adjusting various parameters.
To call up the main menu, press MULTI-CONTROL. Turn the joystick to select AUDIO, press to select. To go to the previous menu, press, and to the main menu, press and hold the DISP/BACK/SCRL button. The BAND/ESC button will return to the original screen.
In the same way, select: FADER/BALANCE (balance adjustment), PRESET EQUALIZER (calling a graphic equalizer), EQ SETTING 1 (adjusting a graphic equalizer), EQ SETTING 2 (fine-tuning an equalizer), LOUDNESS (loudness compensation), SW SETTING 1 (turn on/ subwoofer off), SW SETTING 2 (subwoofer setting), HIGH PASS FILTER (high pass filter), BASS BOOST (low frequency amplifier), SRC LV ADJUST (adjusting the input signal level). Using the HIGH PASS FILTER and BASS BOOST menus, we remove sound distortion.
The equalizer is used to adjust sound correction. Moreover, the device already has 5 presets: powerful, natural, smooth, superbass. There is also a CUSTOM setting - this is an adjustable curve that we create ourselves. If you adjust the equalizer curve, it will be saved in memory in CUSTOM.
Loudness compensation compensates for insufficient sound pressure in the lower and upper audio frequency ranges at low volumes. Using MULTI-CONTROL select LOUDNESS.
How to turn off
To turn off the Pioneer radio, you need to press and hold the OFF button until the device turns off.
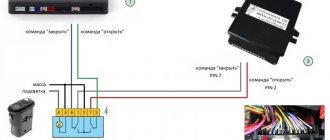
See » Pinout diagram for head unit connectors on Toyota cars
How to use the radio
Shutdown
This is done in the following order:
- Press button 2 and enter MENU. Then select SISTEM, at the next stage press PW SAVE
, all that remains is to turn off the radio with the OFF button. This is how we switch to energy saving mode; - Turn off the radio with button 1. At the same time, a clock indication should appear;
- We press button 4, eventually the display goes out.
Having completed this procedure once, you can subsequently turn off and turn off the radio with the standard button 1. Sometimes, resetting the settings can occur after disconnecting the speaker system from the power supply. In this case, you should repeat the steps described above.
How to setup
Error 19 on the radio pioneer flash drive
The Pioneer radio settings affect the quality of radio reception and music broadcasts. Changing the operating parameters is done through the menu; the settings are described in the instructions. The list of adjustable parameters depends on the modification of the player and the firmware version written into the control unit.
Disable demo
The microprocessor of the head unit supports a demonstration mode, which consists of broadcasting an information message to the display. To disable the parameter, press the volume control and go to the radio settings, then turn the knob to find the System section. Rotate the potentiometer crown to select the Demo Off parameter, then press the knob to confirm the selection. The user needs to turn the knob briefly again, select the Yes option and press the knob to make the change into memory.
Radio
To properly configure the radio receiver, you must:
- Use the SRS/OFF button to select the radio station reception mode.
- By pressing the BAND button, the user selects the range of received waves. The design of the equipment supports radio stations operating in the ultra-short, medium and long wave range.
- Then we set the frequency of the radio station by pressing the broadcast scan buttons. The user can preset the scanning step from 2 fixed values - 50 or 100 kHz. Additionally, you need to go to the settings menu and enable manual broadcast scanning (MAN parameter in the SEEK section).
- Record a wave into a memory cell by pressing and holding the buttons designated 1-6 (located under the screen or on the sides, depending on the modification).
You can automatically search for radio stations using the BSM parameter, selected through the setup menu. The equipment independently scans the airwaves and writes into memory cells the frequencies of stations with maximum signal strength.
How to set the time
The user can set the clock through the operating menu, which is called up by pressing the volume control. To adjust the clock, use the CLOCK SET section; changing the value of hours or minutes is done by rotating the volume control. The parameter is set during the general setup of the radio in the car, the time value is displayed on the liquid crystal display.
How to change language
To change the language settings on the Pioneer radio, press the rotary encoder to bring up the menu. Then you need to move the cursor to the required section by turning the potentiometer washer to the left or right. After finding the LANGUAGE section, the user clicks on the knob and enters a subsection that includes 3-6 languages (depending on the modification). The owner selects the required value by turning the corrector; the parameter is set by briefly pressing the knob.
How to turn off the backlight
The design of the equipment uses a step dimmer, which allows you to change the intensity of the backlight of the screen and buttons. Settings are made through the ILLUMINATION section; some models support automatic color switching and turning on the key backlight when a phone call arrives.
How to reset settings
Resetting the settings in Pioneer equipment means rebooting the microprocessor while simultaneously resetting the memory. To start cleaning, you need to press the rubber RESET button on the front panel with a toothpick. The settings are reset after disconnecting the battery from the vehicle's on-board network.
Clicking noises when the engine is running
Many owners of standard radios are faced with the appearance of periodic clicks when the motor is running. To begin with, you need to understand the reason for the appearance of such a not entirely pleasant phenomenon. It's all about the car's energy system. When the power unit operates, small voltage surges regularly occur. This results in interference.
In principle, the radio tape recorder has protection against this. But the standard noise suppressor does not always cope with the problem. Sometimes this happens due to its failure, which is not a rare occurrence. You can fix the problem by simply connecting power to the radio through a noise filter. This is guaranteed to save you from clicking acoustics.
What to do if the Pioneer radio clicks when the engine is running
Another common problem faced by owners of Pioneer radios is clicking noises when the engine is running. That is, if the engine is not running, the radio operates without problems or interference. When the engine starts and runs, the sound is distorted by constant clicks.
This problem occurs due to a failure or complete absence of an interference absorber in the radio. The interference itself inevitably appears, since when the engine is running, small voltage surges constantly occur, which will “result” in clicks. To fix this problem, you need to supply power to the radio through a noise filter.
Speaker wheezing
Some drivers encountered a situation where the speakers began to wheeze. At the same time, this does not happen all the time, but only from time to time. Of course, the problem could be a faulty speaker. But, often the reason turns out to be unsuccessful configuration of the system itself. Therefore, troubleshooting should begin by viewing the settings. You are interested in the balance menu. Here you can evaluate how the sound is distributed between the speakers. Pay attention to the uniformity of its distribution. Most often, unbalanced low frequencies cause wheezing.
If everything is correct in the settings, then it makes sense to pay attention to the wire connections. There may be a bad connection somewhere. That is why the speaker wheezes. This may be indirectly indicated by the irregularity of wheezing. Especially if the speakers are in the doors. When you open the door, you move the wire, one time the contact may be normal, another time, not so much. The cause of wheezing may be a broken capacitor.
. In this case, you need to check it.
Take a radio component with the same capacity. You need to connect it in parallel with the standard one. After that, turn on the radio and check the result. The absence of wheezing indicates a problem with the capacitor. In this case, the current passed through the additionally installed part. Unsolder the faulty air conditioner and install a new one in its place.
An example of setting the equalizer on a radio
How to disable silent mode on a Starline alarm
This setting is safe for an audio system, but is not absolutely true for all audio systems. Further adjustments are made for the specific system and listener.
Setting up the radio depends on its specific model; here we will look at the settings that are available on almost any radio.
1. Setting up the radio: 1.1 Bass Boost - EVIL! Forget about him! Set it to 0 or OFF1.2. Loudness - loudness compensation; in systems with external amplifiers, we first set the loudness compensation, then we coordinate the levels of the GU and amplifier, or do not use this function at all. If the GU and the external amplifier are matched in level and then turn on the loudness compensation, clipping may occur! 1.3. Equalizer - you can use it to compensate for shortcomings in the sound of the system; personally, I initially set it completely to 0, then, when identifying shortcomings in the sound, I adjust the sound over time. Here, too, when increasing certain frequencies on an external amplifier, clipping may occur, it is worth remembering. 1.4. Sound Retriever and other various “sound improvers” - As in the case of loudness compensation, they are set before the GU is coordinated with the amplifier, or we do not use it at all. 1.5. Radio crossover: If there is one, set it to - 1.5.1 HPF - Depends on the type of speakers, open the specification and look at how many Hz it plays and set the cutoff. Approximately 16 cm midbass from 80 Hz, 13 cm - 100-125 Hz. Mid 150-200 Hz. Once again, this is not the ultimate truth, it all depends on the specific speaker and how many watts will be supplied to it (the lower the cutoff, the less watts can be supplied to the speaker). The order of the filter is by ear (the higher the order of the filter, the less likely it is that the speaker will fail at high powers) 1.5.2 LPF - Depends on the type of acoustic design of the subwoofer. Approximately 60 - 80 Hz. The filter order is by ear. It is advisable to set the level to 0, and adjust the volume directly from the amplifier.
The amplifier's settings depend on whether it is equipped with filters. If HPF and LPF are set on the radio, then it is not necessary to set them on the amplifier; you can simply open the filter as much as possible. If there is no crossover in the radio, we set the cuts on the amplifier. Turn Bass Boost to 0
2. Setting up the amplifier for speakers: 2.1. Turn on HPF filter 2.2. We set the cutoff in the same way as described in paragraph 1.5.12.3 Set Gain (Level): - Turn on a well-known track. — We set the maximum volume on the radio (WITHOUT DISTORTION). This does not mean that you need to turn the volume up to maximum, for example: the pioneers have a maximum of 62 volume divisions, we set it somewhere around 45-50. Different models of radio tape recorders behave differently, at a bass club I tested it with a Pioneer DEH 80PRS oscilloscope, even at a volume of 62 without “improvers” it does not clip. But it’s not a fact that your radio will behave the same way, so turn it up to about 80% of the maximum volume. — We start turning Gain (Level) until we hear distortion in the sound, as soon as we hear it, turn the Gain back a little. — Play other tracks and listen to see if there will be any distortion on them, if there is, then turn down the Gain—Remember! The volume that you set on the radio when setting Gain is the maximum! No more twisting!
3. Setting up the amplifier for the subwoofer: 3.1 Turn on the LPF filter (if you are using a monoblock, you don’t need to turn anything on) 3.2 Set the cutoff in the same way as described in paragraph 1.5.23.3 Setting up the Subsonic (infra-low-pass filter). If you have a subwoofer designed like a Bass Reflex (FI), Quarter-Wave Resonator (QW), or Horn, we definitely use Subsonic. The filter is set 3-5 Hz below the box tuning frequency. 3.4 Gain is adjusted in the same way as in paragraph 2.3
The initial setup is complete, keep an eye on the speakers for the first time; minor adjustments to the settings may be required. Don't forget to warm up your speakers after purchase. Provide proper nutrition to avoid clipping! Follow the prosado
Source
Subwoofer doesn't work
In standard installed stereo systems with a Pioneer head unit, the sound from the subwoofer sometimes disappears. The problem is an unsuccessful output to the low-frequency speaker. The problem is treated in 2 ways. If the radio is new and under warranty, you can try to exchange it. But this does not always happen; more often it is repaired and returned.
Another option is to re-solder the output yourself. Perhaps the second option is the most optimal. Self-made repairs are much more reliable than warranty repairs. Moreover, no difficulties should arise there.
Conclusion
. Acoustics in a car often require quite a lot of attention. It needs to be configured correctly, this will allow you to make the most of its technical characteristics. How to turn off a Pioneer radio is a question often asked by owners of such equipment. In fact, this is done so simply that the manufacturers didn’t even mention it in the instructions.
I'm not a music fan, but I love listening to music on the road. When I drive in the city, I listen to the radio more, and when I’m on the highway, I listen to music from a flash drive. This determines the choice of radio. Therefore, having bought a new car, I also bought a radio, the simplest Pioneer MVH-150UB.
Everything would be fine, but the radio tape recorder connected to the dealership did not want to turn off. Everything in the car turns off after you remove the ignition key, but the radio did not want to do this. If we follow the manual, the best we could achieve was to switch it to the clock display mode, but the backlight of the buttons was on. So it didn’t take long for the battery to drain... I had to unclip the panel. And today I eliminated this “jamb”. I share with everyone, because... I think there are those who also bought themselves a Pioneer MVH-150UB radio.
How to connect
To connect the Pioneer car radio, you can use 2 methods.
- Through a standard ISO connector.
- Without using standard connectors.
The first option using ISO connectors is preferable, but it may not be used in all cases. So in some car models there are simply no suitable connectors for connection. If this option is chosen, then there should be no difficulties. In this case, based on the color connection diagram, you need to correctly connect the connectors to the mating parts.
If there are no connectors for connection, you can go in other ways. For single-unit and dual-unit devices, the process for connecting the Pioneer radio will be slightly different.
Connecting 1 din occurs in several steps:
- The decorative panel is removed from its seat using a screwdriver.
- The plugs are removed from the wires, after which the wires need to be connected to the mating ones (a diagram will help with this).
- To protect against short circuits, each connection must be carefully insulated.
- The wires are secured with clamps, which increases the reliability of the overall structure.
You need to connect the Pioneer 2 din radio in a slightly different way:
- If there is no battery wiring in the car, you should use a stranded wire. It is not recommended to use the wires provided in the kit, since their cross-section is not large enough. In this case, the length of such a connection cable must be no less than the distance from the battery to the place where the radio is connected.
- When connecting, do not twist the wires together, as this may cause a decrease in power and interference.
- To properly connect the Pioneer car radio, the wires from the batteries must be connected after completing the assembly of the device.
Scheme
Before connecting the Pioneer car radio using ISO connectors, you should study the entire wiring on the new device. The connectors are a group of contacts (each contains 8 wires).
During installation of the radio, the connection occurs as follows: each contact is connected to the speaker system on one side, and to the power supply on the other side. This system is called pinout of car radio connectors.
Even a non-professional can cope with such work, since the principle of connecting the wires of the Pioneer radio can be traced in the diagram. For easier differentiation, all wires are painted in different colors. You can read more about this in the operating instructions in Russian.
In this case, you need to remember the fact that connection is only possible through a fuse. This minimizes the risk of problems occurring.
The wide red wire should be connected through the ignition switch to the battery. With this connection, the head unit of the speaker system will be activated only when the ignition is turned on. When parked for long periods of time, the device will need to be disconnected from the battery to operate. In some manuals you can see a recommendation to connect the yellow and red wires. This should not be done, as the battery will discharge faster.
Wide wire with black insulation. It is negative and is designed to be mounted on the car body or the “-” battery.
The wire is white with a blue stripe. When using it, an antenna, an amplifier and a subwoofer are connected to the speaker system.
The next step is to pin out the speaker connectors:
- The cable with the gray winding must be secured to the “+” terminal, which can be found on the right front speaker.
- Gray cable marked with a black stripe. Together with the previous wire, it is attached to the speaker, but to the negative terminal.
- The cable with white insulation is installed on the left speaker on the positive terminal.
- Black and white insulation indicates that the cable is intended for the “-” terminal of the left speaker.
- The green wire in the Pioneer car radio wiring diagram should be installed on the left rear speaker. The “+” terminal is intended for it.
- The black-green one is attached together with the green one, but on the “-“ terminal.
- The cable with purple and black-violet windings are installed on the right rear sound element at “plus” and “minus”, respectively.
Why tune a Pioneer radio?
The audio system in a car consists of several components. The first versions were equipped with the minimum - a pair of speakers on the rear shelf and a radio on the front dashboard. But progress does not stand still - the receiver was replaced with a radio, and the number of speakers increased several times. If the radio is installed in the car at the factory, you usually do not need to configure anything. But the equipment of several companies (among which the leader in audio equipment is Pioneer), as a rule, is purchased by the owner separately. At the same time, the speakers in a car are different. In order to optimally adjust the sound quality and “make friends” between the existing speakers and the new radio, you need to make several adjustments in the latter.
What can be improved
Speaking of settings, it is worth clarifying that Pioneer regards the concept of a radio tape recorder not just as a device for listening to radio or recordings. In this device you can see the date, time and much more if they are configured. Information can be presented in several languages - either Japanese (since the brand is Japanese in origin), or, more often, English.
Whether there will be Russian on the menu depends on many factors, but even the English menu is easier to understand than the Japanese one. Some additional features, such as USB ports, will also need to be enabled through the menu. Not to mention the above problem of connecting specific speakers.
Settings for basic functions on Pioneer
Disable "Demo"
Before making changes to the radio settings, turn off the “Demo” mode. The Pioneer radio and a number of other modern car audio systems have a functionality demonstration mode. Until it is turned off, any setting will be saved exactly until it is turned off. If you don’t want to set your preferences again every time you turn it on, you need to turn off the mode.
The main control knob on Pioneer radios with the signatures of the main control buttons
This is done as follows:
- Turn off the radio (press and hold the SRC key until the display goes out).
- Press the same key again and hold it until the start menu appears.
- Use the volume control to select the “System” option in the menu, and then “Demo”. The On position will be indicated to the right of it.
- Any of the arrows on the sides of the volume knob switches the position to Off.
- To save the settings, press the Band key. The mode is off, saved in memory, the radio turns off. You can move on to other settings.
The volume knob in the technology of this brand also functions as a joystick - in addition to rotation, it can be depressed and moved up and down or left and right to make certain settings.
Setting the time
- Repeat points 1–2 from the instructions described above.
- Then, by rotating the knob in the menu, select the “System” section.
- Press the knob and select the clock setting in the new menu.
- Use the right arrow to enter settings.
- Rotate “Volume” counterclockwise/clockwise to set the value.
- Click on it once to confirm.
- Use the left arrow to exit the settings.
You can set hours, minutes and seconds separately. The selected option begins to flicker.
Language and calendar
Like the clock, these options are located in the System menu. The setting principle completely repeats the clock setting. Like a clock, the calendar can be set individually - day, month, year.
How to install and remove
The Pioneer radio is installed using a rectangular hole made in the instrument panel or center console. To hold the body, a metal shaft is used, which is installed in the window and secured with folding tendrils of a triangular configuration. The head unit is inserted into the shaft all the way and is held in place by latches located on the sides of the housing.
To dismantle the car radio, you must remove the decorative frame located around the perimeter of the case. The clamps are disconnected using keys included in the device set or purchased separately. After removing the case from the shaft, you should disconnect the pads that connected the radio to the on-board network and car audio.
How to remove the panel
To dismantle the front panel, you need to press a separate button and then remove the assembly from the mounting socket. To store and carry the tape recorder panel, a plastic case with foam inserts is used to protect the unit from scratches.
Radio in the car
Stations in the radio can be tuned in three ways. Depending on the model, 18 or more stations can be memorized.
For convenience, we assume that the receiver is already turned on - switching to it is done by pressing the Band button once.
Method one is the easiest
- Knowing the frequency of the station, briefly press the left and right buttons to dial it on the display.
- Then hold one of the six buttons (1–6) below the display. The dialed station will be stored in memory, and a corresponding indication will appear on the screen in the form of a number repeating the button number.
- Dial the next frequency and press the next free button.
- Wait for indication on the display.
This is repeated 6 times - for six different stations.
Stations 7 to 12 and 13 to 18 are stored in the following memory banks. Switching between them is done by pressing Band once.
Method two
- While in receiver mode, hold down the right button for one second.
- The radio will begin searching for a station.
- Having found the first one, it will go into playback mode.
- If you are satisfied with the station, save it by pressing the buttons below the display.
- Then repeat steps 1–4 to select further stations
Storing the station and selecting banks is the same as in the first option.
Method three
- From the main menu you go to the functions menu.
- Scrolling through it, you find the BSM parameter.
- Select by pressing the up or right arrow.
- They wait for a while.
- The radio will check the entire range, find stations and arrange them according to signal strength.
- Then it will play the first one.
- You can save stations in the same way as in other methods. You can scroll through the selected ones by single short presses of the buttons under the display.
There is one thing about this method - not all domestic radio stations are included in the list of those found for various reasons. If you have gone through the entire list, but have not found the desired station, you can proceed as follows:
Video: creating a budget combination of car radio + subwoofer for a car
Next, using the twist wheel or the movement arrows (depending on the model), we look for and go to the SW Kontrol item. After this, we find ourselves in the sub-item EAR SP FUL, which must be changed to SW using the arrow or knob, after which we turn off the radio.
After this, it is necessary to further configure the subwoofer, for which we turn on the radio again and go to the preset menu, where we look for and enter the SW SETTING1 item. Once in this submenu, you need to select one of three types of settings: NORMAL, REV and OFF. As practice shows, most users choose REV.
Next, you need to go back to the preset menu and select the SW SETTING2 sub-item, where we first indicate the frequency (recommended value 50 HZ), and then the power level (ranging from -6 to +6). In this case, you should choose the ranges based on the characteristics of the installed speakers and your hearing perception.
The last action in this paragraph is to regulate the loudness of the radio, for which we go to the menu and look for the LOUDNESS item, where we select the HIGH value.
How to set up the radio
There are three types of radio settings in Pioneer radios:
- Press or look for the FUNC button/menu in the menu, and then look for the BSM sub-item, which is responsible for automatically searching for radio stations. The search is activated by pressing the up or right key, after which the first station found will automatically turn on.
- While in receiver mode, which can be accessed by pressing the BAND button, hold down the right key and hold it for several seconds, then release it, thereby starting the process of scanning radio stations. After the station is found, scanning will be paused, after which the user can remember the radio station by pressing and holding the corresponding key - for example, 1. If the station is not needed, press the button to the right again, and the scanning process will continue.
- While in the radio station menu, briefly press the key/joystick to the right or left until the required wave of the radio station is found, then press the button (1–6) to memorize it.
External ports
- In addition to the radio, the radio can play music from external devices or CDs (older versions).
- To be able to connect external devices, you will need the same “System” menu described earlier in setting the time.
- Go to the menu as described above.
- Scrolling through the menu, select the AUX, USB or Bluetooth option (if this feature is supported).
- Use the arrows on the sides (or tilt the handle itself) to switch the position. There are two options available - enabled (On) or disabled (Off).
- Choose to enable the desired port.
- Press the joystick once to confirm.
- In the same way as in setting the time, exit the menu.
- Further connection depends on the models of the radio and the connected device.
Bluetooth connection
It should be remembered that for the connection via Bluetooth to work correctly, like most other devices that support this function, pairing will be required. The PIN code is entered on the radio and repeated on the device (sometimes, especially if the device has already been connected via Bluetooth, you will only need to enter it on the radio).
To enter the pin code on the radio, take the following steps:
- They turn it off.
- Hold down the power key and go to the initial menu.
- Rotate the joystick to find the PIN CODE INPUT function (will appear if BT is enabled).
- Move the joystick up and down to enter the code. If you need to move between symbols, do it by swinging the handle left and right.
- Confirm by pressing the knob once.
- Exit the menu.
Now you can activate the mode on the device and try to find the radio. Those who like to assign clear names to devices can use the above method, but they must select EDIT DEVICE NAME rather than PIN CODE INPUT. The remaining steps are identical.
Important. Pressing to confirm must be done once. Clicking on the same menu again will reset the code and require you to enter it again.
In the radio, the photo of which is presented below, the 3.5 AUX jack socket is located to the right of the radio control buttons, and the USB is behind a plug with the USB brand logo.
Radio "Pioneer" without CD, but with USB and AUX support
Turning off Demo mode
Immediately after purchasing and connecting the radio, you should figure out how to disable the demo mode, intended for displaying the device in the store. It is possible to use the radio in this mode, but it is inconvenient, since when you turn it off, the backlight does not go out, and inscriptions with various information run across the display.
Disabling demo mode is very simple:
- We go to the hidden menu by turning off the radio and holding down the SRC button.
- In the menu, turn the wheel to reach the DEMO item.
- Switch demo mode from ON to OFF.
- Exit the menu using the BAND button.
You can also set the date and time in the hidden menu by going to the System section. The time display is switched here (12/24 hour mode). Then open the “Clock Settings” item and turn the wheel to set the time. In the System section there is also a language setting (English/Russian).
If your settings are reset when you turn off the ignition, the article “how to connect a radio” has the answer to this question