Almost every car owner asks the question of improving roadway lighting. Drivers of Gazelle Business trucks, which are used exclusively for commercial transportation, will not be an exception. Considering weather conditions and cramped loading and unloading areas, equipping additional light sources will add convenience and safety.
The places under the PTF are closed with plastic plugs
GAZ Gazelle Next Trudyazhka › Logbook › Installing PTF
Well, as planned, I installed the PTF.
To install the PTF, I assembled the following kit: — PTF from BOSCH Article: 09.998 Catalog number: ALRU.676512. 073/074 (073 - left and 074 - right) Manufacturer: BOSCH (bought in a car store for 1850 rubles)
And so, in order, the installation process: 1. As I wrote earlier, I installed additional buttons on the control panel, including the button to turn on the PTF. 2. We install the relay and fuse in their standard places, according to the factory diagram, they are installed as follows: - with the fuse in the first cell (on the lower right side). - relay in the second cell (on the upper left side)
To install the relay and fuse, open the fuse box in the engine compartment, remove the cover from it, unscrew it from the mount and remove the lower protective casing from it.
Let's start installing the fuse: To install it, you need to prepare and install one wire with two terminals (female). One terminal of this wire is inserted into the existing (hole) groove for the fuse, the second terminal will go into the existing (hole) groove for the relay. I’ll immediately answer the question “Why is there one fuse terminal?”, because the second one is already there, it is powered from the positive bus of the fuse block.
Next, we install the relay: To install it, you need to prepare and install three more wires with terminals (female) into the grooves available there (holes). Let's look at the diagram for connecting the relay: - power to the relay coil (-) - power to the relay coil (+) - power input (+) - power output (+) That is, to connect it we need to connect the contacts as follows (I will write the colors, as in the photo below): — we take the ground from the high beam ground relay wire (black wire); — control wire from the PTF power button, which was taken out of the cab (yellow wire with a red stripe); — power supply (+) from the fuse (lilac with a black stripe); — wire supplying power (+) to the PTF (lilac).
3. We route the wiring from the terminal (power output (+) along the side members to the PTF. 4. We check the assembled wiring, to do this we connect the PTF, turn on the dimensions and turn on the PTF using the button. 5. After checking, we assemble and install the fuse box. All work in the engine compartment and in the cabin are finished, we move on to removing the bumper and installing the PTF in it.
6. We make holes for PTF. I made holes for the PTF without removing the bumper. To make the holes quickly and accurately, I used an 80mm crown bit. on wood. Here is the result of such a cut with a crown
The original source where I got the information on connecting the PTF
We drive and enjoy the next improvement. Good luck to all!
Source
About fog lights
Conventional headlights are of little use in fog, rain, or heavy snowfall: they make the space in front of the car not visible and are limited by a whitish veil, especially in long-distance mode. This happens due to the reflection of light from drops of fog, rain, and snowflakes.
In such a situation, an indispensable assistant is a fog lamp unit (FTL), the installation of which on any car will allow you to evenly illuminate the road and avoid dangerous situations.
But it is important not to forget that headlights are different, and knowing something about this will not hurt any driver.
Russian fog lights produced at the Bosch-Ryazan and Avtosvet enterprises have good characteristics. Quite a budget price is another advantage of such products.
Headlights from Asian companies Al Khateeb and Saca are more attractive in appearance, but their cost is twice as high as Russian ones, and high power often leads to overheating and deformation of plastic parts.
The devices of the German company Hella are considered to be the highest quality fog optics, but this pleasure is not available to every driver due to the cost.
When purchasing, first of all, pay attention to the appearance of the headlight (set): “fog lights” have a marker in the shape of the letter “B”. Next, the tightness between the diffuser and the reflector (housing) is checked. Violation of the tightness of this connection will reduce the life of the headlight.
Types of fog lights
Based on their shape, Gazelle fog lights are divided into rectangular, square and oval, but the shape of the body does not play a special role and does not give any special advantages to one over the other.
“Fog lights” may differ in optical designs. Thanks to the use of different options, the issue of the optimal ratio of the maximum luminous flux and the minimum power consumed to provide it is resolved to varying degrees.
The most widely used headlights are those with a parabolic reflector. With this scheme, the installation location of the light bulb is aligned with the focal point, which allows the luminous flux to be formed in the form of a horizontal strip. A special screen limits its upward spread. The headlight efficiency is 27%.
Fog lights with a free-form reflector have higher efficiency (up to 45%). The design allows the use of a significant amount of light, providing a maximum area of its distribution. However, headlights with this optical design are expensive and have not yet become widespread.
READ Teamspeak how to install Russian language
Replacing the headlight
How to install fog lights on a Priora
Headlights on a GAZ-3302 with an on-board 12 V power supply are marked by type: 0 301 215 203 for the right unit, 0 301 215 204 for the left unit. The DRL lamp unit provides the following illumination:
- high beam - H1 12 V, 55 W lamps are used;
- low beam lighting - H7 12 V, 55 W bulbs are installed;
- front marker – W5W 12 V, 5 W;
- front turn signal - a PY21W 12 V, 21 W bulb is used.
Light elements change independently. After replacement, the light beam is adjusted through a gear wheel for the vertical and horizontal planes.
Main stages of work execution
The old-style GAZelle has standard headlights with a soft reflector, which gradually rusts. Often blocks lose the tightness of the lid connection, and drivers often complain about incorrect connection of wires. To correct the situation, the structure is disassembled, all the light bulbs are removed and a complete reinstallation is carried out.
Self-replacement begins with the preparation of new elements; an LED strip is installed as side lights:
- Thoroughly degrease the inner surface.
- Wait 3 minutes until the solvent evaporates.
- Apply double-sided tape to the LED strip.
- Place the LED strip along the edge of the turn signal.
Removing glass for the GAZ-3302 model:
- Warm up the old headlights with a hairdryer, directing the air flow onto the glass.
- Use a thin screwdriver to pry the glass, lift it, and run the tool around the perimeter.
- Clean the reflector or replace the part.
- Prepare the seat, remove any remaining glue.
- Apply a layer of sealant to new glass.
- Twist the wires and bring them out behind the reflector.
- Install the glass into the seat; use a tourniquet to tighten the structure.
- Install the turn signal.
- Connect the new dimensions: the plus is connected to the yellow wire of the marker wire, the minus is connected to the common cathode of the headlight.
Choosing a location for installing headlights
An important point in the configuration of any car is the installation of fog lights. "Gazelle" is no exception in this matter, taking into account the commercial all-weather nature of its operation.
There are two options for installing headlights on the Gazelle: on the bumper and on the roof. Traditionally the first one is used.
The second option does not fit well with the traffic rules, since this document establishes restrictions on the placement on the vehicle of lighting equipment not provided by the factory. Installation of headlights on the roof is permitted only if the vehicle is operated in difficult conditions: gravel road surface, off-road.
The first option also has limitations: you can install fog lights on a Gazelle no higher than the level of conventional headlights, while the dimensions of the car are not violated by more than 400 mm, and the distance from the headlights to the road surface should not be less than 250 mm.
How to Connect Fog Lights to a Gazelle
Installation process
Installing fog lights on your own begins with developing a connection diagram. A properly designed circuit avoids unnecessary wires and ensures reliable operation of the electrical circuit. It is recommended to carry out installation work in the garage, although many owners install it outdoors.
There are three installation methods:
- into standard openings;
- on the outer bracket;
- into a blank bumper not intended for installing headlights.
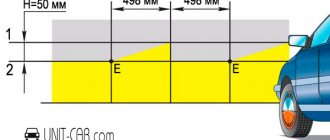
The setup is done using the homemade template presented below. The template is installed perpendicularly at a distance of 5 m from the car headlights. The adjustment is made until the top edge of the light spot coincides. The matching line is located 100 mm below the height of the center of the lamps.
Approximate view of the template for customization
Adjusting your fog lights increases driver visibility and reduces the risk of blinding oncoming drivers.
Installation Guidelines
Fog lights on the Gazelle are installed with the obligatory consideration of the power of their flow. The use of PTF is prohibited if this indicator exceeds the power of the main light sources.
Headlights must be installed symmetrically relative to the axis of the car.
If the factory has already provided and marked on the bumper the installation locations for fog lights, then you should follow the factory recommendations and install the headlights in these areas.
After fixing the PTFs, the correctness of their adjustment must be checked. It is advisable that this be done at a service station by a qualified electrician. This step is perhaps the most important of the previous ones, since the quality of the fog lights depends on it. Only in this case will they be useful equipment.
Connecting "foglights"
After the fog lights are installed on the Gazelle, you need to connect them to the on-board electrical network. This work requires certain knowledge, otherwise not only electrical but also fire safety standards may be violated. To correctly complete this step, you will need a wiring diagram for fog lights (Gazelle must be equipped with an on-board network diagram).
First of all, you should check the proportionality of the cross-sections of the wires of the on-board network and the wires included in the headlights. A minimum cross-section of up to 0.75 mm is allowed. If you use wires of a smaller cross-section, they will overheat and then catch fire.
It is mandatory to disconnect the on-board battery. This measure is necessary in case of erroneous connection of the PTF and a short circuit in the circuit.
If the set of headlights does not provide a relay for turning them on, you should purchase and install one, since a regular button may not ensure normal operation of the PTF due to the high current of their power supply and the burning of its contacts.
PTF power is supplied only through dedicated fuses, otherwise a malfunction of the headlights and their wiring will lead to a shutdown of the entire on-board electrical network of the Gazelle.
The headlights can be considered fully installed if, after completing their installation and connecting the battery, all vehicle devices, including lighting fixtures, work normally.
Turnkey body repair and painting of your car in Moscow
The Mega-Service company in Moscow installs and replaces fog lights. Installation of flashlights and lamps on a car must be done at a car service center. By coming to our salon, you will not need to waste your time and expose yourself to danger.
Work diagram for installing and replacing car fog lights.
- Immediately after contacting our body repair center, our manager will contact you without fail; you will definitely discuss your problem with him, discuss the timing and approximate cost. The manager will also determine which center to send you to.
- The next step will be to inspect the Gazelle Next car. We not only employ good technicians, but also use high-quality professional equipment to inspect cars. The correct lantern and lamp will be selected.
- Our technicians will immediately identify the problem, introduce you to the work, show you a diagram of the work that needs to be done and inform you of the final price of this car improvement service.
- There is no need to pay anything in advance! You pay for the service only after you pick up the car, check the installation or replacement of the lamp and flashlight, and only after assessing the quality and fully connecting the equipment, you will have to pay for the service.
PTF for "Gazelle" series "Business" and "Next"
The problem of safe driving in difficult weather conditions gives rise to the following question: “Which fog lights (Gazelle-Business - your car) should I buy? Is it possible to install PTFs designed for other cars?”
The difficulty lies in mounting the headlights specifically for this car. A mistake in choice can be costly for the owner of Gazelle Business. According to the majority of drivers and car service specialists, the best option may be the Lada-Priora fog lights, although the mount will still have to be modified: an adapter will be required.
The fog lights installed on the Gazelle-Next will not create problems for the driver similar to those encountered by the Gazelle-Business.
This model is equipped with anti-fog devices from the manufacturer.
To bet or not to bet? Drivers' opinion
Judging by the reviews, drivers unanimously welcome the installation of fog lights. The only question is what kind of headlights to put on the Gazelle. The automotive industry has only now “grown up” to install them, and the first models were deprived of this. Therefore, drivers most often address this problem in specialized forums.
Drivers also believe that it is better to use yellow fog lights, but they should not skimp on good PFCs.
They recommend Osram All lamps for fog, and Night Breaker or Bosch lamps for snow.
Source
Installing fog lights on a gazelle
Contact group: Write if you have any questions or ideas.
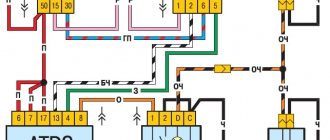
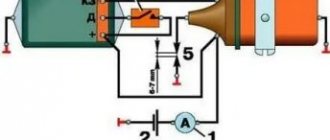
fog lamp diagram
When installing fog lights on a VAZ 2114 and modifications, on cars after 2005, in the cabin you will most likely find a connector for connecting the button connected to the mounting block. Therefore, you will only need to assemble the circuit in the engine compartment. The complete connection diagram is shown below. The disadvantage of this scheme is the same as that of the VAZ 2110 and I propose the same solution. diagram fog lights does not suffer from the disadvantages of circuits for VAZs, and almost all cars are equipped with these headlights. Unlike the Volga, its closest “relative”, the Gazelle , is practically not equipped with fog lights. Therefore, you have to make the connection yourself. When connecting, it should be taken into account that on new panels the central light switch used may have a position for turning on the fog lights and it can be used when connecting, so as not to install an additional button or key. The simplest connection diagram is shown below. The same scheme can be used for other cars.
The more broken down the car, the louder the radio screams from there.
Almost every car owner asks the question of improving roadway lighting. Drivers of Gazelle Business trucks, which are used exclusively for commercial transportation, will not be an exception. Considering weather conditions and cramped loading and unloading areas, equipping additional light sources will add convenience and safety.
The places under the PTF are closed with plastic plugs
How to properly install fog lights on a Gazelle Business: connection diagram
The more broken down the car, the louder the radio screams from there.
Almost every car owner asks the question of improving roadway lighting. Drivers of Gazelle Business trucks, which are used exclusively for commercial transportation, will not be an exception. Considering weather conditions and cramped loading and unloading areas, equipping additional light sources will add convenience and safety.
The places under the PTF are closed with plastic plugs
Where to post
We need to start by choosing the place where our new foglights will be located. Traditionally, either a car bumper or a cab roof is used for these purposes. However, with the second option there may be difficulties in coordinating with traffic rules.
Note! According to these standards, the use of the roof is permitted for vehicles with all-wheel drive or in difficult operating conditions - dirt roads, potholes, etc.
Additionally, you need to know other requirements of the traffic police rules.
So, the installation of Gazelle fog lights must meet the following standards:
Bumper mounting kit
Among other nuances that can be caused by installing fog lights on a Gazelle, you should pay attention to the shape of the products, as they can be rectangular, square, oval, etc. Place them in the places recommended by the manufacturer.
If this does not work, then you can cut holes in the existing bumper or buy a new one, specially prepared for this. The price of purchasing a new bumper may not be acceptable for every Gazelle owner, so we will further discuss how to do this without extra costs.
What to consider when connecting
When connecting, keep in mind that the new Gazelle instrument panels are equipped with a central switch, which has a separate position for the fog lights, so you don’t have to embed a separate button.
A number of points regulate where and how additional lighting fixtures should be installed:
In some cases, traffic regulations allow the installation of fog lights on the roof of a vehicle. For example, if we are talking about an all-wheel drive vehicle with high cross-country ability. Or its operating conditions are so harsh that even making stickers for the headlights is not able to protect them from stones.
PTF before installation
Install on the front bumper
At the same time, in the first photo you can see that the manufacturer has already designated places for future foglight mounts in the bumper. You can choose another place, not forgetting the recommendations of the traffic police officers stated above.
Again, there is quite a variety of headlights on the market, based on shape and size. Most often, headlights of rectangular, square or oval shape . But after the purchase you will have to decide where your lighting fixtures can be placed.
For example, a Gazelle Business fog light will require mounting holes, but the front bumper does not always provide this. Therefore, there are 3 main ways out of this situation:
Advice: purchasing an improved bumper design will allow you to avoid unnecessary movements and significantly simplify installation, although the price of such a product will require additional costs.
So, if we have established for ourselves the mounting location for the foglights, then it’s time to assemble the electrical circuit, and then introduce it into the standard one. Each kit, which is designed for additional lighting in bad weather conditions, includes not only headlights, but also electrical wiring to connect them, as well as an interrupt relay and a button to start the lighting.
Installation location
Since the Traffic Rules must be strictly observed, the only correct place for installing fog lights can be the front bumper of the car.
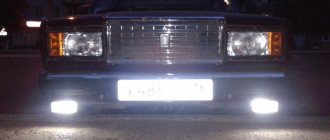
In the photo - fog lights built into the bumper
Note! Traffic regulations prescribe restrictions on the location of additional lighting fixtures on the car. In particular, Gazelle fog lights should not be located above the low and high beam headlights. Also, they should not protrude more than 400 mm beyond the external dimensions, and the distance from the road surface to the headlights should be at least 25 cm.
The traffic rules and GOST 8769-75 allow the installation of fog lights and additional headlights on the roof, provided that the vehicle is operated in difficult road conditions:
READ How to install a direction finder on Ada fallout 4
On such routes, headlights with low mounting will not last long.
Advice: if you don’t want to explain yourself at every traffic police post about the “chandelier” on the cab, motivating your decision with concern for the safety of the headlights, then install fog lights only on the front bumper. And making headlight stickers from a special polymer film will protect the glass from gravel stones.
Installation
We will not reinvent the wheel, but will install fog lights on the Gazelle in their standard places.
Standard installation locations for PTF on Gazelle Business
We dismantle the bumper and cut out the plugs from it.
Expert opinion Alexey Bartosh Specialist in repair and maintenance of electrical equipment and industrial electronics. Ask a question to an expert It is easier, of course, to install fog lights on a removed bumper, but if you wish, this can be done without dismantling it - from the inspection hole or simply lying under the car.
A car with cut-out plugs for installing PTF
We install the brackets that we purchased on the headlights.
Fog lights Kirzhach with installed brackets
We attach the fog lights to their regular places.
Fog lights installed on Gazelle Business
At this point the installation can be considered complete, let's move on to connecting the fog lights.
Where to install fog lights?
First of all, you need to decide where to install such headlights. This could be the front bumper or the roof of the car. The latter option is not excluded by traffic regulations, but only if we are talking about all-wheel drive models, or when installing headlights at the bottom can lead to their breakdown (for example, when traveling on dirt roads).
However, most experts, when advising on how to properly connect fog lights, agree that it is better to do this on the front bumper. But if you are looking for cheap truck rental, then among the vehicles offered there may be those with such headlights installed on the roof.
If PTFs are inoperative
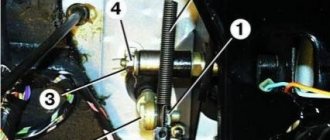
Let's briefly consider the main reasons for the failure of fog lights or problems in the operation of control mechanisms (see photo). Unfortunately, long-term use and not always favorable climate cause corrosion and oxidation of wires and contacts.
- Each fog light has its own fuse located in a block under the hood. Check first to see if it is faulty. If both headlights do not work at once, then the problem is different, since the fuses do not fail in pairs.
- If the lamps burn out, you can’t think of anything else other than replacing them, and the reason may be in the breaker relay. There should be a clicking sound when the headlights are turned on. If not, then either it is not working, or there is no power to it, or, as an option, there is no normal mass on the body, or from the relay.
Installation and connection of PTF
To install, you first need to decide on the installation location. According to the rules, fog lights must be located below the head light, so they are installed on the front bumper. An important requirement when installing and operating a PTF is autonomous activation. This is due to the high power of the lamps required to diffuse light along the road surface. An intermediate relay is used for this purpose. In addition, fuses are used to provide additional safety.
It is better to purchase a bumper with an improved design. This will simplify installation and eliminate unnecessary steps.
Installation and connection of fog lights consists of a sequence of actions:
After installing the PTFs and connecting them to the on-board network, you need to check the system for functionality and correct connection.
Each car has its own use, largely depending on the owner. But if the conversation turns to Gazelle, then almost always we are talking about commercial transportation.
Moreover, the routes often end far from illuminated city streets.
Installing fog lights - Gazelle gets more luminous flux
Therefore, the issue of improving roadway lighting is more relevant than ever:
Note! Traffic regulations prescribe restrictions on the location of additional lighting fixtures on the car. In particular, Gazelle fog lights should not be located above the low and high beam headlights. Also, they should not protrude more than 400 mm beyond the external dimensions, and the distance from the road surface to the headlights should be at least 25 cm.
The traffic rules and GOST 8769-75 allow the installation of fog lights and additional headlights on the roof, provided that the vehicle is operated in difficult road conditions:
Advice: if you don’t want to explain yourself at every traffic police post about the “chandelier” on the cab, motivating your decision with concern for the safety of the headlights, then install fog lights only on the front bumper. And making headlight stickers from a special polymer film will protect the glass from gravel stones.
Where to install fog lights
So, we install Gazelle Business fog lights ourselves. Let's start with the place where such an additional option can be mounted. However, if you pay attention to the traffic regulations , which say that fog lights should not be placed above the main beam headlights, it turns out that the only acceptable place should be considered the surface of the front bumper.
Color illustration of electrical components
One of the key requirements for the installation and operation of PTF is autonomous inclusion:
- This is due to the high power of the lamps, which should dissipate the fog near the road surface.
- For this reason, an intermediate relay is used.
- To further secure the circuit, fuses are used.
Note! One of the common mistakes is installing fog lights on a Gazelle Business and connecting them directly to the side lights of the main light. The current strength and the running light switch itself are not designed for the current that fog lights consume. This remark is also relevant for other models - see KIA fog lights.
How to connect PTF correctly
Installation process
To install the kit yourself, you can:
The fact is that the shape of the fog lights is different both in size and shape. Therefore, the connection of fog lights on the Gazelle will be carried out by you based on the dimensions of the selected lighting devices.
Today you can find the following products on sale:
And the question after purchasing the set you like is how to install lighting fixtures in places not intended for them. The thing is that companies strive to produce universal lighting devices, while there is no uniform standard among automotive manufacturers.
Bumper mounting methods
The difficulty is that the standard front bumper does not have slots for installing additional lighting fixtures.
Therefore, Gazelle owners have two options:
Advice! If the second option seems too expensive for you, since price is a decisive factor, then you still have the option of installing fog lights directly on the bumper using homemade fasteners.
Integration into the electrical circuit
Having figured out the mounting location, you have to connect the electrical components into a single circuit and integrate it into the standard one.
To do this, the fog lights come with:
The work algorithm will be as follows:
Advice! If the kit does not include a relay, then purchase one from Gazelle 3302 - this relay is responsible for the operation of the rear foglights.
Let's figure out how to connect the wires to the relay. The fact is that the relay itself is required to protect the power button, since it is not designed for the current that powerful fog lights consume.
Having assembled the entire circuit together, check that the wires are connected correctly to the relay installed under the hood:
Installation procedure
When installing fog lights with your own hands or when installing them in a workshop, you must:
- provide reliable fastening of headlights;
- make the correct connection to the electrical network (see the article Gazelle Business wiring diagram for details: design differences).
The biggest difficulty is in connecting the fog lights correctly.
After all, the cost of an error is quite high, since failure to comply with safety precautions leads to a short circuit in the unprotected circuit and failure of the wiring and incandescent lamps.
Diagram of connecting fog lights to the standard network
According to traffic regulations, it is necessary to ensure that the fog lights are turned on only when the side lights are on.
And all other additional lighting fixtures can only be connected in this way.
Let's start connecting:
- Disconnect the battery;
- We lay electrical wires in the engine compartment of the Gazelle according to the diagram and securely fix them;
- We connect the positive wire to the parking light relay;
- The role of the minus is played by the metal bracket for the headlight;
- We connect the battery and check the operation of the fog lights.
Replacement of rear light glass
The part is replaced in the second year. The rear light glass for the GAZelle is made of high-strength plastic, but it also fails: the surface cracks from vibrations due to leaky installation and damage during driving.
For replacement, an original part is selected that covers all rear light optics: dimensions, stops, turn signals. A total of 4 technical light lamps are installed on the block. During repairs, it is recommended to go through all the electrical wiring: the connectors on the rear lights in the GAZelle oxidize within 6 months, the electrical wiring often breaks due to incorrect connection and installation of the line.