Replacing the UAZ heater radiator
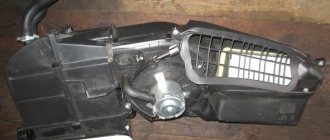
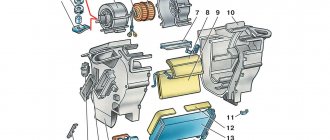
The interior heating system of SUVs from the Ulyanovsk Automobile Plant is structurally quite simple and does not differ from that of most modern cars. The heater itself, which even in specialized literature is often called a stove, consists of a box in which there is a radiator, a fan with an electric motor and an additional resistance designed to control the engine rotation speed. The heater is most directly involved in the operation of the car's cooling system, being its component.
Design features of the UAZ heater
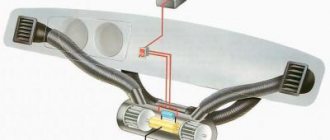
The ventilation system, which forms an integral whole with the heating system, consists of an air intake, dampers of the heat exchanger box, as well as two corrugated hoses leading to the windshield blower nozzles.
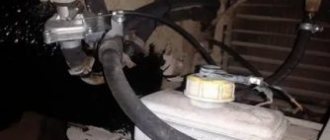
Since 2010, changes have been made to the design of the UAZ heater to prevent moisture from entering the box. To do this, an additional box is installed between the air intake flap and the stove radiator, designed to collect and subsequently drain rainwater, penetrating into the air intake of the car when the flap is open. As the tank fills, excess water is discharged out through a drain hose leading to a partition separating the interior from the engine compartment.
Unfortunately, the installation of this plastic tank (catalog number - 3151-08101231) worsened the throughput of the car's natural ventilation system when driving, especially at low speeds, which especially affects the hot season, forcing the use of forced ventilation. But there is also a positive point - raindrops do not have the opportunity to fall on the walls of the hot heat exchanger to form steam, which then follows with the air flow into the cabin and condenses on the glass. In addition, the tank also protects against other pollutants, including dust, sand, plant branches and insects.
Natural ventilation of the car involves blowing the interior through the vents of the side windows, as well as through the external air intakes (grilles located directly on the hood in front of the windshield). Forced ventilation involves forcing air into the cabin using an electric fan installed in the stove box. In this case, the air flow can be directed into the deflectors either heated (with the radiator tap open) or cold.
In addition to blowing the windshield, air flows to the leg area of those sitting in front (driver and passenger), and in some models to the rear seats through air ducts laid in the central tunnel.
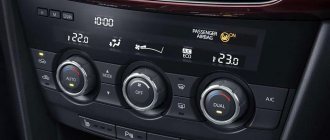
The level of airflow in the cabin is adjusted by a regulator that switches the operating modes of the electric fan, as well as a regulator that opens the air intake flap to a certain amount.
As practice shows, the intensity of airflow into the UAZ interior with the windows completely closed is insufficient both in the summer and in winter. Therefore, most SUV owners are looking for ways to eliminate this design flaw, one of which is replacing the standard heat exchanger with a more spacious one while simultaneously replacing the fan motor.
How does the UAZ stove work?
The air entering the car interior is heated in the radiator of the UAZ heater, and the amount of coolant circulating in the heat exchanger is adjusted using a tap. On some UAZ models (in particular, those equipped with the UMZ-417/421 power unit), this tap is located on the engine itself (in the area of the BC head), which limits the ability to regulate the amount of heat entering the interior of the SUV. On models with a ZMZ-409 engine, the heater switch is located on the dashboard on the passenger side.
On the latest versions of UAZ with the ZMZ-409 engine, it is possible to install a remote control system for the position of the faucet, which significantly simplifies the control of the operation of the stove.
When the tap is open, the antifreeze circulating in the cooling system line enters the radiator directly from the cylinder block of the power unit, that is, almost in the hottest phase. After the heat exchanger, the coolant is sent to the pump, forming a small circulation circuit that operates parallel to the main or large circuit. The outside air entering through the open air intake hatch is directed into the stove body, where a fan is turned on, forcing a flow of air onto the hot radiator. When heated, it follows the air duct system into the cabin. It is possible to distribute the flow of heated air in several directions: to the driver’s/front passenger’s feet, to the front windows, to the rear of the cabin (to the foot area). The UAZ does not provide airflow for the side windows, which can also be called a design flaw.
The operating mode switch for the electric fan motor has three positions: off, minimum and maximum engine speed. In addition to the blowing speed, it is possible to adjust the amount of air entering the cabin. The air intake flap opening regulator is responsible for this.
The UAZ heater radiator itself operates with maximum efficiency only when the engine is fully warmed up, that is, at a coolant temperature of 80°C and above. In winter, when the temperature drops to minus 20 degrees and below, in order to maintain the efficiency of the stove, it is advisable to take measures to preserve heat by covering the main radiator with a special insulating cover. On UAZ 31512/31514/31519 models it is possible to adjust the degree of opening of the radiator grille shutters.
Additional stove
In winter, UAZ Patriot models have the problem of heating the interior with one stove, so craftsmen install an additional one with their own hands. An additional hose outlet is made from the radiator to the second stove. When installing a second heater, the cabin becomes significantly warmer even at the first air supply speed.
On the radiator, when installing a second heater, liquid is not pumped from the bottom up as at the factory, but on the contrary, there is no need to install a pump for air circulation. The additional stove is installed in the armrest, there is just enough space there, there is no need to cut anything additional.
We connect our own switch to the second stove to turn it on additionally. After installing the second stove, the heating system works much better on the UAZ Patriot.
Main malfunctions of the UAZ stove
If in the warm season we simply forget about the presence of a cabin heater, then as cold weather approaches, owners of domestic SUVs have to remember that the efficiency of the stove does not always correspond to weather conditions.
So, what is a radiator - the main part of the stove? This is a metal box, inside of which there is an extensive network of plates, or honeycombs, made of aluminum. By circulating between these plates, the antifreeze cools, transferring heat to the radiator honeycombs. The air passing between them heats up and flows into the cabin. This rather primitive, but quite effective scheme is used on most modern cars.
In this case, a fan is necessary - without it, the air will heat up, but will flow into the air ducts by gravity, that is, at a minimum speed. Thus, the radiator is directly responsible for heating the air coming from outside (no wonder its second name is heat exchanger), and the fan is a means of delivering hot air inside the car.
On average, the service life of a stove radiator is decent - about 100 thousand kilometers, but this indicator is influenced by many diverse factors. If the car is used little in the winter, and the operating conditions are good (driving on roads of acceptable quality, living in an ecologically clean region), then the heater will not bother the car owner even after driving 200 thousand kilometers. But much more often, the exact opposite situations occur, when in winter you have to travel often, the roads are bad, and the environment is terrible. And if you use low-quality antifreeze, and even more so if you fill it with ordinary water instead of antifreeze in the summer, this will lead to clogging of the radiator honeycombs, which will affect the reduction of its heat transfer to an unacceptable level. And this will happen much earlier than the statistical average.
It is not difficult to determine that the radiator is heavily clogged: firstly, you will notice this by a decrease in the temperature in the cabin, all other things being equal (stove operating mode, outside air temperature). Secondly, one of the most characteristic signs of problems with the heater radiator is frequent fogging of car windows, and for quite a long time. Finally, if unpleasant odors appear in the cabin, we can assume that their source is a completely clogged heat exchanger honeycomb, which creates ideal conditions for the decomposition of organic debris accumulated on the walls of the radiator.
The way to eliminate the problem is to flush or replace the heater radiator of the UAZ Farmer, if the flushing procedures are unsuccessful.
The second common stove malfunction is a radiator leak. It is revealed by the appearance of a characteristic sickly-sweet smell in the cabin - the result of coolant vapors entering the cabin. In such cases, it is necessary to immediately begin searching for the leak and eliminating it.
If a leak has formed in the faucet, it must be replaced.
It is much worse if antifreeze leaks directly from the radiator. This often happens on aged heat exchangers due to the appearance of microcracks, which over time, under the influence of unfavorable factors (aggressive environment plus high temperatures), expand until they lose their tightness. Although aluminum is considered a non-corrosive metal, it also oxidizes, albeit at a noticeably lower rate and intensity. So pockets of corrosion can also cause radiator leaks, as well as external mechanical influences (the consequences of car impacts or the result of previously carried out repair work).
Which stove to choose
This is one of the fundamental questions when performing such tuning. The fact is that there is enough space on the UAZ to perform many different manipulations, so, for example, if the stove you like from a foreign car does not fit on the UAZ due to a mismatch in size or connection methods of the pipes, the problem as a whole can be solved. On other cars, such opportunities are an order of magnitude smaller due to the highly compact arrangement of components and assemblies both in the engine compartment and under the dashboard.
Since the domestic automobile industry is focused primarily on the products of the Volzhsky Automobile Plant, it is not surprising that many are trying to adapt the heater from the VAZ. But there are some nuances here. A classic stove is clearly not suitable here; a Chevrolet Niva stove, which demonstrates good performance characteristics, is unacceptable due to the difference between the exit angles of the pipe fittings - it is almost impossible to put hoses on them. So the most realistic way to install a stove on a UAZ from a VAZ is to use the Kalina heater, although in this case a considerable number of alterations will be required.
Radiator replacement algorithm
Let us consider in detail how to remove the heater radiator of UAZ family vehicles using the example of the Patriot model. This procedure is not too complicated from a technical point of view, but it requires a significant amount of time. We will need a minimum set of tools (screwdrivers, hammer, wrenches, rags and a container for draining antifreeze).
So, let's start dismantling the stove radiator:
- de-energize the car by removing the negative terminal of the battery;
- We drain the coolant from the main radiator tap. The approximate volume of leaked antifreeze is 10 liters, although the filling volume is 12 liters (some of the liquid will remain in the system, and in its different components);
- We dismantle the dashboard;
- we start by removing the heater control handles (they are secured with screws located at the bottom of the handles);
- dismantle the lining of the stove control panel;
- take out the ashtray and the compartment for storing small items;
- unscrew three screws on each side;
- dismantle both glove boxes (they are secured with screws located inside), and then unscrew the fasteners of the additional glove compartment shelf. When removing the drawers, do not forget to disconnect the backlight connectors;
- to remove the dashboard, you need to unscrew two nuts, accessed through the panel openings, as well as the side nuts, removing the side decorative panels (they are secured with clips);
- unscrew the bolts attaching the panel to the support frame bracket;
- remove the panel along with the air ducts;
- Having gained access to the heater unit, disconnect the power connectors of the electric fan;
- disconnect the air ducts going to the radiator (unscrew three screws) in the area where the air flow exits the stove body;
- unscrew the two self-tapping screws fastening to the air intake stove;
- All that remains is to unscrew the nut securing the heater frame to the front panel;
- take out the air duct;
- unscrew the screws that secure the decorative trim of the heater;
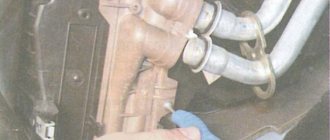
- loosen the clamps securing the inlet and outlet pipes of the stove radiator, disconnect the pipes (since, as we have already said, some of the antifreeze remains in the line, when disconnecting the hoses, a certain amount of coolant will spill, so as not to lose it, we substitute containers of suitable sizes);
- remove the heater from its seat.
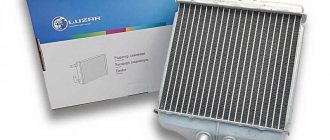
Now you can begin to inspect the radiator in order to repair or flush it. If its condition is such that repair procedures are impractical, we buy a new heat exchanger.
Installation is in the reverse order.
As you can see, in order to remove the UAZ heater core, you will have to disassemble the dashboard, and this is the most time-consuming part of the work. If you want to install an analogue instead of the original heat exchanger, get ready for the fact that you will have to make minor modifications - you will not find radiators that are exactly compatible with the standard ones.
Replacement
Over time, due to corrosion or mechanical damage, the integrity of the structure may be compromised and leakage may occur. Which can be eliminated by repair using soldering or complete replacement of the product. In order to remove the cooling radiator, you need to do the following:
- The battery terminals are removed;
- The liquid is drained;
- The four top bolts are unscrewed and the top shield is removed, after which four bolts are also unscrewed on the left and right sides and the shields are removed from both sides;
- If the design has an electric fan, it must be de-energized; to do this, the blocks are disconnected;
- The wiring is disconnected from the sensor that informs the driver about overheating;
- At the pipes through which the liquid is supplied, the clamps are loosened, after which they are disconnected from the unit;
- The steam exhaust hose is removed;
- The pipes that drain the liquid are removed;
- The rod nuts are unscrewed on both sides of the radiator;
- The entire structure is secured to the frame brackets using bolts that can be unscrewed, but you must first remove a special wire.
After all the steps have been completed, the product can be removed. At the same time, the UAZ Patriot radiator grille remains in place. When the part has been removed, it is necessary to check the condition of the pipes. Because they can cause leaks. Everything is reassembled in the reverse order, and new antifreeze is poured to the required level.
How to remove the UAZ Hunter stove
It all started with the purchase of a car. After driving the car home, I noticed small drops on the passenger floor mat. I tightened the clamps on the stove tap and it seemed to help, but not for long. Gradually, the drops on the rug smoothly grew into small wet spots, and in the end, after arriving from a business trip in the morning, I found THIS on the rug!
What a surprise
I arrived at my father’s garage and the debriefing began. At first I thought that the radiator on the stove was leaking, but after analysis it turned out everything was fine.
Here's a radiator, it's a radiator, it's hard to freeze
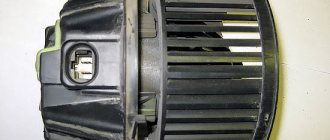
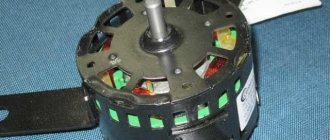
After checking the supplies, my father found a completely new motor for the stove, according to him, from the LIAZ bus on which he worked 15 years ago, because... In terms of power it was higher, it was decided to install it.
Original motor 12/25
new 12/60. It's like it came straight from the assembly line. and you can’t tell that he’s already 15 years old
We collected everything into our own building,
original stove body
replacing the pipes
The pipes for the heater faucet (by the way, the faucet is the same as the VAZ)
Everything was installed back on the radiator. The stove started working like a helicopter. The revs were blown away (but the problem of the windshield fogging never went away), and the leak did not go away. I finally started to blame the radiator - what if it wasn’t sealed after all. They didn’t immediately disassemble it in a new way, because... in a week the NAMI-4 stove ordered earlier was supposed to be delivered. And she is in my hands.
dear and so long-awaited
We quickly took off the old stove.
The second time we filmed it took about 10 minutes
As per the instructions for dismantling the floor, the design of the air flow into the cabin.
extra spare parts on the shelf (maybe they will fit somewhere else)
there are no extra spare parts in the garage
We will find application in another project.
Putting the new stove in place
There will be more room at the passenger's feet!
We connect the air ducts and pipes to the faucet (by the way, the hoses that were included with the stove did not fit at all; we had to make them with adapters from what we had.
it turned out not bad enough
put it in place and connect the air control panel and rheostat
It already looks much more solid in the cabin.
We attach the air filter and air intake to the outside.
A very decent element of the exterior
Let's try. The stove is just great. Having driven 150 km on the highway after installation and about 100 km in the city, I realized that how could I ever drive without it before. I put the cloth for wiping the glass further inside the cabin, I hope to forget about it for a long time. Thank you very much to the manufacturer. This is something without which it is impossible to move normally in intensive mode, especially during rain. By the way, about the main problem, which is why I started disassembling the stove! It turns out that the valve on the heater was leaking from under the valve closing/opening rod. This time I bought a collapsible one. I put it together with NAMI-4.
The main culprit for the start of all heater modifications.
Installation of an additional stove on UAZ 469
Since our winters in Siberia are not entirely humane, the decision was made to install a second stove in the car. Having explored the Internet. Advice from experienced people, it was decided to install a stove under the rear seats (Chinese with 6 outlet diffusers, three-speed with two impellers). It was purchased: - furnace - 3000 rubles - hose for the cooling system reinforced 5 meters - 500 rubles - clamps for 32 - 10 pcs (about 150-250 rubles) - tube of sealant - 50 rubles. — metal water pipes 15 mm 5 pcs — 150 RUR. — Gazelle pump 18 mm — 950 rub.
The installation took me about 10 hours since I did it alone, taking my time in places and thinking about how and where to implement it...
The stove was hooked up in series. Thus. that the supply goes to the upper pipe of the original stove, comes out of it and goes through a hose to the stove at the back, after which it returns to the lower pipe of the faucet. I placed the gazelle pump on the lower branch pipe of the valve in the engine compartment and secured it to the battery frame.
the result is wonderful. You can ride in a car wearing a T-shirt...
PS. If anyone is interested I can post pictures...
The stove was stuck between the front seats. The holes in the floor for seat belts are ideal for mounting. For the third mounting point of the stove, I drilled a small hole in the casing above the transfer case and screwed it on with a self-tapping screw. The hoses and wires were pulled together with tape clamps and secured to the casing in several places. By passing the switch between the lever. speeds and transfer case levers. In short, right above the casing bolts in the center. I connected the wires to the standard stove. I decided not to bother with a separate switch. I drained the antifreeze only from the engine and not much, about two liters. The hoses were connected as follows: from the block head to the lower pipe of the radiator of the standard stove, from the upper pipe of the standard stove to the lower pipe of the additional one and, accordingly, from the upper pipe of the additional one to the pump. IF YOU CONNECT OTHERWISE IT WILL NOT WORK. Either the pump is not enough to pump this circuit or the radiators are only half heated. There is a positive effect from the additional heater: rear passengers feel much warmer and the interior warms up faster. Regards, Yuri
>=====In my mind, it was necessary to buy an additional auxiliary pump/pump for forced pumping of antifreeze. This pump/pump is installed on all minibuses of the Gazelle/Sobol family, if I’m not mistaken, in front of the heater tap and is powered by a separate button. >Sincerely, >Denis. > >
If your hands are crooked, the service life of this device is 15 minutes - close the stove tap and turn on the back one (on the trestle), after 15 minutes the pump is fried. But you don’t need to do that. The stoves should be parallel, with a separate (preferably, um, pneumatic or something else) valve on the back. Mine is exactly like this (I had to make tees, of course - I bought standard plumbing pieces of iron at the market and screwed them together), and nothing is covered. The effect is Tashkent in nature, the dog walker (there are 10 cubic meters!) warms up to +25 at -20 outside.
additional wires and a place where antifreeze can run onto the asphalt. This is not acceptable on an SUV.
Come on, it's not that scary. There are only one wires, zero spaces (you need to install normal clamps.).
If connected correctly, the pump pressure is enough to pump both stoves without an additional pump.
Not on xx. When driving - that's enough, when stopping - all the greedy goat-lovers who have fried the pump stand and fight with the toad. but the toad, of course, still wins.
How to remove the UAZ Hunter stove
05/23/2018 admin Comments No comments
It all started with the purchase of a car. After driving the car home, I noticed small drops on the passenger floor mat. I tightened the clamps on the stove tap and it seemed to help, but not for long. Gradually, the drops on the rug smoothly grew into small wet spots, and in the end, after arriving from a business trip in the morning, I found THIS on the rug!
What a surprise
I arrived at my father’s garage and the debriefing began. At first I thought that the radiator on the stove was leaking, but after analysis it turned out everything was fine.
Here's a radiator, it's a radiator, it's hard to freeze
After checking the supplies, my father found a completely new motor for the stove, according to him, from the LIAZ bus on which he worked 15 years ago, because... In terms of power it was higher, it was decided to install it.
Site about off-road vehicles, SUVs, off-road vehicles
The best improvement to the standard UAZ Hunter heater is its replacement with a more advanced and efficient heater produced by NAMI. It has more advantages than disadvantages, the main one of which is the high price. If you want to save money, then you can increase the efficiency of the standard heater with the help of some simple modifications, which will be discussed below.
Refinement and improvement of the UAZ Hunter heater design.
You should start by sealing the heater housing. To do this, it must be removed from the car and all corners and joints of the body parts must be sealed from the inside using automotive sealant. And then, preferably, also from the inside, cover the walls of the box with thin, 2-3 mm, sheets of automotive noise and vibration insulation. All this together will eliminate air leaks, slightly increase heat transfer and somewhat reduce the overall noise of the heater during operation of the electric motor.
The next step is to try using any available method, for example by gluing a window seal around the perimeter, to seal the lower rectangular outlet hatch of the heater housing. This is necessary in order to eliminate air leaks when the hatch cover is closed, thereby increasing the strength of the air flow that will flow through the corrugated hoses to the windshield or through the lower side air distributors.
Well, in conclusion, you need to remove or simply bend to the left the rectangular protrusion located from the inside of the heater housing and partially covering the left outlet pipe supplying air to the windshield. The general purpose and functionality of this protrusion in the design is not entirely clear, but the fact that without it the force of air supply into the left corrugated hose increases, and therefore the force of blowing the windshield on the driver’s side increases, is a fact.
Rain water leaking from the UAZ Hunter heater housing into the passenger compartment.
Despite the plastic box installed under the air intake hatch, some of the rainwater, when the hatch cover is closed, can still get into the UAZ Hunter’s interior when parked. Initially, as a result of inspection and control during the rain, it seemed that water droplets were entering the cabin somehow through the drain hose of the box.
It was then assumed that the plastic box itself was damaged. In fact, it was precisely determined that water enters the cabin through the joint of the upper internal iron heater box, which exits to the outside of the body. There it forms a small side on which the lower seal of the hatch is installed.
Rainwater flows under this seal, then goes into the gap between the protruding side of the box and the body itself. And from there it immediately gets inside the heater housing and then flows through leaks under the feet of the driver or front passenger. That is, it does not initially fall into the plastic box, but bypasses it.
Therefore, the lower rubber seal of the hatch must be removed, treated well with body sealant around the joining seam that has become visible, and then put the seal in place. No more water will flow into the cabin through the heater.
Installing a door seal on the air intake hatch cover of a UAZ Hunter.
In any case, whether a plastic box is installed on the car above the heater radiator or not, the natural entry of water and dust into the heater, and then into the passenger compartment when the air intake flap is closed, must be prevented. A plastic cover installed on top of the hatch will best cope with this task. You just need to find out in advance whether it is suitable for the UAZ Hunter with a lower windshield wiper arm or not.
If you don’t want to drill additional holes in the car body to install such an overlay, then there is a simpler and cheaper method. It consists of replacing the standard rubber seal on the air intake flap cover with a seal that is installed from the factory on the inner door opening of the UAZ Hunter, its catalog number is 3153-6107018 or 3153-6107019. But in fact, this is an ordinary door seal from VAZ 2101, 2102, 2103, 2104, 2105, 2106, 2107, which goes under the numbers 2101-6107018, 2101-6207024, 2101-6207025.
There are no particular difficulties when installing such a seal. The only thing you need to pay attention to is that during installation the cover is raised as high as possible, as far as its adjustment holes allow. Now, when closed, the air intake hatch cover is maximally sealed around the entire perimeter and water ingress into the interior is practically excluded, even during very heavy rain.
Selecting and replacing the electric heater motor of the UAZ Hunter.
As standard, the UAZ Hunter heater is equipped with an ME236 electric motor with a power of 25 Watts. Its capabilities are frankly not enough to properly draw air through the radiator. The low performance of the ME236 also greatly affects the quality of windshield blowing.
Finding a more powerful electric motor to replace the ME236 is not difficult. For example, these could be electric motors 19.3730, 191.3730, 192.3730 and 194.3730 with a power of 40 Watts, or 197.3730 with a power of 60 Watts, or 51.3730 and 511.3730 with a power of 90 Watts. The main thing is that the diameter of the output shaft of the electric motor is 8 mm, so that a standard impeller can be installed without modifications, and also that it has suitable studs or threaded holes on its body for mounting it in the heater.
In addition, it would not be superfluous to take into account the load that, during operation, this electric motor will create on the on-board network and, accordingly, the generator. Thus, the current consumption of the 90-watt electric motor 511.3730 is 15 Amperes, versus 5 Amperes for the standard ME236. Therefore, perhaps the golden mean would be to install an electric motor 197.3730 with a power of 60 Watts and a current consumption of 8 Amps.
From the world to the details: tuning UAZ 3962
Never joke in front of UAZ employees that the “loaf” of the 1965 model turned out to be so perfect that it is simply impossible to do better, so it has not changed for 53 years. They will be offended by this and will be partly right. They changed a lot there, and the current UAZ 3962s are very different from the first 452s. But there is no limit to perfection, which is why in many workshops in our country grinders squeal and welding machines hiss: people finish the “loaves” as best they can. Or maybe, judging by our today's hero, he is a lot of things.
Concept
This car, produced in 1994, faithfully served its owner Sergei, a member of the Slava search party. Search engines are known to go where people often cannot go on foot. The “Loaf” worked with all the power of its engine and springs, but even its iron interior began to slowly die over time. And not only the inside: the bodywork is also tired of wandering through impassable fields, forests and swamps. And then a joyful event happened: a third daughter was born into Sergei’s family. It would seem, what does UAZ have to do with it? No, no, life-lovers, be silent! It’s just that now the family needs a minivan more than the old “loaf”. But a group of friends decided to save their faithful UAZ, and at the same time make it a truly comfortable car. Preferably cheap.
Outside
The first thing we did was take care of the body that had seen life. All the rotten parts were cut out, some of them were replaced, and some were simply thrown away.
In order not to deny yourself the pleasure of periodically kneading the mud, the standard 29-inch wheels were replaced with wheels with a diameter of 33 inches. By the way, they were given by friends. True, when driving off-road, the wheels began to cling to the arches. The issue was resolved simply: they were slightly enlarged, because the arches were still rotten and had to be cut off.
The power elements of the body were made anew from a 10x10 profile, and the outside was covered with sheet duralumin. The thresholds, front and rear bumpers and trunk also had to be created from scratch, and then cold-rolled seamless pipes came into play. Moreover, I had to tinker with the bumper: remove the patterns from the standard one, and then change the design a little (move the deformation zone to another place, and make the “fangs” according to the principle of triangular motorcycle frames for greater rigidity). The updated and prepared body was handed over to painters for painting, and friends took care of the technical part of the car.
The grilles on the windows have “vandal-proof” functions, and the homemade expeditionary trunk is the envy of KamAZ body designers. Of course: on this “loaf” Sergei was able to transport all imaginable and inconceivable building materials to build his own house.
Technique
Of course, the suspension on standard 16-leaf springs was modified (after all, we remember that the “loaf” was supposed to become a family minivan, while remaining an off-road vehicle). So now there are shock absorbers from GAZ-53 and UAZ disc brakes “in a circle”, which is allowed by the technical regulations of the Customs Union.
At the front, a preload inter-wheel lock was added - an indispensable thing when overcoming off-road conditions. There is also a lock at the rear (developed for the UAZ Sprut with a pneumatic drive). You never know, maybe somewhere you can hang the car diagonally? This is where blocking comes in handy.
They worked especially carefully on the steering. To dampen impacts, a steering damper was installed, and a more efficient power steering was installed. It was taken from a later version of the UAZ. In order for the car to stand better on a straight line, especially in an asphalt track, we had to change the angle of the kingpins by four degrees. And so that you could safely drive off the asphalt, the steering rods were covered with homemade protection.
The UMZ 4216 motor with the MIKAS control unit from GAZelle Business, which is now installed, was donated by a friend. His car burned down, but the engine miraculously remained intact during the fire. And since, in the words of Comrade Brezhnev, “the economy must be economical,” LPG was installed in the car (and this is another gift from a comrade). A filled cylinder with a volume of 150 liters is enough for approximately 650-700 kilometers. Well, if you run out of gas, you can continue the journey on gasoline (a full tank will last for another 600 km).
Xenon tank headlights are responsible for the lighting here. By the way, they are sold in regular stores as additional equipment for SUVs.
“What about the winch? Without it, the UAZ is not a UAZ at all, but an incomprehensible piece of iron!” - some fans will notice that they are going through this car while sitting up to their ears in a swamp. It turns out that the friends showed enviable wisdom in this matter.
- There is no winch here. If there are such things on the car, fearlessness disappears,” they explain. Sergey and his comrades get by just fine with a regular hijack and successfully overcome off-road terrain of any complexity.
Inside
Now let's take a look at the interior, which, of course, has also been redone. In order not to become deaf from the screams of the engine and transmission, the noise and vibration insulation was made multi-layered. New wall panels were cut out of plywood, subsequently covered with Brandy eco-leather (the so-called “non-stripe”). This is eco-leather on microfiber, which is practically not subject to mechanical stress. Of course, someday it will become unusable, but this will not be soon: the manufacturer’s warranty is eight years.
Replacing the heater radiator on a UAZ Patriot with and without air conditioning
In warm weather, any car, including the UAZ Patriot, does not need a heater, except in cases where the engine is “about” to overheat, and it needs to be cooled somehow. But everything changes with the onset of cold weather and during a transition period, such as autumn, for example. In the fall, due to constant rain, the car windows begin to fog up, and in the winter you can’t go far without a properly working stove.
The heater in the UAZ Patriot functions due to the constant circulation of engine coolant. This principle undoubtedly increases the overall efficiency, since energy losses in the form of heat from the engine are used to heat the interior, although some part is still absorbed by the atmosphere, without bringing any benefit. However, for example, an electric heater in a car not only does not use heat from the engine, but also requires additional power.
Design
The UAZ Patriot uses a heater in the form of a radiator, but not the same as the main cooling radiator in front of the engine, but smaller. In the UAZ Patriot, the heater radiator is installed in front under the instrument panel (dashboard). Inside it there are numerous aluminum plates, near which hot antifreeze or antifreeze circulates. There is a fan above the radiator that blows air around it. Also, the design includes a special damper that regulates the ratio of hot and cold air supplied to the cabin.
There may be two heater radiators in the UAZ Patriot in some trim levels with air conditioning. Although, in most cases, the design provides only one radiator. The entire set of parts can last a long time, the Patriot can travel more than 100 thousand kilometers, and the heater will quietly perform its function. However, this is true under one condition - timely replacement of the coolant is necessary. Although a breakdown may not necessarily occur because of this, a defective product is no exception.