Repair / From Vladimir
- How often should I change
- What you need to replace it yourself
- How to change it correctly with your own hands: step-by-step instructions
How to replace parts on a Chevrolet Lanos (video)
- How to install new ones on a Volkswagen Passat B6 (video)
A stabilizer is present in any car and controls the car’s roll behavior, that is, it directly affects handling. The struts (rods, “bones”) of the stabilizer are part of the system, so their technical condition affects safety when driving. You shouldn’t put off this inexpensive repair, especially if you can change everything yourself.
Diagnostics of stabilizer struts
Before starting repairs, you need to pinpoint the source of the concern. The main symptom is a strong knocking sound on a bad road and when the car rocks. There are several ways to confirm your suspicions.
- It's worth starting with a visual inspection. On most cars, you can access the stabilizer link simply by removing the wheel. Look at the boot; if it is cracked or has holes, then you don’t have to check further. When moisture and dust get inside, a few days of driving is enough to render the rack unusable.
- In the second option, you need to lift the car. A lift or jack with stands will do. The main thing is to hang both wheels of one axle (front or rear), and then use a small pry bar or crowbar to move the stabilizer in the area of the struts. There should be no noticeable “movements” or knocking noises, otherwise it’s time for replacement.
- If it is not possible to hang the axle, then grab the rod with your hand and ask your partner to rock the car from side to side. If there is a malfunction, you will physically feel a knock. More detailed diagnostic methods are described here.
Use the help of a partner when diagnosing
Purpose and reasons for wear of racks
Such an element in itself is very important, as it performs a special function - it connects the body and suspension. It is this section of the mechanism that is very vulnerable when driving, so the spare part wears out and constantly needs to be replaced. Many believe that all this does not matter and the manufacturer invented it only to extract money. In fact, you can drive freely even with violations, but then the motorist risks a lot, because he may experience the following changes:
- The car doesn't listen as well to the steering wheel;
- other parts gradually fail;
- the car starts to make noise;
- bounces on rough roads.
Suspension As you can see, struts can cause all sorts of troubles if not given enough attention. An analogy can be drawn with a tooth that hurts more and more every day; ultimately, the person suffers from acute pain and the problem gradually spreads to neighboring teeth. If you do not change it regularly, but at will, the car will pull to the side when driving freely, it will constantly sway. This is often done negligently, which increases the risk of accidents.
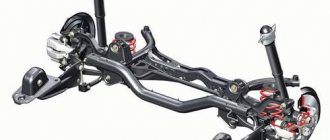
Car suspension assembly
Do not forget that this element is directly related to the body and suspension. Therefore, if spare parts are unable to confidently perform their functions, they cease to stabilize the movement. However, in this way a person tries to cope with driving, thereby using the car more intensively than during normal driving.
Read more: Which of the following signs allow turning?
Body and suspension
When under heavy workload, they often feel less comfortable and work at a higher intensity. If a person completely ignores potholes and other uneven surfaces, while racing at high speed or doing extreme driving, the element takes all this hard and therefore wears out quickly. As a result of all this, the car constantly rattles, especially when all these actions are repeated. The sound of the stabilizer bar can always only be rattling, which gives the driver a signal of a malfunction.
Faulty stabilizer link
It is worth noting that when a part wears out, a machine always becomes less maneuverable and more uncontrollable. Also, it does not drive as smoothly and the movement is not as stable. If the body bounces on any uneven surfaces, then the struts are no longer doing their job as effectively.
Convenient option for yourself
Important: You don’t have to buy the part all the time. In Russia, disassembling the stabilizer bar is practiced, which allows you to make the most durable and convenient option for both the front and rear of the car.
What you need to replace it yourself
The list of tools can be divided into two groups.
Necessary:
- an open-end or ring wrench of the required size (depending on the car model);
- hexagon;
- WD-40 lubricant or equivalent.
Optional:
- socket head with extension and wrench;
- clamp;
- thread locker;
- grease gun;
- metal brush.
Everything you need can be found in any garage
Recommendations for use
The driver is always interested in how to repair the stabilizer link, but if you think about it, you can drive competently and won’t have to repair it so often, right? Russian mechanics have prepared several tips for drivers on how to operate their car with minimal damage to the anti-roll bar struts:
- drive smoothly, avoid skidding;
- slow down when turning;
- avoid small obstacles;
- do not increase speed on uneven roads.
In order for the struts to last longer, you first need to think about the correctness of your driving style. If the stabilizer receives a signal of danger during drifts, it tries to smooth out this very movement, which is first felt by the struts. To prevent this from happening, it will be enough to brake when turning, then the racks will wear out much longer.
Braking on corners
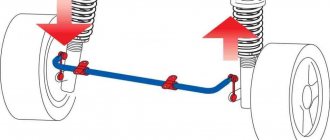
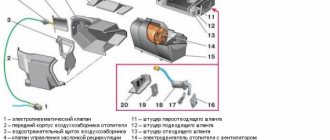
The stabilizer deals not only with turns. Also, its synchronous operation with the car’s suspension can be affected by uneven roads, small holes, humps or speed bumps. In this case, it is better to go around the bumps, but if the whole road is breathing with difficulty, then it is better not to increase the speed.
Car suspension diagram
The anti-roll bar ensures the safety of the car and the driver when driving, but this cannot be done without struts, which need to be constantly changed or repaired. If you have enough experience in this area and can share it with us, write in the comments.
How to change it correctly with your own hands: step-by-step instructions
In case of malfunctions, the racks must be dismantled and either replaced completely or some parts restored.
As with diagnostics, when replacing, it is necessary to hang both wheels of the axle. If you “jack up” only one side, then the stabilizer will be in “tension”, and it will be difficult for you to pull out and install the rod.
An option is possible: with the wheel removed, place any stop under the lower arm and slowly lower the car until you can easily remove the stabilizer link.
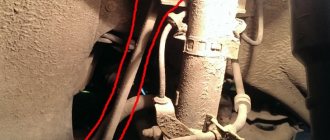
- Now, in order. Clean the fastening nuts from dirt and rust and moisten them generously with Vedashka.
Lubricate stuck parts with WD-40 - After waiting a few minutes, start unscrewing. The ball pin must be firmly secured with a hexagon, and the nut must be turned with a wrench, otherwise it will spin. If it doesn’t work, try tapping the nut with a hammer (just be careful not to damage the edges), treat it again with WD lubricant and wait 5-10 minutes before unscrewing it.
To unscrew it after lubrication, you can help the key with a couple of precise blows with a hammer
Do not try to rip off the nut, it is better to moisten the mechanism with lubricant again - After a successful procedure, we repeat the same with the upper mount.
You can't do without lubrication either.
Unscrew the second nut - It happens that the internal hexagon is “licked off”, then the optional clamp will come to the rescue. Fix the finger in the area of the boot with it, and use a wrench to turn the nut (in this case, a head with a knob is preferable).
In advanced cases, use a ratchet - Before replacing, be sure to compare the old and new parts. There should be no significant difference in length or configuration. In our example, the racks are slightly different, but not in size.
Comparison of new and old racks by size - The “bones” are secured with nuts and locking nuts. They are disposable, do not reinstall old ones.
Don't use old parts, replace them! You can play it safe by additionally lubricating the threads with a special locking agent. It prevents unwinding from vibration.
Use thread locker to lubricate - The assembly procedure is faster, especially if the axle is suspended. If not, then finally tighten the nuts only on a loaded suspension, that is, by placing a stop under the lever and lowering the jack.
Use a heavy-duty jack to ease the effort. - Different manufacturers may have different configurations for the same stabilizer link. We unscrewed it using a hexagon, and tightened it with a second open-end wrench or clamp. Make sure that the finger does not turn, otherwise you risk damaging the boot and not completely tightening the fastener.
Monitor the integrity of nearby node elements - If the rack is equipped with a grease gun, then it must be lubricated with lithium grease. In this case, you will need a special syringe. There is no need to squeeze out too much lithol; the boot will quickly be damaged when stretched. But there should be enough lubricant to cover the entire inside of the part.
Fix the stand tightly - Even if there are no special grease fittings, try to additionally lubricate the ball pin. If possible, remove the boot, lubricate it and put it back (watch for tightness).
Don't forget to lubricate the ball pin
A video version of replacing a less common type of stabilizer link is presented below.
How to replace parts on a Chevrolet Lanos (video)
How to install new ones on a Volkswagen Passat B6 (video)
Repair work
Ball elements
Restoring them, as already mentioned, is not easy. Typically, the restoration process involves replenishing the amount of lubricant in the boot. The following actions are envisaged:
- Removing the support. The stages depend on the specific make and model of the machine, as well as its technical features.
- Determination of wear. You need to move your finger and determine how easily its rotation is ensured. If there is a crunch, repair is impossible.
- Restoring the flare of the ring that secures the boot. To do this, take a tube and place it in a vertical position.
- With your finger down, the support is inserted into the tube. Next, the retaining ring is removed using pliers.
- Use a screwdriver to lift the boot, which is then folded up and filled with lithol using a brush.
- The boot that covers the hinge must be sealed using a thin wire wrapped around the boot.
- The retaining ring is placed in its original place, and the functionality of the hinge is checked. Movement and movement of the finger should be difficult.
Attention! A part that has been restored has a shorter service life compared to faulty elements, so during operation it is important to take into account that such supports can be driven after 1,000 km.
Repair of structures with bushings
Typically, such models are used on expensive machines and are easy to repair.
To repair the rack yourself, you will need to acquire bushings; it is better to give preference to polyurethane options. This approach will make the service life of the spare part longer.
The procedure for carrying out the work is quite simple:
- The stabilizer links are removed using a special removal tool.
- The parts are inspected and the condition of the stabilizer tips is taken into account: if there is a noticeable increase in wear, the rod is completely replaced.
- The support to be removed is clamped in a vice. Using a hammer, knock out the bushing head. Usually this stage of repairing racks with your own hands goes without problems.
- The new bushing is lubricated with oil and placed in place of the old design, and clogged. The main thing is to secure the element correctly, since each model has a different method of fastening.
Such elements have a long service life because they are made of high-quality iron. However, their service life is shorter than that of ball elements. But they can be changed easily, so this factor is not considered a disadvantage.
Final nuances: is a wheel alignment necessary and why does the knock persist?
- Some drivers do a wheel alignment after each suspension intervention. After replacing the struts, this procedure is not necessary. The stabilizer does not affect the wheel angles in any way.
- If the knock remains after the repair, there may be several reasons: pay attention to the stabilizer bushings (there are also two of them, they are easy to change and are inexpensive);
- the nuts are tightened incorrectly or weakly;
- malfunction of other suspension parts.
Replacing stabilizer struts is one of the simplest types of car suspension repairs. But not everyone knows which side to approach them from. With our instructions, you will save some money and avoid unnecessary mistakes when replacing. Choose high-quality spare parts, and you will change them much less often.
How to assemble and install air suspension with your own hands
Replacing the VAZ 2114 heater tap with your own hands
Repair of racks with bushings
As already mentioned, bushings are much less common, most often on expensive cars from well-known brands. It has also been observed that bushing struts are an ideal option for an SUV. Unlike hinged ones, this type can be completely repaired, but only if the rack is not yet completely worn out. To do this, you need to check the base - that same metal rod. If everything is fine with it, remove the rack from the car.
Replacing the bushing and stabilizer link
Next you need to repair the stabilizer link. Ends with bushings are more expensive than articulated ones, but if the base is intact, then why buy the entire part? For this purpose, the bushings are sold separately from the base and the driver can freely buy them if necessary. Removing the bushing is easy, you just need to knock it out with a hammer; it is recommended to hold the rod itself in a vice so as not to miss.
Stabilizer bushing
Important: After dismantling the element, a new bushing is installed, which must first be lubricated with oil. The process does not take as long as it seems. Mechanics recommend checking struts every few thousand kilometers. As a rule, you can ride this way indefinitely until the rod itself is completely worn out.
Methods for checking part wear
A car fan is always faced with a choice - buy parts, use them and buy them again, or make the most durable option for yourself and use it for a long time. Russian stabilizer struts are a very dubious concept, since the part is in any case imported by the manufacturer and sold on the market. In fact, making front stabilizer struts with your own hands is easy and simple; this requires only basic knowledge in auto mechanics.
DIY stabilizer struts
Once the driver already knows for what reasons a part can wear out quickly, it’s time to move on to the reasons. This information will be useful to all those who want to avoid bringing their car into a state of disrepair and at the same time save on a trip to the service station. Also, if a car enthusiast wants to learn how to make such parts himself, he first needs to learn methods for checking its functionality.
Worn rack
The wheel well can show the driver the level of strut wear. To do this, you will need to pull the rack while simultaneously turning the wheels left and right. If a part gives in or makes a sound, repair is definitely needed. You can easily determine by the sound how badly the part is damaged, but if it begins to twitch and give in, the outcome is clear.
Determining stabilizer link wear
If you plan to check the car with a friend and it is possible to do this through a pit, this will make it even easier to accomplish your plan. A comrade goes down under the car and holds on to the hinge, the driver, in turn, swings the car horizontally. If vibration is felt, repair is needed. There are other testing methods, but they usually show dubious results.
Inspection of the rack through the pit
Racks with ball joints
Restoring such parts is quite problematic. Moreover, it is not always possible to do this. If there is a lot of wear on the finger, nothing can be done. Typically, restoration consists of replenishing the required level of lubricant in the boot. This work is done in the following order:
- The support is removed from the car. This is done differently for each model; pay attention to the technical features of your car. After removal, determine the level of wear. To do this, move your finger and determine how easily it rotates. If a crunching sound is heard, then such a stand cannot be restored;
- The restoration work begins with flaring the retaining ring securing the boot. To do this, take a tube of suitable size. We place it vertically. The support is inserted into it with your finger down. Next, we take a head that is suitable in size, and through it with a hammer we apply several blows to the base of the ball joint;
- After such preparation, the retaining ring appears to be torn off; it is removed using pliers;
- Next, use a screwdriver to lift the boot; it needs to be screwed up. Next, lithol is taken and the boot is stuffed with it. To do this, you can use a sliver;
- It is necessary to seal the boot covering the hinge. To do this, take a thin, soft wire. Using pliers, it is twisted around the boot (top and bottom);
- Reinstall the retaining ring;
- We check the functionality of the hinge. To do this, take a support and move your finger with your hand. He should be able to move with difficulty.
The restored part has a shorter lifespan. Therefore, keep in mind that you can only drive on such supports for 1000-5000 kilometers. Many car enthusiasts prefer not to bother with such work, but simply purchase new spare parts.