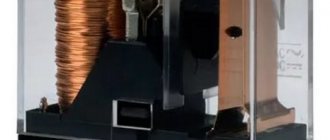
Element Role
All VAZ cars, including model 2109, have a standard engine starting system, which is based on an electric starter. Here's what you need to know about him.
- A starter is a small electric motor that is connected to the flywheel of the motor via a coupling (Bendix) for a short period of time to start the rotation of the flywheel.
- Despite its small dimensions, the starter passes through itself enormous currents.
- If the starter circuit were closed directly in the ignition switch, then not a single component of the system would be able to withstand such current loads. As a result, they would burn out.
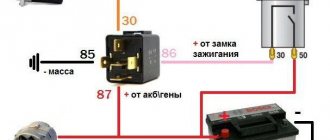
- Therefore, for these purposes, the starter is connected remotely to the battery via a relay. Its contacts are designed for high currents.
- The starter operates briefly and must be turned off after the engine starts. Otherwise, its active destruction will begin due to the influence of motor power.
- Relyushka performs these tasks perfectly. Actually, it is precisely to ensure the functioning of the system and protection against current, timely shutdown of the starter, a retractor relay is included in the design.
Element diagram
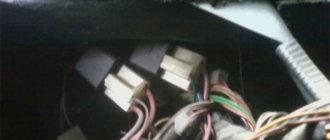
How to replace the starter switch relay on a VAZ 2108-VAZ 21099?
If you carefully read the above text, you will immediately guess how to remove this relay, but we will still instruct you, find this relay in your car (the location is shown in the photo above), you see a block of wires is connected to it, then disconnect it, and then After it is removed and set aside, take a wrench in your hands and unscrew the relay mounting nut with it and then remove it, by the way, if the work is done in rain or in very wet weather or if you are simply afraid of a short circuit in the wiring (In this case all the wiring will burn out and require replacement), then protect yourself by disconnecting the wire from the minus terminal on the battery to do this; if you don’t know how to do this, then study “this article”, it says everything in the first paragraph.
Note! To check whether the relay is working or not (Just like a new relay
We don’t recommend buying, always check everything), you can use two different methods, the first is that you have to remove the cover from the mounting block and pull out the relay from there with exactly the same markings as yours, the relay goes to turn on the starter, after pulling out these two replace the relay and try to start the car, if it doesn’t start, it means the problem is not in
the relay
and you need to look for the problem either in the starter itself or in the ignition switch, the second method implies that you will find a jumper wire (Indicated by a blue arrow, the wire can also be used) and bring its conclusions to the wire block, namely to its contacts “30” and “87” (These are the lower and upper contacts of the block, take a closer look at the relay on it they are marked or for clarity, look at the photo they are indicated by a red arrow, although the block is completely different another car, but it is almost the same and you can understand where these two contacts are located), if the car starts up immediately (Don’t forget to remove the jumper when it starts to start immediately), then it’s all in the relay, if not, then look further (When you do the second method, do not forget to turn the key in the ignition until all the devices light up)!
Additional video clip: For more detailed information about checking the relay using the classic example, see the videos below:
Checking status
Before changing the relay, make sure that the problem with starting the engine is related to this component.
To do this, consider two situations that indicate its malfunction.
| Situation | Your actions |
| The relay makes clicks, but the armature does not spin | If there are clicks from the relay, check the condition of the armature. To do this, the terminals of the retractor relay are bridged with a large screwdriver or a piece of welding cable to the terminals at the ends. Taking a thin wire or a screwdriver can easily burn the terminals. When the armature is working, after closing the terminals, the armature will spin, which can be determined by the sound. Consequently, the solenoid relay itself has failed and requires repair. |
| The relay is completely silent | Even if there is silence after closing the terminals, the problem should be looked for in the starter. The relay no longer plays any role here. |
Having discovered that the relay has served its purpose, it must be replaced or repaired, if possible.
Malfunctions of the VAZ 2109 starter retractor relay
Burnt contacts are the most common malfunction of the solenoid relay. A fairly large current passes through them (in the case of normal operation, approximately 80 A, if there is high rotation resistance - 300 A).
This leads to the formation of a spark gap, due to which the contacts burn and electrical conductivity decreases.
The second, common malfunction is associated with a break in the coil of the solenoid relay. If the winding breaks where it is soldered to the contact, this can be fixed. If the break occurs in the middle of the winding, you will have to completely change the solenoid relay.
Dismantling
There should be no problems with the dismantling process. The main thing here is to remove the starter, since the required relay is held on it. Therefore, dismantling is carried out as an assembly.
- Turn on the handbrake, disconnect the battery by removing the negative terminal from it.
- A wire with a large cross-section goes from the battery to the contact of the relay. It can be turned off by unscrewing it using a 13 key.
- Remove the thin winding power wire from the solenoid relay.
- Using the same 13mm wrench, unscrew the three mounting nuts holding the starter to the clutch block.
- You can remove the device through the bottom or top. If you chose the top, then you need to slightly rotate the starter around its axis and remove it.
- The lower output is more difficult, since here you need to remove the crankcase protection. But if parallel work is carried out that requires similar manipulations, problems will not arise.
Self-test of the starter relay
To begin with, before checking the solenoid relay, you need to check the starter itself, since these checks have their own nuances and they must be performed in order to figure out what exactly is not working.
To do this, turn on the ignition switch and turn the key; if the starter does not work, but characteristic clicks are heard, then the relay is working, but the starter is not.
Without removing the starter, if you can get to it, of course, you can check it by jumping the two contacts (copper bolts) on the back cover of the traction relay. If the mechanism spins, the retractor is faulty.
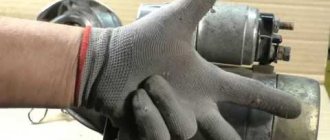
When independently checking, disassembling or repairing various parts, be careful and careful, as this can lead not only to parts breaking, but also to various injuries.
If for some reason you were unable to check it on site, then you will have to dismantle it. When checking, be careful, since the rotation of the mechanism is quite strong, so that it does not break out and cause injury.
Place it near the battery, or preferably on the ground, and use a wire to connect the relay contact terminal to the positive terminal. Using another wire, connect the battery ground to the starter ground.
After the wires touch the terminals, the relay should operate, making a sharp and quick click. If you feel that the relay operates too slowly, then the contacts may be burnt.
Bendix replacement
VAZ 2107 starter relay: purpose, malfunctions and repairs
Replacing the Bendix VAZ-2110 and other front-wheel drive models begins with dismantling the starter.
To do this you should:
- remove the “-” terminal from the battery;
- Using a 13 key, unscrew and remove the power terminal from the electric motor;
- unscrew the starter mounting bolts with a 13mm wrench (2 on top and 1 on bottom);
- remove the starter.
It is worth noting that the electric motor mounting bolts often become so sour that it becomes difficult to unscrew them.
In this case, you should not try to unscrew the bolt by force. This may cause it to break. It is necessary to tap the heads with a hammer, fill them with WD-40 liquid and wait 15-12 minutes. With the electric motor removed, the retaining ring is removed from the shaft. To do this, you need to knock it out of its seat with a special mandrel (if you don’t have one, a high 15 socket will do) and remove it using pliers. After this, the part can be easily removed by hand. » alt=»»> The above procedure answers the question of how to remove the bendix from the starter. In general, at this point the main part of the repair can be considered complete, since replacing the bendix on the starter after the old element has been dismantled is a matter of one minute.
The new spare part is put on the shaft, after which the electric motor is assembled in the reverse order. They put on the retaining rings, install them on the car, secure the starter itself and the power terminal with bolts, and return the removed terminal to the battery.
Checking with the starter removed using a multimeter
This test of the solenoid relay allows you to very accurately perform internal diagnostics and determine the condition of the windings and contacts. Dismantling the starter, depending on the make of the car, is carried out in various ways. For VAZ 2110, this procedure is carried out from below from the pit. Before unscrewing the fasteners, remove the wires (it is better to mark the terminals so as not to confuse them during assembly); you may need to remove the crankcase protection.
To begin with, voltage is applied from the battery to the body and terminals of the relay; operation is accompanied by a characteristic click and visible movement of the rod. Further checks are carried out using a multimeter, which is switched to resistance measurement mode and the range of 200 Ohms is selected.
Video: Checking the starter removed from the car
First, check the serviceability of the retractor and retention coils. To do this, one of the probes is connected to ground, the second touches the contacts in succession. The device readings are 2 ohms. Deviation of the device readings from the specified value is a sign of a break or short circuit. To check the power contacts, remove the core from the relay body and remove the return spring, after which the core is inserted back. The core rod is pressed against the table with a certain force and the resistance between the contacts is replaced. The resistance is approximately 1.5 ohms.
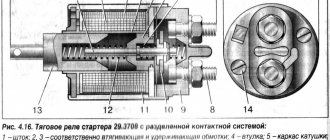
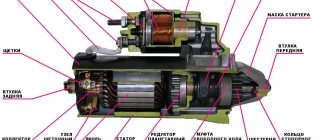
Purpose and design of the retractor relay
The starter solenoid relay is a two-winding traction electromagnet that has a movable core with a return spring and is used to activate the overrunning clutch. Often, for reasons of increasing overall reliability, it is structurally designed as one of the functional blocks of the starter.
The engine starts from the starter due to the rotation of the flywheel in the desired direction, which occurs through the corresponding gear. Therefore, when current is supplied to the retractor winding of the relay, the starter (Bendix) clutch gear is moved to the operating position and engages with the flywheel ring gear, further compressing the return spring. When the clutch reaches its extreme forward position, to reduce current consumption, the retracting winding is turned off and only the holding winding remains under current. Then the starter motor turns on.
Constant engagement of the bendix and the flywheel is unacceptable and it must be broken after starting the engine. To do this, when the ignition key is removed from the start position, the current supply circuit to the holding winding is broken, the force of fixing the clutch in the forward position disappears, and the return spring moves the relay rod to its original position.
The need to use the rather complex procedure presented here is due to the fact that
- turning to it reliably protects the starter from failure (it is not carried away by the running engine and does not go into generator mode);
- the load on the battery is reduced;
- There is no coloring of the gear teeth and ring gear.
Something else useful for you:
- Three Level Generator Voltage Regulator
- How to correctly change lamps on Renault Logan
- Bendix starter - functions, malfunctions, checking and replacing bendix on the starter
Repair of a collapsible solenoid relay
The manufacturer equips starters with a non-separable or collapsible retractor device. If a non-separable relay breaks down, it must be replaced, but a dismountable relay can be repaired. The described method allows you to check the solenoid relay of all VAZ models: 2101, 2102, 2103, 2104, 2105, 2106, 2107, 2108, 2109, 21099, 2110, 2111, 2112, 2113, 2114, Niva, Lada Priora, Kalina, Granta, Vesta and most foreign cars. Disassembly and repair of the relay is carried out in the following order:
- Unscrew the nuts securing the housing cover.
- If necessary, the ends of the windings are additionally soldered.
- After removing the cover, inspect the power contacts:
- If they burn, the damaged part is cleaned with sandpaper;
- When worn out, replace.
- The device is assembled in the reverse order and tested for functionality.
- The repaired relay is installed back on the starter.
Every driver wants to drive a car that behaves predictably from the moment the key is turned in the ignition. But sometimes it is at this moment that troubles happen with the car. One of the culprits for this event may be the relay in the starter.
Before checking the starter solenoid relay, it is advisable to make sure that the diagnosis is unambiguous. To do this, a superficial check of the participating elements in the vehicle starting system is carried out.
Diagnosis of engine starting problems
The driver must make sure that the problem is solely a relay malfunction. To do this, you can conduct a visual inspection of the electrical wiring and measure the battery charge. If this circuit and all parameters are normal, then with a high degree of probability the breakdown lies in the starter relay.
The absence of clicking sounds from the starter indicates that the solenoid relay is not working. If switching on/off is heard, then the fault is outside the relay.
First you need to try again by turning the key in the ignition. Silence of the motor in response to these actions will lead to disassembly of the starter. But, before disassembling the starter solenoid relay, it must be removed from the engine compartment.
How does a relay work?
Knowledge of the device always helps to understand the malfunctions of the mechanism, so let’s find out the principle of operation of the starter solenoid relay. The coil receives voltage from the car battery. Due to this, a magnetic field is formed that interacts with the armature, which rotates and tensions the spring. Due to its interaction with the bendex, the latter engages with the crankshaft flywheel gear.
Relay circuit
The closed contact elements block the supply of voltage to the winding, but the armature does not disengage due to the magnetic field. It returns only due to the retaining spring after the electrical supply to the coil is stopped. At this time, the bendex disengages from the flywheel.
Most likely malfunctions
Visual inspection of a faulty relay usually reveals burnt wiring at the contacts. Also, the contacts themselves become recessed (stick), and the coil windings may become insulated and burnt.
You can often focus on the following symptoms, after which you may need to repair the starter solenoid relay yourself:
- the starter does not turn off after starting the engine;
- a click may occur after turning the key on the starter, but the engine does not start further;
- You can hear the starter idling after turning the key, but the engine is silent.
To repair the relay, you will need to disassemble this element. However, there are models that have a non-separable device; these only need to be replaced. This type of repair is the most common.
Relay replacement work
Any action, be it dismantling or checking the starter solenoid relay, must begin by disconnecting the power supply from the car battery. If this is not done, the possible consequences will be a short circuit and damage to all wiring. Such a replacement can be very expensive.
Repair kit
Before opening the case, it is necessary to clean carbon deposits and dirt from the surface so that they do not get inside the electrical device. Then you need to loosen the nut on the brush assembly and disconnect the contact from the bolt. Now you can loosen the tie rod and its bolts that hold the block to the mass. We take out the relay from the engine compartment.
Unscrew the nut at the end and reveal the internal contents. We take out the burnt out or non-working core, and install a new one in its place. We carry out the assembly in the reverse order and mount the part in the engine compartment. If everything was assembled correctly, the engine should start the first time.
ktonaavto.ru