Car tuning often costs a lot, and does not always satisfy the customer’s initial requirements. That is why many who have decided to do this on their own are interested in how much paint is needed to paint a car. As practice shows, painting a vehicle is possible if you have some experience in working with dyes. This can be easily learned, but our article will help you study the requirements for painting a car. We will look at how to correctly calculate a sufficient amount of paint, what material is best to choose and what factors you should pay attention to when purchasing.
What affects paint consumption?
Specialized stores offer a wide selection of different paints for painting cars. However, it is worth noting that the cost of this type of product is very high. Nobody wants to overpay for one-time painting and buy extra. Before buying a coloring composition, it is necessary to make a preliminary calculation. After all, if there is not enough paint, you will have to urgently buy more, and it is not always possible to choose an identical shade.
When calculating the amount of material, consider the following:
- parameters and model of the vehicle, as well as its condition;
- preferred type of paint and its packaging;
- availability of certain necessary tools;
- weather and working conditions.
These are just the main parameters that affect the amount of substance consumed. Also, paint consumption is affected by the thickness of the coating, the number of layers applied and the method of painting. Thus, it is very difficult to calculate the exact amount of material; you can only rely on standard figures.
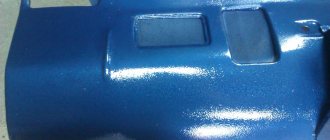
Priming the bumper surface
To complete the preparation of the bumper for painting, it is necessary to apply a two-component acrylic primer. First, you need to mix the primer directly in its original packaging, and then dilute it with solvent and hardener in a separate measuring container. It is best to mix with a wooden ruler or a clean non-metallic stick. Mix all components of the working mixture strictly according to the instructions. The resulting mixture can be used only within 2 hours after preparation, so you should not prepare it in large quantities.
Average consumption rates
So how much paint does it take to paint an average sized car? Experts note that painting damaged areas of a car fender or door is a widely applicable service. This process requires about 150 ml of dye, but to paint a bumper (medium size) you need at least 300 ml.
To paint a larger bumper, the hood or the trim of the entire vehicle, you need from 600 to 1000 ml, respectively. It turns out that approximately 250 ml of paint is needed per square meter of coating.
Below is a table with car enamels consumption indicators:
| Part or area/vehicle type | Consumption in ml/l |
| Hood | 400-600 |
| Wing | 150 |
| Bumper | Up to 300 |
| Door | Up to 200 |
| Upper part (roof) | Maximum 400 |
| Trunk (lid) | 300-400 |
| For painting a medium sized car | 2-3 l |
| For painting Gazelle | Up to 5 l |
Useful tips
To make the master happy with the result of the work, you need to follow these tips:
- Paint the bumper only in a warm room without drafts. Otherwise, drying will occur unevenly, and particles of dust and debris will stick to the part.
- If the bumper is new, still do not forget about washing and degreasing it. When particles of fat remain on the surface, the paint does not adhere tightly and peels off.
- Do not dry the painted bumper with a hairdryer. If there is no infrared heater available, then drying should occur naturally.
- If drips or sagging appear, remove them immediately. To do this, you need to sand the defective area well and treat it with polish.
- Make sure that insects do not fly into the room. Mosquitoes and flies can stick to the paint and ruin the whole job. To prevent their appearance, it is worth hanging a net on the door.
- If possible, use materials of the same brand. If the paint, primer, varnish and putty are all made by the same company, they will work better together. The quality of the finished coating will improve, and the risk of mutual rejection of the layers will be reduced to zero.
- Work in the warm season. If it’s winter outside, you’ll have to look for a heated room or wait until it warms up. Otherwise, the paint drying process will be disrupted and the coating will quickly crack.
When painting skills are completely lacking, it is better to try painting on an old car part or on any other surface. After gaining a little experience, you can work on a finishing job - the likelihood of getting an excellent result will seriously increase.
Choosing the best paint for a car
The paint consumption on a car directly depends on its type. To understand the basic properties of paintwork materials for tuning work and choose the best option, you need to study their composition. However, any high-quality paint consists of the following components:
- pigment that is responsible for color;
- connecting element (designed to attach the pigment to the required part of the body);
- solvent (responsible for the fluidity of paint).
So what kind of paint is suitable for painting a car? The following types of paints are most suitable for garage work:
- nitro enamels;
- alkyd;
- acrylic.
On the video: the main types of car enamels.
The best option is acrylic enamels. They have a number of undeniable advantages compared to other paint and varnish coatings:
- ideal combination of high quality and low price;
- uniform surface coloring;
- natural shine;
- long service life.
The advantages of acrylic enamels also include economical consumption. How much paint is needed per square meter? You only need 200 ml; bumpers and other large areas require up to two liters. And when painting the inside of a car, you will need no more than one and a half liters of paint.
Acrylic enamel is highly resistant to mechanical stress, so the coating does not need to be renewed every two to three years. This also saves you money.
Painting the outside of a vehicle using acrylic enamels is quite easy and quick, and does not require special skills or professional knowledge. This process takes about several hours.
Despite the fact that acrylic paint has high durability and pigmentation, the resulting coating cannot be polished. For the initial finishing of a car, you can use this type of paintwork, but for repainting, “soft” paints that are easy to polish (alkyd, nitro enamels) are more suitable.
On video: review of acrylic paint.
DIY bumper painting. Preparing a plastic bumper for painting
Let's look at the different options for bumpers that need to be painted.
New bumper, not covered with primer
- The most important rule when preparing a new bumper for painting is to remove the factory mold release agent (applied when the bumper was manufactured). Mold release is used to release plastic parts from the injection mold. There may be a residue of it on the bumper, which is not visible visually, but affects adhesion. If you grind the bumper before removing such grease, it will be rubbed into the plastic. Insufficient cleaning or incomplete removal of mold release agent may cause poor paint adhesion. Even if the paint does not peel off immediately, chips from stones will appear more often.
- Some craftsmen use Scotch Brite when washing the bumper with soapy water. That is, simultaneous grinding occurs. This process is also acceptable.
- Mold release may consist of wax or oil. It can be either outside the plastic or inside. Modern release agents are most often water-soluble (using something like a soapy composition) and can be washed off fairly easily with soapy water.
- When washing a plastic bumper, soapy water should be as hot as the hand of the master can withstand. This will dissolve and wash off the mold release agent more effectively. It is better that the soap in the water is pH neutral.
- A bumper with a structured surface must be washed most thoroughly. To do this, you can use a brush with soft bristles.
- You need to wash both the front and back sides so that the grease does not accidentally get back onto the front part.
- Next, rinse the surface and warm the bumper for 15–30 minutes at a temperature of 60 degrees Celsius. The heat will help release the lubricant that is inside the plastic out. Once cooled, repeat the washing process again, rinse and dry.
- When rinsing the bumper after washing, the water should flow freely. If it behaves like it does on a wax surface and separates into separate streams, then this part of the bumper is not clean enough.
- To remove wax or oil based release agents, you can use a 1:1 mixture of isopropyl alcohol and distilled water. As mentioned earlier, modern lubricants are water-soluble, but to be on the safe side, treatment with this solution can be done. In addition, this will provide additional general degreasing.
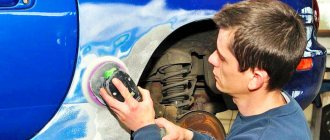
- Next, you need to sand the surface well with Scotch Brite with water and matting paste, each indentation, without missing the edges of the bumper.
- After sanding, dry the bumper and inspect it carefully. There should be no glossy areas left; the entire bumper should be matte.
- Plastic can accumulate a static charge, which attracts dust, so it is better to use an antistatic agent, which is part of a special degreaser for plastic. The article “preparing a new bumper for painting” describes a recipe for a homemade antistatic solution.
- Before painting, you need to apply an adhesion promoter (primer for plastic), wait 10 minutes and paint.
- There is also a painting method in which, after applying a special primer for plastic, an epoxy primer is applied. After it dries (from 30 minutes to 1–2 hours), paint is applied. Epoxy primer (see article on its use) increases paint adhesion, which, in turn, will affect chip resistance.
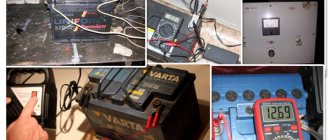
How much spray paint will you need?
The most inexpensive option is car paint in a can. On average, it costs between 150-350 rubles. However, few people think about how long such a can of paint lasts, because it is almost impossible to control the consumption of the substance in such a package. Note that one cylinder containing 150 g of paint is often enough to paint 0.25-0.5 m² of surface. To cover 1 m² of body area you will need at least 2-3 cans.
Only experienced mechanics can accurately answer how much of this paint is needed to paint a bumper, but at least 250 ml of the composition will be required.
However, little depends on the material itself; it is impossible to definitely calculate the amount of such paint. Depending on the manufacturer, the can may contain different volumes, and the quality of the enamel (for example, ductility and density) may be different.
Expert opinion (2 videos)
Various car enamels (24 photos)
Applying primer for plastic
To prime plastic with your own hands, you will need a special Velcro primer containing a plasticizer. It comes in a transparent color and with a silver filler, the advantage of which is its visibility on the surface.
The primer for plastic is sprayed using a spray gun and it will take no more than 30 minutes to dry completely. It is applied in 1-2 layers with an interval for drying. If sprayed excessively, leaks may occur. Once completely dry, no additional sanding is required.
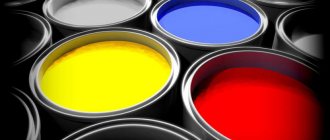
Getting different colors
Both primary and complementary tones occur naturally and are called chromatic. It is difficult to find achromatic colors in their pure form: white, gray and black. Shades of achromatic tones arise from the fusion of colors located on opposite segments of the color wheel.
Among professionals, it is customary to use synthesis tables to save time on composition selection. The data in the reference books is obtained empirically. Synthesis scheme for obtaining a rich palette
| Base color | Additional color (introduced gradually) | Result |
| Red | Chocolate or charcoal | Chestnut |
| White | Pink | |
| A drop of ultramarine or dark gray and honey | Burgundy | |
| Yellow (half the size of the base) | Scarlet | |
| Green | Brown | |
| Yellow, chocolate, a little white | Apricot | |
| Ultramarine, green | Black | |
| Gold and copper brown | Tomato | |
| White, ultramarine and agate or dark gray | Plum | |
| Heavenly | Violet | |
| Yellow | Shades of red | Variations of orange |
| Red, charcoal and emerald | Mustard | |
| Emerald | Light green | |
| Light green, white | Citric | |
| Green and a little white | Emerald | |
| Emerald, white and dark red | Tobacco | |
| White and a little green | Light green | |
| Brown or scarlet and emerald | Ocher | |
| Orange | Yellow, red and copper or brown | Terracotta |
| Green | Honey | Olive |
| Ocher and charcoal | Coniferous | |
| Black | Snowy and umber | Copper gray |
| Blue | Emerald | Turquoise |
| Agate and a drop of green | Dark blue | |
| Umber, white, red | Crimson | |
| White | Blue | Heavenly |
| Blue and a drop of agate | Wedgwood | |
| Black | Grey | |
| Brown and yellow | Beige |
Additional colors must be introduced correctly - add carefully and in small quantities, mixing thoroughly before adding a new portion.
An interesting fact is that the result is not always perceived as a variation of the base color during synthesis. Raspberry is considered a shade of red, and is mixed on a blue base. Plum, which is closer to blue, is obtained on the basis of red.
Red and its shades
Red belongs to the three main chromatic colors and is the basis for many tints, therefore it is always present in the set of paints and colors. In printing, it is often practiced to obtain red by combining magenta and yellow colors.
The main shades of this color are listed below:
- coral;
- chestnut;
- cinnabar;
- scarlet;
- carmine;
- burgundy;
- umber;
- lilac;
- pink;
- cherry;
- ruby.
Blue and its shades
The classic blue is called royal and is rarely found in paint sets in its true form. Ultramarine mixed with violet is often used instead. You can bring ultramarine closer to traditional blue by adding a few drops of white.
The most popular types of blue:
- sapphire;
- ultramarine;
- Navy blue;
- cobalt;
- cornflower;
- azure;
- blue;
- heavenly.
Green and its shades
Green is present in all paint sets, but is no longer one of the primary colors. It is synthesized by the fusion of blue and yellow.
By varying the number of components or adding other colors, we achieve the desired color nuance:
- herbaceous;
- olive;
- turquoise green;
- bottle green;
- coniferous;
- emerald;
- light green;
- khaki.
By adding white to each of these options, you can develop a smooth gradient of secondary shades.
Gray and its shades
Gray color reduces the intensity of paint, reduces brightness and can serve as a basis for neutral backgrounds. At the same time, gray itself also has many variations:
- pearl gray;
- ashen;
- gray-blue;
- light gray;
- smoky;
- monsoon.
Basic gray is obtained by mixing white and black, and the introduction of a small amount of other colors gives it a kind of internal “illumination”.
Brown and its shades
Brown is the result of combining red and its varieties, blue and yellow, and orange and blue or gray.
By varying its composition, you can get warmer or cooler shades:
- dark brown;
- golden brown;
- chocolate;
- red-brown;
- honey;
- copper.
Dark brown can be obtained by adding the same amount of scarlet and 1-2 drops of black to yellow paint.
Yellow and orange
You can achieve yellow by adding orange to green paint.
Common options for this color:
- gold;
- citric;
- solar;
- canary;
- saffron;
- vanilla;
- amber.
The color orange has its own shades:
- coral;
- carrot;
- salmon;
- bronze;
- ocher.
As the tone darkens, orange moves closer to brown.
Violet tones
Purple can be created by combining blue and red paints, but different shades can be formed:
- lavender;
- lilac;
- violet;
- amethyst;
- blackberry;
- grape;
- purple;
- blue-violet;
- dark purple.
The result depends on the purity of the paints. Using a dark blue will result in a rich eggplant color. It is almost impossible to make it brighter by changing the proportions or introducing scarlet or white. To get bright purple, it is better to use pink and blue tones of the primary colors or start from lilac, if it is in the set of paints.
Other colors
There are many borderline colors, the nuances of which can only be distinguished by a non-professional through direct comparison. For example, ivory color can be obtained by introducing ocher and a small amount of dark brown paint into white. The aqua color is made from white, green and a dash of black, while the eggshell color is made from white, yellow and a dash of brown.
Most of these shades require direct hands-on experimentation. The results of such personal experiments in creating your own palette will differ from the tabular information, but at the same time they will be much more useful in practice.
How to spray paint a car - step by step guide
No matter how diligently you take care of your car, it is impossible to avoid minor scratches and damage.
Most often, the top layer of paint is damaged when parking, when the doors were unsuccessfully opened or there were stones on the road.
In any case, the damage is not significant, it is not always possible to notice it immediately, but over time it can turn into a serious threat and become a problem.
In this case, you just need to contact a car service. There you will already have to shell out a more serious amount of money.
Therefore, while the problem is insignificant, they prefer to eliminate it at the root, not go anywhere, but simply paint it on their own using spray paint.
The method is very economical and does not require special knowledge.
Criterias of choice
Today, supermarkets and markets sell a variety of goods of varying prices and quality. What to choose and what to be guided by? The main selection criteria are:
- manufacturer - it is better to purchase goods from well-known brands that guarantee quality and have earned national recognition. These companies are Motip, KUDO, Molotow, MTN and Trane.
- volume - you need to know the approximate consumption of material, and take it with a small margin, preferably in a large container, it will be a little cheaper.
- the presence of an instruction manual and complete set so that there is no need to purchase any accessories separately.
It also makes sense to familiarize yourself with the prices - the difference in cost in different supermarkets for the same product can reach up to 30-40%.
Why us?
Masters with 5 years of experience
All our employees undergo annual advanced training courses. They have all the necessary certificates; basically, they all previously worked in dealerships.
Lots of variety from different brands.
We are representatives of many paint and primer brands, so we can offer the best conditions and prices.
Comfortable receptions
Our recreation areas are equipped with all the necessary equipment for comfortable relaxation: sofas, TVs, coffee/tea and, of course, cookies and coffee makers.
We work with legal entities and conclude contracts
We have been in the automotive painting and body repair market for over 10 years, so we can offer you a discount on servicing your commercial vehicle. We serve some of the city's leading businesses
Free tow truck
We provide a free tow truck to our car service center if you are involved in an accident. The only thing you will need to do is leave your car with us for repairs or pay for a tow truck if you suddenly change your mind.
Peculiarities
An important feature of acrylic is its naturalness; the environment does not suffer from the use of an automotive composition. There are no fumes or strong odor from the paint. The advantage of acrylic is the variety of shades; it is easy to obtain any color using special pigments in the appropriate dosage.
Due to its water base, the substance is resistant to fire. The listed qualities contribute to the use of acrylic in residential premises and small spaces. Water evaporates quickly, causing the material to harden faster than its analogues. An important advantage of the composition is that acrylic can be diluted even after drying, so the substance will return to its original form. You just need to know how to dilute acrylic paint and the recommended dilution rates.
Acrylic auto enamel Mobihel
Tools and materials
Painting a car bumper requires the proper tools and material. To complete the work you will need:
- Putty and primer;
- orbital sander for polishing (it can be replaced with an electric drill with attachments);
- high power soldering iron;
- sandpaper or sandpaper;
- solvent or white spirit;
- bumper paint. Black matte and elastic hi gear will do;
- painting tool - spray gun or spray can.
Do not forget about safety rules, prepare a protective breathing mask and gloves.