If there is any suspicion that the starter is faulty, I immediately remove it from the engine and throw it in the trash. I simply don’t have time to repair such small things. Especially when the motorcycle season is in full swing and everyone needs to quickly get repairs and go about their business.
But, in especially rare cases, I still take on repairing starters, when I come across a rare model of scooter for repair for which it is difficult to find spare parts, or when several faulty starters accumulate, from which I then assemble one.
Repair or diagnosis itself does not present any particular difficulties, even for a beginner. And it will mainly consist of disassembling, washing, checking, cleaning the working surfaces of parts and assembly. But we won’t rush into repairs just yet. Let’s start with general questions, and we’ll touch on the topic of repairs at the very end of the article.
Where is the starter on a scooter?
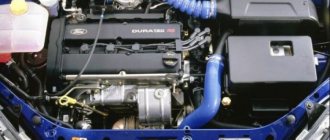
Finding a starter on a scooter engine is very simple: remove the front plastic hood of the engine and the seat tank, inspect the engine and find a small cylindrical part on it (approximately the same as in the photo) located perpendicular to the longitudinal axis of the engine to which a thick power wire fits - this will be the starter.
On most scooter models, the starter is mounted at the top of the engine, just behind the cylinder. In rare cases, the starter is installed at the front or bottom of the engine.
How to check the starter of a scooter?
If, when you press the start button, the starter does not turn, then this situation cannot always tell us about its malfunction. In addition to the starter itself, the scooter's electrics have several elements that control its operation. Such as the battery, relay, start button and power supply wires. And if at least one of these elements fails, a completely serviceable starter will not work.
Therefore, in order not to waste a lot of time and not do unnecessary work later, we will not guess, but will do it simpler: we will use the elimination method: we will connect the starter directly to the battery - bypassing the relay, the start button circuit and the standard power wires, thereby completely eliminating malfunctions in the elements responsible for the operation of the starter.
Why doesn't the starter work?
Initially, you need to exclude battery discharge from the list of possible breakdowns. If this were the case and the battery suddenly became low, you would hear a peculiar sound when you press the “start” button. This sound indicates that the starter is not engaged with the bendix and is running without load, idle. If you still hear this sound when starting up, do certain things:
- you need to check the terminals and clean them if necessary;
- inspect the wiring for damage;
- Check the condition of the battery (voltage level), recharge or replace it if necessary.
In most cases, these points will help you solve the problem with your scooter.
However, there may be other breakdowns, which in themselves are considered more serious when compared to a dead battery. We are talking about audible clicks when the starter operates. This is a deeper problem and it is necessary to look for its causes.
Causes and solutions
Step 1: With the ignition on, try honking the horn. If everything worked out and you could hear a loud and ringing sound, everything is fine, you can start the engine. If the sound was very quiet or could not be heard at all, there were problems with the battery or power supply (recharge the battery, clean the terminals).
Step 2. When you press the engine start button, you hear the sound of the relay turning on. If yes, then try bridging the power terminals of the relay. If there is no sound, disconnect the relay from the power supply, and then use the wires to connect the battery and starter.
Step 3. Once you have connected the starter, it works fine. If yes, then you just need to replace the relay. If not, check the contacts of the start button, the wires from the starter, and replace all worn parts.
Step 4. If, after you bridge the power terminals of the relay, the starter begins to operate normally, replace the relay. If not, then you are faced with a more serious task: you need to disassemble the starter and check the condition of its parts (brushes, windings and springs).
By analyzing your scooter breakdown using these simple steps, you can easily identify and fix the breakdown. Of course, you don’t have to worry too much about this and just bring your scooter to a service station. But at the same time, you will spend your money and will not be able to gain that invaluable experience that you will gain when diagnosing and repairing yourself.
Published:07 August 2015
↓ Comments ↓
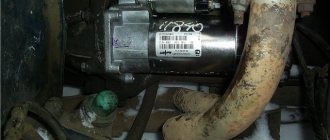
Checking the starter
Without removing the starter from the engine, we look for the power terminal on its body and disconnect the wire from it. We remove the battery (charged) from the scooter, look for it, ask someone for it, or buy two pieces of thick copper wire. Connect the wires to the battery terminals. Then, we apply the wire coming from the negative terminal of the battery to the starter housing, and the second wire - coming from the positive terminal of the battery - is applied to the starter power terminal
- If the starter works, then it is fully operational and the cause of the problem must be looked for in the relay, start button or wires supplying power to it
- If the starter does not work, then the fault lies in itself and it needs to be removed, disassembled and checked. It is quite possible that it can still be repaired and save a lot of money
Rules for operating a moped
The service life of a moped depends on maintenance. Care comes down to following the rules recommended by the manufacturer.
The main ones include:
- Testing a new scooter. The first concerns the running-in of a new scooter. The scooter must not be overloaded for the first 1000 km. When driving for a long time, you must stop every 30 minutes to prevent the engine from overheating.
- Correct use in winter. You need to drain the fuel before storing the scooter in the garage for the winter. Remaining fuel can destroy the tank and flood the carburetor. If you plan to use the scooter in winter, you need to change the fuel, check the battery charge, oil level, condition of the filters and tire pressure (it should be about 1.5 atmospheres).
- Correct use in summer. In hot weather, it is important to prevent the scooter from overheating. When driving for a long time at 30 degrees, the cylinders will be constantly overheated. This could cause the belt to break or the engine to break down. You should also not squeeze the throttle for too long, and when stopping, immediately turn off the engine.
- Use quality fuel. Gasoline must be at least 92. On a new moped, you need to change the oil for the first time after a run of 500 km. Subsequent replacement will be required every 1000 km. The first time to change the oil in the rear gearbox is after 200 km, then every 5000 km.
- Replacing the variator belt. This part is considered a consumable item, as it wears out quickly due to the high power load. If the moped stops squeezing out high speed, then the part and its components need to be replaced.
- Carburetor maintenance. The procedure includes a visual inspection for leaks and gasoline consumption levels, checking the condition of the connecting elements and the serviceability of the unit elements.
- Filtration quality control. The filter must be replaced promptly and impregnated with a special product after installation. This is necessary for high-quality air purification. Dirty air reduces the life of the motor.
Sources:
https://neknopka.ru/%D0%BF%D0%BE%D1%87%D0%B5%D0%BC%D1%83-%D1%81%D0%BA%D1%83%D1%82% D0%B5%D1%80-%D0%BD%D0%B5-%D0%B7%D0%B0%D0%B2%D0%BE%D0%B4%D0%B8%D1%82%D1%81% D1%8F-%D1%81-%D0%BA%D0%BD%D0%BE%D0%BF%D0%BA%D0%B8/ https://omopede.ru/remont/skuter-ne-zavoditsja. html https://proscootera.ru/masterskaya/ekspluatatsiya/skuter-ne-zavoditsya-so-startera https://topkarting.ru/chto-delat-esli-skuter-ne-zavoditsja-so-startera.html
How to remove the starter on a scooter?
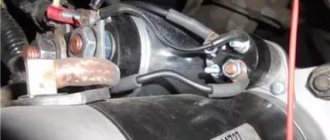
After we have found the starter and provided free access to it, we look on its body for the terminal to which the power wire fits and unscrew the wire from it. Then, we determine where the starter is attached to the engine body, unscrew the mounting bolts and remove it from its seat.
Power terminal
Mounting bolts, in this case they are located at the end of the housing
In this case, the starter is flanged and its mounting bolts are located at the base of the housing.
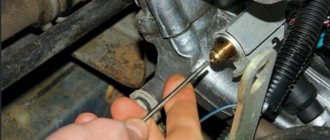
To facilitate dismantling, on some engine models, there is a special technological gap between the starter housing and the engine housing (depending on the engine model). We insert a flat screwdriver into it and loosen the starter with it.
What to do if the scooter does not start?
Real practice of electronics repair
There are times when scooter owners are faced with the problem that it will not start. The reasons for this can be different, but there are also quite typical ones. In some cases, fixing the problem takes a few minutes.
Let's look at several reasons that lead to the scooter not starting. All examples are real, obtained during the repair of the Chinese scooter ABM Storm L and Motoland VXR5 .
Scooter won't start with button
If the scooter does not, but starts from the kickstarter without problems (from the “leg”), then you should pay attention to the main fuse, which is located in the battery compartment.
This same fuse may be the cause. There was a real case when, when measuring the voltage at the battery terminals, 13 volts was displayed on the multimeter display. The norm, considering that the battery was slightly discharged.
When measuring the voltage after the fuse, the multimeter showed 12.8 volts. Wonderful, isn't it? Does a piece of wire (fuse) really drop 0.2 volts? In theory, this shouldn't happen. The voltage in the scooter's electrical network after the ignition switch was also measured. The voltage was a little more than 5 volts and was fluctuating. The turn signal relay also began to crackle ungodly after the scooter was started with the kickstarter and the turn signals were turned on.
Due to the fact that the fuse was made, to put it mildly, poorly, the wire inside the glass bulb barely touched the contact caps. Because of this, the electrical contact in the fuse was poor. This is where those 0.2 volts of voltage were lost.
Due to the fact that the turn relay received undervoltage, it crackled, since the supply voltage was sometimes enough to operate the electromagnetic relay, sometimes not.
Also, when pressing the “Start” button, the starter, which spins the engine shaft when starting, did not start. Naturally, since the voltage in the scooter's electrical network was underestimated due to a faulty fuse.
After replacing the faulty fuse, the scooter began to start with the “Start” button.
In case of such malfunctions, you should first check the integrity of the connecting conductors in the engine starting circuit. If you don't have a scooter wiring diagram handy, take a look here. There you will find a scooter wiring diagram that is suitable for almost all Chinese scooters.
Let's look at another problem.
The scooter will not start either from the start button or from the kickstarter
What could be the problem?
Many people encounter this problem when they try to start a scooter after winter. In this case, the scooter seizes, but does not start. The electric starter turns, but something is missing to start the engine itself. The cause may be old fuel left in the gas tank. It is better to drain the old fuel and fill the tank with new one.
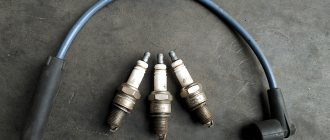
Another possible cause could be the spark plug and the wires that connect the CDI ignition module, ignition coil and spark plug.
First, it is better to check for the presence of the spark itself. You can do it like this.
To check the spark on a scooter you need to get to the spark plug. To do this you will have to remove the seat and find the cap.
The spark plug cap is removed with a little effort. It is attached to the candle with an elastic metal clip, which is built into the cap.
There is no need to twist the cap with the wire clockwise! Some people do this to remove the cap. This can damage the contact between the wire and the cap.
The spark plug can be unscrewed using a socket wrench. I filmed it like this.
Next is actually checking the spark.
We insert the spark plug into the cap and lean the outer metal edge of the spark plug against the metal body of the engine. Just like in the photo.
This is how we connect the negative, common contact of the spark plug with the common wire of the scooter's electrical wiring. Then we turn the spark plug so that we can see the gap where the spark should jump. Press the “Start” button, as we do when starting the engine. In this case, you will most likely need the help of another person. One is uncomfortable.
When you press the “Start” button, a bright white spark . If the spark is blue-green, then most likely you need to clean the spark plug and at the same time check the contact of the high-voltage wire and the spark plug cap. It's done like this.
In Chinese scooters, the high-voltage wire that connects the ignition coil and the spark plug is attached to the spark plug cap in a very unreliable way. The wire is simply screwed onto the metal screw of the cap. In this case, the metal screw simply cuts into the strands of the copper wire. Vibrations and shaking may cause this contact to weaken.
If the spark is weak, then it would be a good idea to update the contact between the high-voltage wire and the spark plug cap. To do this, you just need to shorten the high-voltage wire by 0.5 cm. In this case, the copper wires will be fresh and not broken. Next, simply screw the end of the high-voltage wire onto the screw of the spark plug cap. After this you can check the spark. If there is a spark and it is bright, then put the spark plug in place and put on the cap. We check if the scooter starts.
Do not forget that the reason for the engine not starting may be failures not related to the electrical equipment of the scooter.
» Workshop » Current page
also be interested to know:
Source: https://go-radio.ru/skuter-ne-zavoditsa.html
Principle of operation
Inside the body there is a movable cylindrical element called a rotor (in collective farm language - an anchor). An insulated copper wire is wound on the rotor in a strictly defined order, forming several independent coils, circuits, windings, poles, circuits - which, in fact, is the same thing. The ends of each of the coils have their own independent outputs in the form of lamellas (contacts) on the collector.
Inside the main body, two permanent magnets are glued exactly around the rotor. Each of the magnets has a different pole N (north) S (south) in relation to each other. Anyone who went to school will understand...
After you press the start button, the electric current from the battery will begin to pass through the power terminal, the brush and then, passing through the lamellas of one and the rotor windings - it forms a constant magnetic field along the axis of the armature.
I think there is no need to explain that the magnetic field that forms a constant electric current has different polarities? So, what am I talking about?.. Oh yes, the magnetic field of the rotor will begin to interact with the magnetic field of the permanent magnets and the armature will deviate by a certain degree. The commutator will turn, the next pair of lamellas will approach the brushes and the rotor will deviate again. Thus, it will rotate exactly until you lower the start button.
Malfunctions
There is nothing special to break in the starter and all its malfunctions consist of wear, sticking of the brushes and contamination of the commutator, which often happens due to engine oil getting into the housing from the engine crankcase. It is worth noting that faults associated with commutator contamination and brush wear are typical for DC electric motors.
Worn brushes, as well as a dirty commutator, prevent the passage of electric current through the brushes to the lamellas of the rotor windings and therefore the starter stops working. In this case, to restore the functionality of the starter, we just need to clean and wash the commutator and replace the brushes with new ones or make them ourselves (more on that later).
In addition to purely mechanical faults associated with wear and contamination of current-carrying elements, there are also a number of faults associated with a short or interturn circuit of the rotor windings, as well as with a violation of the contact of the winding output with the commutator lamella and burnt wire insulation.
All these malfunctions are characterized by increased noise and heating of the starter during operation and a drop in its speed. If, after cleaning the commutator and replacing the brushes with new ones, the starter turns poorly, gets hot, and hums, then most likely not everything is in order with the rotor windings. Either they shorted out, went to ground, or simply burned out. And nothing can be done about it.
Incorrect brush replacement
As a rule, if the starter has not been repaired for a long time and its brushes have not been replaced, the polarity of the supplied voltage can easily be disrupted. In other words, the positive and negative positions in the starter cables have been reversed. The reason is depressurization of the line and mutual contact of wires.
Another development of events is also likely when the starting device has previously been repaired. The procedure for replacing the brushes this time was carried out incorrectly, the elements were accordingly placed in the wrong sequence. You need to test and determine where the brush with the “plus” polarity is facing. She should look directly opposite the "minus".
To determine the polarity of the brushes, simply attach them to each other. Accordingly, attraction or repulsion will help determine the correct polarity.
Incorrectly installed brushes are usually associated with the starter cover. It is placed incorrectly, which leads to polarity reversal (more on this below).
Disassembly
We unscrew the bolts holding the body together; there may be two of them, or maybe more, depending on the design. We pinch the shaft protruding from the housing with our fingers and, as carefully and slowly as possible, separate the halves of the housing.
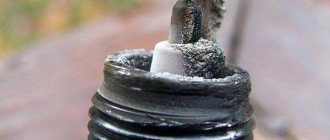
We remove the rotor from the housing and carefully inspect the commutator and brushes. If the collector is dirty, then it must be cleaned and washed with clean gasoline.
Dirty collector
Worn brushes
Brushes in normal condition should be no shorter than 5-6 mm.
Cleaning the collector
We place the rotor on some clean surface, preferably wooden, and use any suitable needle to clean out the dirt between the collector lamellas.
After cleaning, take a piece of some lint-free cloth, thoroughly moisten it in clean gasoline, wrap it around the commutator and begin to rotate the rotor commutator in it. It is not necessary to rub the collector much; it will be enough just to wash it from dirt to approximately the same condition as in the photo.
How to make brushes for a scooter starter?
There are no problems with the rotor commutator: they cleaned it, washed it, dried it and that’s it. But what about worn brushes? They are not on sale and never have been, and a new starter is very expensive, what should I do? There is a way out: make the brushes yourself, or rather, not make them, but remake them from others.
To make new brushes, a set of new brushes for the dynastarter of the Soviet Ant scooter is ideal for us. This kit costs only 150 rubles and includes two pairs of brushes, enough for exactly two starters. You can buy such a set at any store selling spare parts for Soviet motorcycles. Why exactly from “Ant”, and not from a drill, for example? Because ant brushes are designed for high current and are very resistant to abrasion, while brushes from conventional power tools are soft and quickly burn and wear out.
We take a brush, it is initially much larger than the original one, and we grind it on all sides using sandpaper so that it fits easily into the socket and at the same time does not dangle there too much. Ideally, you should try to sharpen the brush so that it sits in its socket as tightly as possible and at the same time walks in it without the slightest, even barely perceptible resistance.
We insert our freshly ground brush into the socket and check its mobility without fail.
Solder the wire of a homemade brush to the power terminal
We install our homemade brushes in place.
That’s the whole secret and the most important thing - with such homemade brushes, which also cost a penny, you can completely restore the operation of the starter. And for many many seasons. And this has already been tested on more than one copy. At least I have never received any complaints about the operation of the starter with brushes from “Ant” implanted into it.
The starter turns in the wrong direction! — logbook Lada 2114 2007 on DRIVE2
The starter turns in the other direction. One day, the starter on my car began to turn the engine very poorly. Having disassembled it, I immediately discovered that the counters were worn out. I bought new meters for 150 rubles, and at the same time decided to go through the entire starter in order to clean it of any ... ram. I took it apart, cleaned it, lubricated it, reassembled it, installed new counters and put it back in place. But the trouble is, the starter started turning in the other direction. At first I thought it was Bendix, but then I finally decided that this couldn’t be because before the bulkhead, Bendix didn’t hint at my imminent death and worked perfectly. I took it off again and checked, as if the beast was turning in the other direction. I googled in search of the cause of this phenomenon, but did not find a single worthwhile answer. Some suggested changing the power polarity, that is, swapping + and –, but the design does not allow this to be done without major changes. But I didn’t want to change anything significantly, since before this incident it worked perfectly and turned where it was needed. Others suggested an even more ingenious option: unsolder the rotor and change the wires in a certain way. This option did not suit me categorically. And yet, since before this everything worked perfectly, it means I did something wrong. Then I began to think about the design of the electric motor, why it always starts turning in exactly the right direction. I won't go into details of my thoughts. Well, in general, after several experiments, the starter began to work as it should. It all turned out to be magnets that act as a stator. The fact is that there are 6 magnets of different polarity installed there, or rather 3 magnets of the same polarity and 3 magnets of reverse polarity. They are located alternately, that is, according to the pattern +, -, +, -, +, -. It was necessary to switch the magnets in places, that is, change the positive ones to the negative ones. Schematically it looks something like this:
How to determine the polarity of magnets? It’s very simple, magnets of the same polarity will attract each other, as a result you should get two stacks of magnets like this:
One stack of magnets of one polarity and the other stack of magnets of reverse polarity. This may not be news to some, but there are probably people who do not know about this and are faced with the same problem. I hope this article will help people find a solution to this problem and save valuable time.
www.drive2.ru
The secret to reassembling
To avoid the long and tedious hassle of installing the rotor into the housing, secure the brushes from moving out in their sockets with toothpicks, lubricate the rotor axles with some refractory grease, install the rotor in the housing and remove the toothpicks. This will make it much easier and faster, and most importantly, you won’t break or twist anything.
And one more thing: if after assembly the starter rotates in the other direction, do the following: unscrew the bolts holding the housing together and rotate the housing with magnets 180 degrees relative to the second half of the housing and the problem will go away.