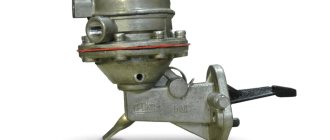
It is well known that one of the most vulnerable elements of the diesel engine power system are fuel injectors. If during operation the power unit gradually begins to consume excess diesel fuel, the thrust decreases, the exhaust becomes smoky, etc., then in this case, as a rule, diagnostics and repair of diesel injectors are required.
If the diesel engine is relatively simple (with a cam injection pump), a whole range of work can be done in a garage with your own hands. More modern diesel units are equipped with complex fuel injection systems (for example, Common Rail).
We also recommend reading the article about what a CRDi engine with a Common Rail direct diesel injection system is. From this article you will learn about the maintenance features, main advantages and disadvantages of motors of this type.
Repairing fuel injectors on direct injection diesel engines or even simply cleaning them can be quite a complex procedure. At the same time, many diesel owners, for various reasons, do not always have the opportunity to get to a professional car service center.
Next, we will talk about how you can repair diesel engine injectors yourself, as well as in what cases and what equipment may be needed to repair diesel injectors.
The principle of operation of diesel injectors and frequent malfunctions
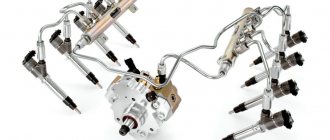
Let's start with the fact that most diesel injectors (with the exception of pump injectors and Common Rail systems) are designed and operate on a similar principle. This means that their repair also involves similar actions. For a better understanding, let's start with the operating principles.
Fuel is supplied to the injectors in diesel engines by pumping it under high pressure. This pressure on each nozzle creates:
- high pressure fuel pump injection pump;
- pump injectors themselves compress and inject fuel;
- in Common Rail systems, fuel pressure is constantly maintained in a special high-pressure “accumulator”;
Now let's look at the operation of the most common power supply system with a conventional injection pump. Simply put, such a pump is mechanically driven and rotates from an engine. The rotation of the injection pump pulley allows the plunger pairs in the pump device to strongly compress diesel fuel and produce a pressure of about 300 kg/cm². Then the diesel fuel is distributed to the injectors, which corresponds to the engine operating cycles.
The fuel flows from the pump through high-pressure lines to the injector installed on each cylinder, after which it passes through a separate channel and ends up inside the diesel injector (in the nozzle cavity). The structural element inside the sprayer is a special conical needle. Such an injector needle is ground to the seat from below with very great precision. A spring presses the needle from above. This spring presses on the needle through a separate washer.
The washer can have different thicknesses, which determines the degree of spring pressure on the needle. For this reason, the washer is called an adjusting washer, since the fuel pressure from which the injector needle will operate will depend on the spring pressure.
The needle is triggered as a result of the fuel pumped by the injection pump accumulating inside the injector. Otherwise, when the fuel reaches the needle cone, further passage of diesel fuel becomes impossible, since the channel is blocked by the needle, tightly pressed to the seat by the force of the spring.
We also recommend reading the article on how to clean and adjust diesel injectors with your own hands. From this article you will learn about the features of diagnosing, cleaning, adjusting and adjusting the spray quality of diesel injectors.
However, the injection pump continues to operate and pump fuel, and the pressure increases, which at a certain moment becomes stronger than the spring pressure. As a result, the needle rises, the fuel passes into the space between the seat and the needle cone, enters the nozzle holes under high pressure, and then the atomized fuel charge is injected.
The injection time depends on when the fuel pressure inside the injector drops enough for the spring to press the needle against the seat again. It turns out that the fuel outlet channel is blocked, the pressure will begin to rise again and the process will repeat.
The synchronous operation of the entire mechanism involves precise injection of fuel into the cylinder in which the piston approaches TDC. The next injection in this cylinder at a given moment will be possible only if the needle closes in a timely manner, that is, immediately after the fuel pressure drops.
Malfunctions that can lead to problems with closing the needle after injection do not allow the growing fuel pressure to open the needle again exactly at the moment the piston approaches TDC. As a result, the injection timing is disrupted, the diesel engine begins to stall, function intermittently, etc.
For example, if injection occurs earlier, the process of fuel combustion in the cylinder is disrupted, and the diesel engine operates loudly and harshly. Moreover, the wear of not only the internal combustion engine, but also the problem injector increases significantly.
The fact is that gases break through through a loosely closed seat, the mechanism is destroyed, and is subject to severe contamination from the accumulation of carbon deposits. At the initial stage, carbon deposits are removed by washing the diesel engine injectors, that is, without repair.
It is important to understand that carbon formation is not the cause, but only the result of problems inside the nozzle itself. In other words, the problem of accurate needle actuation, spring force, and effective seat overlap must be addressed.
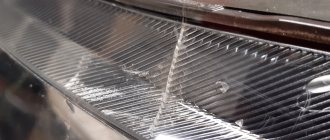
Diesel leaking from nozzle
Diesel injectors leak fuel due to a broken needle end seal. In this case, the leakage can be either minor or significant. This depends on the degree of deterioration in the fit of the sealing cone.
Injector with leak
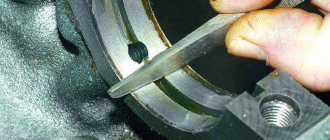
The first action when such a malfunction is detected should be grinding the end of the needle to the seat. To do this, use a thin grinding paste diluted with kerosene. Avoid getting the mixture into the gap with the guide bushing.
At the end, it is necessary to rinse all the elements with diesel fuel or kerosene. Then blow with compressed air. After assembling, check for leaks. If lapping does not help, the engine injectors need to be replaced.
DIY diesel injector repair
In some cases, do-it-yourself repair of pump injectors, restoration of Delphi or Bosch injectors, as well as work with Common Rail elements will require special equipment. Such equipment is often not available in garage conditions, that is, repairs are best done in a specialized service center.
As for the need to repair mechanical injectors, you can handle such work yourself, having the necessary spare parts and a minimum of tools. Let's look at this process.
Let's start with the fact that loose fit of the needle to the nozzle seat in some cases is due to the occurrence of lateral force, which appears depending on the degree of wear of the pressure pin in the area of the guide hole. At the same time, the wear of the specified hole (spacer) should also be taken into account.
Under the influence of lateral force, the cone of the needle, when pressed against the saddle, will adhere more strongly to one side of the saddle compared to the other side. As a result, both the seat and the tapered tip of the needle undergo uneven wear, changing the shape from a circle to an oval. A normal fit cannot be achieved under such conditions; the nozzle must be restored.
- To eliminate the problem, you will need to remove the nozzles, unscrew the nozzle nut and replace the nozzle. In this case, it is often also necessary to replace the pressure pin and spacer. At the same time, the pressure spring is unrolled or replaced.
- Before starting work, it is important to know that the nozzle design does not require the presence of seals, that is, the tightest possible fit of the parts to be connected and sealing are possible due to the high quality of processing of the mating surfaces.
- Also note that the spray needle moves in the guide channel, and the hole has a small gap. This gap also does not have seals, that is, excess diesel fuel inside the nozzle gets into the location of the spring.
- To maintain the mobility of the needle, a special return drain channel is implemented, which allows you to remove excess diesel fuel, which is then returned through the “return” system to the fuel tank.
Main types of injectors used in this system
The Common Rail system uses different types of parts of this type. They differ in both design and performance characteristics. We list the most popular models.
Piezoelectric
The vast majority of engines with Common Rail systems use piezoelectric injectors, since they are considered advanced and have many advantages.
The actuator mechanism of the piezoelectric injector is based on a compact piezoelectric element
As the name suggests, the actuator is based on a piezoelectric element. Using such an element provides a number of advantages:
- an injector with a piezoelectric element switches 8 times faster compared to analogues made on the basis of electromagnetic valves;
- the needle in it weighs 70% less;
- such a part can inject fuel several times during one engine stroke;
- the fuel injected into it is very accurately dosed.
Electromagnetic
Electromagnetic injectors are used primarily in gasoline engines. The needle in it is driven by a spring and an electromagnet, and during one engine stroke the part can produce only one fuel injection. The design of this device can be seen in the figure below.
This is interesting: Engine displacement characteristics
Common Rail electromagnetic injectors are used primarily in gasoline engines
It should be noted that in terms of fuel dosing accuracy, the electromagnetic one is significantly inferior to the piezoelectric one. This indicator directly depends on the type of control system. For example, if a car is equipped with a modern ECU, the accuracy of gasoline dosing increases by 10–12%. There is a certain error in the timing of electromagnetic injectors. For example, an injector needle can hold the nozzle channel open for 2–2.5 ms with an error of 6%. This figure is very far from ideal.
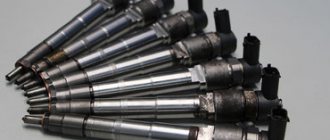
Preparation for removing diesel injectors from the engine and dismantling injectors
Before starting repairs, it is very important to prevent dirt and small foreign particles from getting into the elements of the power system. To do this, it is recommended to first wash the cylinder head using one of the available methods (Kärcher, steam washing, self-cleaning, etc.), clean the recesses for the injectors and the injectors themselves.
These actions will help avoid damage to the threads, sealing cone hole, and also reduce the likelihood of small particles of dirt getting inside the internal combustion engine after unscrewing the injectors.
Another important point is the high-pressure tubes. It is recommended to mark them before removing them, since during reassembly there may be difficulties with the installation order and correct installation. For marking, you can use a marker; marks are applied in the area of the fitting of each injector and the fitting of the fuel pump.
To learn how to repair Common rail injectors with your own hands, watch this video:
We would like to add that it is highly not recommended to repair the common rail system in a garage without the proper experience and equipment, as damage to individual expensive elements is possible.
So, back to mechanical injectors.
- After the high pressure pipes are disconnected from the nozzles, it is necessary to cover the holes in the fittings using special protective caps. The protective plugs must be cleared of dirt in advance; the plugs can also be used to protect the fuel pump fittings.
- Each return fitting is closed in a similar way, since small particles cannot be allowed to enter the power system. For example, debris that gets into the fuel channel of a diesel injection nozzle will penetrate into the atomizer after installing the element on the test stand.
As a result, the injector needle may no longer jam on the engine, but during testing, debris particles will damage the atomizer, etc. If a new nozzle is installed before such a check, then the nozzle will need to be disassembled again, and there is a high probability of another nozzle replacement. The nozzle itself also needs to be disassembled only in conditions of maximum cleanliness.
- As for removing elements from the internal combustion engine, attempts to unscrew the injectors using a conventional open-end wrench can lead to licking and damage to the edges. The fact is that the injectors are tightened with a high tightening torque. For this reason, to unscrew it, you need to have a spanner, and it is also advisable to have an extended head.
- After the injectors are unscrewed, it is recommended to clean their external surfaces again to remove dirt. This cleaning is done with a regular soft brush, using clean diesel fuel as a cleaner. After this, the injectors are dried or wiped with a rag, then the device is ready for diagnostics and repair.
- We also note that after removing the injectors themselves, special O-rings remain in the cylinder head. These injector O-rings are located in hollow niches and, as a rule, stick to the holes in the cylinder head. These rings must be removed and replaced with new ones, since reusing these elements is not recommended.
To extract, you can use a small piece of thin metal wire, which carefully removes the rings. The main task is to avoid damage to the threads in the nozzle hole.
It is prohibited to tap the rings using steel spacers, screwdrivers, etc. The fact is that there is a high risk of damaging the seats of the sealing rings. If this happens, then even after replacing the rings with new ones, there will be no proper tightness.
- It should also be noted that when removing the rings, dirt may get into the injector holes. To prevent it, it is necessary to coat the hole with a viscous lubricant, after which the ring can be removed. Often, Solidol or a similar lubricant is used for such purposes. The crumbling dirt adheres to the lubricant without entering the combustion chamber opening.
At the end of the procedure for removing the rings, Solidol is also removed, for example, using a soft rag, which is wrapped around a rod or screwdriver. Additionally, you can crank the engine crankshaft with the starter for several seconds. This is necessary so that contaminants trapped in the combustion chamber are pushed out by the piston.
To learn how to repair Delphi injectors with your own hands, watch this video:
Note that although the process of repairing Delphi injectors is reminiscent of restoring a conventional mechanical injector, a number of design differences require some nuances.
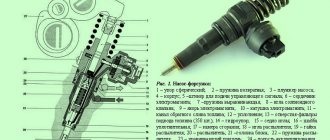
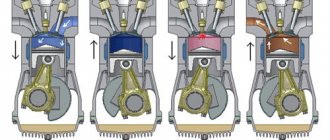
Design and principle of operation of a diesel engine injector
To understand the mechanics of the injector, we will schematically describe the injection cycle:
- The injection pump takes fuel from the tank;
- then the pump saturates the fuel rail with diesel fuel;
- fuel enters the channels that lead to the nozzle;
- inside the nozzle, fuel flows to the atomizer;
- when the pressure on the atomizer reaches the set threshold, the nozzle opens and diesel fuel enters the combustion chamber.
We recommend: I washed the engine, why the car won’t start
We recommend that you additionally read the article by our specialist, which describes in detail the diesel engine power system.
Checking removed injectors
First of all, after removing the injector, you need to diagnose it. To do this, you need a testing stand or testing device. The main evaluation parameters are the accuracy of operation at the required pressure, the uniformity of fuel supply and the correct shape of the spray pattern, as well as hermetically sealed closure.
- It turns out that injection should occur only at a certain pressure. Deviation up or down is not allowed. Before injection begins, there should be no leakage of fuel (the injector should not overflow).
- Also, after injection, pressure must be maintained in the cavities of each nozzle to discharge excess diesel fuel through the return line into the tank.
- As for the shape of the torch, the optimal shape can be considered an even cone, that is, without curved deviations in any direction.
- The fuel itself should not stream or drip, since high-quality spraying involves supplying fuel exclusively in the form of a sprayed mist.
At the same time, during the check, you should pay attention to the sound when the injector fires. Without proper experience, it will be difficult to immediately determine the problematic part, but by comparing the sound of a known-good injector with the others, you can quickly detect the problematic element.
Spray check
In normal condition, the injector produces a short injection, accompanied by a characteristic sharp sound. During operation, the nozzle becomes clogged and wears out. Depending on its condition, a decision is made on the advisability of repair or replacement.
Type of jet depending on the condition of the nozzle
For diagnostics, the nozzle is fixed on a special stand. The nozzle is aimed at a clean sheet of paper. After this the injection is carried out. By the marks left on the paper you can judge the condition of the nozzle. The number of marks on the sheet should be equal to the number of holes that the sprayer has. If there are fewer traces, the nozzle must be cleaned from contamination.
The shape of the tracks should be the same, as should the distance from the center. The main task of the injector is to distribute fuel as uniformly as possible throughout the combustion chamber. Otherwise, the engine will not be able to operate at full capacity.
How to disassemble a diesel injector for repair
So, after diagnostics on the test stand, the defective injectors should be separated, after which you can begin to repair them. In order to unscrew the element, it is not recommended to use open-end wrenches. A socket wrench is well suited for this task, as it ensures a tight grip on all edges of the nut.
The fact is that with an open-end wrench you can lick the edges on the nut; also, on some injectors, these nuts are initially fragile, that is, they can simply crack if there is uneven pressure on the edge. The problem is complicated by the fact that it can be very difficult to find nuts separately on sale.
For proper disassembly, the nozzle must be inserted into a spanner wrench, then the wrench should be clamped in a vice. Now you can unscrew the nut using the socket head. After the nut has moved a little, further unscrewing should be done by hand.
The nut can be unscrewed immediately, together with the sprayer stuck to it. If this happens, then the sprayer should be soaked in a solution for loosening soured bolts and nuts (for example, WD-40). Then it is carefully tapped out of the nut.
- To remove the sprayer, the nut must be placed on an aluminum plate in which a through hole is made. The specified hole should have a diameter that is slightly larger than the diameter of the sprayer. The plate itself is placed on the “lips” of an open vice.
- Now you need to place a rod made of copper or aluminum on the end of the nozzle, and then knock out the nozzle by lightly tapping the extension. After removing the sprayer, all elements will need to be thoroughly cleaned of carbon and deposits. This can be done using a brush with fine steel bristles.
- It is also necessary to use a carbicleaner for cleaning. If there is no such cleaner, then you can wash the parts from carbon deposits in clean diesel fuel or acetone. The final stage of washing is to rinse the nut, injector body and nozzle in clean diesel fuel.
- It is recommended to use compressed air from a compressor for drying. This approach allows you to remove small debris from the joints of the parts being joined, and also eliminates the ingress of lint particles when wiping with a rag.
- Next, you can proceed to installing a new atomizer and assembling the nozzle. First, all elements are tightened by hand, after which tightening is done using a spanner. Note that at the initial stage you should not tighten the nut too much, since it is possible that you will need to disassemble the device again.
- Now the assembled nozzle with a new atomizer will need to be re-checked on the bench. If the element begins to work properly (opens in a timely manner, sprays fuel efficiently, closes hermetically, dumps fuel normally into the return line, etc.), then it will be possible to finally tighten the nut, put the injector aside and then install the part on the engine.
During the final assembly of the injector, it is important to take into account that the union nut of the nozzle is tightened with a certain force using a torque wrench (the tightening torque is indicated in the operating and repair manual for the specific internal combustion engine). Also, before starting tightening, you need to close the holes of the washed and tested nozzle with special caps.
As a rule, immediately after replacing one nozzle, the element rarely begins to work properly, since the nozzle usually operates at low or high pressure, the nozzle overflows fuel, etc. This indicates that additional adjustment is needed.
- To ensure that the operation occurs at the required pressure, you need to select the correct adjusting washer. Adjustment is made by changing the thickness of the washer. If the response pressure is lower, then it is necessary to install thicker washers, but if the injection pressure is higher, then a thinner washer is installed.
- For accurate selection, you must have several adjusting washers in advance, as well as a micrometer to measure the thickness of the washers. Let us add that to increase the response pressure of a diesel injector by 10 kg. per centimeter, the adjusting washer should be 0.1 mm thicker. Accordingly, reducing the pressure is possible by installing washers of thinner thickness.
- As for the diameter, this indicator of the installed shims should be the same as those that were originally on the injectors. Washers must be made of durable steel, since the material determines the durability of their operation.
Let us add that after disassembling the nozzle, you may find that the shims additionally have holes. If these are the washers, then you cannot replace them with washers without holes. If washers without holes are installed as standard, then any type of washers can be installed for adjustment. The main thing is that the diameter matches.
It is also necessary to take into account that during adjustment it is advisable to adjust the injection pressure a little more (10-15 kg per centimeter) from the indicator stated by the injector and engine manufacturer in the operating manual. The fact is that after installation on the engine, the parts are seated and run-in (the needle cone “rubs in” to the seat cone of the replaced nozzle, the adjusting washer sag a little, etc.).
Note that the highest quality adjustment using shims can be considered an indicator when the actual pressure does not differ from that recommended by the manufacturer by more than 5 or a maximum of 10 kg/cm.
Let us add that the adjustment should also take into account the fact that there may be wear on the plungers in the high-pressure fuel pump itself. This means that if the pump produces reduced pressure, then it is more correct to slightly reduce the injection pressure (by 5-10 kg per centimeter).
Please note that this procedure may not be effective in all cases. For example, for a rotary fuel injection pump, it is necessary to set the exact injection pressure for each injector.
Another feature that after installing a new nozzle, the injector pours fuel may be:
- hardening of the factory preservative lubricant in the sprayer;
- the spring is worn out or there are problems with the pressure pin;
The first case is extremely rare, so let's move on to the second. After disassembling the nozzle, you should inspect the indicated elements for wear. Usually defects are clearly visible upon visual inspection. If the problem is with the spring, then the element can be deployed, but this solution is temporary. This means that it is better to immediately replace the pressure spring and other parts with new analogues.
After the injectors are assembled and properly adjusted, they can be put back on the engine. Before installation, be aware of the injector O-rings. First of all, they must be replaced with new ones after each tightening of the injectors with the recommended torque.
In other words, if the injectors have been tightened but then come off again for some reason, reusing the O-rings is strongly discouraged. The reason is simple - after tightening, the rings shrink, they lose their shape, etc.
It is also useful to know that the rings not only ensure the tightness of the connection, but also prevent the injector from overheating. The seals act as a kind of barrier, preventing excess heat from being transferred from the cylinder head to the injectors. It turns out that the degree and speed of coking of the injectors under heating conditions will depend on the quality of the rings.
Assembly and testing of injectors
Reassembly shouldn't be a hassle, but that's only if you didn't get carried away and marked all the tubes and fittings when removing them. Just a few tips. Before installing the high-pressure pipe, you need to wash the outside and flush the inside with fuel. And yes, do not neglect to reinstall the clamps that collect the tubes into a bag. These clips are not intended for aesthetics. They prevent vibration. Tubes without clamps break very quickly (it’s like they’re being cut with a knife).
Well, that seems to be it, you can remove the air from the equipment and try to start the engine.
How to check injectors after repair
What is the best way to check the performance of the injectors? Undoubtedly, it is best to use a stand to test injectors. This stand can be a very complex electronic one, costing several thousand dollars, or very simple, one might even say primitive in the spirit of the fifties (Fig. 7) or homemade (Fig. 8).
Figure 8. Stand for testing diesel injectors
Figure 9. Homemade test bench
Any of them can be used with a lesser or greater degree of convenience. I think even in your smallest city there are diesel garages that have stands. We need to find it, because we know how to negotiate.
But it happens that your diesel is the only one in the area. Then we try to make the stand ourselves. You can make a homemade stand from a KAMAZ tractor pump or a ship pump; in extreme cases, you can adapt your car’s fuel injection pump for testing.
To do this, you need to make a tube - a tee, one end of which will be connected to one of the high-pressure fittings of the injection pump, the other end we will attach the nozzle, and on the third we will attach a pressure gauge of 200-300 atmospheres, of course more is possible, but this one will do at the end.
First, we crank the engine with the starter until the injector starts firing, and then, without leaving the ignition on, we crank it by hand. Of course it’s painful, but if there’s no other way out, it’ll do.
About the injector opening pressure
During the compression stroke, an air charge flows from the cylinder into the combustion chamber at enormous speed. In the combustion chamber, due to its shape, at this moment a directed vortex appears, and fuel is injected into this vortex.
There are different nozzles and different fuel injection pressures, depending on the compression ratio and the design of the combustion chamber; the shape and speed of the vortex are different. Designers establish recommended, permissible injection pressure values for each engine.
As a rule, the set values must be observed with an accuracy of 5-10 kg.cm2 within the set of nozzles. When reassembling the nozzle, the injection pressure must be set 10-15 kg.cm2 more than required, since in the very first minutes of the nozzle operation there will be some shrinkage of the moving parts and, accordingly, a decrease in the set pressure will occur.
It is necessary to note the property of rotary fuel pumps from LUCAS - these pumps have strict requirements for the accuracy of injection pressure adjustment within the set of injectors. In engines with such fuel pumps, searching for a faulty injector using the shutdown method is impossible. Since the engine will immediately stall due to the fact that the fuel supply to the remaining injectors will stop.
Reinstalling injectors on the engine
After the O-rings have been installed, the injector threads must be additionally lubricated with a small amount of graphite or copper grease.
- The next step is to screw in the injector, and only by hand, and not with a key. If one of the injectors does not “go” by hand, then the threads in the cylinder head need to be further cleaned. When screwing in, the nozzle must be precisely positioned along the thread. The main task is not to damage the threads in the engine head.
If the nozzle cannot be screwed in by hand, then for proper installation you should carefully unscrew it back and then try again. The final tightening using a torque wrench is carried out only when the nozzle is completely screwed into the hole by hand. It is also imperative to observe the recommended tightening torque.
- The final step is to connect the high pressure lines to the nozzles and pump. As mentioned above, the tubes must be marked to prevent errors during assembly. Before installing the tube, it is advisable to rinse the inside again with clean diesel fuel.
In parallel with the tubes, it is necessary to correctly install the fixing plates that hold the tubes, eliminating their vibration. If you make mistakes when installing the plates, then strong vibrations will cause cracking and quickly destroy the high-pressure tubes.
- Next, you need to get rid of air in the fuel system, after which the engine can be started. To remove air, you may need to perform a number of actions, which will depend on the specific case and type of injection pump.
Sometimes it is enough to crank the engine with a starter or use a manual pump, after which fuel without air bubbles begins to come out of the high-pressure pipes. Additional manipulations may also be required to unscrew the fuel filter housing. Note that the most difficult situation is removing air plugs from the fuel injection pump itself.
Replacing the injector nozzle
During the operation of a diesel car, situations may arise when fuel consumption increases noticeably and engine power decreases until it stops completely. This is often caused by faulty nozzles. In these cases, it is advisable to carry out repair work as quickly as possible.
The cause of decreased engine power and increased fuel consumption is often a faulty injector nozzle.
Symptoms of a faulty injector nozzle
The need to replace the sprayer can be determined by the following signs.
- Fuel is supplied in excess volume. It continues to flow into the engine even after the end of the operating cycle. Smudges appear.
- The engine is unstable, starts poorly after a long stay and the idle speed fluctuates. The reason for this is a lack of fuel in the system.
- Due to incomplete combustion of fuel, the exhaust becomes black and denser.
This is interesting: Will there be a unified methodology for conducting crash tests?
As a result, engine power is reduced. In this case, replacement of the nozzles is required.
Required Tools
Typically, injectors are installed in the cylinder head on a thread. To dismantle them, you should not use open-end wrenches. Even if you manage to remove the injectors in this way, you will not be able to install them back - it is impossible to tighten them with a wrench with the required force.
The main part of the injector body is a hexagon. To remove them, you can use standard 24 and 27 socket heads and a wrench. They should be elongated. In addition, you will need a container with fuel to flush the injectors.
Video: dismantling and repairing injectors
Procedure for replacing an injector
After removing the injectors, washers and contaminants are removed from the injector channels. The washers are pulled out using self-made hooks. After cleaning the channels, be sure to crank the starter for 10 seconds. This will ensure that the channels are completely clear of debris. In addition, it is recommended to check the functionality of the glow plugs and control system.
After removing the injectors, their performance is checked according to the following criteria:
- when fuel is supplied under a certain pressure, the injector must open;
- before opening the injectors, fuel should not flow out of the nozzle;
- spraying should be uniform;
- When the fuel supply is stopped, the pressure inside the injector must remain unchanged for some time.
When disassembling the nozzle, it is convenient to use a vice, but you should not use excessive force.
If the nozzles are faulty, protective caps should be put on the nozzles and the work area should be prepared. The surface must be clean and level. You will need:
- vice;
- container with clean fuel;
- spanners.
Japanese car injectors that have a return through a ramp should not be clamped in a vice, as the part may be damaged. The key is secured in a vice and the nozzle is placed in it.
The injectors of German engines can be clamped in a vice. It is not recommended to use open-end wrenches - only socket wrenches and extended heads.
The procedure for replacing the nozzle is as follows.
- The union nut is loosened and unscrewed. Sometimes it is removed along with the sprayer. In this case, it is knocked out with any suitable attachment, cleaned of dirt and washed.
- The intermediate housing is removed and washed in a container with fuel.
- The remaining fuel is drained from the injector body.
- Remove the new atomizer from the packaging and wash it.
- The intermediate body is removed from the container in such a way that contaminant particles are removed along with the fuel.
- The nozzle is assembled, the nut is tightened.
- The performance of the injector is checked at the stand.
- Before installing the nozzle, the seat is lubricated with graphite lubricant. Tightening is carried out with a force of 6–7 kg-m. Screw the nozzle into the channel by hand - it should go easily.
The assembly process does not present any difficulties if the tubes and fittings were marked during disassembly. Before installation, high-pressure pipes are washed with fuel both outside and inside. After connection, clamps are installed on the tubes to prevent vibration and premature failure. Air is then removed from the system and the engine is started.
Video: DIY injector replacement
Injector diagnostics
You can check the unit for functionality even before dismantling it. This is done like this: start the engine at idle and remove the injectors one by one. If, after removing one of them, the operation of the engine has changed, then the part is in order and can be returned to its place. Thus, by the method of elimination it will be possible to detect a defective element.
For diagnostics you need to use a maximeter or multimeter. We remove the battery terminals, disconnect the injector wiring, and measure the performance of each part. For high-impedance products, the values should be in the range of 11-17 ohms, for low impedance products - less than 5 ohms. Let us note the characteristics that indicate the performance of the node:
How to carry out repairs
Buying a new part for the Common Rail system is quite expensive. Depending on the manufacturer’s brand, such a nozzle can cost at least 16 thousand rubles. Accordingly, in order to reduce car maintenance costs, some car enthusiasts resort to self-repair of injectors.
It should be noted that after repair, the service life of the part is almost identical to the new product, which means that the feasibility of repair is quite clear. At the same time, as noted above, speaking of repairs, this means restoration of its atomizer.
The main task of such repairs is to ensure complete tightness between the needle and the body. For these purposes, you will need to perform six mandatory operations:
Washing and blowing parts. Mechanical processing of needles. Increasing the surface of the needle to eliminate the effects of wear. Mechanical processing of the housing. Grinding the needle and body together. Check the operation of the sprayer.
Repairs can be carried out instead of a more expensive replacement of the atomizer in cases where parts of the product have not yet exhausted their service life. That is, the surfaces of the needle and body do not have severe deformation and high wear.
Repair procedure
The Common Rail nozzle is clamped in a vice - you need to unscrew the nut that secures the nozzle. After which you can perform all six stages of repair work:
The needle is washed in a container with fuel, and then wiped dry with a clean cloth. Also, to achieve a perfect result, it is recommended to blow out the sprayer with a can of compressed air or at least a stream from a tire pump. Mechanical processing of the needle should begin with grinding in the cylindrical surface. To do this, you will need a cast iron lap and abrasive paste. The needle must be very carefully passed over the lap several times in order to remove only those marks that were already on it, avoiding new cracks. After this, you need to return the needle to its previous volume so that it tightly covers the nozzle cavity. To do this, it is necessary to carry out an extension. It is performed using nickel plating with chemical elements. That is, after grinding the needle again acquires its working dimensions. The atomizer body also needs good machining. To do this, the body is subjected to lapping and moved along it. The work should be completed when the body has become shiny and smooth. Now you need to insert the needle into the body and see how big the gap is between them. If the space between the needle and the body wall is greater than the standard value of 1–2 microns, then it is recommended to chemically nickel-plate the needle again.
That is, the essence of repairing a sprayer comes down to first cleaning its elements from adhering dirt and carbon deposits, then grinding and increasing the new volume, bringing the gap between the needle and the body wall to factory specifications.
The only drawback of the repair is its difficulty. Almost every driver can replace the sprayer. And to repair it yourself, you need special equipment (lapping) and sensitive measuring instruments.
How to clean injectors
First, let’s talk about what a procedure like cleaning injectors does. It allows you to remove carbon deposits that interfere with the normal operation of the engine, increases its performance, reduces fuel consumption and wear of individual engine elements.
Now let's talk about how to clean the injectors. There are several ways:
Self-cleaning. For it, special mixtures are used (similar to mixtures for cleaning throttle valves and injection systems), which are poured into the tank and allow you to wash both the injectors and fuel pipes. The method is considered ineffective.
Cleaning injectors on a stand. This cleaning option uses an injector cleaning stand. Usually, they are installed in specialized centers, where specially trained personnel know all the intricacies of the process (for example, how to choose the right liquid for the most effective washing of injectors on a stand). This cleaning option is preferable.
Disassembling and cleaning the nozzle
Once the defective part has been identified, it must be disassembled for repair. This is done quite simply, after unscrewing the nut, we fasten the element in a vice (without strong clamping, so as not to deform the body) and knock out the nozzle with a light tap. Next, all internal parts are removed - the transition element, the adjusting throttle, the atomizer block and the magnetoelectric contact.
After disassembly, it is necessary to thoroughly clean each element. For these purposes, it is best to use a specialized flushing liquid. If you don’t have it at hand, use clean diesel fuel or acetone. It is necessary to completely remove carbon deposits and any contaminants. At the final stage, the body itself, the nut and the sprayer are rinsed in clean diesel fuel. Drying will also be required - for these purposes it is optimal to use compressed air from a compressor or just a dry rag.
After carrying out the work, you need to measure the injector with a multimeter; if the values are within the normal range, you can assemble it and put it back. It is likely that the sprayer has failed, in which case it needs to be replaced. By the way, the factory grease must be completely removed from the new element, otherwise it will not be possible to achieve normal operation.
The last stage is the reassembly of the part and its installation. It is not recommended to over-tighten the nuts immediately, as re-disassembly may be required after installation and inspection. The assembled injector is checked for compliance with all characteristics - correct “return” of fuel, correct atomization, hermetically sealed closure, and so on. If no problems are found, fully tighten the nut and install the injector on the engine, having previously carried out calibration.
Nozzle sprayer repair
Since the purchase and installation of a new nozzle is associated with quite serious financial costs, often only the atomizer is replaced. It consists of a body and a needle located inside. During operation, the seating surfaces become deformed and the sprayer begins to work incorrectly.
This is interesting: Current leakage in a car
Sprayer repair is possible in the following cases:
- Sticking of the needle in the body due to contamination, deformation, scuffing or chipping of the working surfaces.
- Spray nozzle is dirty.
Procedure for repairing a sprayer
There are several ways to repair a sprayer. One of them is ultrasonic cleaning, which is used to remove carbon deposits from internal surfaces. However, if the sprayer is highly coked, complete removal of carbon deposits using this method is impossible. Moreover, ultrasound cannot restore mechanically worn surfaces.
One of the options for repairing a sprayer is ultrasonic cleaning.
Another option for repairing nozzles is grinding in using polishing pastes of varying degrees of grit. The disadvantage of this method is the possible violation of the geometry of the relative position of the parts. As a result, fuel may leak into the injector from the atomizer. Lapping will not help in case of severe mechanical deformation of the surfaces.
The injector elements are arranged in a strictly defined sequence
Grinding is carried out as follows.
- The nozzle is clamped in a vice. The nut securing the sprayer is unscrewed.
- The needle is washed in a container with fuel, wiped with a clean rag and blown with compressed air.
- To grind the needles, use a paste containing an abrasive and a cast iron lap for final processing. The needle is passed over the lap to remove marks. At the same time, the appearance of new damage should be avoided.
- Nickel plating restores the working volume of the needle.
- The spray body is machined. It should take on a smooth and shiny appearance.
- The needle is inserted into the body. The gap between the needle and the body should not exceed 1–2 microns. Otherwise, nickel plating should be repeated.
Thus, repairing the sprayer consists of cleaning it from carbon deposits, grinding it and increasing the volume. This process is quite labor intensive. If almost every car owner can replace an injector nozzle, then for independent repairs you will need special equipment.
Video: repairing a diesel injector nozzle
Cases when the nozzle needs to be completely replaced
Let's list the main features:
- the resource declared by the manufacturer has been exhausted;
- there are breakdowns or other leaks in the housing;
- burnt nozzle nut: if the problem is not corrected at an early stage, the nozzle itself will become unusable.
Please note that on some engines, after installing a new injector, it is necessary to “bind” it to the engine: make changes to the settings of the control unit. It is better to install the nozzle at a service station, since the station has bench equipment for adjusting and assessing the current condition of the part
It is better to install the nozzle at a service station, since the station has bench equipment for adjusting and assessing the current condition of the part.
Self-repair of injectors is rather a necessary measure. Such a service in artisanal conditions can only bring success if the craftsman is highly qualified. The main problem of garage repair is the lack of high-precision bench equipment for diagnostics. The repairman cannot objectively assess the effectiveness of service activities.
If you have the opportunity to go to a service station, do not neglect it: computer equipment and cleaning stands will extend the life of the injectors and save you from potential expensive repairs. The same ultrasonic cleaning can relieve a motorist of engine problems for several seasons. Repairing modern Common Rail type injection systems in a garage is not possible: fine computer tuning of the part is required.
To avoid costly repairs and replacement parts, use fuel cleaning additives. They prevent the formation of soot and sedimentation. The use of additives should be systematic and not one-time. Remember: additives are about preventing breakdowns, not eliminating them.
Disassembling injectors
So, the injectors have been removed. Now we immediately begin to remove the sealing washers from the nozzle channels, or rather their remains and general debris. Removing washers often takes a long time.
Injector and glow plug
As a rule, normal washers should simply be removed with a hook, but sometimes you have to come up with homemade devices for this (for example, screw a tap into them and pull it).
Under no circumstances should you try to cut the washer in the channel with a chisel. You will definitely damage the end of the channel, and correcting such nicks will require removing the cylinder head. You should not try to solve the problem of a damaged end by installing tricky washers.
The engine will clean itself. In this case, you can check the condition of the glow plugs and their control system. With the injectors removed, the operation of the spark plugs is clearly visible.
Do not forget to plug the nozzle channels with oily rags, and the engine on top with polyethylene so that no water gets into the channels.
After cleaning the channels to completely remove debris from them, you must crank the engine with the starter for 10-20 seconds.