Tinting on car windows is not only a tuning element, but also a guarantee of passenger safety.
If you are planning to apply it to your car, please note that tinting in some cases is prohibited by law and is punishable by a fine. Therefore, before sticking a strip of tinting film, you should familiarize yourself with the rules for tinting, but as an alternative, use a visor on the windshield with which there will be no problems.
Tint strip on windshield
Standards
According to current legislation, the width of the strip of tint film on the windshield at the top should not exceed 14 cm. Despite the fact that this requirement is clearly stated in the regulations, many problems arise with such indicators. Most often this happens because the measurement is made not from the edge of the tint film itself, but from the edge of the windshield. Such mismatches can also occur if the film is glued unevenly in the upper part of the windshield (in the presence of triplex).
Then you should refer to GOST:
- the border is measured taking into account all 3 points;
- width (in cm) is calculated based on the arithmetic average of these indicators.
Some traffic police employees do not take such indicators into account, citing the fact that GOST does not have legislative force.
It should also be noted that tinting the upper part of the windshield is allowed only with a light film with a transparency of at least 70%. That is, the sunscreen should be almost completely transparent.
If you decide to stick a tint strip on the top of the windshield, you need to adhere to the requirements of the traffic rules. Please note that 14 cm is the thickness of the film over the entire glass, and not just in the center, as many drivers believe.
Other color markings on the road
In accordance with GOST 51256-2018, other colors can be used for road markings:
- white. The priority color used for most permanent marking lines
- orange, primarily used for temporary markings
- yellow. Used to designate sections of the roadway where, for one reason or another, it is prohibited to perform such maneuvers as parking and stopping. Yellow lines also indicate stops for public transport (passenger taxis) and the boundaries of intersections (“waffle irons”)
- blue. Used to delimit the boundaries of traffic lanes, for example, at an intersection
- green. The primary area of use is duplication of installed road signs on the roadway
Strip selection
Gluing the strip with your own hands is quite simple. Initially, you should choose the right material. There are special strips of standard size (14 cm) with different inscriptions or shades. But as for the latter, we should not forget the standard regarding light transmittance.
The cheapest and at the same time simplest option is to purchase a standard strip for tinting the windshield of a certain car brand. It meets all standards according to GOST. So you don’t need to adjust it to size and worry about fines from traffic police officers.
In addition to the presented options, you can also pay attention to the stripes for tinting (size - 130 cm by 50 cm). In this case, the strip on the glass is divided into 2 equal parts (rear and front glass).
Types of stripes on the windshield
Another way
You can do car tinting yourself in another way. It is necessary to prepare a 20% solution of rosin by dissolving it in caustic soda. Dissolve the rosin until the liquid acquires a dark yellow tint. The composition must be filtered - add ferrous sulfate or ferric chloride solution for this. A red precipitate forms, which must be separated, washed and dried thoroughly. Apply the tint to clean glass using a spray bottle. This is a good alternative to glass tinting film. A highly durable film is formed on the surface of the glass.
Now you know how to tint a windshield with film, paying special attention to the issue of tinting using a chemical solution. The most important thing is to take into account the current legislative requirements when applying a darkening layer. The windshield must transmit at least 75% of the light flux, side windows - at least 70%.
Preliminary stage
The stripes should be applied to the windshield in a dry room. If you are going to carry out such an operation outdoors, the weather should be warm and calm.
Initially, you should prepare the surface of the car. To do this, you need to use a soap solution (10-20%). You can also use regular shampoo.
If soapy water is not suitable for you, a special glass degreaser will do. Please note that the substance should not be hazardous to metal surfaces.
After the glass is completely cleaned and well dried, you can begin gluing the strip.
Standard tinting method
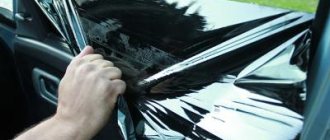
How to glue tint with your own hands? We move on to practice. To apply the film to the windshield and other windows, it is absolutely not necessary to remove them - you can simply remove the sealing rubber.
For the sprayer, it is recommended to use filtered water with a small amount of baby shampoo. When filling the glass, you don’t have to be particularly careful - the more water there is, the easier and better it will be to tint the windshield with film. The temperature in the box should be 20-25 degrees. The humidity level must also be very high - otherwise dust will stick to the adhesive side of the film. It is advisable, before tinting the glass with film, to enlist the help of an assistant - he will help peel off the transparent layer from the tint.
As soon as the tint film has been freed from the transparent protection (on the adhesive side), we spare no water, moisten it generously with soapy water and glue it to the glass. After that, take a rubber eraser and expel the water remaining inside. However, if you were unable to stick it to the windshield properly and there is still air inside, you can very carefully pierce the film with a blade and let it out.
A few hours after application, the tint film should be cut off at the edges. An important point is that when cutting the film, you must do it at an angle of 30 degrees. This way, the material applied to the windshield will not subsequently bend from the glass.
We were able to answer the question of how to stick such a useful component as tint film on the windshield. However, be careful - very dark material will interfere with the driver’s normal visibility at night.
Film application
Please note that you need to cut off the tint strip with a margin (5-7 cm more). The strip should only be applied to well-washed glass. Otherwise, the film will simply fall off. Next, the following actions are performed:
- the outside of the glass is treated with soapy water;
- carefully apply the film itself (make sure there are no air bubbles);
- excess pieces (2-5 cm) are cut off;
- The protective layer of the strip is removed with smooth movements, and at the same time the film is moistened with a soap solution from a spray bottle;
- on the inside, the glass is also moistened with a soap solution, and a film is applied;
- the material is leveled and adjusted (spare centimeters are immediately removed);
- use a non-sharp spatula to remove air bubbles;
- Use a technical hairdryer to thoroughly dry the surface.
The tint film dries completely only after 2 days. Therefore, during this period you should not actively operate the vehicle, especially in bad weather conditions.
Applying film to windshield
Necessary materials
In order to stick a tint strip according to GOST, you need to have the following materials:
- film in the size of 200 cm minimum (how much you need exactly, it is better to measure in advance);
- rubber spatula;
- soap solution;
- spray;
- sharp stationery knife;
- technical hair dryer;
- clean rags.
Once you have all the necessary materials, you can begin preparation.
Necessary tools and materials for window tinting
Benefits of tinting
Despite the fact that window tinting is partially prohibited by law. This tuning element has undeniable advantages:
- protects glass from mechanical damage;
- prevents the windshield from cracking when a crack or chip forms;
- in the event of an accident, the glass will not fall out on passengers, since it will be held in place by the tint film;
- protects the car from ultraviolet rays and interior fading;
- keeps the cabin cool in summer and warm in winter;
- protects from oncoming headlights;
- preserves personal space in the car interior, since everything is hidden from prying eyes.
If you decide to apply such a tuning element to your vehicle, then measure in advance how much film you need (plus 10-20 cm for reserve).
The pasting process is simple and anyone can do it. But when applying such an addition to your car, you should remember the legal requirements. Otherwise, administrative penalties are inevitable.
For many who drive OPEL Mokka, it is no secret that the windshield in our cars is too large
.
Such dimensions would make sense, otherwise 20% of the glass area does not in any way affect the visibility of the road situation.
During the next audit, in my old bins, I came across a 1 m linear tinting film for the rear lights.
I bought it, I don’t even remember when, for a VAZ 21120, but I never started using it. In general, it was lying in a warm room, the adhesive layer was preserved very well and I decided not to use it for gluing the lanterns, but to make a stripe on the forehead. Once I’ve decided, I have to do it. So, in order to do everything efficiently, it is necessary:
1. Wash the glass well, both from the outside (due to the fact that we will heat and form a film on the outer part of the windshield) and from the inside (for high-quality gluing of the film in place).
2. Mark the glass to facilitate future gluing of the film from the interior. 3. Detergent for washing, cleaning and polishing glass, spray. 4. Cutter. 5. Masking tape (according to Feng Shui), for some reason I didn’t have it, so I used electrical tape (I had to wipe the glass with solvent after removing it). 6. An industrial hair dryer, or a hair dryer, because we set the temperature within 250-300 degrees. 7. Clean rags for washing and wiping glass. 8. A sheet or any rag to cover the dashboard. Having collected everything I needed, I began to carry out my plans.
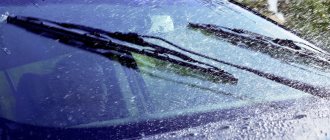
Repair of car wiper blades
If it is determined that the reason for the malfunction of the car wiper blade is the wear of the working surface of the edge of the rubber band, then it can be restored without even removing the wiper from the windshield wiper arm. To do this, you need to take a plate of non-bending material, such as multi-layer plywood, and glue a sheet of the same size of fine-grained sandpaper onto it. The longer the plate is, the better the quality of the edge.
The main thing when doing this work is to try to grind the rubber tape evenly along its entire length to prevent failures, otherwise stripes may remain on the glass in these places when the wiper is working.
It is even better to sand the rubber band by gluing sandpaper to a plate that is 10-15 cm longer than the length of the brush itself. Then the work will be much easier to complete with a better end result. After every few passes, you need to check the result so that you get right angles and do not grind off excess rubber, since it will still be useful for subsequent repairs. In this way, the tape can be restored several times.
If the rubber band has completely become unusable, and the frame is still in good condition, then it is advisable to replace it with a new one. For replacement, you can also use a used rubber band, torn on the moving side along the neck line, removed from a longer brush. Removing the rubber band is not difficult.
First you need to use the blade of a screwdriver to slightly bend the rubber band rocker support clamp to the side.
The rubber band is removed from the rocker arm support tabs. Elastic plates are removed from the tape. Sometimes the elastic plates are bent, and you need to remember which way to go in the same way in the groove of the new rubber band. Sometimes the recesses in the plate are smaller than the protrusions in the tape groove. Then you need to use a file to adjust the samples to size.
A new rubber band prepared for replacement is threaded through a groove through all the rocker arm support clamps. The tape should move freely, but without play, along the rocker arms. If any of the supports does not provide free movement or the tape in it is too loose, then you need, accordingly, to slightly move the legs apart or tighten them.
After threading the rubber wiper band into the arms of the rocker arms, you just need to use pliers to squeeze the clamp and the blade is ready for installation on the car windshield wiper arm.
As you can see, by spending just ten minutes you can give a second life to your brush. Such repairs are especially relevant for expensive branded wipers.
Tinting standards
The width of the strip glued to the windshield should not exceed 14 cm. This simple, at first glance, statement contains a small catch, since measurements are always taken not from the edge of the film, but from the edge of the element itself. A crookedly glued strip may have a thickness of 14 cm in the center, but due to the bending of the triplex, it will slide down a couple of centimeters along the edges. Not many people know that the sequence of measurements is described in sufficient detail in the notorious GOST 5727–88. The standard, of course, does not have the force of law, but the measurements taken by the inspector must comply with it:
- The boundaries of normative fields are measured at three points.
- The width of the normative field is calculated as the arithmetic mean of these numbers.
The measurements taken must be recorded in the appropriate act, according to which a protocol is drawn up. Violations committed and recorded during measurements, as well as the use of instruments that are not included in the uniform suitcase of traffic police officers (for example, a construction tape), can be used for defense in court, although they are unlikely to be a good defense in themselves. The light transmittance of the tinting film must meet the general requirements - 70% (glass element + film). Those. Tinting is only permissible with a very light film.
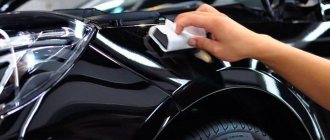
Pasting the film
Many people are concerned about the issue of adjusting the film to the curvature of the surface. This can be done with your own hands (with a rubber spatula) and a hairdryer. During heating (it is better to heat from the other side, i.e. the surface itself, not the film), the tinting takes the form of glass, but it can only be heated after the bubbles have been driven out and smoothed out. Before all such work, the rubber seals are removed, the hairdryer is set to minimum power (the film may melt, the glass may burst). There are no special requirements for the surrounding air temperature, but experimental data indicate that better adhesion is achieved at a temperature slightly below room temperature.
Degreasing and “soaping” the surface from a spray bottle is carried out using standard tinting technology, but the entire strip is glued to the windshield, immediately after fixing both corners of the strip on the corners of the surface. These corners cannot be allowed to move, so it is better to work together. One controls, the other gradually smoothes the strip with vertical and diagonal movements, moving horizontally from the center to the edge. During the smoothing process, the film may stretch by several millimeters; after heating with a hairdryer, stretching may also occur - at this stage you need to be delicate and smooth out the tint carefully.
How to do it yourself?
The question arises - how to glue the tint with your own hands? As we know, this film helps to darken car windows. The effect is achieved quite simply - a special polyester film is glued to the windshield. Paint or a metallized composition is applied to the surface of the film. Black tinting is very popular, but in stores and markets there is a film of various colors (you can tint your car windows yourself to match the color of the body).
How do you do car tinting yourself? First of all, I would like to note the main advantage of independent work - it is much cheaper when compared with a similar service in a car service center. If you study the reviews on thematic auto forums, there are no big difficulties here - the necessary tools and materials can be purchased in the store.
What do you need to apply tint yourself?
- film that we will stick on the windshield;
- knife;
- putty knife;
- industrial hair dryer – you won’t be able to tint curved glass without it;
- dry rag.
The most important thing is the film. If you do not have a bus, then one standard roll will be sufficient. Choosing the right spatula is important - how can you properly smooth out the film without it? It is best to use a rubber spatula for your car, but if you don't have one, you can use a soft plastic product.
Caution is very important - there is a risk of leaving deep scratches on the film or tearing it, so you need to act as carefully as possible.
To glue the tint with your own hands, you will need a knife. You can use a regular one, but it is better to buy a stationery one with a sharp blade. An industrial hair dryer is necessary to remove wrinkles and air bubbles if the glass in the car is curved. In all other cases, film tinting is done without using it.