Working with the front bumper of Lada
The most common reason for replacing bumpers and fenders is damage. Often, the front structure suffers from potholes on the road, frontal and side collisions, the rear – from unsuccessful parking maneuvers, as well as drivers who do not comply with the speed limit and driving distance. Bumpers are also removed for tuning installation of additional headlights, parking sensors or a video camera.
Before starting work, prepare the necessary set of tools: a Phillips screwdriver, an 8x10 mm open-end wrench or a socket wrench with 8 mm and 10 mm heads (bits).
To dismantle the radiator, use a key to release the upper grille fastenings
Using a 10 mm open-end or socket wrench, unscrew the fastening screws on the top side of the radiator grille.
We remove the grid from the lower hooks and separate it
Lifting it up, release the grille from the sockets of the lower fastenings and completely separate it.
We attach the front bumper to the body from above with two 8 mm screws. From below it is attached to the engine protective casing with five 10 mm bolts. Additionally, we use two self-tapping screws to attach the structure to the fender liners on each side. The cavity also has two side projections with mounting holes together with 8 mm screws, which are used for fixing in the body brackets.
How to remove the bumper yourself
The structure is dismantled in the following way:
- Using a 10 mm socket wrench, loosen the tightness of the bottom side to the engine protective casing at five points.
- Using a Phillips screwdriver on each side, unscrew the screws securing the bumper to the fender liners from the bottom.
- In the same way, we free the upper part from the attachment to the fender liners.
Using an 8 mm socket wrench, unscrew one screw on each side.
Using the same key, we disconnect the fastenings on the front panel of the hood.
We move the bumper forward, disengaging the technological protrusions.
Photo gallery: step-by-step instructions for dismantling the structure
Video: how to change a radiator grille
Installing the bumper is also easy. It is enough to follow the reverse sequence of actions performed during dismantling.
Video: what is the difference between the process of installing a front tuned bumper
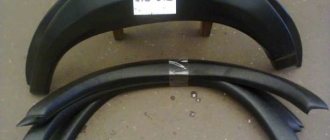
Application of foam plastic
You can also use polystyrene foam to make a homemade structure. This material is also characterized by a high degree of machinability. Among the features we note the following points:
- A massive bumper requires several sheets, the width of which is 25-30 centimeters.
- Separate sheets are folded together to increase strength. Liquid nails are used for gluing.
- The required time is allotted for drying the foam sheets. At the time of drying, it is recommended to place a weight on the top, which will increase the degree of gluing.
- The number of sheets used depends on the ground clearance of the vehicle. In this case, 8 sheets are used.
- Cutting out the shape is a rather painstaking task. Before performing this work, it is recommended to create a sketch that will determine the location of all bends and niches. To cut out the shape, you can use a variety of tools, since polystyrene foam is an easily processed material.
- After the required surface has been formed, the surface is covered with technical plasticine. It protects the surface of the foam from the negative effects of epoxy resin. The surface should be treated with high quality.
- Several layers of putty are applied on top, thereby increasing the resistance of the surface to the effects of resin. The formed surface is treated with sandpaper.
- The next step is to apply the putty and process it, after which the surface is primed.
- The final layer is paint.
Such a bumper is characterized by low weight, due to which fuel consumption is significantly reduced and the degree of controllability is increased.
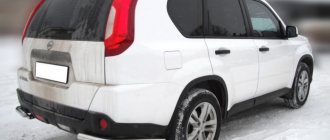
Removing the VAZ rear bumper
To carry out this operation, you will need a 10 mm wrench. Removal work is carried out in the following order:
- Using a 10mm wrench, unscrew the two nuts securing the bottom to the body.
- We do the same with the two upper screws located at the rear lights.
- Disconnect the license plate light power connector.
- We unscrew the terminal of the negative wire attached to the threaded point of the body inside the trunk.
- We derive the structure from technological hooks.
Photo gallery: the main stages of work on detaching fasteners and replacing parts
Video: how to replace a rear bumper without involving specialists
Information about the rules for replacing the front and rear bumpers of a VAZ 2110, 2111, 2112 car will expand the technical horizons of a novice car enthusiast. With minimal knowledge and skills in servicing your car, you can replace the bumper yourself if necessary. The ability to remove and install this part without involving car service specialists will save time, money and nerve cells of the owner.
How to put it in its place
Installation of the rear bumper (standard type) is carried out in the reverse order of dismantling. Before finally putting the part in place, it is necessary to set uniform gaps between the bumper and the body of the VAZ 2110 car. After this, all fastening points are tightened.
If it is intended to install a cladding of a different shape, the attachment points may differ. Such a part is adjusted to the VAZ 2110 car locally, modifying the standard attachment points.
How to properly remove the bumper on a VAZ-2110
The driver is forced to change the front bumper more than once during the operation of the car.
However, not everyone knows how the replacement is carried out. Therefore, today we have prepared an article for you where we will present in detail the procedure for replacing the bumper on a “ten”. On the domestic car VAZ-2110, the manufacturer for the first time began to install attractive bumpers made of streamlined plastic, which are painted to match the iron horse. Meanwhile, on the previous model, such elements look much more primitive and simpler. However, there is also a negative point, because the paintwork deteriorates from various mechanical actions. To restore the appearance or completely replace a component, you need to remove the bumper from the car, which is not as difficult as it seems. Therefore, it is not at all necessary to run to the service station. It is possible to carry out the manipulations to remove the bumper from the “ten” and analogues on your own, having first studied the instructions we presented.
- different types of wrenches (open-end wrenches 8 and 10 mm), socket wrenches 8 and 10 mm;
- heads with extension or wrench;
- screwdriver (double-sided);
- WD-40 preparation;
- rags.
Replacing the front bumper in VAZ 2110-2112 cars
- Initially you will need a wrench or socket. Together with the specified tool, look under the lower compartment, that is, under the car’s bumper. Here you see that the engine splash guard, also called the crankcase protection, is attached to the bottom of the bumper. So, this mudguard at the front is attached to the body with 5 nuts, which need to be unscrewed (there is no need to remove other nuts, especially to remove the entire mudguard). If you neglect this advice, the mudguard will significantly impede the work of replacing the front bumper.
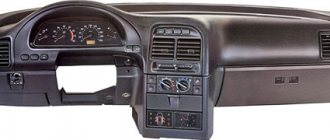
- Go to the car interior and pull the handle that opens the hood. As soon as the hood is slightly opened, you should lift it and place it on a support to gain access to the engine compartment. Then you need to remove the radiator grille from the car. Here you will need to unscrew 2 bolts. As soon as the latter are unscrewed, you should lift and carefully remove the grille. This is required to provide access to the other bolts securing the front bumper.
- The radiator grille has been removed, and now you can see 2 bolts in front of you, securing the bumper on top. Both bolts must be unscrewed and set aside (preferably in a bucket or box so as not to be lost).
- It's worth laying down a mat if you're not on grass or work clothes. At this stage you have to unscrew those bolts and screws that hold the bumper on the sides. First of all, unscrew the inconvenient, hard-to-reach nut, which you will notice when you find yourself under the side of the bumper. Now you see the bolt, it secures the inner section of the bumper to the bracket. It is this that you must unscrew and send to the drawer/box. After all this, remove the remaining bolts and carefully remove the bumper.
Note. Both the rear and front body kits of the VAZ-2110, 2111, 2112 have almost no differences in shape and are fixed to the body identically. Meanwhile, the rear one from a VAZ-2110 cannot be exchanged for a VAZ-2112 spare part, while the front one can.
A license plate illumination lamp is built into the rear part of the VAZ-2110 car. Sometimes the bumper needs to be dismantled in order to understand the wiring process and other faults of the lamp.
Installing the front bumper
When reinstalling the bumper, you must first insert it into the guide brackets on the sides of the VAZ 2110. Then the trim is attached in the reverse order. All fasteners should be replaced with parts that have new threads. Before installation, it is advisable to lubricate the hardware, thus providing minimal protection against corrosion.
The fastening of the cladding should not be immediately tightened until it stops. It is necessary to align the part as evenly as possible, achieving gaps across the body of almost the same width. After this, you can finally secure the cladding by tightening all the fixing bolts and screws.
Replacing the rear bumper
- Disconnect the negative terminal from the battery.
- Open the trunk, then remove the rear upholstery (not entirely, you can move the part that interferes with work deeper into the trunk).
- Remove the trim on the left to disconnect the connector (it goes to the license plate illumination) and get to the wiring block.
- Unscrew the nut and disconnect the wire that goes to the car body.
- Unscrew the bumper mount from above. The VAZ-2110 has 1 bolt on each side.
- In the same way, unscrew the 2 mounting bolts from the bottom (one on each side).
- Remove the bumper and move it back. Through the back panel, in which there is a hole, release all the wires.
- Unscrew the 3 mounting screws (on the license plate cover) and the 3 fastenings from the wiring harness clamps. So, remove the casing with optics from the old body and install it on the new one.
Choosing a new bumper
Body parts made of plastic are available for sale in 2 types:
- plastic (bare) without paint base;
- ready for installation, painted in a specific color.
The first version should be purchased if you need to repaint the car completely or its tone is unique and it is difficult to find a painted bumper.
A coated part will be more expensive, but you can immediately install it on the car and not have to think about painting. Note that the rear bumper on VAZ-2110 and VAZ-2112 cars will not be interchangeable, even though they have a similar shape and are fixed to the body in almost the same way.
If you compare prices, it is noticeable that purchasing an unpainted bumper is very rarely justified, since in any case you will need to pay for painting and waste time. When choosing new parts, pay attention to the following nuances:
- what is the quality of the paint base, carefully inspect for defects and minor chips;
- front parts are sold both with a plastic amplifier and without (choose the appropriate one);
- give preference to products where the manufacturer provides additional internal ribs (to strengthen the structure);
- the material (in this case plastic) should be elastic and not brittle/hard.
Note. If the parts are improved or painted in expensive colors, then the cost may differ by 1-1.5 thousand rubles.
Create a new one or change a stock one?
Having decided to make a new bumper with your own hands, you need to decide whether the stock one will be replaced or a new one will be made. When considering this issue, we note the following points:
- The easiest way is to finish the stock bumper, since in this case you won’t have to create fastening elements or a solid base. The most problems arise with fitting fasteners and creating a solid base.
- A new bumper is much more difficult to create, but you can get a more attractive result. When using the stock design, the surface is increased, due to which the bumper becomes massive.
In most cases, novice craftsmen finish the stock bumper to obtain a new body kit. By using a ready-made base, the manufacturing process is significantly accelerated, and there are no difficulties during installation.
Why do they replace?
As you know, each motorist has his own reason for replacing the front bumper. Let's list the main ones.
- Tuning. The driver is interested in various innovations and introduces some elements and additions to the car body.
- The old body kit has scratches/chips, so it needs painting. Since the job is quite complex, many drivers simply change.
- Accident or traffic accident. The bumper may become unusable and require installation on a similar or more interesting, exclusive one.
- Installation of original optics. There was a desire to provide a visual effect and improve the quality of headlight lighting. And since the old bumper is no longer suitable for such a plan, it is necessary to change it.
Replacing the front bumper on a VAZ 2110, VAZ 2111, VAZ 2112
Welcome! The front bumper - it basically constantly suffers on the road, then I wanted to park but it didn’t work out well, then the brakes didn’t work very well and thereby caught up with the car in front, etc. Therefore, you have to change the front bumper many times while you are using the car, but not everyone knows how to do this, so we wrote this article especially for such people, in which we tried to detail the process of replacing the front bumper on cars of the tenth family.
Note! To replace the bumper, you will need to stock up on: Various types of wrenches, you may also need sockets with an extension, or a wrench, and you will also need to take a screwdriver with you!
Summary:
How to replace the front bumper on a VAZ 2110-VAZ 2112?
Removal: 1) At the very beginning of the operation, you will need to take a wrench with you, or a socket, and together with these tools, look under the lower part, namely strictly under the bumper of your car, there you will see that the so-called engine mudguard is attached to the lower part of the bumper (Some people also call it crankcase protection, although this is a completely different part, but still you will most likely understand what we are talking about), so this mudguard is attached to the body with five nuts in its front part, so just unscrew all these nuts (The remaining nuts, and even more so, you don’t need to completely remove the mudguard), because if you neglect this, this mudguard will greatly interfere with replacing the front bumper on your car.
2) Then move into the car interior and, already inside the cabin, pull the handle that opens the hood of your car, after the hood is slightly opened, approach it and thereby lift it and place it on a support in order to gain access to the engine compartment, after To do this, you will need to remove the so-called radiator grille from the car, for this you will need to unscrew two bolts, one of which is already unscrewed in the photo, and the other is just unscrewed and their location is also indicated by arrows, so when the bolts are unscrewed, lift and thereby completely remove the radiator grille from the car in order to gain access to the remaining bolts that already secure the bumper itself.
3) After the radiator grille is removed, you will see in front of you two bolts that secure the bumper on top (Unfortunately, one bolt is not visible in the photo, but it is very close and therefore when you remove the grille you will immediately see it), so You will need to completely unscrew these two bolts and put them in some kind of box or somewhere else so as not to lose them, otherwise people usually put the nuts and bolts out on the grass and then they look for them for a very long time, so all the nuts and bolts , washers and so on, it is best to put them in a separate box, or in a small bucket.
4) And finally, lay down some kind of carpet, or if you are in dirty clothes and on the grass, then you can do without it, in general, you only have to unscrew all those screws and only all those bolts that secure the bumper on the sides, for example we will show on the left side of the car, firstly, from the very beginning, unscrew the most difficult to reach and inconvenient nut, you can see it only when you climb under the side part of the bumper of your car, so there will be a bolt there (Meaning inside the bumper) , this bolt will secure the inside of the bumper to the bracket, you will need to unscrew it and put it in the box, or somewhere else, and then unscrew all the remaining side screws and, as a result, completely remove the bumper from the car.
Note! When this bolt is unscrewed, then get out from under the car and, having already picked up a screwdriver, use it to unscrew all the screws that secure the bumper in its side part, so that you understand where these screws are located, then look at the photo below, it will show the places of the side bumper mounts!
Installation: The new bumper is installed on the car in the reverse order of removal.
Additional video: So that you can clearly understand where all the bumper mounting bolts are located, then watch a detailed video below that explains how to remove the bumper from the car.
How to make tuning of a VAZ 2110 bumper with your own hands?
“How to tuning a VAZ 2110 bumper yourself?” - Almost every owner of an “iron horse” asks this question. After all, a tuned body kit will give the car some chic.
And after this, even the Soviet VAZik will look like a sports and prestigious car. I want to warn you right away that this will not be a piece of cake, since such work will require some knowledge and work experience will not hurt.
But still, don’t be afraid and put off. After all, the one who does nothing makes no mistakes.
If you decide that your LADA 2110 needs something exclusive, then you shouldn’t buy a tuned body kit, because hundreds of people, not counting you, may have it. In this article I will try to tell and clearly show in the photo all the intricacies of creating a bumper.
Of course, it is easier to modify a stock bumper than to create one from scratch. All you need is to add some bells and whistles such as extra vents, fairing, air intakes and more. This way, all bumper mounts will remain factory.
Well, in the second case, you will have to provide not only all the gaps, but also fasteners. You can use the original mounting points, or you can make additional ones, it’s up to your discretion, as long as everything is measured down to the millimeter.
In most cases, protrusions are glued to the inside of the bumpers, which rest against the car body and are screwed to it with self-tapping screws:
If you can't find a place to attach the new bumper, a welding machine will come to the rescue. Measure where the new fasteners will be convenient for you, and simply weld the metal brackets to the body or place them on the bolts.
What are bumpers made of? As they say, craftsmen can make a bumper out of wood. But still, the most common materials for making a tuning bumper are polystyrene foam and polyurethane foam. And all because they have an affordable price and are convenient to work with.
So let's look at the process of tuning the VAZ 2110 bumper in order: 1. Make a mold from the selected material. 2. Prepare the surface. 3. Cover with resin and fiberglass. 4. Treat with putty. 5. Prime and paint.
!!! I would like to immediately warn those who will use polystyrene foam, since it can dissolve under the influence of polyester resin. Therefore, before covering the foam with resin, treat it with technical plasticine! If you choose foam to make the bumper, then there is no need to further process it.
So, now let’s go through in detail each method of making a new bumper. How to make a foam bumper?
To do this, you will need several sheets of polystyrene foam, 25-30 centimeters wide and slightly wider than the car, depending on your discretion. We stack these sheets on top of each other and glue them together with “liquid nails”.
Let it dry thoroughly, it is advisable to put some weight on top for better adhesion of the sheets to each other. In our case, 8 sheets were needed. Here again, it all depends on your ground clearance and your desire.
I don’t recommend making the bumper very low, since in parking lots all the curbs will be yours, and some people even manage to hit speed bumps with their bumpers.
The next painstaking task will be cutting out the shape of your future body kit. This will take you a lot of time, but don’t despair, cut carefully.
Once you have everything cut out, comes the step of applying the polyester resin. But don’t rush to do this, because at the beginning of the article I said that it will dissolve the foam. Therefore, we cover our bumper with technical plasticine and apply a couple of layers of putty on top.
We treat it with “zero” (fine sandpaper) and cover it with glass wool. By the way, you can use newspaper instead of glass wool. Apply a layer of putty again. And we prime the top. For those who will use glass wool, take 300 fiberglass, it is more convenient to work with.
You need to apply about 5 layers.
Well, that's all, our unique bumper for the VAZ 2110 is ready! There is one small task left, to paint our tuned body kit in the color of the car, but that's a completely different story.
How to make a foam bumper?
Since polyurethane foam has a very, very bad effect on metal, the first step is to carefully close everything:
We blow foam into the space where our future bumper will be located, apply it, don’t skimp on the foam, this will take 4 bottles. It doesn’t dry quickly, so we won’t start the next stage until a couple of days later.
Now, just like making a foam bumper, it will take a lot of time and patience to cut our bumper according to your imagination. By the way, when you are engaged in this process, it is better to stock up on a couple more cans of foam, since the voids found will need to be blown out.
The next steps are similar to how we made a bumper from foam plastic, namely, we apply glass wool with resin, putty, prime and paint.
Bumper made of polystyrene and foam I think, after the methods discussed above for creating a tuned, original bumper, it is not worth describing this method, since it is completely similar. You can clearly see the work process in the photo:
Tuning the rear bumper of the VAZ 2110 is carried out in similar ways. You can learn about this in other articles on this site.
Source: https://vaz2110-remont.ru/kak-sdelat-tyuning-bampera-vaz-2110-svoimi-rukami.html
Removing and replacing the front bumper on a VAZ 2110
The car bumper acts as a protective buffer. It is he who suffers primarily in collisions and touches. It is possible to repair a part locally in rare cases. Therefore, removing the front bumper of the VAZ 2110 for restoration work will be the most correct solution. If you have minimal plumbing tools, the entire operation will take no more than 1 hour.
What is a body kit?
Some car enthusiasts believe that body kits are non-standard parts that are used only for tuning. In fact, the body kit includes all body elements that can be detached. Below are the main body kits that are installed at the factory or can be purchased as tuning:
- Car bumpers - these body elements are needed to protect the structure and increase the safety of the driver and his companion; in the event of a collision, they take the blow.
- Thresholds - the standard body kits of the 2110 model can hardly be called thresholds, but their function is already clear - assistance when entering and exiting the cabin.
- Spoilers - for the VAZ 2110 they are non-standard elements. Their task is to improve the aerodynamic characteristics of the body. The rear one is used as decoration, but if a pair is installed (front and rear), then at high speeds the controllability and stability of the car increases.
- Trims - these elements can be designed for sills or bumpers. Apart from the decorative component, thresholds have no other useful properties.
- Additional body kits – this category includes small elements. These include a mesh for the radiator grille, additional underbody protection, an external roof rack (attached to the roof), and protection for optics.
The diagram shows parts of the body kit
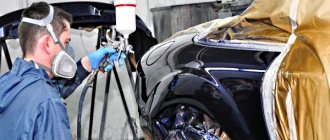
Preparatory stage
Removing the front bumper of a VAZ 2110 is mainly done from the bottom of the car. Therefore, it is necessary to provide a dry area for dismantling/installation work. It is possible to carry out the removal in the inspection hole, this makes the task easier.
To work, the car owner will need a tool such as:
- Phillips screwdriver;
- open-end wrenches: 10, 13 mm;
- spanners or heads: 8, 10 mm;
- liquid key.
Removing and replacing the front bumper of a VAZ 2110 may require the help of a partner. This is necessary to avoid unwanted damage in the form of scratches or chips on the freshly painted part.
On a note! It is possible to cover the surface of the bumper with paper tape; this will also protect the paintwork during installation.
The use of polystyrene foam and polyurethane foam
To create a complex shape, the surface is built up using the stock bumper as a base. Most often, polyurethane foam and polystyrene foam become the main materials for the following reasons:
- Relatively low cost. When using this material during work, you can save significantly.
- High degree of machinability. Due to this, complex shapes can be obtained when processed with conventional hand tools.
- The materials do not respond to exposure to high moisture and temperature changes. Their volume remains unchanged throughout the entire service life.
Insert: Important: It is worth considering that such a surface cannot withstand impacts and other mechanical impacts. Therefore, you need to park carefully; hitting the curb can lead to severe deformation.
Removal process
Before we remove the bumper from the front of the car, the battery on the VAZ 2110 should be disconnected. This is a mandatory rule stating that plumbing work must be performed on a de-energized machine. Leave the hood open. Turn the steering wheel in any direction. This gives improved access to the two screws that secure the fender liner to the bumper. Unscrew the screws with a Phillips screwdriver. We turn the steering wheel in the opposite direction and perform a similar operation with the fender liner on the other side.
On a VAZ 2110, when replacing front bumpers, it is not necessary to remove the lockers. But this can be done quickly without removing the wheel by unscrewing just one nut with a 10 mm wrench and 5 self-tapping screws.
Let's move on to the bottom of the fasteners. Disconnect the fog lights (if installed). The inner side parts of the buffer are secured to the guide brackets, one screw on each side. We turn them out with an 8 mm head. Take a 10 mm spanner or socket wrench and unscrew the five nuts securing the bumper between the engine protection and the lower panel of the radiator frame (TV). Then, you need to unscrew two 13 mm bolts connecting the buffer to the supporting frame of the body, the side members. Next, move on to the top part.
On a note! It is recommended to pre-treat the steel fasteners of the front bumper with liquid key, since the lower studs on the VAZ 2110 often break.
Unscrew the two screw bolts of the false radiator grille. Its lower part is attached to groove joints. We remove the grille from its seats. There is access to two bolts connecting the bumper to the channel (steel buffer amplifier). Using a socket wrench or 8 mm socket, unscrew the fasteners. The bumper is completely unscrewed. It can be removed by pulling the element towards you from each side one by one.
Installation process
After body repair and painting, the bumper is reinstalled in the reverse order. If the owner plans to replace the bumper on his VAZ 2110, then certain difficulties may arise with the new buffer. Mismatch of fasteners with seats is the most common problem with purchased elements. Moreover, some parts may not fit as they are defective. You should exchange the defective buffer in the store or make adjustments before painting to avoid damage to the paintwork.
As described above, attaching the front bumper to a VAZ 2110 is easy. But it is better to do the installation with a partner. It is very difficult for one person to insert the side fasteners into the seats and exert a certain force on the buffer. As a rule, its central part is difficult to fit onto the channel and the side parts will jump out of the brackets.
Upon completion of installation, you should check whether the bumper fits into the seats everywhere. It happens that the owner screws the front part, but the side guides remain free. In this case, you have to unscrew the fasteners, remove the part and reinstall it.
If the inspection gives a positive result, then the fastening sequence looks like this:
- screw the two upper bolts into the steel channel;
- then, install the lower part of the buffer on the five lower studs;
- We press the buffer with the crankcase protection and secure it with nuts;
- screw 2 fasteners to the side members (head 13 mm);
- screw the bolts into the side internal mounts (under the wings).
- connect the fog lights.
- fasten the fender liners in place;
- Installation completed.
On a note! If you have autoplasticine available, it is recommended to apply it to the surfaces of the fasteners. Thus, studs, nuts and screws will be perfectly preserved, and the processed edges will not be destroyed during the next dismantling.