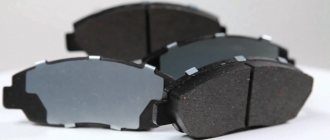
The cost of replacing pads and discs
Disc brakes (front, rear) per axle – 693 rubles.
Discs + pads (front, rear) per axle – 1650 rub.
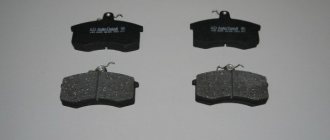
Drum pads – 1880 rub.
Parking brake pads – RUB 1,880.
Prevention of guide supports (one support) – 253 RUR.
Sandblasting of a part – from 110 rubles.
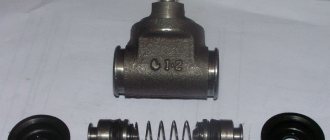
Caliper bulkhead – 1650 RUR.
Replacing brake fluid with bleeding – 1100 rubles.
Prevention of drum pads and mechanisms – 253 rubles.
Removing and installing the drum – 550 rubles.
Drum pads last more than 100 thousand km. mileage
Do not forget about the prevention of drums and pads. If you neglect and save on this procedure, then replacing the drum shoes will result in replacing the adjustment and tension mechanisms. And these are very expensive spare parts. And often have no analogues.
Therefore, the masters of our car service center “Avtogarazh” in the South-Eastern Administrative District, Maryino, Lyublino recommend servicing the drum shoe mechanism once a year. This is as follows. The removed drum is purged, cleaned and lubricated with copper grease.
It is also advisable to maintain parking brake shoes in the same way as drum shoes. As a rule, they are rarely used at all. More and more cars have automatic transmission or CVT. And it seems like it’s not necessary. Maybe when the car is going up or down.
But in vain. With infrequent use, parking brake mechanisms rust and sour faster than drum pads. Replacing parking brake parts is not cheap. Therefore, we recommend carrying out preventative maintenance on the parking brake pads.
If you have any questions, call tel. or come to the address Moscow, st. Ilovaiskaya, building 3a, building, auto service center "Avtogarazh". We will be happy to service your car.
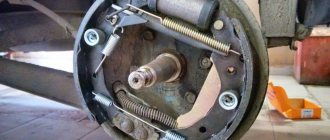
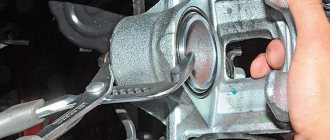
Removing the rear pads
How to replace brake pads?
The process of replacing the pads is carried out in this order. The car is driven onto an overpass and first gear is engaged. To fix its position, additional “shoes” are placed under the front wheels. Next, you need to remove the muffler from the rubber cushions in the area where the handbrake tensioner is located. Then loosen the handbrake by unscrewing the tensioner cable nut with a sized wrench. In order to avoid problems later with installing the brake drum, the nut must be unscrewed to the maximum. Next, loosen the wheel mount with a wheel wrench, lift the car with a jack and completely remove the wheel.
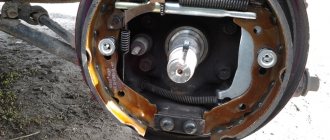
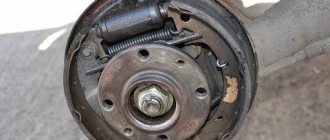
In order to remove the drum, you need to unscrew the guide bolts using clamps, turn the drum a quarter turn in any direction and evenly tighten the bolts back. Thus, the drum will pull out on its own, since in the new position there are no holes for the bolts, but only a cast surface. A hammer and a wooden block will be needed if the drum is jammed. We place the timber in a circle on the surface of the drum and tap it with a hammer. You need to knock until the drum starts to rotate. At the same time, it is better not to knock on the drum itself, otherwise it can break.
Under the drum there is a cylinder, springs and two pads. The spring guides are disconnected from the pads using pliers, a homemade hook or a flat-head screwdriver. Next, the tension spring and the pads themselves are removed. After this, it is necessary to compress the side grooves of the brake cylinder. A handbrake lever is installed on one of the pads, which needs to be moved to new pads.
Now let's move on directly to how to change the rear brake pads on a VAZ 2114.
Experts recommend doing this as soon as you buy a car. Be sure to check the level of wear. It is strictly forbidden to operate a vehicle with worn rear pads.
The procedure for replacing the rear pads is different from working with the front ones. In this case, you will have to spend a little more time and effort.
During the replacement process, some difficulties may arise, such as:
| Problem | Solution |
| The brake system drum is worn out (the internal diameter is more than 200.5 millimeters) | Be sure to replace the element |
| There is a brake fluid leak in the cylinder | The cylinder must be replaced |
| The drum is stuck, it’s hard to dismantle it | Use a wooden block and a sledgehammer. Do not hit the drum itself under any circumstances, otherwise it will break. |
As for replacing the rear pads, this work is performed in the following sequence.
- Place the car on the overpass, put the car in gear and be sure to put reliable supports under the wheels. Under no circumstances should the car roll away. This is a big risk.
- Check if the handbrake is turned off in the cabin, then go under the car itself.
- Remove the pipe from the muffler where the hand brake is applied.
- Lighten the handbrake slightly. To do this, unscrew the cable tension nut. By loosening the cable, you can then easily install the block.
- Use a wheel wrench to loosen the fastenings on the rear wheels.
- Raise the car on a jack and remove one of the wheels on which you plan to replace the brake pads.
- Remove the guide bolts from the drum. They are completely dismantled and not simply weakened.
- Rotate the drum counterclockwise about 30 degrees and begin tightening the bolts at the same time. Since there are no mounting holes, when tightened, the bolts will hit the metal and push the drum out.
- When the drum is removed, you will see a brake cylinder, springs and a pair of pads. The springs are removed first.
- The pads are removed along with the lever. It will then need to be put on new pads.
- Remove worn brake components and then compress the cylinder grooves.
- New parts must be installed in these grooves; the handbrake bar fits into the grooves on the pads. After this, the spring is put in place. Don’t forget to also hook the cable from the handbrake, which you specifically loosened or at the initial stage of our repair, to the drive lever.
https://youtube.com/watch?v=b_ie54CHmdE
Replacing brake pads yourself
The principle of operation of automobile brakes is quite simple: under the action of the braking force transmitted from the brake pedal through a sealed line (in passenger cars, often hydraulic), the pistons of the brake cylinders push the stationary pads towards the rotating discs or drums, and due to the frictional force they slow down. At the same time, the pads are made of relatively soft composite materials that are resistant to overheating, but wear out fairly quickly.
SERVICE LIFE OF PADS
Unlike many other components of the brake system, brake pads are consumable items, and wear out quite quickly. Car operating instructions recommend checking the wear of the pads (discs, and the condition of the system in general) at every maintenance, that is, after 10-15 thousand kilometers. The front pads almost always wear out faster than the rear ones - due to the fact that the main load during braking falls on the front axle.
The service life of brake pads depends on several factors:
- Driving style. Aggressive, with frequent braking leads to accelerated wear of pads and discs. In this case, it makes sense to check the pads more often.
- Terms of Use. High temperatures, uneven, dusty, polluted roads wear out the pads much faster.
- Serviceability of the brake system. If the brake cylinders, calipers and their guides become sour, the pads wear out faster.
- Pad material
Based on the type of friction mixtures, pads are divided into three types:
- organic (“soft”, graphite-based);
- semi-metallic (“hard”, with a high coefficient of friction at high temperatures);
- metal-ceramic, combining the properties of the first two types.
Soft pads wear out faster, but do less damage to the discs. The use of this type of pads is recommended for drivers with a smooth braking style, as well as for those who are not averse to changing the pads themselves.
SIGNS OF WEAR PADS
Although some vehicles are equipped with an electronic brake pad thickness sensor, you cannot rely on it completely. Firstly, indicators are often not located on each wheel, but one per axle. Secondly, the indication may occur due to an open circuit. And finally, the system only works correctly when the brake discs are relatively new. In the case when the 3rd or 4th set of pads is used and the discs are already thin, incorrect operation may occur.
A mechanical indicator (the so-called “creaking”) is more adequate, but it can also misinform: squeaking is caused by overheating or wetness of the pads, dirt and stones getting between them and the discs.
Indirectly, pad wear can be determined by changes in the position of the brake pedal and the level of brake fluid in the reservoir - they will go down. Again, the situation may indicate other malfunctions.
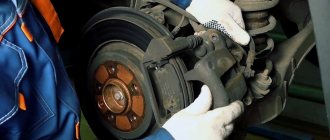
The best way to check the remaining pad thickness is by visual inspection. But it is not effective on all cars without a hole or a lift, and sometimes without removing the wheel. On drum brakes, inspection is impossible without removing the drum, and on disc brakes, the pads can be hidden both behind the wheel rims and behind the wide caliper brackets. In addition, it is easier to see the condition of the external brake pads, while disc mechanisms wear out more, as a rule, internal ones. If inspecting the pads is difficult and involves removing the wheel, just in case you need to prepare to replace them so as not to do unnecessary work.
REPLACEMENT OF PADS
There are two types of car brakes: disc and drum. Discs are used almost 100% on the front axles of modern cars; they also predominate on the rear axles of passenger cars; budget or commercial versions are equipped with drums.
The process of replacing disc brake pads is quite simple. Tools you will need:
- “balloon” wrench for wheel nuts;
- jack;
- pear (syringe);
- wide flat-head screwdriver (or crowbar);
- 3 types of lubricant: for pads, guides and anti-stick;
- WD-40 liquid.
Work order for the disk mechanism:
- Loosen the nuts of the required wheel, raise the car on a jack, installing 2 wheel chocks under the diametrically opposite wheel.
- If the pads are being changed on the front axle, pull out the handbrake. Additionally, if the axle where you are changing the pads does not receive drive, you can put the manual transmission in 1st or reverse gear.
- Turn the steering wheel towards the wheel to be removed, unscrew the nuts, and remove the wheel.
- Open the hood and brake fluid reservoir cap.
- Using a blower, pump out the brake fluid to a minimum (but do not drain the reservoir completely).
- Unscrew the caliper guides (if souring, use WD-40). On some vehicles it is necessary to remove both of them, on others it is enough to loosen the second one to remove the caliper. It depends on the length of the brake hose.
- Important! If possible, do not unscrew the brake hose or touch the bypass fitting - this will avoid the bleeding procedure.
- Remove/unfold the caliper, remove the pads. Attention! Never leave the caliper hanging from the hose; secure it to suspension elements or tie it to a spring or other component.
- Check the thickness of the pads and brake disc. Find out the minimum value for pads in the manual; for discs you can read it on the end of the part.
- Check the integrity of the brake cylinder seals, the absence of cracks in the hose and chips in the piston. If there are problems, the parts must be replaced.
- Press the piston into the caliper as much as possible using a special puller. Keep in mind that in most cases on the rear axle the piston is not pressed in, but rather screwed in. At the same time, monitor the liquid level in the tank and pump it out if necessary.
- Lubricate the back of the pads before installing the anti-squeak plates.
- Lubricate the guides and, preferably, the surface of the hub against sticking. In all three cases, use a different lubricant.
- Reassemble the wheel, be sure to repeat the operation on the other wheel of the axle (the pads are changed together).
- After completing the operation on both wheels, after tightening the bolts, check the force on the brake pedal by pressing repeatedly.
Replacing drum pads is a little more difficult. The general procedures (like removing a wheel) are the same, but there are differences:
- In addition to the wheel, the drum must also be removed. To do this, you either need to unscrew the two fixing screws and tap the drum from behind with the shaft of a hammer, or screw the bolts into other, reserve holes to press them out.
- After removing the drum, remember, or better yet, photograph the position of the pads and springs.
- Remove the parking brake lever.
- Install the pads and springs exactly in the same order - otherwise the brakes will not work.
- Reassemble the assembly in reverse order.
RECOMMENDATIONS
Despite all the apparent simplicity, replacing pads can be fraught with pitfalls.
Main dangers:
- souring of threaded connections;
- detection of additional faults;
- violation of safety precautions when lifting a car and working under it.
If you are not confident in your abilities, do not take risks - even in the best case, the car will be immobilized. Turn to professionals - for example, to any of the service stations of the Wilgood smart car service network, where the work will be done quickly, competently - and inexpensively.
Front TC
When starting to replace the front TCs, remember that they are changed only in pairs. Buy new pads rather than old ones that have not yet served their useful life just because they are cheaper. Don't skimp on your own safety.
- Place wheel chocks under the rear wheels. The machine must be stationary. If you have a working handbrake, apply it.
- Disconnect the negative terminal from the battery by de-energizing your VAZ 2109.
- Check the current level of fuel fluid in the expansion tank. If the fluid is at or near the MAX mark, part of the brake fluid should be drained. Otherwise, when the pistons are compressed, the fuel fluid will begin to pour out.
- Loosen the tension on the wheel bolts, raise the car, and then remove the first wheel you start with. Next, following the same instructions, change the TC on the second wheel.
- Thoroughly clean the surface of the brake disc and caliper from accumulated dirt. No mineral solvents. Dry clean only.
- Remove the rubber seal (also known as the brake hose holder) from the bracket located on the rack.
- Bend the antennae of the lock washer of the bolt responsible for fixing the guide pin.
- Unscrew the bolts and remove the housing.
- You have freed up access to the front fuel tanks, so nothing prevents you from dismantling them.
- If you need to remove the TC, but you are not going to change them, be sure to put marks on them. If you mix them up during assembly, the consequences may not be the most pleasant.
- Measure the thickness of the friction layer on the TC. If it is less than 1.5 millimeters, the pads must be replaced. Replacement is also required if there are clearly visible chips, scratches, or defects on the surface of the pads.
- Before installing new brake brakes, carefully remove all dirt from the brake mechanism.
- Using a mounting spatula and one of the old TCs installed in its socket, press the piston into the cylinder, thereby fully preparing the site for reassembly with a new block.
- Assembly is performed in the reverse order of disassembly.
When driving on the roads, you are not only responsible for yourself. Therefore, your car should always be in good condition.
https://youtube.com/watch?v=1M8iKMFVM0
If you change your brake pads in a timely manner, you guarantee the safety of yourself, your passengers and other road users.
Front brakes
Device
The disc brake mechanism is considered more reliable and efficient due to better cooling of the disc and greater efficiency during braking. It consists of the following parts:
- Damn brake disc.
- Pad guide brackets.
- Caliper housing.
- Brake bars.
- Caliper cylinder.
- Internal piston.
- A wire with a sensor terminal that indicates pad wear.
- Piston seal ring.
- Protective cover.
- Guide bolt.
- A casing that protects the disc from dirt.
Replacement process
The answer to the question of how to replace the front brake pads and do it correctly will be discussed below.
Initially, we prepare the machine for carrying out this work with our own hands. On a flat surface, put it in gear, squeeze the parking brake and secure the rear wheels with shoes on both sides. Then loosen the bolts securing the wheel to the rim. We jack up one side until the tire tread comes off the ground and install a support stand under this side. Everything is ready for replacement, which goes according to this scheme:
- Completely unscrew the wheel mounting bolts and remove it from the rim.
- Having gained access to the caliper, the first thing we do is turn the wheel in a convenient direction for better access.
- We remove the brake hose from the mounting niche so as not to damage it.
- Using a screwdriver or chisel, bend the edges of the lock washers that secure the guide bolts from unscrewing. It is also necessary to insert a screwdriver between the disc and the brake bar on the caliper piston side. Press down on the bar to release the piston pressure and move the pads away from the disc a little. This will allow you to lift the housing and pull out the pads without force.
- Loosen one of the bolts and completely unscrew the other. We move the caliper casing with the fixing brackets and take out the old pads.
- Before installing new pads, you need to press the caliper piston with a pry bar, a long screwdriver or a suitable device inward until it stops. Check the level in the brake fluid reservoir. It will rise as the piston is applied. If you topped it up while driving, you will need to remove the excess liquid using a rubber bulb or a large syringe.
- Before replacing, it would be a good idea to visually inspect the thickness of the disc and check the brake hoses for cracks.
- We put new pads in place.
- We reassemble in the reverse order, having previously lubricated the guides and all unscrewed bolts.
We repeat the same steps on the opposite side of the car.
Symptoms of malfunction, resource
Another sign is the car’s responsiveness to the brake pedal. So, when the rear pads wear out, the car will slow down slower. And if the linings are worn down to the metal base, then the problem will be accompanied by creaking and overheating of the drum. The latter factor can lead to the brakes jamming, which is extremely dangerous.
The manufacturer notes that the minimum thickness of the pads on the rear drums should be 1.5 millimeters.
It is worth noting that the design of the brakes on the 14th Lada is identical to the “eights” and “nines”.
With the front pads, everything is simple - you can determine their wear visually by removing the stamped disc. And if the car has a “casting”, then without dismantling the wheel at all. With drum pads everything is much more difficult. They are hidden under the lid. Not every car owner will remove it in the hope of detecting imminent wear and tear.
There are only two characteristic signs. The first is a weak handbrake. Many will think that the cable has stretched (after all, the mileage is no longer low) and, having tightened it, will continue to use the car. But the cable is not always the cause of the malfunction. If the thickness of the pads is minimal, the travel of the parking brake lever will increase, since more force is required to compress them.
Alert Features
On domestic cars, the warning system about the need to replace rear and front pads is organized very simply. A special steel wire is attached to the metal base.
Once the main material of the brake pad has worn out, this wire touches the brake disc, which is the source of a strong grinding noise.
On some foreign cars, this system has a more advanced form and is made in the form of an electronic alert by means of a warning light on the dashboard.
Removing and replacing rear brake pads VAZ 2108, 2109, 21099
Warnings
- Loosen and tighten wheel bolts only with the vehicle on the ground. The tightening torque of the bolts is 65–95 N m (6.5–9.5 kgf m).
- The use of gasoline, diesel fuel or any other mineral solvents for cleaning brakes is unacceptable.
- When installing old pads, replacing the front and rear pads with each other, as well as between the left and right wheels, is unacceptable. This may result in uneven braking.
- Brake pad sets must be replaced on both sides of the vehicle at the same time.
- If the brake fluid level in the reservoir is at or close to the “MAX” mark, pump out some of the fluid from the reservoir. Otherwise, it will overflow when installing new pads.
When replacing pads, also inspect the brake drum. Measure the diameter of the working surface of the drum with a caliper. The maximum permissible drum diameter is 201.5 mm. If the diameter is equal to or greater than the maximum permissible, replace the drum. If there are scratches, the drum can be bored to a diameter of 201 mm. It is recommended to replace the drums on both sides at the same time.
Work order
1. Engage first gear and install thrust blocks under the front wheels. Raise and support the rear of the vehicle. Remove the wheel.
2. Wash with detergent and dry the brake mechanism.
3. Unscrew the two guide pins.
4. Remove the brake drum. If you have difficulty removing, screw two M8 bolts into the threaded holes of the drum and, screwing them in evenly, press the drum.
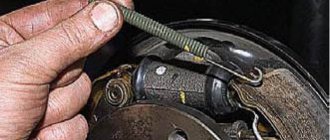
5. Remove the upper tension spring using a punch or pliers.
6. Remove the lower tension spring using a punch or pliers.
7. Remove the front pad guide spring and.
8. . remove the front pad.
9. Remove the expansion bar.
10. Remove the rear shoe guide spring.
11. Remove the rear shoe by disconnecting the drive lever from the parking brake cable end.
12. Remove the cotter pin from the rear block.
13. Remove the support washer.
14. Press down on the pin and remove the drive lever from the block. Remove your finger from the block.
15. Check the thickness and condition of the friction linings of the brake pads.
16. Install new pads in reverse order. When installing, insert the upper toes of the pads into the grooves of the piston.
17. Before installing the drum, bring together the brake pads using two pry bars and install the drum in the reverse order of removal.
18. Install the wheel and lower the vehicle to the ground. Then press the brake pedal several times to set the piston to the working position. Check the brake fluid level in the reservoir and add up to normal if necessary.
How to change brake pads yourself
There seems to be a question mark at the end of the title. Indeed, how to replace brake pads yourself? But for those who love and know how to tinker with technology, this is not a question. They have carried out a similar operation more than once. For them, replacing the front brake pads themselves, as well as the rear ones, is, in general, an everyday matter. There will definitely be car owners for whom replacing brake pads on their own is comparable to flying to Mars. They will not find out details on social networks, from friends and acquaintances, but will simply go to the dealer. Those who remain are those who want to save money, and at the same time learn a useful business. This “cheat sheet” is addressed to them on the topic: “How to change the brake pads yourself?”
When to change?
First of all, let's try to answer the question: when should they be changed? The fact is that no one will tell you the exact time, since several main factors influence the wear of the pads. This includes the quality of the product, operating conditions, and driving style. If you purchased a counterfeit product (intentionally or unknowingly - it doesn’t matter), drive on unkempt roads, brake hard, then, of course, the service life of the pads will unpleasantly surprise you. For a calm driver who does not crave self-realization or the dubious reputation of a road hooligan, they will last much longer.
On average, the pads on the front wheels last 10-15 thousand kilometers. Rear pads are more durable, especially on drum brakes; they can last up to 50,000 kilometers or more. But again, this depends on the condition of the car and the factors listed above. And still, the day will come when it becomes clear: the pads need to be changed. It is important not to miss this moment.
It’s one thing - a pebble hit, the brakes “squeaked” and calmed down, and quite another thing - a persistent squeak when braking, which only grows every day. Call for service immediately! Or go to a spare parts store if you decide to replace the brake pads yourself. Otherwise, the piston of the working cylinder may become covered. This is exactly what happened to the author of these lines: while driving, the brake pedal sank, all the brake fluid leaked out and... Well, the speed was low, and there was an almost empty parking lot nearby, where we managed to stop. What if everything happened at high speed, and even in heavy traffic?!
I had to change the pads on both front wheels, as well as the discs - the most expensive components in this “company”. And, after all, he knew how things could turn out, but he kept putting off the repairs. If I hadn’t pulled the tires, I would have kept the wheels and saved money. But I learned a lesson, albeit a somewhat harsh one.
In general, decide whether to take the car to an authorized service center, to “Uncle Vasya’s” garage, or try to figure out how to change the brake pads yourself. You may lose time, but you will definitely save money.
Changing the front pads
To replace the front brake pads yourself, we drive onto a flat surface, put the car in gear, raise the handbrake lever, and place shoes under the rear wheels on both sides.
Now you need to loosen the bolts that secure the wheel to the rim. Then, jack up one side of the car, and when the tread comes off the surface, install a stand on which the body will also rest.
Replacing brake pads yourself is not that difficult, but if you are doing it for the first time, then you need to have endurance, patience and push your doubts somewhere very far away. Then replacing the front brake pads yourself will go relatively smoothly. So: unscrew the wheel mounting bolts and remove it from the disk.
For better access to the caliper, turn the wheel so that it is convenient for you to work; to avoid damage to the brake hose, remove it from the mounting niche; Using a screwdriver or chisel, bend the edges of the lock washers securing the guide bolts.
The caliper serves to create traction with the discs through hydraulic pressure, which slows the wheel before the brake pads are applied. Usually consists of one or two parts and is attached with two to four bolts to the hub - where the wheel fits onto the axle.
We insert a screwdriver between the disc and the brake bar on the caliper piston side. Now you need to press on the bar to relieve the pressure of the piston and move the pads away from the disc a little. This will allow you to lift the housing and pull out the pads without additional effort.
Now loosen one of the bolts and completely unscrew the other. We move the caliper casing with the fixing brackets and take out the old pads.
Make note of how each block is attached. Typically, they snap into place using metal clips. It is possible that you will have to apply force to get the pads to pop out. “Apply” carefully so as not to touch the calipers and brake pipe.
The algorithm is simple, but it requires skills, and they are acquired only through experience. Several such operations, and you will know as well as anyone else how to replace the brake pads yourself.
Photo caption Recessing the piston into the cylinder
Before installing new pads, use the same screwdriver to press the caliper piston inward until it stops. The brake fluid level in the reservoir will begin to rise. Excess liquid needs to be pumped out. For example, using a rubber bulb. Check the integrity of the brake hoses: if cracks appear, don’t change them already. Then - an immediate replacement, if, of course, you really care about your safety.
Everything is fine? Then put the pads in place, reassembling them in reverse order. After making sure that replacing the front brake pads yourself was done correctly, let’s figure out how to replace the rear brake pads yourself.
But first, a small “lyrical” digression. There are often private requests on the network, for example, “Replacing brake pads on a Solaris yourself,” “Replacing Tiguan brake pads yourself,” “Replacing an AMD brake pad on a Daewoo yourself.” Actually, this is all from the same “opera”, well, maybe, with the exception of some nuances. The abbreviation AMD is the name of a South Korean company whose products fully comply with the parameters of original spare parts. If your car has exactly these pads, then this only speaks of their quality, but the replacement process is still the same. True, we must take into account the features of some models, for example Daewoo Nexia.
Replacing Solaris brake pads yourself will require ring wrenches and a wide flat-head screwdriver. Before you start replacing, you need to pump out the brake fluid if it is at the MAX mark. First, the lower guide is unscrewed, then the upper one, the brake caliper and brake disc are removed along with the old pads. The worn block must be picked up with a screwdriver and removed. We do the same with the second block. The plate from the old pads is mounted on the new ones.
And in the case of the Nexia, and in the case of the Solaris, and with other cars, it is recommended to drive the first 500 - 1000 kilometers calmly, without resorting to emergency or simply intense braking. You need to give the pads time to get used to the discs.
Changing the rear pads
Let's skip the steps of preparing the car for removing and installing the pads. When the wheel is removed, use a wrench to unscrew the two bolts, holding the guide. Then remove the brake caliper and press in the front brake cylinder. We remove the pads, clean the caliper, install the pads and assemble the entire structure.
Replacing the rear brake pads yourself will be more confident if you have already changed the front ones. This refers to disc brakes. With drums it’s a little more difficult. However, replacing the Solaris rear brake pads yourself will not bring much trouble if you follow the instructions, take your time and do not confuse anything. In general, we carry out the work in the same way as on other cars with a similar type of rear brakes.
In any case, you need to know that the drum brake mechanism works somewhat differently than the disc brake. When you press the pedal, brake fluid flows through tubes and hoses and acts on both pistons in the working cylinder, which press the bars against the sides of the drum and reduce the speed.
We fix the front wheels with shoes. We engage first gear, without squeezing the handbrake. Loosen the bolts securing the wheel to the hub. Raise the desired side with a jack. We immediately slide the stand under it. Now you can unscrew the bolts and remove the wheel. Let's start disassembling the brake mechanism.
Replacing the rear brake pads yourself begins with removing the brake drum. It is fixed to the hub with two guide pins. We unscrew them. We compress the separated cylinder pistons with a pry bar, acting on the strips. This is important, otherwise it will be impossible to put the drum back on by installing new pads.
We monitor the level of brake fluid, which can spill out of the reservoir when the cylinder pistons are compressed. Using pliers, remove the upper and lower tension springs. We dismantle the handbrake lever itself. Installing the pads and assembling the brake mechanism yourself is done in the reverse order.
Which pads should I buy?
The answer is simple: you need to buy those brake pads that are recommended by the manufacturer. Everything else is from the evil one. Replacing rear brake pads is not such a difficult task if you proceed in the required sequence and do not fuss. But as for choosing pads, this process may be more difficult.
If, for example, you look for the cheapest pads for a VAZ-2110, or any other car, then, thinking only about savings, you can lose a lot in quality, and, therefore, in safety. This applies to both budget and expensive cars. Finding out which brake pads are the best is actually not difficult. But what's most interesting is that it's not so much a matter of brands, but where you buy spare parts.
On the market or in online stores, there is a greater chance of running into fakes that can only be distinguished from the originals by an expert. And they learned to stamp the packaging no worse than the branded one, although an experienced person will find differences on the boxes.
A non-original pad, even if it fits in size, can fit into the caliper at different angles and in different planes. We look at photo 1 - the block easily moves at a certain angle to the right relative to the axis. In photo 2 - to the left. In photo 3, she stands in a different plane, known only to her. In any of these positions, the wear will be uneven and the pad will not last long. It will creak, play (*move away), damage the brake disc, dirt will get into the caliper, and as a result, braking efficiency will be reduced because the clamping force will be different.
In general, experts say that even in the most well-known networks that sell spare parts, you can easily run into a fake. It’s another matter if you deliberately buy a non-original part or, in our case, brake pads. But then the responsibility for the consequences lies entirely with you.
It’s better, after all, to contact an official dealer and buy pads from him. So, at least you will get an authentic product. The path is a little more expensive, but you will still save on installing it yourself, and at the same time, quite possibly, save your health and life.
Photo: DRIVENN.RU and from websites
For any use of site materials, an active link to is required.
When product replacement is required
Both the front and rear wheels are characterized by the use of 4 brake pads to ensure effective braking. These products differ only in design, although the principle of operation is similar.
The rear pads of the VAZ 2107 are presented in the form of an arched steel structure, on the outer part of which a friction layer is applied. It is due to the friction of this layer against the inside of the drum that the car stops. If you do not replace the brake elements in a timely manner, this will be fraught with the development of unpredictable consequences, because the most important thing for any car is the serviceability of the braking system.
It is necessary to change the rear brake pads on a VAZ-2107 when the friction lining wears down to a thickness of less than 1.5 mm. It will not be possible to determine this fact without removing the wheel and dismantling the drum. But this is one of the main ways to determine whether the brake system is faulty. There is a second option, which is more convenient and does not require dismantling the rear wheel. To do this, you need to listen for signs of squeaking of the rear wheels, as well as grinding and lack of braking effect, but this can lead to damage to the drum itself. You can squeeze the handbrake while standing on a slope and check that it is working correctly. Of course, the cable on the handbrake may become loose, but if you tighten it and still have no effect, then it’s time to start replacing the pads. If the rear brakes are not functioning, then it is time to change the pads. It is recommended to change them as a set on both rear wheels, since they are often worn out at the same time. What is the process of replacing rear brake pads on a VAZ-2107 will be determined further.
Features of replacing rear pads
At the beginning of the work, it should be noted that the handbrake must initially be lowered to its lowest position. This will allow you to dismantle the brake drum and thereby get to the worn parts. To begin replacing the brake pads of a VAZ 2107, it is necessary to remove the rear wheel:
- There is a drum behind the wheel, which also needs to be removed. There are no problems with this, so we move on.
- After removing the drum, it is necessary to inspect the worn pads. If the thickness of the friction lining exceeds 1.5 mm, then there is no need to replace the products. Before carrying out further work, it is necessary to clean the mechanism from dirt and dust. To do this, you can use a brush or cloth.
- If the products need to be replaced, then you need to take a screwdriver and then remove first the upper, then the lower connecting springs. If you can’t dismantle it with a screwdriver, then you should use pliers. The photo below shows the springs that should be removed.
- Next, you need to remove the clamps, which consist of a rod, a washer and a spring. These washers must be rotated 90 degrees to remove them through the slots. This is what the washers that hold the pads look like.
- Similar procedures are carried out with the second block.
- After removing the springs and clamps, the pads are removed independently.
- The parking brake locking pin is straightened. The photo below shows the location of the locking pin. Now you need to unscrew the parking brake lever. This can be done using pliers. After this, the washer is removed, then the lever.
- During the dismantling process, you will have a question, what to do with the parking brake tip? It must be disconnected from the product and then left hanging.
- If necessary, it is recommended to replace all parking brake parts that were removed from the old product with new ones.
The rear brake pads on the VAZ 2107 should be installed in the reverse order of removal. Before installation, remember to bring the brake cylinder pistons as close as possible. Despite their simple design, installing them is much more difficult than the front ones. But having completed the procedure once, all subsequent repairs will be much easier for you.
The cost of new pads starts from 800 rubles per set, but it is important to purchase high-quality products, and not Chinese “consumer goods”. Not only the service life of the products, but also the braking of the car will depend on this. This completes the replacement procedure, if you have any questions, be sure to ask them
This completes the replacement procedure; if you have any questions, be sure to ask them.
Replacing brake pads and discs
The brake system, in particular pads and discs, is one of the most heavily loaded and intensively used components of a car. Theoretical replacement intervals are usually indicated in the operating manuals for specific machine models.
However, in practice, everything is different - they need to be changed as they wear out, the intensity of which depends on the material of manufacture, atmospheric conditions, condition of the road surface, driving style, etc.
There is nothing complicated in the design of brake pads: they are steel plates to which are attached special linings made of high-strength materials that are resistant to friction and temperature changes.
Brake pads: features and replacement intervals
Manufacturers indicate in the technical documentation how long their products will last, but this information is for advisory purposes only. You can determine in advance how often you will have to buy new consumables.
On average, brake pads are replaced at the following mileage:
imported cars: 17 +/-3 thousand km;
Brake pads: when do they need replacement?
The easiest way to determine when the pads need to be replaced is by the wear sensors and/or the indicator on the dashboard, if provided for this model. Additional signs of the need for replacement are a “light” pedal, increased braking distance and increased fluid consumption.
A characteristic sign of brake failure will be a specific sound during heavy braking. After the pads are worn, the sensor plate emits a characteristic squeak when in contact with the surface of the disc. The design of most foreign cars includes light indicators that are connected through contacts built into the pad linings.
If the car does not have any mechanical or other means of signaling the condition of the brakes, you should periodically check their wear by measuring the size of the linings of both rear and front wheels without taking into account the metal base. Replacement is required if the thickness of one of the pads is less than 1.5+/-0.5 mm. If the car has alloy wheels with large holes, this check is not difficult to perform visually, even without removing the wheels.
Brake discs: features and service life
Unlike pads, brake discs last much longer. In most cases, they are changed after 80 thousand kilometers. More accurately, the service life is indicated in the technical documentation of a specific model, but this data is also conditional.
Manufacturers use different technologies and materials, which affects the rigidity and strength of various modifications of disks. The amount of wear depends on the quality of the pads, driving style, road conditions, weather conditions and other factors.
Brake discs: when do you need replacement?
To know when to replace your brake discs, you should regularly monitor their condition. Excessive wear may cause the following anomalies in the machine:
- Increased braking distance;
- Reduced level of working fluid;
- Lightening the pedal;
- “Pulling” to the side when braking;
- Uncharacteristic noise in the wheel area.
If one of the above deviations occurs, it is necessary to check the condition of the brake system. In this case, special attention should be paid to both discs and pads. It is best to entrust this to qualified service center specialists.
Systematic inspection of brake discs is required on both the front and rear wheels. In addition to the condition of the surface, you need to measure their thickness using a caliper. The acceptable range for use is usually indicated on the back of the disc.
Note.
Replacement of discs, as well as pads, regardless of which mechanism has unacceptable wear, must be done on one axis only in pairs.
At the technical centers of the FAVORIT MOTORS Group of Companies, qualified mechanics will be able to quickly check the condition of the brake system and, if necessary, change the pads and/or discs. In addition to high craftsmanship, European service, high-quality auto parts and consumables, our arsenal of advantages includes a guarantee for all work, short service times, reasonable prices and attractive bonuses.
About the resource
The service life of brake pads is ambiguous. Depending on the place of application (front or rear of the car), they last from 20 to 50 thousand kilometers. And again, the resource depends on the quality of the build and the type of driving of the driver himself.
As for the first point, there have been cases when, after 3-5 thousand kilometers, the upper friction layer of the pads simply crumbled and turned into powder. All that was left of them was a metal plate. If this problem is not noticed in time, this part will simply stick to the brake drum or disc. Then wheel blocking is inevitable.
In general, you need to control the wear of these elements not by mileage, but by the thickness of the remaining top layer. All pads have special indicators - recesses. They just signal wear. If the top layer has reached these beacons (usually 1.5-2 millimeters thick from the plate), then the brake pads need to be changed.
How to replace pads on disc brakes
The job of installing rear brake pads on disc brakes is a very difficult process and is very different from replacing them on drum brakes. As mentioned above, for this process you need to stock up on additional tools. In addition to screwdrivers and wrenches, you need to have pullers that are designed only for your car's system. Let's look at the step-by-step instructions:
- In the place where replacement is necessary, the car must be jacked up and the wheel removed. In order to remove the drum itself, you need to loosen the nut that secures the rear drum and unscrew it completely. Removing the drum from the hub is done by prying it off from different sides; this must be done carefully, since there is a bearing there that will need to be monitored. But, if there is a parking brake mechanism, you don’t have to remove it;
- The next step is to remove the springs. It is necessary to take into account that the springs have a high force, so be careful when working. After removing the tension springs, the plastic springs of the clamps are then removed;
- We put the pistons of the working cylinder in place. And actually, these are all the steps before installing or replacing the pads;
- Installation occurs in the reverse order - they are fixed using special clamps.
As for the use of lubricants, before installation it is necessary to lubricate both sides of the gasket with silicone grease. Also, before installing the wheel, an anti-corrosion layer must be applied to the hub rim.
Design and principle of operation of the sensor
The structure of the element is very simple - the cover has a soft metal core. If the level of wear approaches critical, then it becomes the initiator of a short circuit. A corresponding signal will be sent to the instrument panel. But even if the sensor is installed, one nuance must be taken into account. It doesn't work correctly every time. Sometimes failures and false positives occur. This situation is due to the fact that the brakes often come into contact with moisture. The result is corrosion. And because of it, the sensors fail
It’s important to know when to change brake pads by visual inspection - it’s much safer this way
Brake pad problems
The parts of the braking system in question have to be changed not only when they wear out, but also when malfunctions occur that are associated with the use of low-quality consumables or too active driving. The following characteristic signs indicate problems with the pads:
- creaking, grinding and other extraneous sounds when braking;
- car skidding when pressing the brake pedal;
- to operate the pedal you have to exert more or less force than usual;
- beating of the pedal when braking;
- after releasing the pedal, it does not return to its original position;
- the presence of black dust on the rims.
Extraneous sounds
Modern brake pads are equipped with special indicators that indicate wear of these car parts. The indicator is a metal strip that is attached below the friction lining. When most of the material is worn out, but the pad is still able to decelerate, a characteristic grinding or whistling sound appears when the brake pedal is applied. If the pads are not equipped with such indicators, the presence of extraneous sounds indicates obvious wear of the elements in the brake mechanism and the need to replace them.
Pad wear can manifest itself in different ways, and one of the signs is extraneous sounds when braking.
Skid
If the car skids to one side when braking, then the likely cause is wear on one of the pads. The car can skid until it turns around, even on a dry surface. In addition to the pads, skidding can occur due to scuffing or deformation of the brake discs.