How to open a car without keys
Here are some proven ways to solve the problem of opening a car:
The most common way is to take a spare set of keys. Surprisingly, many people are confused and forget that they have a second set of car keys at home. And if the house is located within transport accessibility, it is cheaper and faster to get there by bus or taxi than to try to open the car.
If there is no second set of keys or for some reason it is impossible to take it, you can contact a special emergency door opening service. They have special equipment for reading the alarm code, which allows you to open the door of any car in a couple of minutes. You will have to pay for the services of specialists. You also need to provide documents for the car for security purposes.
Let's say the first two methods didn't work. Then we take the wire and make a loop at the end. Next, we try to lower the glass on any door at least a couple of millimeters. You need to insert a wire into the resulting gap, hook the cap of the locking mechanism with a loop and pull it up. This method only works if the door latches have a cap. Advice - it is quite difficult to move the glass from its place with bare hands. Wear rubber gloves or pick up something rubber and press firmly. After several up and down movements, the glass will begin to lower.
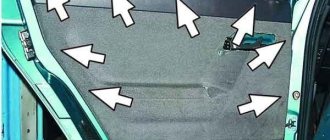
If you can’t lower the glass, you can slightly bend the right edge of the door (where the seal is) and carry out a similar procedure with the wire. After bending the edge of the door, you can try to press the window button with a stick or ruler. The glass will lower, revealing the entrance to the car interior.
Another method using metal wire
Make a hook at the end (note that the wire must be strong; a metal hanger is better suited for this purpose). Next, insert the wire between the glass and the rubber seal, push it down
Feel and hook the door pull leading to the button and pull up. This will remove the blocking.
Image source: zacep.com
Another commonplace way is to enter the cabin through the trunk if it is left open. So, we find the button that folds the rear seats and press it. The seats fold down and you can easily get into the cabin.
You can try to pull out the glass of a small window, which is found in almost all cars. To do this, remove the rubber seal and carefully pull out the glass. You can then easily put it back in place.
When do you need to replace your door window regulator?
If we are talking about an electric window lifter, then as a rule, when it fails, the glass stops going up and down when you press the corresponding button, in addition, on some cars (you most likely have already paid attention to this) it happens that the glass somehow goes down (Slowly ) and almost does not rise (you have to help with your hand), this also indicates that the window lifter has become unusable and requires replacement, but by the way, in some cases, due to the fact that the glass does not rise and fall poorly, it may not even be the window lifter itself that is to blame glass, it’s just that over time its fastening weakens and thus the glass becomes skewed, which is why problems occur with lowering and raising the glass on the car, but as for mechanical window lifters, everything is simple here, if by rotating the handle the glass has ceased to be adjusted, then the window regulator itself has failed and requires replacement.
Instructions for replacing the electric motor
Lada Kalina Station wagon PORT WINE NOT LIKE EVERYONE Logbook Rear door lock
Repair of a window regulator may include different stages depending on the breakdown. In this case, we will tell you how to repair a window regulator by replacing its electric motor; as mentioned above, this problem is one of the most common.
The replacement process is considered using the example of a Lada Kalina car:
- First you need to buy a new electric motor, which is sold in a housing with a gearbox. The door trim is dismantled - this operation cannot be performed in the cold, since the trim is fixed using plastic pistons, which will quickly break.
- Unscrew all screws and other fasteners securing the inner handle.
- All wires must be disconnected; for greater convenience, you can remove the speakers. After these steps, the glass, which is fixed in the guides, is unscrewed. In order for the glass to sink to the bottom, you need to unscrew four more screws; to do this, use a 10 key. There is a curtain at the bottom of the glass unit, which must be removed.
- The window regulator itself is mounted on nuts and guides, the electric motor itself is secured with three more nuts. The block can be pulled out through the technological holes in the door. If you disassemble the gearbox, the electric motor will fall apart into two parts. In general, the gearbox must be dismantled and replaced with a new one, further reassembling in the reverse order. The gear cable should be lubricated before use.
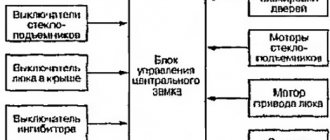
Design and types of window lifters
Kalina front window lift
Window regulators are a device designed to raise or lower car windows.
At the moment, there are a huge number of options for these devices, but the design, despite the differences in component parts for different models, is similar, it includes:
- grooves that hold the glass by the side edges
- so-called “rails” that ensure the movement of glass
- Seal and damper, glass movement limiters in the up and down direction.
A window regulator of any design consists of two main elements:
- drive unit
- lifting mechanism - transmitting vibrations of the drive movement to the glass, and thereby ensuring its movement.
The drive is divided into two types:
- Mechanical, known to us from Soviet cars, where in order to lower or raise the window, you need to turn the window lifter handle.
- Electric, typical of modern cars, where to move the glass you just need to press the window button. The electric drive consists of a reversible electric motor with a worm-type gearbox.
In addition, window regulators differ depending on the mechanism of glass movement:
Each option has its pros and cons and technical features. All these device options have one thing in common: one day they fail; this problem especially often occurs in a model that is so popular today as the Lada Kalina.
There can be dozens of reasons why power windows malfunction, but the most common are the following:
- The commutator brushes of the electric motor, which is responsible for the glass movement process, freeze. This happens, as a rule, due to overheating of fragile graphite brushes, unstable to sudden temperature fluctuations, and this factor starts a chain reaction: overheating of the brushes begins to melt the nest, which is made of plastic in all Kalinas, and not of the best quality. For this reason, the brushes lose mobility, and the device can only be brought into working condition using a hammer. At the initial stage of the breakdown, it is enough to give a good knock or two on the door trim, but after a couple of weeks, this method stops working, and then you will have to disassemble the window regulator to repair it.
- Another cause of failure, typical of the Lada Kalina, as well as many other VAZ models, is the ill-conceived electrical circuit. The contacts cannot withstand the load placed on them, there is no unloading relay, which is why all the window regulators fail at once, and then it is necessary to repair not only the window regulators themselves, but also the remote control.
When it is impossible or too problematic to repair the device, it is more advisable to replace it with a new one. The following options are suitable for the Lada Kalina:
- electric window lifter Garnet VAZ – 530 rub.
- electric window regulator Ningbo – RUB 1,699
- electric window lift AUTO-GEO – RUB 3,300.
Of course, the price is directly related to quality, but if the budget is limited, then the domestic option is not bad.
Now let's talk about how to install window regulators yourself.
Electric windows for VAZ 2106
How to remove the driver's door trim Ford Focus 2
Having electric windows in modern cars is not a luxury. This convenient device, which facilitates the process of raising and lowering the windows, simply must be in the car, including the VAZ 2106. Let's figure out how to install window regulators, how difficult it is to replace the standard mechanism and how to do it yourself.
Replacing the classic mechanism
For the VAZ 2106, mechanisms for raising windows come in two varieties:
| Kinds | Characteristics |
| Cable. | They consist of an electric drive with a gearbox and a reel with a wound cable. The upper drum is connected to the classic window lifter through slots and is designed to operate the cable. |
| Rack and pinion. | They have a different design and work on the principle of a steering rack in a car. Such devices are good for hard-moving car windows, since the mechanism itself moves easily. |
The classic mechanism on the VAZ 2106 is a simple device for raising and lowering the windows, which is controlled using a handle. Despite its simplicity, Six car owners encounter situations when the device needs to be replaced. Given the age of the car, the mechanism may break or malfunction.
The order of your actions when carrying out the procedure for removing a faulty product and installing a new one is as follows.
- Remove the door where the window regulator will be replaced.
- Disconnect the bar that secures the glass to the lifting cable. Move the cable itself to the side and remove the device.
- Check how easily the rollers rotate. If necessary, lubricate them with lithol.
- Attach the new mechanism to the standard connections, passing the cable along the rollers, as indicated in the installation diagram.
- Pull the cable over the rollers without sagging or strong tension.
- Secure the handles while rotating the lifting mechanism of the VAZ 2106 window regulator. The entire structure should rotate smoothly, without jolts.
- Fix the glass in the lower position, lower the device, attach the cable to the bar.
Replacing the “six” window lifting mechanism is quite simple and does not require a lot of time and money.
Sequence of actions when installing a power window
In order to tune the “six” by installing electric window lifts, it is not necessary to go to a car repair shop. You can do this yourself. On the modern automotive parts market there is a large selection of power window kits. To install the device yourself, no special knowledge or skills are required. Typically, the power window kit includes electrical wiring, control keys, and fasteners.
Installing the mechanism is quite simple and is done in the following sequence.
- Remove the door and install a power window. Use self-tapping screws to attach to the car door frame. This should be done carefully so that the door does not become deformed as a result.
- Check the glass movement for ease of sliding. Adjust the guides if necessary.
- Connect the electrical wiring, referring to the wiring diagram. Route the wires under the panel.
- Assemble the door by installing the plugs in place of the handles.
- Mount the control key in the instrument panel.
- Connect the battery and check the system's functionality. This completes the installation.
When carrying out work on electrical equipment, disconnect the ground on the battery. Do not forget that the circuits of new mechanisms must be protected by fuses.
The handle turns but the glass does not move
In the summer, in cars without air conditioning, window regulators become one of the main devices.
Their breakdown in the heat is a real disaster that you want to fix as soon as possible. Let's consider what malfunctions occur with conventional cable window lifters. Almost all failures of manual window lifters result in the handle turning but the glass not moving. There are several reasons for this.
Ground handle slots
This malfunction often occurs on classic AvtoVAZ models due to the plastic of the handle itself being too soft. There are splines at the point where it connects to the window regulator shaft. Over time, they wear down, and the handle begins to spin idle, without turning the shaft.
Premature grinding of the handle slots can result from too difficult movement of the glass due to misalignment of the guides, the presence of a foreign object in the door, or a malfunction of the gearbox. The handle with the slots ground off can only be replaced with a new one, and it is better to choose the option with reinforcement with a metal insert.
Selection of new mechanisms and handles
Lambo doors for VAZ 2108 diagrams and instructions
There is a fairly large selection of accessories and spare parts in retail and online stores.
When selecting, special attention should be paid to the following issues:
- Typically, external handles are sold in three colors: white, black and unpainted.
- Different manufacturing companies are engaged in the production of pens of a new form, respectively, their prices and quality are different.
- The use of locking mechanisms from 8 Series cars will require modifications to the devices and doors themselves.
In the process of selecting the necessary spare parts, the quality of their manufacture is assessed. Silumin and plastic parts do not have sufficient strength, especially at low temperatures. High-quality installation of new handles is possible only if its dimensions and seat configuration exactly correspond to the standard ones.
Preference should be given to those manufacturers of Euro handles for the VAZ 2107 car who have proven themselves accordingly. This kind of information can only be obtained from car owners who have previously purchased such parts and installed them. In preparation for installing parts, they must be painted in the same color as the body, if this is in the owner’s plans.
Chevrolet Lacetti window lift motor brush size
The size of the brushes is 4 mm x 5 mm x 8 mm. The wire outlet from the brush is on top, but this is not essential and can be installed with the outlet at the back.
In general, we take a new brush and start adjusting it with a file. This is done quite quickly. The main thing is not to overdo it and not to waste more than necessary.
Important! Remove worn brushes forward. That is, do not bend the back of the brush holder. In 99% of cases you will break it off. Therefore, push the brush forward only.
Brief instructions for replacing the mechanism
In general, the procedure for replacing a window regulator looks like this:
- The door trim is removed.
- The cable is disconnected from the clips that hold the glass.
- The cable is removed from the rollers.
- Next comes the removal of the guide chute and the lift mechanism.
- Installing a new window regulator.
- Threading the cable.
- Fixing the glass brackets and tensioning the cable.
- Reinstalling the door trim.
To summarize, we note that the process of replacing a window regulator on a VAZ-2107 is a completely feasible task for the car owner. During the repair process, the main thing is to carefully follow all the recommendations and installing a new mechanism will not be a problem for you.
There is a special offer on our website. You can get a free consultation with our corporate lawyer by simply submitting your question in the form below.
The window regulator is an important component of any car. Although motorists do not use power windows every time they travel, they should always be in working order. In VAZ-2107 cars, the manufacturer installs manual windows with a cable drive. The presence of electric windows in the “Seven” indicates that the car has been modified by its owner.
The main difficulty when carrying out such an operation as replacing a VAZ 2107 window regulator is the small space inside the doors of this car.
Let's take a closer look at the procedure for replacing a manual cable-type window lifter on the front door of a VAZ-2107 car. So:
-First of all, remove the opening handle and the manual window drive handle from the inside of the door;
— Unscrew the door lock button;
— Remove the door trim;
— Unscrew the two clamping plates holding the cables;
— Lower the door glass to the lowest position;
— Using wrench No. 10, loosen the fastening of the tensioner roller and move the roller itself a little to the side so that it becomes possible to remove the cable;
— Using a spanner number 8, unscrew the three fastening nuts of the window lift mechanism;
— Lift the door glass and remove the window lift mechanism through the technological hole in the car door.
Installing a new window regulator is carried out in the reverse order. However, there are some features that I would like to mention:
— Before installing the mechanism, be sure to lubricate the cable with lubricant;
— The lower branch of the cable is immediately fed to the upper roller of the door, and the upper branch will correspondingly go down. Due to the need for such actions, we recommend using a wire, which is removed after the window lifter mechanism has been completely secured and all adjustment work has been carried out;
— There is also one upper invisible roller in the window lift mechanism of the VAZ-2107 car. At first glance, it is simply impossible to put a cable on it. We do this - at the top of the cable we twist an open loop and direct it to the place where this “invisible” roller is located. We move the loop up and down, trying to catch on the roller. Either way, after a few tries, you'll be hooked on this video;
— We adjust the smoothness of the glass movement and finally tighten all the fastening nuts.
That's the whole process of replacing the window regulator on VAZ-2107 cars.
Removing the power windows
As mentioned above, the design of the front, rear, right, and left window lifters is different, but the operating principle is similar.
To dismantle, you need to arm yourself with two screwdrivers: a Phillips and a flathead, as well as two keys, 8 and 10.
- First of all, we remove the window lifter handle, for which you will first have to pull out the stopper located under the lever washer of this very handle. Using a screwdriver, move the latch to the side, removing the stopper from the plate. Now you can remove the handle. If the handle is too tightly seated in the seat, you can help it with two screwdrivers, hooking it onto the base.
- Remove the armrest handle. Using a flat-head screwdriver, we unscrew the plugs that hide the two screws that hold the handle, and with a cross-head screwdriver, we unscrew the screws themselves.
- The handle of the exterior rear view mirror is removed, as well as the handle trim.
- Carefully, slowly, the door trim is removed, along with the compartment for things.
Drives
As in many other cars, in the case of the VAZ 2110 there are two types of drives.
- Electric. A rather complex set of elements, which consists of a drive drum or gear, as well as an electric motor with a worm gearbox built into it. This design allows you to raise and lower the glass at the touch of a button.
- Mechanical. The most simplified design, which includes several parts, gears and handles. To raise the glass in a VAZ 2110 using a power window lifter, you need to turn the handle clockwise. The drive roller takes on the required physical effort, so lifting is not difficult.
READ Replacing the VAZ 2110 gearbox mount
There are two types of drive:
- Mechanical - consists of a simple set of parts, a pair of gears and a handle. In order to set the glass sheet in motion, you need to turn the handle clockwise (if you need to raise the glass) or counterclockwise (if you need to lower it). Physical forces are transferred to the drive roller, that’s the whole principle of operation of the mechanical device.
- Electrical is a more complex set of parts. An electric window regulator consists of a drive drum or gear and an electric motor with a built-in worm-type gearbox.
According to the lifting mechanism, window lifters are divided into several types. Moreover, in AvtoVAZ cars there are different design options for window lifters.
So, the well-known seven is equipped with a rack-and-pinion type device; by the way, the “ten” also has rack-and-pinion window lifters.
This option is good because it is easy to repair and easy to operate, but a serious disadvantage of the design is its unreliability. In addition, the rack-and-pinion type of device requires lubrication.
A more advanced design is the cable type, presented in the tenth VAZ model.
The positive point here is the fact that the possibility of glass distortion is completely eliminated. But, like rack and pinion mechanisms, cable mechanisms are also unreliable.
Although. and Metprom devices costing 300 rubles.
A standard cable window lift costs less, 250 rubles.
The new generation of mechanisms are lever ones that operate using hinges.
Their advantage is the absolute absence of noise, but this type of device only works in conjunction with an electric motor, while the first two can also be presented in a mechanical version.
The tenth model is equipped with two types of window lifters: simpler modifications of previous years come with mechanics, and modifications of later years of production come with electric windows.
But since owners of the old ten are more common among motorists, then we will next talk about how to replace a mechanical window regulator yourself, but first we will understand the most common faults of window regulators characteristic of the VAZ-2110.
By the way, the electric window lifter changes in exactly the same way; all the grooves and fastenings are similar and will fit easily.
- What most often happens in the top ten is the grinding of the lift gear, which makes the device inoperative.
- The second reason is a cable break, which disrupts the entire system.
Problems can be solved by dismantling the device and replacing defective parts, or by completely replacing the window regulator, which would be a more correct and simpler option. Now let's get to work.
Lifting mechanisms
As for lifting mechanisms, there are several of them. For the VAZ 2110, various options are available.
It was installed on the VAZ 2107, then switched to the VAZ 2110. The advantages of such a mechanism are its simple repair and operation. But the design is not particularly reliable; for effective operation, the rack and pinion device must be lubricated. Design flaws forced the developers to abandon it
A more advanced system that eliminates the possibility of glass distortions. But the reliability is not the highest. The most attractive option for a cable mechanism is a structure made of galvanized metal. They are also worth paying attention to Metprom devices. Their current Standard VAZ cable lifts will cost 250 rubles
These are the most advanced mechanisms available for the VAZ 2110. Their operation is based on the use of hinges. The design ensures silent operation. However, the mechanism is only available on electric windows
Rack and cable mechanisms are offered complete with electric and mechanical drives, while lever mechanisms are available only with an electric motor.
Sources:
https://autopower2015.ru/raznoe/kak-snyat-ruchku-steklopodemnika-vaz-kak-snyat-ruchku-steklopodemnika-vaza-kak-snyat-ruchku-steklopodemnika-vaz-2107.html https://autoflit.ru /130-kak-snyat-steklopodemnik-na-vaz-2110-poshagovaya-instrukciya.html https://avto-idea.ru/remont/zamena-steklopodyomnika-na-vaz-2110-foto-i-video/
How to remove the window handle
If your small fleet consists of a car that is made by a domestic manufacturer, then be prepared for the fact that problems may arise with the window lifter handles. From time to time they may break, so you should have a minimal idea of how to replace this element without resorting to the help of specialists. Even if your experience in repairing car interior elements is minimal, you can still cope with such an easy task.
What you need to remove the window lifter handle
In order to remove and install a new window lifter handle, you will need to obtain:
1) Flat screwdriver;
2) A handle I just bought, complete with a washer and a latch.
No special pullers or rare tools are needed. That is why repairing the window lifter mechanism will not be prohibitively expensive from a financial point of view.
How to remove the window handle
To remove the power window handle, you will need to follow these simple steps:
1) Place a flathead screwdriver between the handle washer and the latch. The latter needs to be lifted and pressed away from the surface so that later you can remove it by simply pulling it towards you. The handle will easily come out of the “seat”.
2) After removing the handle, you need to remove the washer of the old handle.
That's all. But it’s not always possible to fix everything by replacing the handle.
For example, if difficulties arise in raising and lowering the glass, you should pay attention to the window lift mechanism itself. Maybe the culprit is the cable that lowers and raises the glass
The cause may also be worn out gear splines of the window lift system. If this is the case, then the entire mechanism will have to be changed. To do this, you do not need to remove the glass. The steps are as follows:
1) First you need to disassemble the car door itself.
2) Remove the handle and armrest. To do this, just pry off the decorative plugs with a screwdriver, after which, using a Phillips screwdriver, you will have to unscrew the screws that hold the armrest handle itself. After unscrewing the screws that hold the door pocket in place, remove it.
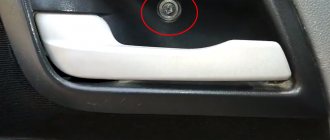
3) There is a pad on the handle that opens the door. It needs to be lightly pryed and then removed. Next you need to unscrew the button that blocks the door.
4) Using a flat-head screwdriver, you need to pry off the upholstery, which is secured by eight pistons. After that, remove it.
5) The glass is attached to the window regulator with two bolts, which must be unscrewed with a “10” head. Lift the glass up. Using the same method, you need to unscrew the nuts that secure the window lift mechanism itself. The parts must be removed through the door panel window. After replacing the window regulator, reassemble everything in reverse order.
6) After installing the new window lift mechanism, you will need to secure the glass and install a new handle. Next you need to check the operation of the system. Only if everything is in order will it be possible to return the upholstery, lock button, armrest, pocket and handle pad to their place.
In principle, no problems should arise. This work is not particularly difficult.
Replacing the window handle
Installing a new window handle is carried out by performing the above steps in reverse order. You need to take the washer that comes with the new handle and insert it in place of the old one. This washer must be held with your hand, while inserting a new handle in place of the old one. Many experts say that the new handle needs to be turned several times. This will facilitate better adhesion of the new handle to the splines of the lift gears. Only after you are sure that the handle holds well can you install the latches that come with the handle. After completing all work, check the operation of the window lifter handle. Just raise and lower the window several times. It should go smoothly. If this does not help, then you will have to go to the mechanism itself.
So, even the most inexperienced car owner can replace the window lifter handle with his own hands. Experts say that it would be useful to check the serviceability of the entire mechanism, so as not to return to a similar problem later. Only if you are unable to solve the problem with the window regulator yourself, you should turn to professionals for help or advice. But there is a high probability that such actions will not be necessary.
Subscribe to our feeds on Facebook, Vkontakte and Instagram: all the most interesting automotive events in one place.
Removing the door trim
First, remove handle ; to do this, you need to remove the plastic stopper located under the washer of the handle lever. By carefully prying the latch with a screwdriver and moving it to the side, the stopper is removed from the slot. After this, you can remove the handle itself, it happens that it sits very tightly on the slots, you can help with two screwdrivers, using them to hook the seat.
Next, remove the armrest handle; there are two plugs at the top and bottom that cover the screws. Using a flathead screwdriver, open the plugs, then unscrew the screws with a Phillips screwdriver. Carefully pry up the lining of the inner door handle and remove it. It will be more convenient to do this by pulling the handle itself towards you.
READ Lanos low and high beams do not light up
If the front door is dismantled, the adjusting handle of the outside rear view mirror and its trim are unscrewed, and then the triangular plastic plug is removed. Then unscrew the door lock button.
The plastic upholstery is secured using eight plastic holders (pistons) located around the perimeter of the panel. During the dismantling process, these pistons very often break, so it would be a good idea to stock up on new holders in advance. So, using a flat-head screwdriver, starting from any bottom edge, carefully release the pistons.
Thus, we remove the plastic door trim assembly with the radio speaker and a pocket for small items.
Download PDF
For that? To understand how to remove the window regulator of a VAZ 2110, it is not at all necessary to contact a car service center. This is a fairly simple procedure that does not require any special knowledge or skills; all you need is a wide flat-head and Phillips screwdrivers, 8- and 10-point socket heads (in principle, a regular open-end wrench will do, but heads are much more convenient).
Let's look at how to remove the VAZ 2110 window regulator sequentially and in detail:
Replacing the front door window lifter of a VAZ 2101, 2106 with your own hands
Hello! Today we’ll talk about such a simple, but at the same time not without secrets, matter, about replacing the window lifter on the VAZ 2101 and 2106. That is, the story will be about how to tame this unruly cable, in the post we mean short windows (2101), on long glasses (2107-05) have a slightly different cable movement pattern.
Window lifter VAZ
It is necessary to start the replacement with theory, so I present to your attention a diagram according to which a regular window lifter works.
As you can see, the cable moves along three rollers; when replacing a window lifter, it makes sense to lubricate them and check whether they rotate freely.
I won’t go into details about how to disassemble the door, it’s not difficult and everything is clear. The replacement must begin by dismantling the unusable window lifter; it is secured with three nuts on “8”; also, using a Phillips screwdriver, you need to unscrew the fastening of the glass strip to the cable and move the cable to the side.
Here you need to unscrew and move the cable to the side
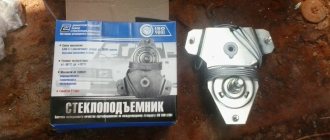
After dismantling the old window regulator and checking the free rotation of the rollers, you can begin installing the new one. We take the new window regulator out of the box - it will look similar to the one shown in the first photo.
The rollers are in these places
Attention! You cannot remove the bracket on an uninstalled window lift that secures the cables in a wound state; if the cable comes off, the lift will get tangled and returning it to its previous position is oh, how difficult. Next, we unwind the cable wound by the manufacturer, without touching the latch!
Next, we unwind the cable wound by the manufacturer, without touching the latch!
Latch! Do not remove until installation!
Next, you can screw the new window regulator onto the door, and put the cable on the rollers according to the diagram (photo 2). Near the lift body, the cable must cross, that is, the cable that comes out from the bottom of the drum goes to the upper roller, from the top of the drum to the lower roller.
It should look like this at first
After this, you can pull the cable onto the rollers; in order to do this, you will need to loosen the lower adjustable roller and stretch the cable according to the diagram. If suddenly there is not enough cable to put it on the rollers, then you need to put the cable on two rollers and remove the latch that secures the cables and, without loosening the tension of the cables, put it on the rollers.
Tension roller
Thanks for subscribing!
Next, using this roller, we tighten the cable; it should not sag, but it should not be stretched like a string. Also, if you did not remove the lock, you can now remove it.
Now we put on the handle and try to rotate the lift; the cable should rotate easily, without jamming. Now we lower the glass to the very bottom, do the same with the window lifter, screw the cable to the bar, and now the installation can be considered complete.
Once!
Two!
Three!
Everything must work perfectly!
Replacing rollers
The seven window lifters have four rollers:
- The first is a tension roller. It maintains the cable in a certain state of tension, but over time it “relaxes”;
- The second and third are fixed on the glass. The left and right rollers transmit lifting torque when controlling the movements of the cable;
- The fourth is fixed to the door and is motionless. It takes the lifting force.
In order to dismantle the rollers, you need to remove the door card and simply unscrew the nuts that secure them. They also need to be installed carefully. After new parts are installed, the structure must be reassembled.
how to supply and install the mechanism, repair and diagram
The VAZ 2106 window lifter has a reliable design, but, like any mechanism, it can fail. The article discusses typical malfunctions of power windows on the “classic” and provides instructions for removal and installation.
Design and types of window lifters
The mechanical window lifter on the VAZ 2106 has a simple design and consists of a control handle, a glass lift transmission system, a cable and three rollers.
Many drivers install electric windows instead of classic ones.
They come in two types:
- Cable. The design includes an electric motor with a drum on which the cable is wound, and a gearbox. The upper drum is connected to a conventional window lifter using a spline. With its help the cable is activated.
- Rack and pinion. They use the principle of a steering rack in a car.
To install the electric mechanism, you need to purchase a kit consisting of wires, fasteners, backlit control keys, a decorative plug, and installation instructions (the author of the video is VALENTIN VERNIGORA).
Common faults and solutions
Over time, the window lifting mechanism becomes unusable - it is impossible to raise or lower the glass.
There may be several reasons for a device malfunction:
- cable break;
- foreign objects entering the mechanism;
- gearbox wear.
There is no point in repairing window regulators, since their cost is low; it is easier to buy a new device and replace it.
Electric lifts may have the following faults:
- All power windows do not work: the fuse is blown, there is no connection to ground, the wiring is broken. The repair consists of replacing fuses, restoring ground connections and electrical circuits.
- The lift on one of the doors does not work. The switch is faulty, the reverse current relay is broken, the electric motor is broken, the wiring is broken, the connector is disconnected. Faulty parts should be replaced, the wiring restored, the connector connected.
Removal instructions
To complete the work you will need the following tools:
- Phillips and flathead screwdrivers;
- a set of keys;
- knob;
- extension.
The removal procedure consists of the following steps:
- First of all, you need to remove the casing.
- Next, the glass is lowered as far as possible. Use a Phillips screwdriver to unscrew the bolt holding the clamp.
- After unscrewing the bolt, lower the clamp down.
- Then on the left side of the door, just loosen the roller nut using a wrench.
- The cable is now free and can be removed from the roller.
- Next, unscrew the three nuts holding the window regulator.
- When unscrewing the third bolt, the mechanism should be held from the inside.
- When the window lifting mechanism is free, move it to the side.
- After unscrewing the last nut, you can remove the window regulator from the door.
Next, repair or replacement is carried out. The rear mechanism is installed in the same way.
Installation Features
Installation of a new or repaired window lifter is carried out in the reverse order of removal.
Photo gallery “Installing a window lifter”
To install a power window, follow these steps:
- Dismantle the door, remove the door trim. Next, the electric window lifter is installed using self-tapping screws.
- After installation, you need to check the sliding of the glass.
- Connection to the vehicle's electrical network should be made according to the electrical diagram.
- Next, the door is installed on the car.
- A control button is mounted on the toolbar.
After installation, the electric window lifter must be checked for functionality. You can install a heated rear window.
Video “How to change window regulators on a VAZ”
This video demonstrates how to replace a window lifter on a VAZ (car video - Pavel Pavek).
Window lifter malfunctions and ways to eliminate them
The operation of the window lifter is configured and adjusted by the manufacturer, so you should interfere with it extremely carefully and carefully, otherwise the mechanism may jam, crackle and crackle.
From personal experience, I advise you to carefully study the device and read the detailed troubleshooting instructions before starting to independently repair the window lifter mechanism. Even though many of them seem quite possible to fix with a screwdriver and a wrench, in some cases it may be necessary to completely replace the window regulator.
Read more: Engine valve timing, what is it and how do they work?
At first glance, the creaking of the window regulator does not seem to be a serious malfunction, but you should pay attention to this signal, since this is the first sign that the mechanism is wearing out and may soon break. Methods to combat this symptom are extremely simple, accessible to everyone and do not take much time:
- lubricate the window lifter - lubricants from any manufacturer, widely available in car dealerships, are suitable for these purposes;
When the window regulator is functioning properly, it is better not to touch it, unless you are going to install an electric one. The mechanism is well regulated at the factory, so any interference with its operation usually ends in breakdowns.
However, like everything else, window regulators sometimes fail. The following signs indicate this:
- jamming;
- creaking;
- glass warping.
Unpleasant sounds that appear when you try to lower the window indicate wear and tear on the moving elements. As a rule, this symptom appears shortly before the final failure of the entire node. Getting rid of the problem is not very difficult - open the door, vacuum the inner cavity and lubricate (or replace) the rollers.
Sometimes unwanted noise appears when the glass no longer fits tightly to the rubber bands. In this case, dust gets into the grooves - that’s why it creaks. Here:
- wipe the seals with a sponge soaked in soapy water;
- dry;
- treat with silicone grease;
- open and close the window several times.
Occasionally the glass simply gets stuck. This happens because:
- serious wear of the star-shaped cable winding mechanism;
- breakage of the pressure plate;
- traction misalignment.
Often older cars have all of these problems at the same time. Repair is carried out by replacing a failed part or the entire mechanism assembly.
Types of fastenings
How to remove the window handle? Drivers are afraid of dismantling this element. This is due to the minimal amount of information on the Internet, as well as stories from experienced drivers about a large number of broken handles. To properly dismantle the unit, you need to know its design, in this case the method of fastening. All types of fasteners 3:
- Plastic latch;
- Retaining ring;
- Splined fastening.
The first option was most often used on VAZs, and also on some European cars. The retaining ring can be found on the vast majority of modern foreign cars. Renault cars are equipped with handles with slotted fastening.
Repairing a VAZ 2107 window lifter: step-by-step instructions
Most window lifter breakdowns in a VAZ 2107 car are not difficult to fix. In most cases, regardless of the design and mechanism, it is the teeth of the rotating gear that break. To begin the repair, first remove the trim and card of the car door with all the elements placed on it. Then the window lifter itself is removed, after which the necessary work is carried out.
Removing the window lifter handle
One of the most common malfunctions is the breakage of the handle, which occurs on both front and rear window lifters due to careless use or simply over time.
Over several years of owning a VAZ 2107, we became convinced that if the handle breaks down, it is better to immediately change it, since repairing it only helps for a short time and is not economically feasible. The cost of the window lifter handle for the “seven” ranges from 20 to 80 rubles in different auto stores, so you can replace all four handles at the same time, choosing their appearance to suit your taste. You can even choose and install beautiful handles from other cars.