Diagnostics
Checking the performance of the Renault Megane 2 generator using the old proven method (by disconnecting the tip from the battery terminal) is extremely dangerous. Modern on-board vehicle networks are sensitive to voltage drops (U). They contribute to the failure of Renault Megane II electronic systems.
Diagnostics is carried out by measuring U or by checking a dismantled DC source on a specialized stand. When diagnosing a generator by measuring U, the following operations are performed:
- With the engine stopped, replace U at the battery terminals - it should be around twelve volts;
- The Renault Megane II internal combustion engine is started - in this case, U should be from 13.8 to 14.7 Volts. Lower readings indicate a malfunction of the generator or power circuits. Inflated readings indicate a breakdown of the Megan 2 voltage regulator, which is accompanied by the delivery of excessive charging current.
Generator Megan 2
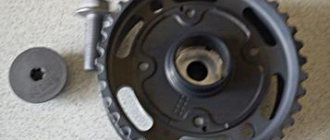
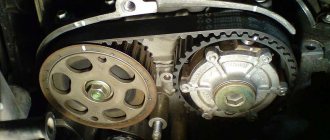
Renault Megane 2 is equipped with a three-phase alternator. The design includes a built-in rectifier unit and an electronic voltage regulator. The working direction of rotation is to the right, when looking at the device from the side of the drive mechanism. Rotation is provided by the Megan 2 attachment belt, the tension of which is provided by an automatic mechanism.
Click to enlarge
The stator of the Renault Megane 2nd generation generator, together with the protective covers, is tightened with four bolts. Bearings are mounted in the covers, which ensure rotation of the armature. Excitation is supplied to the armature winding through a brush-commutator apparatus. This ensures the formation of three-phase alternating current in the stator winding, which is subsequently converted into direct current through a rectifier unit. The rectifying device is attached to the rear protective casing.
Electrical power is supplied to the rotor winding through the output of the voltage regulator when the Renault Megane 2 ignition is turned on.
To monitor the functioning of the Renault Megane II generator, there is a light indicator on the dashboard in the form of a battery icon. If the power source is working properly, the indicator lights up after turning on the ignition and turns off after starting the power unit. A problem in the Megane 2 battery charging circuit is indicated by a constant, bright or full glow of the indicator. In this case, the generator will need to be repaired.
Replacing the brush
Brushes are made from graphite, so they quickly become unusable. The brushes are usually located under the headlights, so they are easy to access. It is recommended to change brushes every 50 thousand km. Renault Megane mileage, so you will encounter this need quite often. Watch the video to understand how to properly remove the brushes and install new brushes. This is a fairly simple procedure, and you can purchase brushes at any car store.
In some cases, it may be necessary to change the regulator, which is not at all difficult. The regulator is located near the chain itself; you need to fix it and remove the device. After this, a new tension regulator is installed.
Articles
To replace the Renault Megane 2 generator with an original, use the spare part article number manufactured by Renault 8200667603 . Products from the following companies are available as analogue options:
Original generator Renault Megane 8200667603 (Link to photo source)
- STELLOX – 0610779SX;
- ERA – 210280.
The following spare parts are available for bearing replacement:
- NTN 6303-LL-U5-K – catalog number of the bearing on the pulley side;
Original Bearing NTN 6303-LL-U5-K (Link to photo source)
- NTN 6202-LLU-5K – brush bearing article number.
Belt Drive Inspection
To determine if an alternator belt is faulty, it is important to look along its entire length and carefully examine each section. In this case, cracks or delamination can be found not on the outside, but on the working side, which is directly connected to the generator pulleys. Sometimes deformations occur on the sides of the belt.
When conducting an inspection, it is important to think about safety. If everything is bad with the generator, then it is better to disconnect the battery and all possible electrical appliances used in the car in advance. This will help reduce energy consumption.
Usually, when replacing a belt or the generator itself, people turn to specialized service stations, where professionals are able to inspect the structure, determine the cause and location of the breakdown, and quickly fix the problem. However, if necessary, you can perform the replacement yourself.
It is recommended to start replacing the generator with the belt, since it is this part that is more susceptible to wear than others.
Voltage regulator
A malfunction of the Renault Megane 2nd generation voltage regulator is accompanied by the following symptoms:
- formation of a greenish coating on the contact part of the battery;
- when the engine is running, the voltage of the Renault Megane 2 on-board network is about fifteen volts;
- at the moment of increasing speed, electrolyte pours out of the battery cans, that is, boiling is observed.
To replace the regulator on the Renault Megane 2 generator, you will need to purchase the appropriate spare part. In this case, you need to pay attention to the contacts. Often there is a complete match in design and even number, but the shape of the plug and the number of contacts are different. Procedure for replacing the Renault Megane II voltage regulator:
- The positive tip is disconnected from the Megane 2 battery.
- The fixing rod between the generator and the power unit is unscrewed.
- Use a thirteen wrench to tighten the nut and remove the wire contact that goes to the Megane 2 battery.
- The power terminal is pulled out.
- The protective plastic casing is dismantled by prying it with a screwdriver or pulling it out with pliers.
(Link to photo source)
- The two mounting bolts and the pin are unscrewed, and then the Megan 2 voltage regulator is removed.
two pin connector
The specified cylinder will need to be moved until it clicks
- The new regulator is installed in the reverse sequence. It is necessary to take into account that the spare part contains recessed current-collecting brushes, which are held by partitions. This is provided for ease of installation. After installing the voltage regulator, you should move the cylinder in which the brushes are located until you hear a characteristic click. This is accompanied by the extension of the brushes.
Replacing the alternator belt with your own hands (algorithm + photo)
Before you get started you will need the following tools:
- Socket head for 16.
- Open-end wrench 13.
- TORX key 40.
- Flathead screwdriver with wide blade.
New set of spare parts.
Step-by-step work order
- Place the car on a flat surface.
- We block the rear wheels using wheel chocks and put the car on the handbrake.
- Jack up the front right wheel and remove it from the hub.
Removing the right front wheel
Removed the wheel and fender liner
4 bolts are visible in the photo, circled by a line
The next step is to assemble the entire structure.
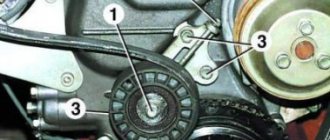
- After the new tension roller is securely fixed in its seat, you should tighten the generator belt on all pulleys.
Replaced alternator belt
Note!
The pulley on the generator and crankshaft has five grooves, while the air conditioner has six. Therefore, make sure that the outer furrow on the air conditioning compressor side remains clear. Otherwise, when starting the engine, the belt will fly off its seat and be deformed.
Subsequent assembly of the protection, fender liner and installation is carried out in the reverse order of removal.
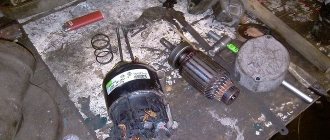
How to remove the generator
The process of dismantling the Renault Megane 2 DC power source requires the preparation of flat-head and Phillips-head screwdrivers, and 10, 13, 16-size keys.
Removing the Renault Megane 2 generator is performed as follows:
- The vehicle's on-board network is de-energized by removing the tip from the negative contact of the battery.
- The fixing bar is pressed out and the power connector on the Megane 2 generator casing is pulled out.
Click to enlarge
- The tip of the red wire is removed from the contact leg after unscrewing the fixing nut.
Click to enlarge
Click to enlarge
- The belt drive of the attachment is dismantled.
Click to enlarge
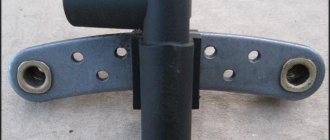
- The bracket that is installed between the generator and the Megan 2 cylinder block is removed. To do this, you will need to unscrew the mounting bolt from the side of the DC source and the nut from the side of the cylinder block.
Click to enlarge
- The bolts securing the generator from the bottom and top are unscrewed.
Click to enlarge
- The generator is removed from the engine compartment for further repair or replacement.
The installation process includes identical operations, but in reverse order. Finally, the tension of the attachment belt drive must be monitored.
Recommended Posts
lord_wolf 2
lord_wolf 2
- Newbie
- Users 2
- 7 messages
- Car: Renault-scenic -2
I removed the generator for Renault Scenic 2 engine K4MT 782
I learned a lot of interesting things that are not written in the instruction manual. Here I am posting my experience - it may be useful to someone.
To remove the generator, basically according to the book, you need to unscrew two main screws and one secondary (this is the fastener for the so-called generator stop), and of course disconnect the wires. I won’t write about the wires; there’s one sensor and one nut - they can be easily removed: the nut - a 13mm wrench, the secondary screw can also be easily removed - a 13mm wrench and the nut on the engine is also 13mm.
Now let's move on to the interesting part: according to the book, it says that you need to unscrew two screws, one at the top and one at the bottom (the screws secure the generator to the engine brackets). If there are no problems with the upper one - and it’s easy to get to, and it’s easy to take out - the key is 13, then with the lower one - you’ll be fiddling with it for a long time. When pulling out the bottom screw, you are faced with a problem: it rests against the load-bearing beam of the body and does not want to be pulled out (to be honest, I spent half a day fiddling around) - in order to pull it out completely there is not enough free space, about one and a half to two centimeters. But it turns out that the box opens simply: (this already became clear when I removed the generator and found out how cunning the French are. If for the top screw the entire distance through which the screw passes in the bracket is complete, then for the bottom a special channel is machined and only part of the bracket is complete, i.e. e. the bottom screw does not need to be pulled out completely - it is enough for it to come out by 3-5 centimeters (because it is completely kept at the distance of the generator bushing and a centimeter and a half to two on the bracket - then a free groove is machined, open on one side, like the letter “C” and all that matters is that it is advisable to pry it with a screwdriver first from below - then from above - so that the generator comes out of the grips.